
USS Texas in 1914, and preserved today.
Country of origin: USA
Date of construction: 1914
Location: Battleship Texas State Historic Site, Texas, USA
IN 1906 HMS Dreadnought, the first of a kind, was launched. Whereas the battleships of the late nineteenth century were distinguished by their dedication to a variety of gun calibres, HMS Dreadnought was distinctly different. Naval doctrines at the close of the old century were predicated on the idea that while ships’ initial engagements would be at long range – therefore requiring large guns, typically 12in – much of the fighting would take place at relatively close range; and here the obvious choice for gunnery were smaller calibre quick-firing weapons that could finish off a beleaguered enemy. With HMS Dreadnought, this panoply of guns of varied calibre was destined to become a dead concept.
One of the many outcomes of the Russo-Japanese War – which also saw the extension and development of trench warfare and siege tactics – was the acceptance that long-range gunnery could be effective. The Battle of the Yellow Sea, fought on 10 August 1904, was destined to be the world’s first battle between modern steel ships, and the first to really test the concept of long-range gunnery, engaging at ranges of 8 miles. Already moves were afoot to plan for ships capable of engaging each other at distance – ‘all-big-gun’ ships with thicker armour. The birth of the dreadnought class came from the appointment of Admiral John ‘Jacky’ Fisher as First Sea Lord in October 1904. Fisher, an innovative naval thinker, had proposed ‘all-big-gun’ ships and, on his appointment, he set up a committee to consider ship design that was influenced, at least in part, by the sea battles of the Russo-Japanese War – and other countries, Japan and the United States amongst them, were actively pursuing the idea. But with HMS Dreadnought came the physical embodiment of the ideal. Laid down on 2 October 1905, it was launched four months later. Equipped with ten 12in guns paired in rotating turrets, and 11in belt armour, the Dreadnought was capable of speeds of 21 knots, its steam turbine engines powered by oil. It had considerable armour, even though Fisher himself preferred lighter armour traded off by greater speed as battlecruisers – an extension of the all-big-gun concept.

The big guns of the first ‘all-big-gun’ ship HMS Dreadnought.
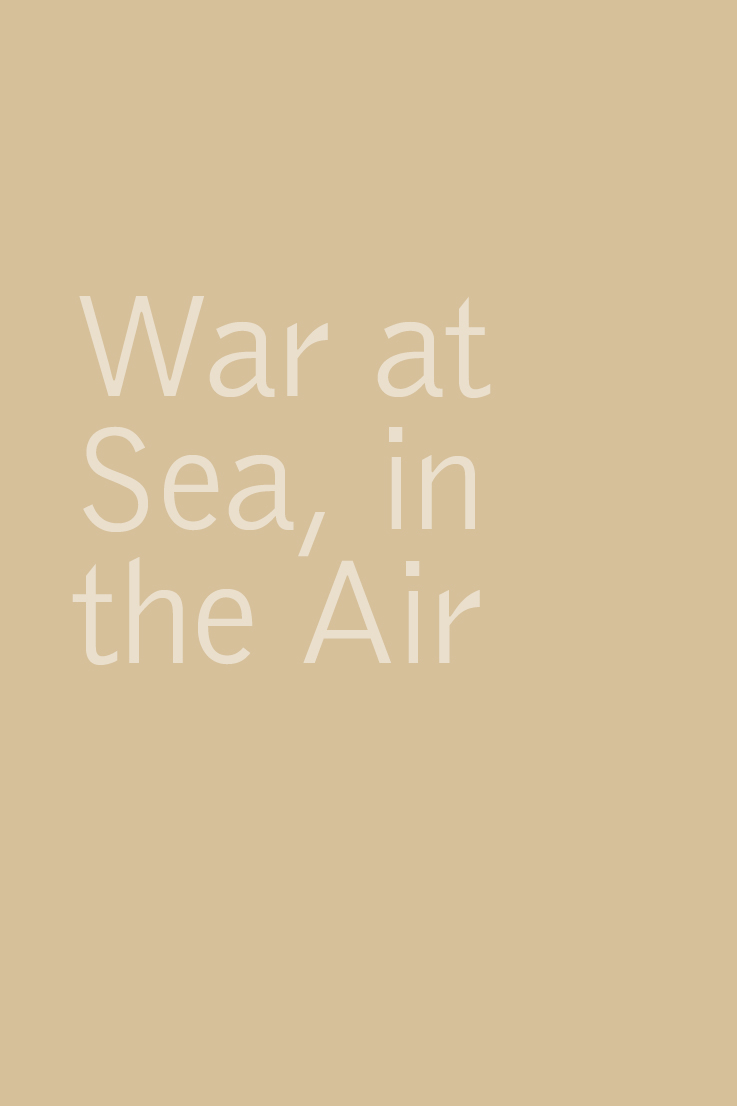
When finally the European conflict erupted, the dreadnought class was the mainstay of the battle fleets. From 1906 to 1914, ninety all-big-gun ships were constructed. Britain, with its traditional commitment to the navy, built the most – thirty-four in total; its rival, Germany, mustered twenty-four. Japan and the United States managed eight each; Austria, France, Russia and Italy four each. Of these, the only survivor is the USS Texas, completed in 1914. The building of the Texas was authorised by the US Congress in 1910 but was amongst the last dreadnoughts to be built. Equipped with ten 14in guns and 12in belt armour, it saw action in both wars. First used in punitive operations against the Mexicans in the summer of 1914, the Texas was assigned to the US Atlantic Fleet. But with the US entry into the world war in 1917, the American dreadnought was assigned to serve with the 6th Battle Squadron of the British Grand Fleet. Arriving at Scapa Flow on 11 February 1918, the Texas was involved in convoy protection duties and in supporting the British blockade of Germany – with very little hope of engaging in the ‘dreadnought-to-dreadnought’ actions it was built for. With HMS Dreadnought decommissioned and sold for scrap in 1923, the Texas is the last wartime example of a type of ship that helped precipitate the world into an arms race that ultimately led to the world conflict. Today, the Texas is preserved by the state that gave the ship its name.
USS Texas in New York, 1914.

Country of origin: Germany
Date of manufacture: 1914–18
Location: Private collection
WITH THE BRITISH EMPIRE spread across the globe, and with school textbooks and atlases showing British possessions, dominions, colonies and protectorates as a splash of red across five continents, the British Royal Navy was pre-eminent in the run-up to the Great War. The maintenance of this powerbase was of the greatest importance to the British, and any challenges to its supremacy at sea were viewed with great suspicion. With the launching of the game-changing HMS Dreadnought in 1906, all other large naval ships were effectively made obsolete, and navies across the world commenced retooling their fleets with the large gun battleships.
When Kaiser Wilhelm II came to the throne of the Deutches Reich in 1888 he was keen to emulate the naval prowess of Britain and France, and to extend the reach of the empire such that Germany could be ranked as a global power. In 1897, the expansion of naval power was ramped up when Rear Admiral Alfred von Tirpitz was appointed Secretary of State for the Navy. With Tirpitz focused on surpassing British naval power, expansion commenced in earnest. Two naval bills, in 1898 and 1904, charted the construction of thirty-eight battleships and fifty-eight cruisers – with Tirpitz focused on adding at least ten more major ships to the roster. With the launch of HMS Dreadnought, the Germans were faced with abandoning the expansion, or building their own. They were not swayed from the path; the German dreadnoughts were laid down in 1907.
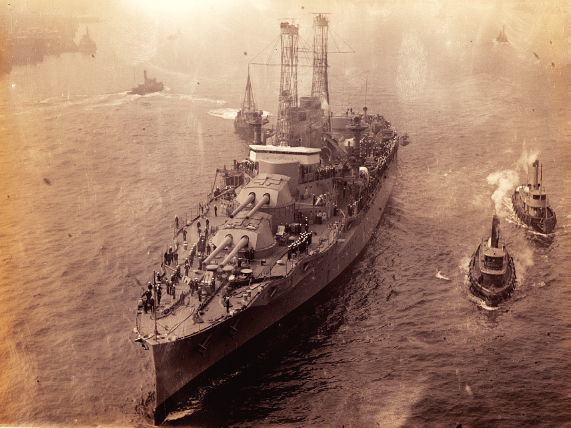
Kaiserliche Marine flags.
The growth of the German Navy, the only German imperial force (the ‘German Army’ was actually composed of an amalgam of many state armies) was perceived as a direct threat to the largest naval power, Britain. In an escalating arms race, the delicate power balance between the strongest European nations – Britain, Germany, France, Austro-Hungary and Italy – was shifted. Traditionally isolated, Britain sought to clarify its relationships with France and Russia, and the stage was set for the alliances that would propel the continent of Europe to war.
Each German ship carried and flew an Imperial War Ensign, or Reichskriegsflagge, like that illustrated, which was used by the Imperial German Navy up to 1919. This flag, first developed for the North German Federation prior to the Franco-Prussian war in 1867, consisted of a white field, an offset black cross with a central white disc bearing the Prussian eagle and a black-white-red flag. In the top left-hand corner, the canton, was a black Iron Cross. The flag was modified twice in its long life, with minor changes to the eagle and to the general design: the changes made in September 1903 were because of an incident in which a Russian warship mistakenly raised the British white ensign to salute a German squadron. The 1903 pattern was introduced on 26 September 1903 (changing the previous ensign and jack, or Gösch). The changes increased the thickness of the cross as well as the border of the central disc, in order to distinguish it from the white ensign with its central red cross and union flag in its top right corner – a symbolic distancing of the two navies at the time of increasing suspicions.
With the German fleet symbolically scuttled at Scapa Flow in an open act of defiance against the British in 1919, the kaiser’s war flag was consigned to history. This example, made by Bonner Fahnenfabrik, bears no Kammerstempel (office stamp) – indicating that it was not an official flag drawn from naval stores but rather a later example dating to the 1920s and 1930s. These flags were still flown by German warships on special occasions – such as the anniversary of the Battle of Jutland, a battle that both sides claimed as a victory.
Country of origin: United Kingdom
Date of manufacture: 1915–18
Location: Private collection
DEFYING ANY ATTEMPT at military categorisation is the Royal Naval Division (RND). Formed in August 1914 from Royal Navy reservists, the RND was the brainchild of the First Lord of the Admiralty, Winston Churchill. With mobilisation on the outbreak of war, it soon became apparent that there would be too many reservists called to the navy on the outbreak of war, and not enough ships to house them. As such, the RND was raised from these men to serve as soldiers – though retaining their naval distinctions and ranks. The Royal Naval Division had a shore establishment in Crystal Palace Park in south-east London – officially Royal Naval Shore Station HMS Victory VI, but very soon developing its own identity as ‘HMS Crystal Palace’. The RND was an essential addition to the war machine. With the navy revered by most people in the island nations of Britain, the fact that the Grand Fleet had not yet met the German High Seas Fleet in battle was perplexing. The raising of the RND perhaps indicates above all things the difficulty that the Admiralty faced – it could not keep able-bodied men away from the front line while the army was actively seeking more men.
Originally, there were eight battalions raised, each named after famous admirals, organised into two brigades: Benbow, Collingwood, Hawke and Drake battalions (1st Brigade); Howe, Hood, Anson and Nelson (2nd Brigade). Four battalions of Royal Marines were also to serve alongside their blue-jacketted colleagues. The division was to serve with distinction at Antwerp in 1914, at Gallipoli in 1915 and, later, as the 63rd (Royal Naval) Division on the Western Front. The RND was at first to wear naval blue and ‘Nelson’ caps with distinctive cap tallies – it was in this garb that the men of the RND were sent to the defence of Antwerp by the volatile First Lord of the Admiralty. The division remained under Admiralty control throughout the war. Khaki uniforms replaced naval blue in 1915 as the division was sent to the Dardanelles; on their return, two of the battalions were so heavily depleted – Benbow and Collingwood – that they were disbanded.
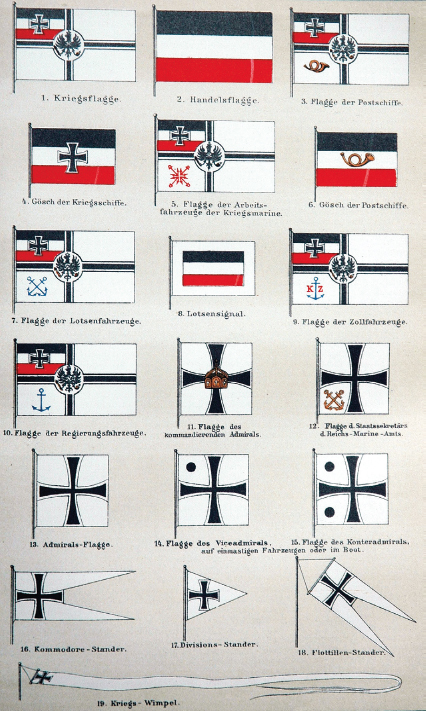
The cap badges illustrated were worn by men of the RND from late 1916. The badge worn by the Drake Battalion took Sir Francis Drake’s ship and his personal motto Auxilio divino (‘By divine aid’); Hood Battalion took a Cornish chough bird from the arms of Admiral Hood, hero of the American Revolutionary War; the coronet, spear and ‘Never Despair’ (Nil desperandum) motto is from the family arms of Admiral Anson, who circumnavigated the globe; while the Nelson Battalion took a depiction of HMS Victory. Each of these screams out their naval connections, yet these men’s boots were firmly rooted in the ground. Despite this, attempts to transform the division into fully fledged soldiers was resisted throughout the war. And as the war claimed more lives, so the unique nature of this naval unit was changed as soldiers replaced the sailors who were rapidly falling in battle on the Western Front. The division was disbanded in 1919, the graves of its sailor-soldiers in peace in France, Belgium and Gallipoli.
Country of origin: Germany
Date of manufacture: 1908
Location: Private collection
THE NAVAL WAR in 1914 was full of frustrations for the British Royal Navy, the most powerful navy in the world. The British had suffered badly at the hands of the Kaiserliche Marine; in September 1914, the U-9 shocked the British press by sinking three aged British cruisers in quick succession. With HMS Aboukir torpedoed and sinking, the other two cruisers came to support it. HMS Hogue was rapidly targeted and in trouble; while it sank, HMS Cressy, weaving to avoid its own fate, was soon heeling over too. The loss of this small group of ships, soon to be known as ‘the live bait squadron’, rocked the nation, and left 1,459 men dead. Though the balance of power remained with the immensely powerful British Grand Fleet, cracks were appearing. And this was not helped by the Battle of Coronel, fought in the South Atlantic on 1 November 1914. Here Admiral Maximillian von Spee took on the British off the coast of Chile, sinking two British cruisers with the loss of 1,570 men. The First Sea Lord, Admiral John ‘Jacky’ Fisher, was incensed; he assembled a force of battlecruisers and cruisers under Admiral Sturdee to the South Atlantic in order to track down and destroy the upstart Germans. This he did, at the Battle of the Falkland Islands, fought a month later; von Spee and six of his ships were lost in this battle.
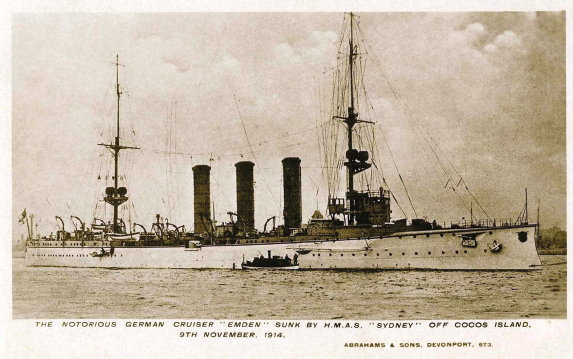
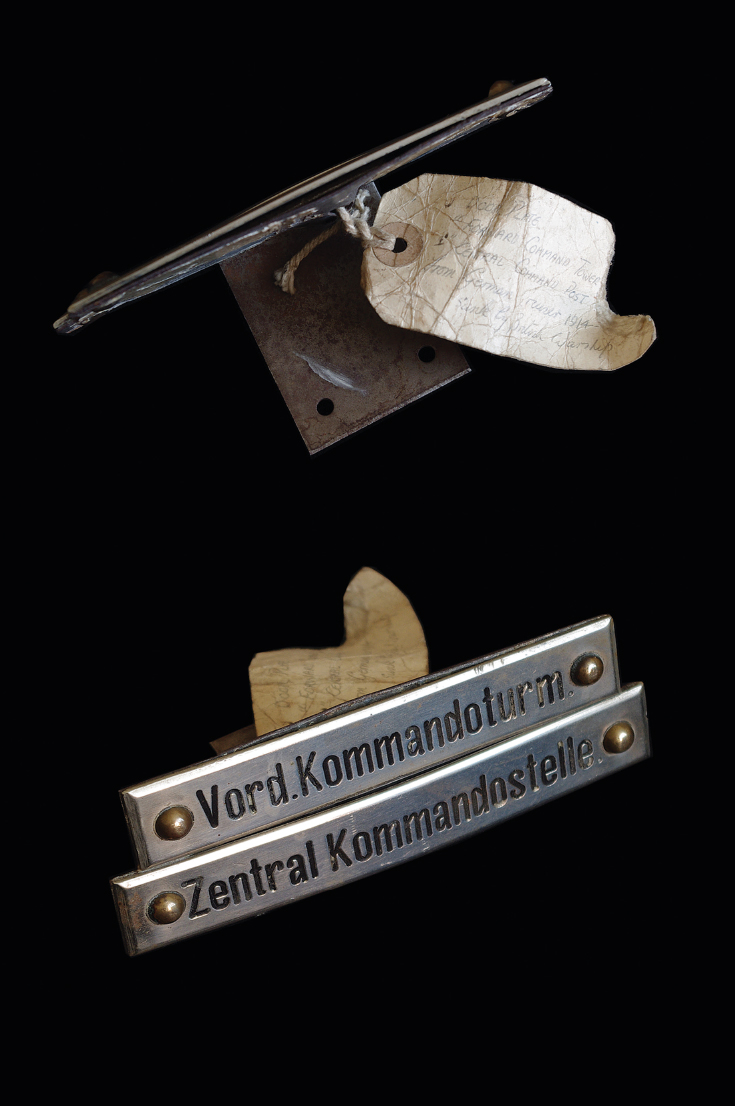
SMS Emden, the ‘notorious cruiser’.
Though these actions grabbed British headlines, the fact remained that the British still controlled the most important part of the coastal waters and seaways that dominated Germany, the German fleet bottled up in Wilhelmshaven. The Indian Ocean, surrounding the imperial jewel of India and stretching down towards Australasia, was another focus for attention. Here, the German East Asiatic Squadron was roaming, which would lead to the actions of one of the most charismatic naval commanders of the war, Captain von Müller of the SMS Emden. Our illustrated object is a rare fragment of the naval war, presumed to be a piece of one of the most notoriously successful of all Kaiserliche Marine ships, a ship that operated well away from the spotlight focused on the ‘will-it-or-won’t-it’ world of the High Seas Fleet. With the Emden run aground after the Battle of Cocos on 9 November 1914, fragments of this light cruiser were recovered as trophies. There is an armoured turret and other guns in Australia, removed and on display in Sydney, from at least 1916. The reason? Australia was to figure largely in the sinking of this ship, with the nation’s first naval battle that saw the Australian cruiser HMAS Sydney force the German vessel to ground at the Keeling Islands. Fragments from the wreck were gradually salvaged until its remains were pushed out into deeper waters. This fragment, a sign from the control tower, was easily removable.
The Emden had been on station in Asiatic waters since commissioning. It had served alongside British ships during the Boxer Rebellion, and was based at the German colonial station of Tsingtao – though Müller was quick to move his ship as war seemed imminent; just as well, as Tsingtao was to be captured by an Anglo-Japanese force in November 1914. Joining von Spee’s Asiatic squadron, the Emden set off on a course that saw it take several prizes in the Indian Ocean. Steering north-westwards after rounding Sumatra, von Müller was to set out on a spree that saw him take twenty-six merchantmen and naval vessels in four weeks during September–October 1914, in the seas between Burma and India, and surrounding Ceylon (now Sri Lanka) and the Maldives. Müller ensured that the crews of the ships were taken off before destroying his prizes; he was also to ensure that neutral ships were left to pass on their way. In a war that increasingly saw few echoes of a chivalric past, Müller did his best to emulate this. His dash and daring also led to the Emden bombarding the Indian city of Madras, causing panic in British India. In just a few months, the German cruiser was to create havoc. It was no wonder that it would be hunted down by the Allied naval forces.
In November 1914, von Müller turned his attentions to the destruction of the telegraph station on Direction Island, in the Cocos Islands. It was a fatal mistake. With the commander of the telegraph station aware of the German vessel, he sent out a warning signal. And with the ANZAC troop convoy on its way to Europe, one of its escorts, the Australian cruiser HMAS Sydney, was dispatched to deal with von Müller and the Emden. The Sydney poured fire into the German ship, hitting it over 100 times; von Müller had little choice but to beach the stricken ship. The captain of the Sydney had to fire once more before the Germans surrendered. But for the charismatic German captain this would not be the end of the story. Commandeering a British schooner, he escaped with much of his surviving crew, a true adventurer.

Country of origin: United Kingdom
Date of manufacture: c. 1914–18
Location: Private collection
WITH ADVANCES IN aviation proceeding apace, the Royal Flying Corps (RFC) was officially created on 13 April 1912 in order to answer the military need for aircraft. The value of aerial reconnaissance of a sort was first demonstrated in the late nineteenth century with the use of captive balloons – so it was a logical step forward that when the first powered flight aircraft staggered into the air, its potential to observe and report movements of men and materiel on the ground was large. The RFC had grown out of the versatile Corps of Royal Engineers, but was unusual – in the first year or so of its life it would be a shared entity, with both military and naval wings. This marriage was not destined to work; on 1 July 1914 the Royal Navy claimed rights to the ‘naval wing’ of the Flying Corps, and renamed it the Royal Naval Air Service. From this point onwards the two air services would operate in tandem.
The cap illustrated belonged to an unidentified officer of the Royal Flying Corps. The uniform style adopted by the new corps was distinctive; officers and men alike wore a double-fronted jacket with no buttons showing, so simple that it was referred to as a ‘maternity jacket’ (someone must have drawn a parallel with women’s maternity clothing at some point, but who and when is not recorded). With pilots wearing ‘wings’ indicating their status, and bronze RFC badges on their high collars, the uniform cut a dash – especially as it was topped off with the khaki serge ‘Austrian pattern’ cap, worn distinctively upon the side of the head. With a bronze cap badge and tailor’s label, this cap belonged to an officer – unidentified: a pilot who never came home? Possibly, but just as likely a ground-based officer.
The work of the Royal Flying Corps was predominantly that of observation of ground activities, reporting on enemy dispositions, troop movements, or the development of new defences – where possible taking photographs in order that detailed trench maps could be drawn up that would aid the infantry in their attacks, and the artillery in destroying their opposing batteries of guns. In the early days of the war, aircraft such as the Royal Aircraft Factory BE2c were designed to be a stable platform for such work. But this activity invited enemy opposition, and very soon aircraft and pilots appeared on the scene whose sole purpose it was to shoot down their enemies out of the sky.
The average life expectancy of a pilot in the Royal Flying Corps is difficult to evaluate. In the air, manoeuvrability, rate of climb, speed and armament were factors that changed the face of aerial battles. In April 1917 – Bloody April – pilots with few operational hours and obsolete aircraft were pitted against German aces flying sleek aircraft such as the Albatross, and life expectancy was very low indeed. With the arrival of new machines, things improved.
Second Lieutenant Medlen was typical. A grainy photograph reveals him as a bright young man proudly wearing his RFC cap. Just 21, he was a promising engineer at the Woolwich Arsenal. He joined the RFC in June 1917 and was examined in order to become a pilot on 30 August. He was found to be unfit as a pilot, but having perfect vision he was accepted as an observer. A copy of the telegram to his father announcing his death in action on 22 December 1917 is present in his records. Poignantly, Leslie Medlen had only been confirmed as a Pilot Officer Observer the day before his death on the Western Front. His local newspaper, the Kentish Independent and Kentish Mail, reported his death in two articles on 4 January 1918: ‘He and his pilot were shot down by a German machine that they had gallantly attacked […] [he] was killed instantly by a bullet through his head.’
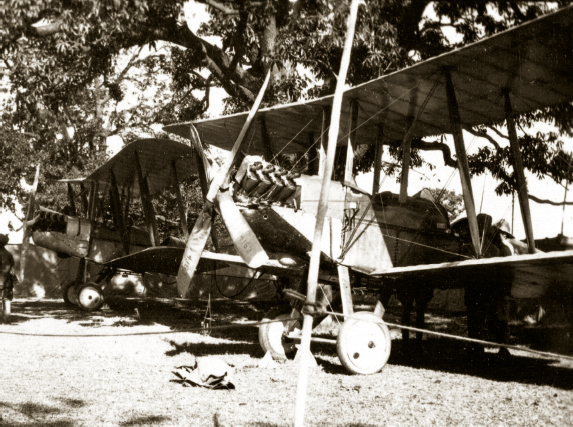
BE2C reconnaissance aircraft in India, 1917.
Second Lieutenant Medlen is buried in Aubigny Communal Cemetery Extension, Aubigny-en-Artois, France, a cemetery that contains a great many airmen, the majority of whom are officers and aircrew presumably shot down in combat. Second Lieutenant Medlen’s grave bears the personal epitaph:
In loving remembrance
Of a brave and noble
Son and brother

Country of origin: Germany (in Belgium)
Date of printing: 1917
Location: Private collection
THE PRIMARY FUNCTION of the aviation services of all countries in the First World War was reconnaissance and, from the beginning, photo-reconnaissance was the ideal. In the first stages of the war, the military air services employed unarmed aircraft that were stable platforms for cameras, which were hand-held over the side of the aircraft. Though some adventurers took pistols into the air in case they encountered the enemy, for the most part the business of snooping on the troops below was only as dangerous as the quality of the aircraft, its ability to stay airborne, and the capability of the engine to keep it in the air. With the war developing rapidly into a static one of positional warfare, keeping a regular check on the developing trench systems was essential if attacks were to be successful, or artillery bombardments were to be on target. And while reconnaissance aircraft were plying their trade, ‘scouts’ were sent up – aircraft equipped with machine guns intent on only one thing: knocking out the eyes of the armies by sending aircraft crashing to the ground. It was with this task in mind that aces such as Manfred von Richthofen targeted patrol and reconnaissance aircraft: at least fifty of his eighty confirmed victories were of this type.
The aerial photographs illustrated were taken by the aircrew of German Flieger-Abteilung 33, formed on 11 January 1917 from personnel of Flieger-Bataillon 1. Based at Moorsele, the squadron was equipped with DFW CV, a well-respected reconnaissance aircraft first introduced in 1916. It was well able to defend itself in combat, as British fighter ace James McCudden recorded in 1917: ‘As I dived down I went quite close to the Hun and opened fire […] For the next five minutes I fought that DFW […] at last I broke off combat, for the Hun was too good for me and had shot me about a lot.’ Flieger-Abteilung 33 was no stranger to McCudden, with two of its pilots – lieutenants Georg Müller and Walther Dern – shot down by him on 19 December 1917.

DFW CV aircraft engaged in ground reconnaissance.
These photographs were all taken in January 1917, and depict the Ypres Salient, spying on the British rear areas at Dickebusch and examining the ground at Passchendaele. The top one shows fields and some trenches, and is signed by pilot Lieutenant Eugen Röcker. A student of theology, Röcker started the war as an infantryman, facing the French attacks in the Champagne region and experiencing the great changes in trench warfare. He wrote of his experiences on 3 November 1915:
I have witnessed the development of trench-warfare for more than a year. One year ago the art of building trenches was still in its infancy. Today it is done in a far bigger style. Our communication trenches stretch for kilometres, the ground is covered with boardwalk. Each Musketeer has his own secure dugout, a year ago only the officers had them. The advances in armament forced us to dig deeper into the earth. The conflict is slowly turning into an underground war. A sophisticated war full of horrors. Its strange that mobile warfare lacks that kind of sophistication and is far less dangerous. In sophisticated war you sit comfortably, in a well-furnished dugout, but you can be dead from one second to the next. In mobile warfare you sleep on wet ground under an open sky, in all kinds of weather, wet and freezing. Hard to choose what’s better. I wonder if I will ever see another year so full of good and bad, of joy and sorrow, of deprivation and indulgence. [Translated by Robin Schaefer]
In transferring to the Luftstreitkräfte, the German air service, Röcker was in a position to see for himself the development of the ‘underground war’, and to ensure that its progress was mapped out thoroughly. But, in common with most pilots of patrol aircraft, he was in constant danger from scouts and, inevitably, Röcker was wounded in aerial combat over the Ypres Salient, at Menin on 28 May 1917. Hospitalised to Germany, like so many others, he died from his wounds in hospital, and was laid to rest at Waldfriedhof in Stuttgart. Already holder of the Iron Cross 2nd Class, he was awarded the Württemberg Military Merit Medal in silver on 21 June 1917. Like so many young aviators, he was the victim of the insatiable need to document and record the evolving battlefield from the air.
Country of origin: Germany
Date of printing: 1917
Location: Private collection
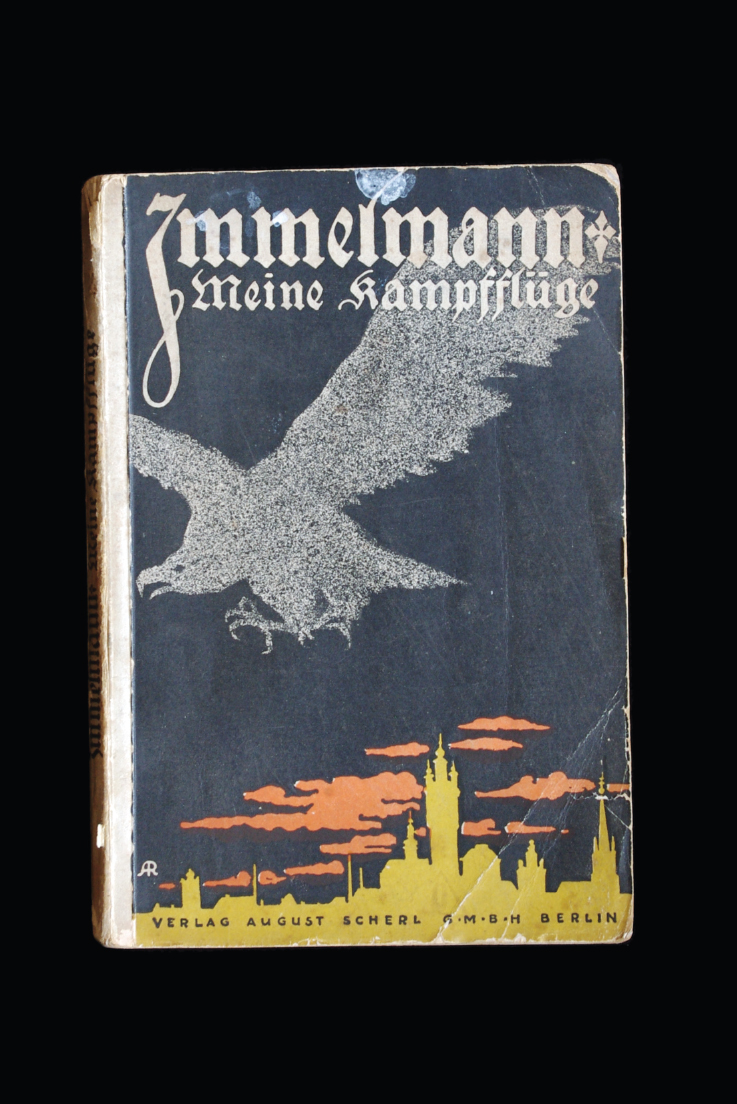
MAX IMMELMANN WAS the first German ‘fighter ace’ of the war. Derived from cards (aces being the best four cards in the pack), the term ‘ace’ was first given by the French to those pilots who were successful in shooting down at least five enemy aircraft. Immelmann, a quiet, unassuming soldier from Saxony, would become forever associated with the development of acrobatic movements that were essential in order to both take – and preserve – life in the air.
The cult of the fighter ace was popular in the war and was followed by most nations, the heroic exploits of these airmen acting as an antidote to the dull news of the offensives on the ground and the grind of trench warfare. Immelmann was one of the first, but others would follow, with von Richthofen and Werner Voss, Albert Ball, James McCudden and Billy Bishop, Georges Guynemer and Charles Nungesser all receiving positive press. Immelmann, Meine Kampfflüge (My Combat Flights) was published in 1917, a year after his death, and contained a view of the famous airman as reflected in his letters home. The strong visual imagery of the German eagle flying over the city of Lille in silhouette is typical of German poster design from the war. Immelmann was feted as the ‘Eagle of Lille’ and was showered with awards and medals before his death. With the interest in aces continuing after the war, his letters were republished by his brother, under the title Max Immelmann, Eagle of Lille, alluding to Immelmann’s earlier book.
His narrative tells the story of his activities as a member of the German aviation service and his rivalry with fellow ace Oswald Boelcke in Flieger-Abteilung 10 (and then Flieger-Abteilung 62). Immelmann’s fortunes turned in the summer of 1915, when Anthony Fokker delivered two of his fighter monoplanes to the squadron. Equipped with an interrupter gear that prevented the forward-facing machine guns from destroying the propeller, this provided the German ace with the opportunity to aim the whole aircraft at its target. He described his first aerial victory, against Lieutenant William Reid of the RFC:

Max Immelmann.
I tried to keep my machine above my opponent’s, because no biplane can shoot straight up. After firing 450–500 shots in the course of a flight which lasted 8–10 minutes, I saw the enemy go down in a steep glide. When I saw him land, I went down beside him. I went up to him, I shook hands and said: ‘Bon Jour, monsieur.’ But he answered in English.
This statement encapsulates a sense of chivalry that allowed the public to escape from the drudgery of the war – and the public lapped it up. Immelmann was responsible for another sixteen combat successes before his death, and the success of the otherwise unimpressive Fokker EIII monoplane in 1915–16 was such that the Germans gained the upper hand. The ‘Fokker scourge’ was eventually answered by British aircraft with an unrivalled field of view – ‘pusher’ aircraft such as the de Havilland DH2, which featured a propellor behind the pilot’s nacelle. Max Immelmann died on 18 June 1916 while attacking British ‘pushers’, his Fokker destroyed in the air. Whether it was by artillery, the bullets of his foes – or even from his own, malfunctioning interrupter gear – is difficult to ascertain. His reputation as a proponent of fighter tactics lives on even today through the ‘Immelmann turn’, a simultaneous loop and roll that allows pilots to both evade and attack pursuing aircraft. But his loss was much more than the death of a pilot. A much decorated soldier of Saxony and Germany, Max Immelmann’s passing marked the move away from aerial chivalry to the melee of dog fights and flying circuses.
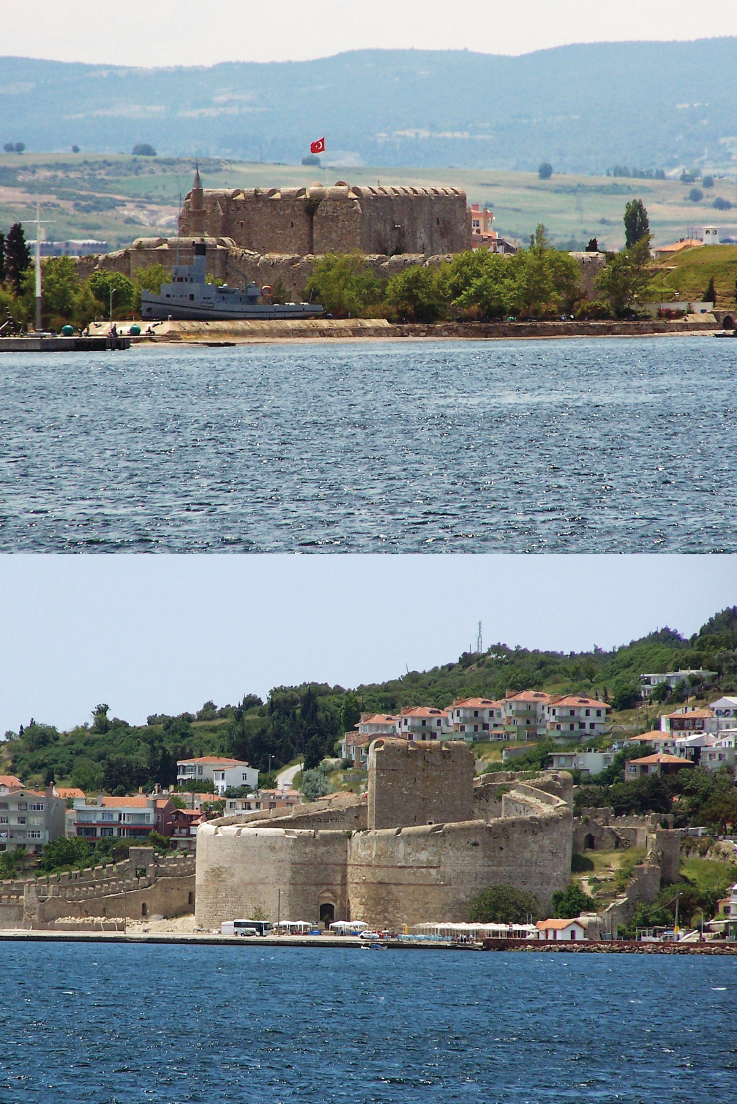
Dardanelles forts Kale-i Sultaniye (top and Kilitbahir Kalesi (bottom).
Country of origin: Ottoman Turkey
Date of construction: c. 1493
Location: Historic monuments, Çannakale and Kilitbahir, Turkey
WITH THE OTTOMANS committed to the war in August 1914, some means was sought to ensure that they would be quickly dispatched. Standing in the way of the winter supply line to Russia, through the Dardanelles and Bosphorous, the loss of the Turkish-led empire to the Central Powers was a significant diplomatic failure, especially as there was now the direct possibility of Ottoman belligerency towards Allied possessions and protectorates in the Middle East.
Dawning in the minds of the British was the old concept, exercised since the late nineteenth century, of ‘Forcing the Dardenelles’ in order to threaten Constantinople – especially if the north shore of the Straits, the Gallipoli Peninsula, could be taken by force by the Greeks, and if the Russians could be on hand to meet the Allies at Constantinople. This would surely lead to the surrender of the Ottomans, and thereby remove the threat to Egypt and the Suez Canal. In November 1914, at the first meeting of the War Council set up to advise the Cabinet on directions in the war, First Lord of the Admiralty Sir Winston Churchill, reignited the Dardanelles question by suggesting the best way to protect Egypt and the Suez Canal was to ‘capture’ the Gallipoli Peninsula; on 13 January 1915 he was to persuade the War Council that this would be possible by purely naval action.

Kilitbahir Kalesi fort.
On 3 January 1915, the Admiralty signalled to Admiral Carden, commanding the Eastern Mediterranean Squadron, for his views on the forcing of the Dardanelles. As First Lord of the Admiralty, Churchill had hopes that the age-old naval concept of pitting ships’ guns against stone fortresses in ‘forcing’ a passage through the Dardanelles Straits could be achieved. The fortifications were impressive – on paper at least.
For the British, knowing that the Dardanelles were well defended, Carden was cagey with his political masters, replying: ‘I do not consider Dardanelles can be rushed. They might be forced by extended operations with large numbers of ships.’ This cautious, politically worded statement was taken as positive by the Admiralty, who asked Carden to expand his ideas. His detailed four-stage plan that followed involved the reduction of the forts at Sedd el Bahr and Kum Kale at the mouth to the Dardanelles, destroying the inside defences up to Kephez at the entrance to the Narrows, reducing its forts and, finally, clearing the minefield, reducing the defences above the Narrows and advancing into the Sea of Marmara. The plan was careful and cautious, but it caught the imagination of Winston Churchill, who, almost by seeing the plan written down, could imagine it executed. It was Carden’s plan that would ignite the flames of the Dardanelles expedition.
Forcing the Dardanelles was attempted in February–March 1915. Testing the outer defences brought heart to the Allies, who could see the possibility of reducing the solid forts to a pile of rubble, after the fort at Sedd el Bahr had been badly damaged in a show of strength there in November 1914. And this may well have been true; but the admirals had not banked on the ability of the Ottomans to defend their shores with mobile howitzers, and by mines. On 18 March 1915, the Allied ships advanced in lines, the lines of mines crossing the channel having been indifferently swept. Tellingly, a line of mines in Erin Keui Bay laid by the Ottoman mine layer Nusret in early March had gone undetected. In a matter of hours the Bouvet, Inflexible, Irresistible and Ocean had all been mined. The attack was called off. In total, the Allied navies lost nineteen vessels and 700 men in their attempt to force the Dardanelles; the course was set for the military landings a month later – transferring the problem to the military.
In April 1915, the Allied armies would struggle to gain a foothold on the peninsula – and would lose sight of their goal: to remove the mobile defences, clear the mines, and let the ships through. Throughout the five-month campaign, the navy gradually melted away.
With the Dardanelles forts being still strategically sensitive during the later Cold War era, they have been preserved. The stone fort of Kale-i Sultaniye on the Asian side of the Dardanelles is now preserved close to the Turkish naval museum. Equipped with four large artillery pieces, the fort was damaged by the super dreadnought HMS Queen Elizabeth in March 1915. It was constructed by Fatih Sultan Mehmet in 1493, designed to face the heart-shaped Kilitbahir Kalesi, its partner on the other side of the Narrows (the name Kilitbahir meaning ‘lock of the sea’). Both have served as guardians of the Narrows of the Dardanelles for centuries.
Country of origin: United Kingdom
Date of manufacture: 1915
Location: Private collection
THE STRENGTH OF the Royal Navy in the North Sea and English Channel was such that it could dictate terms to all shipping in the region. With Germany dependent upon its North Sea ports, the British were in the strongest position possible, and from November 1914 operated a blockade that effectively sterilised the North Sea to any trade with their enemies. First Lord of the Admiralty, Winston Churchill, was also insistent that there should be an aggressive response to any U-boat sightings by merchantmen. Faced with starvation and the suppression of war materiel brought by neutral shipping, the Germans countered with an announcement on 4 February 1915 in the Imperial German gazette, the Deutscher Reichsanzeiger:
All the waters surrounding Great Britain and Ireland, including the whole of the English Channel, are hereby declared to be a war zone. From February 18 onwards every enemy merchant vessel found within this war zone will be destroyed without it always being possible to avoid danger to the crews and passengers.
Neutral ships will also be exposed to danger in the war zone, as, in view of the misuse of neutral flags ordered on January 31 by the British Government, and owing to unforeseen incidents to which naval warfare is liable, it is impossible to avoid attacks being made on neutral ships in mistake for those of the enemy.
The Germans were in a position to back up their threat through the use of their submarine fleet. In 1914, there were just twenty-nine U-boats (Unterseeboots), but with the impotence of the German High Seas Fleet came reliance on these sleek vessels as an effective threat to Britain’s naval dominance – and an exponential increase to a high of 142 submarines in 1917. Fear of the U-boat had led to a rise in the use of neutral flags by British vessels – but with the German announcement of unrestricted submarine warfare came the probability that such vessels would still be targeted.
The RMS Lusitania, one of the largest and most impressive ships on the Cunard transatlantic fleet, had flown a neutral flag on 31 January when faced with reports of German U-boats in the vicinity. The giant liner was stalked again in March in the Western Approaches. But when it sailed from New York to Liverpool in May 1915, the liner’s luck had finally run out. Returning from New York on 7 May 1915, while off the coast of Ireland the Lusitania was struck by a single torpedo fired from a German U-20. The massive ship sank in eighteen minutes, with the loss of 1,198 lives – of whom 128 were American. The outcry and negative backlash against the Germans was huge.
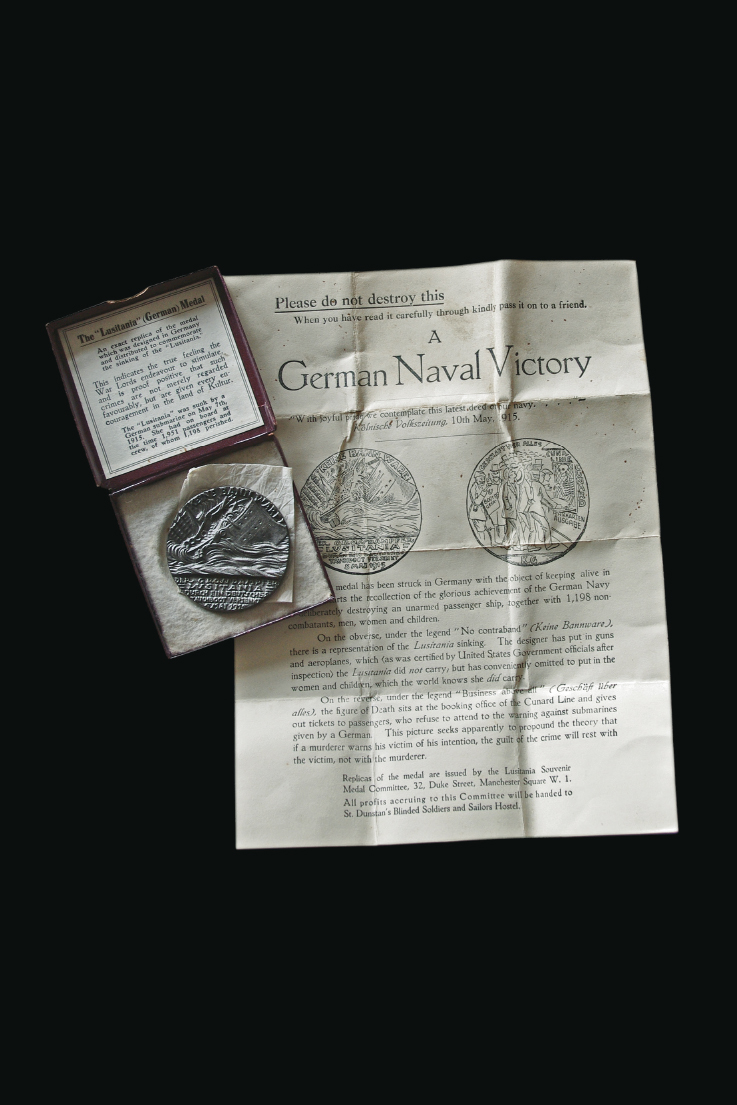
Our object is a British propaganda medal, manufactured in cast iron and paid for by the American department-store owner, Gordon Selfridge. Some 300,000 of the medals were cast, and were issued with a leaflet that decried the ‘German Naval Victory’. The casting is a replica of a bronze medal that was created by the medal maker Karl Goetz. Goetz had already issued bronze medals that had condemned British activities on the high seas; his medallion, bearing the date 5 May 1915, illustrates the figure of death selling tickets for the liner while others look on, reading a newspaper carrying the warning issued by the Imperial German Embassy in New York against sailing across the Atlantic. Above the figure reads Geschaft über Alles (business over all). The other side of the medal shows the Lusitania foundering in the Atlantic, with the words keine Bannware (no contraband) prominent.
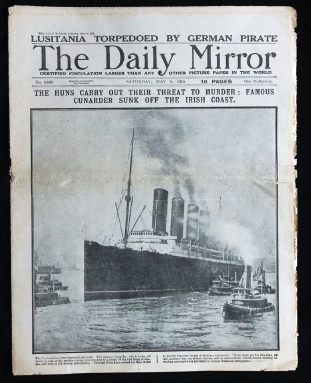
Sinking of the Lusitania.
Goetz’s medal had the wrong date; this was reproduced faithfully by the British, who claimed the date was evidence of a pre-planned action. The leaflet commented bitterly:
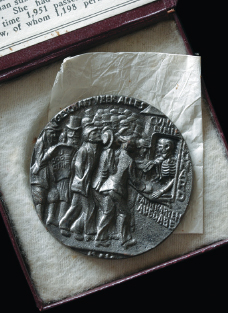
The medal.
The designer has put in guns and aeroplanes, which (as was certified by United States Government Officials after inspection) the Lusitania did not carry, but has conveniently omitted to put in the women and children, which the world knows she did carry.
The sinking was universally condemned on both sides of the Atlantic. The Lusitania had been constructed to be a naval auxiliary cruiser if necessary, but no guns were fitted. The hold did contain cargo, which included small arms ammunition, but did not carry larger weaponry. The arguments as to whether the Lusitania represented a legitimate target still resonate down the ages. But the great loss of life, and the propaganda victory scored by the British, were a disaster for the Germans. The submarine campaign was scaled back; the Americans were enraged. The sinking of the Lusitania would be a cause célèbre that would start the United States on a track that would ultimately see them join the war two years later, and with it the promise of greater numbers of men and materiel crossing the Atlantic than could ever have been envisaged at this early stage of the war. It was a costly mistake for the Germans.
Country of origin: Germany and United Kingdom (in France)
Date of construction: 1919 (replacing 1917 original)
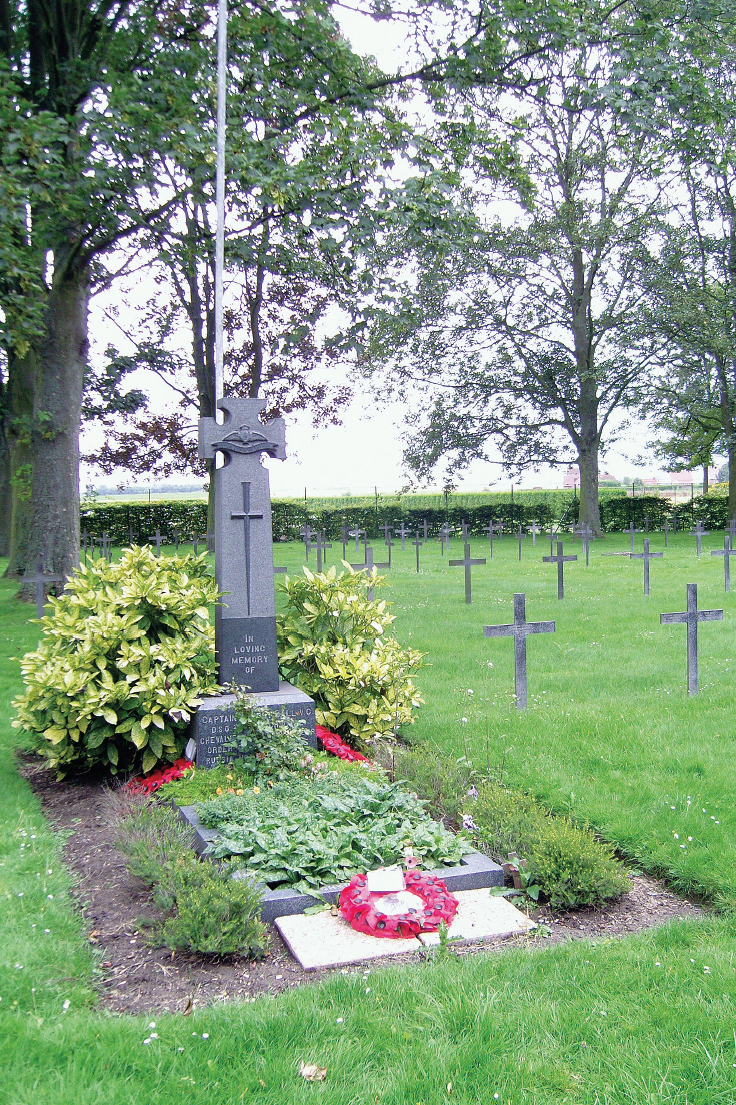
Location: Annoeullin German Cemetery, Annoeullin, France
CAPTAIN ALBERT BALL, one of the most celebrated of all fighter aces, lies buried in a cemetery that was built by the Germans in the village of Annoeullin. Ball was posted missing after a patrol over enemy lines on 7 May 1917, and the nation held its breath. The interest in the exploits of the daring aviators was such that news of Ball’s fall was carried by newspapers across Europe. And it was not until the end of the month that definite news was received from the Germans, who dropped a note over British lines, the text of which read: ‘RFC. Captain Ball was brought down in an air fight on May 7th by a pilot who was of the same order as himself. He was buried at Annoeullin.’
Credited with shooting down the officer was Lothar von Richthofen – the brother of Manfred von Richthofen – who claimed he shot down the officer at 8.30 a.m.: ‘On May 7th I had a combat with many triplanes. One of them attacked me in a very determined manner. We fired a great deal at each other, and during the combat he came very close. He came down under my fire.’
Yet Albert Ball was flying a SE5a, not a Sopwith Triplane, and though the younger von Richthofen supplied Ball’s engine serial number, many experts hold that Ball was killed by gunfire from the ground, and not in aerial combat.
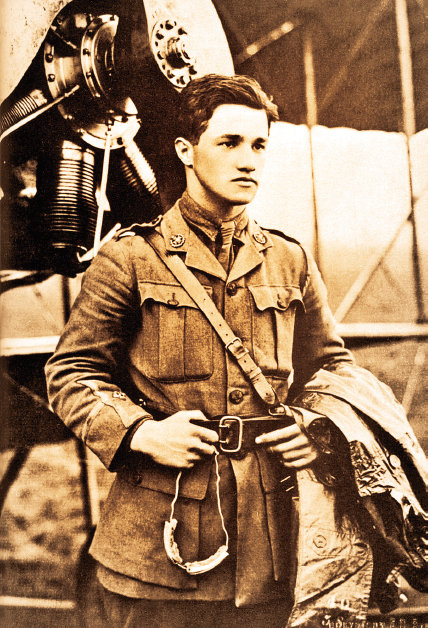
Albert Ball.
In any case, the Germans buried their enemy with full honours two days later; and in June 1917 a memorial service was held for him in his hometown of Nottingham. In France, his grave was marked with a simple white cross bearing the painted inscription: ‘Im Luftkampf gefallen für sein Vaterland [In air combat, fallen for his country] Engl. Flieger-Hauptmann Albert Ball Royal Flying Corps gef. den 7. 5. 17.’
Ball’s grave cross, sitting amongst German soldiers’, was replaced with a larger one bearing an English inscription; in 1919, his father, the Mayor of Nottingham, paid for its replacement by a substantial black stone cross that bears the wings of the Royal Flying Corps (he would also buy the field where his son had crashed).
Albert Ball was the epitome of the dashing airman. He was young, handsome and impetuous. Joining the army early in the war in the 2/7 Battalion, Nottingham and Derbyshire Regiment, he took private tuition in order to attain his Royal Aero Club certificate that would allow him to transfer to the Royal Flying Corps. He was granted his ‘wings’ on 26 January 1916, and on 29 April scored his first combat victory while flying a BE2c; his first victory in a single-seater ‘scout’ came on 15 May. His final tally was forty-three aircraft and one balloon. He would be awarded the Victoria Cross, its citation, published in the London Gazette for 8 June 1917, reading:
For most conspicuous and consistent bravery from the 25th of April to the 6th of May, 1917, during which period Capt. Ball took part in twenty-six combats in the air and destroyed eleven hostile aeroplanes, drove down two out of control, and forced several others to land.
In these combats Capt. Ball, flying alone, on one occasion fought six hostile machines, twice he fought five and once four. When leading two other British aeroplanes he attacked an enemy formation of eight. On each of these occasions he brought down at least one enemy.
Several times his aeroplane was badly damaged, once so seriously that but for the most delicate handling his machine would have collapsed, as nearly all the control wires had been shot away. On returning with a damaged machine he had always to be restrained from immediately going out on another.
In all, Capt. Ball has destroyed forty-three German aeroplanes and one balloon, and has always displayed most exceptional courage, determination and skill.
As with the very first grave markers, Ball’s monument sits quietly alongside those of his former enemies, now in peace.
Country of origin: France
Date of construction: 1918
Location: Smithsonian Institution, Washington DC, USA
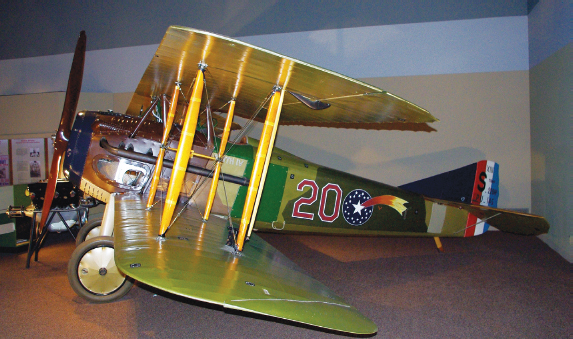
THE RISE OF the fighter ace was matched with the need for aircraft that would have a higher rate of climb, greater speed and manoeuvrability, increased resilience and devastating firepower. By the end of the war, technological advances were such that aircraft could fly at a speed undreamt of by their 1914 counterparts, and there was continuous competition to outperform the enemy. There were many aircraft that could claim to be the best fighters of the war – the Sopwith Camel and the Fokker DVII amongst them – but it was the fighter or scout aircraft produced by the Société anonyme pour l’Aviation et ses Dérivés (originally the Société de Production des aeroplanes Deperdussin), usually simply known as SPAD, which were amongst the most famous aeroplanes produced by the French.
The problem that had plagued the early years of aerial combat had been the ability of the pilot to fire forward-facing machine guns through the propeller arc without destroying the propeller. But it was the development of the interrupter gear, which interrupted the firing of the machine guns to protect the propeller, that really solved the problem. The war in the air became a technological battleground, with the latest technology – affecting engines, speed, firepower, turn-rate, height and so on – creating the possibility of gaining the upper hand.
The first SPAD aircraft were not ultimately successful. Attempting to fix the problems of forward fire, they were ungainly, with the pilot sitting behind the propeller but a machine gunner sitting in a nacelle in front of it. Few of these were produced. But it was the production of a superior aircraft fitted with a Hispano-Suiza V8 water-cooled, in-line engine that was to make the SPAD marque famous. The SPAD S.VII was designed by Louis Béchereau and was developed from the SPAD V, the first of the line to be engined by the Hispano-Suiza. It was a neat design with a distinctive profile. First appearing in April 1916, the SPAD VII was robust, a little difficult to manoeuvre but definitely fast, and it had an excellent rate of climb. It had a strong gun platform for its single Vickers gun. Some 5,600 of this type were produced in France alone. It served with several fighter units (escadrilles de chasse), including Georges Guynemer’s Les Cigognes – his aircraft, Vieux Charles, is preserved in Paris.
But the aircraft illustrated is of a later type, the SPAD XIII, equipped with a more powerful 220hp Hispano-Suiza 8, equipped with twin Vickers – making the aircraft a formidable fighting machine. Over 8,400 of this type were constructed, equipping most French fighter units; Guynemer lost his life in one such aircraft. The SPAD XIII is notable as being the prime fighter aircraft of the sixteen aero squadrons of the American Expeditionary Force, with 893 aircraft committed to the Americans; over half of these returned to the United States at the end of the war. This particular aircraft – No. 20, Smith IV – was flown by Lt A. Raymond Brooks of the 22nd Aero Squadron (2nd Pursuit Group), and is now preserved in the US National Air and Space Museum of the Smithsonian Institution in Washington DC. Brooks was an ace – credited with six victories – and chose this aircraft to bring back to the United States for evaluation. It is an exceptional survivor of an exceptional type of aircraft.

Country of origin: Germany
Date of manufacture: 1916
Location: Private collection
THE FIRST GERMAN assault on British soil came from the sea. At the outset of war, with the British Royal Navy dispersed to tackle its commitments, the more concentrated German Imperial Navy sought opportunities to trap small numbers of British ships and destroy them. With this in mind, Admiral Hipper planned raids on the British coast that he hoped would bring him success. The first of these, at Great Yarmouth on 3 November 1914, was a failure. A more ambitious raid, targeting Scarborough and Hartlepool, was planned for 16 December 1914. At 8 a.m., German ships shelled Scarborough, hitting the Grand Hotel, churches and private properties; the nearby town of Whitby was also hit. Hartlepool was assaulted ten minutes later; over 1,000 shells were hurled at the town, damaging factories, homes and churches. Eighty-six civilians and seven soldiers were killed and 438 were injured. The raids were a propaganda victory for the British – ‘Remember Scarborough’ now replaced ‘Remember Belgium’ on recruiting posters.
The assault on Britain was not limited to bombardment from ships, however, and the next phase would be the use of airships – Zeppelins. The first aerial attacks were approved by the kaiser himself in January 1915 – though at first excluding London – with night raids that were intended to target military installations on the Thames estuary. The raids soon escalated. The first successful one was on the night of 19 January, when two Zeppelins attacked East Anglia with high explosive bombs and incendiaries, killing four and injuring sixteen; it was the shape of things to come. London was admitted as a target in February. Though early attempts were ineffectual, at 11.00 p.m. on 31 May 1915, Captain Linnarz of Zeppelin LZ.38 dropped the first enemy bombs – some 3,000lb of explosives – on the capital. Seven people were killed and thirty-five injured. The response from the ground was non-existent, with no aircraft to meet it, no guns fired at it, no searchlights trained on it.
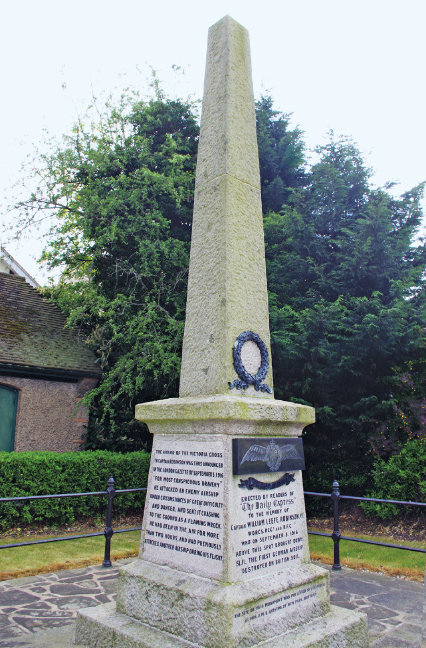
Monument to Leefe Robinson, victor over the SL.11.
Raids on Britain would continue into the summer, though the short nights were a problem for the Zeppelins, which depended on the cover of darkness, and the bombing started to get heavier. Anti-aircraft defences were still ineffectual, and though the pencil-like shapes of the airships were often caught in searchlights – the problem was that neither anti-aircraft fire nor aircraft were able to intercept the high-flying airships. The Zeppelin raids continued into 1916, with larger numbers of airships targeting London and other cities in the eastern part of the country. The largest raid was on the night of 2 September, which was to prove a turning point in the aerial war as on this night Lieutenant William Leefe Robinson became the first pilot to actively shoot down an airship over Britain, the rigid-bodied Schütte–Lanz SL.11. Robinson fired three drums of ammunition into the airship, which quickly caught fire and was sent to the ground as a fireball, the crew killed outright. His report recorded the event:
I had hardly finished the drum before I saw the part fired at, glow. In a few second the whole rear part was blazing.
This event was to become celebrated, and fragments of the stricken craft were sold to aid the Red Cross; a memorial to the event is to be seen at Cuffley in Hertfordshire. The fragments of the SL.11 illustrated were collected by a soldier in the Royal Field Artillery for his officer – an inveterate collector of such artefacts.
Leefe Robinson would be awarded the Victoria Cross for his gallant act – the first of many such acts carried out by RFC airmen in tackling the Zeppelin ‘baby killers’. Later, Robinson would be shot down in France by fighters of von Richtofen’s Jasta 11, to spend the rest of the war in a prison camp – tragically succumbing, on his return home at the end of the war, to the influenza pandemic that killed so many people in 1918–19.
Country of origin: United Kingdom
Date of manufacture: 1914–16
Location: Private collection
WHILE NAVAL ENGAGEMENTS were being fought in odd corners of the world, the U-boats were plying their trade. Considered only as a defensive arm at the opening of the war, the public expected much of their dreadnought and battlecruiser fleets. With the dreadnought having thick armour and in-line all-big-gun weaponry, the battlecruiser was favoured by some – especially the British First Sea Lord, Jacky Fisher – as a much faster alternative. With its thinner armour, Fisher believed that speed would be the battlecruiser’s answer to the heavier armour of the more lumbering ships. HMS Lion, launched in 1910, was one of the best of its type. Created during the British and German naval arms race at the turn of the twentieth century, the Lion was a formidable ship, armed with 13½in guns and considerably faster than others in its class, this ‘splendid cat’ was one of the biggest warships in the world, and was destined to be Admiral Beatty’s flagship of the 1st Battlecruiser Squadron, consisting in 1916 of four ships, the Lion, Princess Royal, Queen Mary and Tiger. All would be severely tested during the Battle of Jutland.
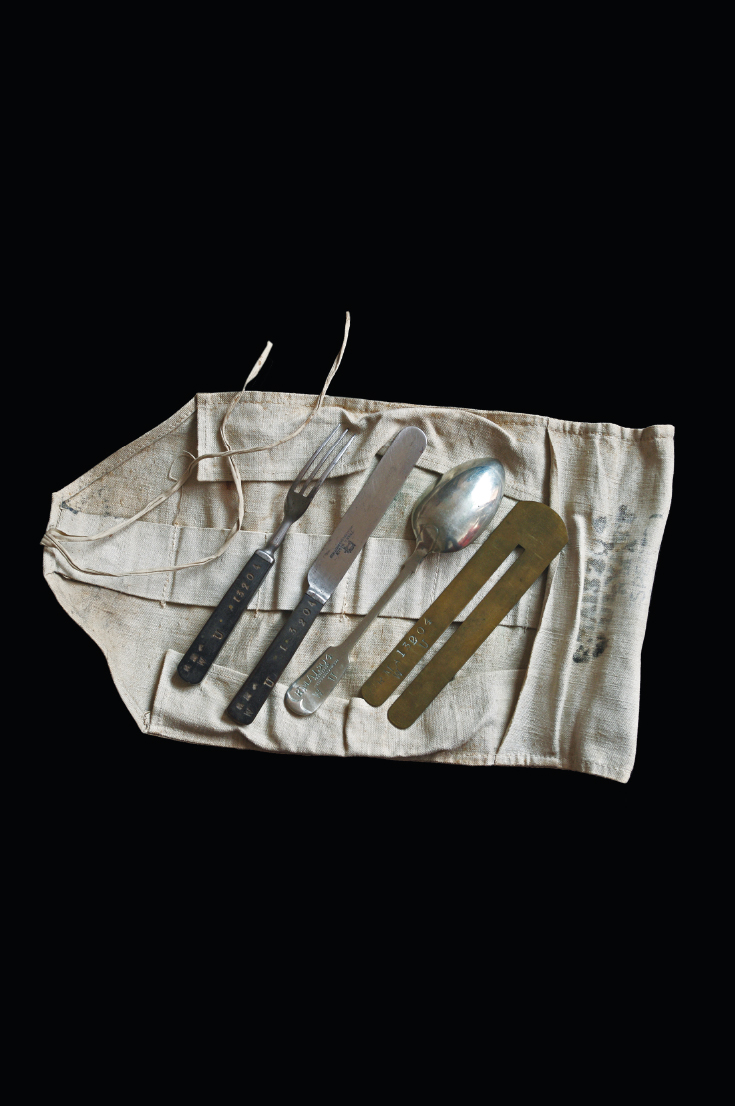
British ships were manned by officers and ratings of the Royal Navy and the Royal Naval Volunteer Reserve, as well as the sea-soldiers of the Royal Marines, then divided into two branches – the Royal Marine Light Infantry and the Royal Marine Artillery. The gunners manned at least one turret on a warship, and all were involved in gunnery control. Marines were equipped as soldiers and were provided with all the ‘necessaries’ that a soldier would require. The set of equipment illustrated belonged to one man, Bombardier Wilfred Robert Ulyatt of the Royal Marine Artillery. His knife, fork and spoon are all marked with his regimental number; this matches his kit roll, known as a holdall, which also contains his button brass – specifically designed to protect his uniform from staining while he was cleaning his buttons. Bombardier Ulyatt was one of the complement of marines who manned a turret in Beatty’s flagship, HMS Lion, and who are mute witness to its actions at Jutland.
The Battle of Jutland was the largest fleet battle of the war and provided the opportunity for the British Grand Fleet and the German High Seas Fleet to finally meet in strength on 31 May 1916 in the open waters in the North Sea, north of Denmark and the Jutland peninsula. The German strategy had long been to create a fleet that would threaten the security of Britain simply by its existence. But numerically it was still weaker than that of the British; an all-out battle would inevitably lead to more losses and a further weakening of their position. With this in mind, the Germans created several elaborate ploys intended to lure out the British in sufficient numbers that they could be taken on by submarines, and sunk. Raids on the east coast of England caused outrage – and created opportunities for the British to sit on the moral high ground, claiming that the Germans had set out to murder civilians in the coastal towns. The plan was simply to force a naval reaction – and to gain the chance to destroy the British ships in detail, and submarines were ready to pounce on any unwary ship – as they had done in 1914. This cat-and-mouse campaign created many frustrations and forced the hand of Admiral Scheer, commanding the German High Seas Fleet. In May 1916, Scheer dispatched his battlecruisers under Admiral Hipper to the Skagerrak, on the pretence of threatening merchant shipping. But it was Scheer’s hope that Hipper’s battlecruisers would be too tempting a target for Jellicoe and, specifically, for Hipper’s opposite number, Admiral Beatty and the 1st Battlecruiser Squadron. Scheer expected Beatty to take up the challenge and, with the High Seas Fleet lying in wait, to be able to trap and destroy them. It was unfortunate for the German commander that British intelligence knew of his intention. Suitably warned, the British Grand Fleet moved into position. And at 3.30 p.m. on 31 May 1916, Beatty in HMS Lion made contact with his German opposite numbers, who turned to the south in order to lure Beatty’s ships into the embrace of the German High Seas Fleet.
At 3.48 p.m., the battlecruisers from both sides opened fire. Within minutes, the first casualty was HMS Indefatigable, serving with the 2nd Battlecruiser Squadron. With better gunnery and more effective double-skinned armour, the German ships easily bested the British. Under fire from the SMS Von Der Tann, HMS Indefatigable was ripped apart, all but two of its crew killed. Fisher’s expectation that speed would provide the safety net for his battlecruisers was clearly inadequate. Beatty’s flagship, the Lion, was the leading ship and engaged the Lützow. With German gunnery proving highly accurate, the Lion received several hits – including a direct hit on Q turret with a 305mm shell. The shell penetrated the turret and blew off its armoured roof, killing or wounding its crew; Bombardier Ulyatt was one of those who lost his life. A fire was started that could have threatened the ship – fortunately the RMLI turret commander, Major Francis Harvey, had the foresight to order the shell magazine to be flooded. Harvey later died of his wounds but was awarded the Victoria Cross for his bravery. The Queen Mary was next, receiving hits on its magazine from the Derfflinger. The ship exploded, again with great loss of life. Beatty’s laconic comment was: ‘There seems to be something wrong with our bloody ships today.’
Though suffering many grave losses, the remaining battlecruisers were turned away from the battle when the main German fleet was spotted at 4.40 p.m. Beatty hoped to lure the Germans into an open conflict with the Grand Fleet, approaching from the north-west. With both sides conscious of the possibility of defeat, and with Jellicoe fearing submarines, the fleet action that followed was not decisive. By the following day, both fleets remained, and both sides claimed success. The Germans had sunk more ships and killed more sailors than the British. But the German High Seas Fleet never put to sea again. The bravery of men like Wilfred Ulyatt had made sure of that.
Country of origin: United Kingdom
Date of manufacture: 1918
Location: Private collection
IN THE WAKE of the Lusitania affair and complaints from the US president, Woodrow Wilson, the German policy of attacking all ships that entered the designated war zone around the United Kingdom was suspended. Wilson had sent three firmly worded notes to the Germans expressing the right of the American ships to sail unmolested on the high seas, and the US president went so far as to warn the Germans that any further deliberate acts of war against American shipping would be seen as ‘deliberately unfriendly’. The sinking of another liner off the coast of Ireland on 19 August 1915 – the White Star Line’s SS Arabic with a cost of forty-four people – did little to allay American fears, and with the Germans becoming increasingly nervous about the reaction of the US government, the U-boats were withdrawn from attacking merchant ships and turned their attention to the Grand Fleet.
But for Admiral von Holtzendorf, chief of the admiraly staff of the German navy and a convert to the doctrine of ‘Unrestricted Submarine Warfare’, there was a gamble to be taken. With the odds stacked against the Germans on the Western Front, and with the strength of the British Navy rising, von Holtzendorf issued a top-secret memorandum on 22 December 1916, advising the kaiser and the military High Command to resume submarine attacks on all shipping:
Most Secret!
I have the honour to respectfully submit to your Excellency […] a memorandum on the necessity for the commencement an unrestricted campaign of submarine warfare at the earliest opportunity.
The war requires a decision before autumn 1917 […] If we succeed to break England’s backbone, the war will immediately be decided in our favour. England’s backbone is the merchant tonnage, which delivers essential imports for their survival and for the military industry of the British islands […]
Based on a monthly rate of destruction of 600,000 tons of shipping through a campaign of unrestricted submarine warfare […] at least two fifths of the neutral tonnage sailing in the trade with England will be deterred by such a campaign [… and] the current volume English sea borne trade will be reduced by 39% within five months. This would not be bearable for England, neither in view of her future position after the war, nor in view of her ability to continue the war effort. Already, the country is at the verge of a food crisis, which will soon compel it to attempt to undertake the same food rationing measures, which we, as a blockaded country, have been forced to adopt since the outbreak of the war.
Therefore my conclusion is that a campaign of unrestricted submarine warfare […] has to accept the risk of American belligerence, because we have no other option. In spite of the diplomatic rupture with America, the unrestricted submarine warfare is nevertheless the right means to conclude this war victoriously.
The kaiser took the gamble; he agreed to the new campaign and authorised its start from 1 February. For the merchantmen, the idea of being attacked by submarines, a hidden menace, was terrifying. The torpedo – the self-propelled, submarine-launched weapon – had been effective since the turn of the century and was a means of ensuring that a ship was struck by a significant warhead, with devastating results. For a mechantman, being ‘torpedoed’ or ‘submarined’ meant loss of ship and livelihood – and the need to find a new berth.
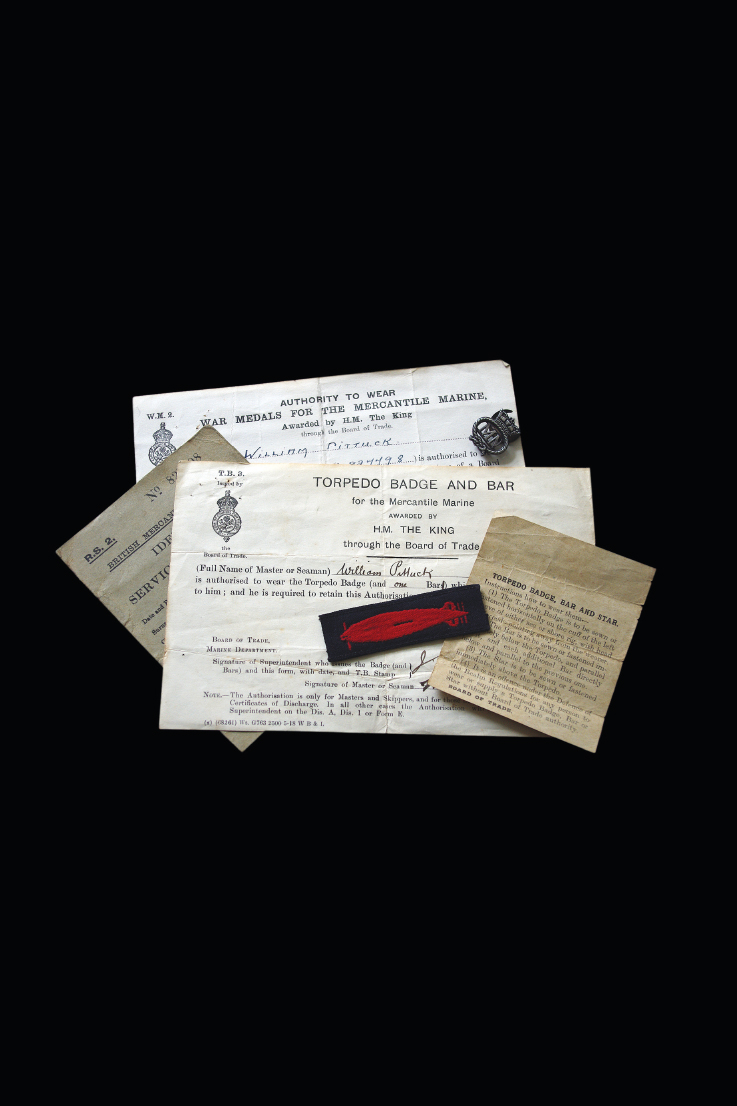
As a recognition and mark of distinction for those mariners who had been sunk by submarines (or mines), and who had lived to sail again, the Board of Trade granted the right to wear an embroidered torpedo badge on the left sleeve – the torpedo meant to face forwards. The example illustrated was awarded to William Williams Pittuck of Essex who, in his sixties, was a veteran seaman and master, who carefully preserved the honour as a remembrance of a sinking – most likely by submarine, most probably by a torpedo itself.
At first, the British response to the submarine menace was an Admiralty-sponsored scheme of direct attacks on U-boats by merchantmen – a policy that led to the execution of Captain Fryatt, captain of the SS Brussels, who had attempted to ram the U-33 on 28 March 1915. With the resumption of unrestricted attacks in 1917, the rate of shipping losses doubled and then tripled; only then, in the early summer of 1917, was the Convoy System introduced, providing safety in numbers and the support of naval ships, which led to a decline in shipping losses.
The Germans had gambled that they could bring Britain to its knees by their policy of submarine attacks – but failed. The stakes were high, for the Americans broke off diplomatic relations with Germany and formally declared war with them on 6 April 1917. At this point, for the Germans the war was, ultimately, lost.

Country of origin: United Kingdom
Date of construction: 1897
Location: Ostend Harbour, Ostend, Belgium
IN APPRECIATING THE military reasons which directed the […] blocking of Zeebrugge, it is desirable to recall to mind the general naval situation at the beginning of 1918. Briefly stated, the German High Seas Fleet was contained […] whilst German submarines were engaged on vast operations, having for their object the stoppage of the trade of Great Britain […] In the face of such an attack, the aim of Great Britain was either to destroy the enemy submarines, or, failing destruction, to prevent their egress from their bases […] it was with this military object that plans for the blocking of Zeebrugge were initiated.
Admiral of the Fleet, Earl Beatty, 1921
The British had tried many ways of ensuring that the German submarines – based too close for comfort to British ports on the coast of Flanders – were kept bottled. The Germans had established their submarine base inland, close to Bruges and connected by canals to the sea at Zeebrugge and Ostend. The Royal Navy had tried to bombard the lock gates without success, and with the submarine war telling heavily upon the British merchant trade, it was necessary to take direct action. That action involved simultaneous attacks on the harbours at Zeebrugge and Ostend, attacks that would remove the threat by blocking the channels using old ships that were specially prepared so that they could not easily be removed. This, it was hoped, would ram home the stopper into the bottle, and remove much of the U-boat threat.
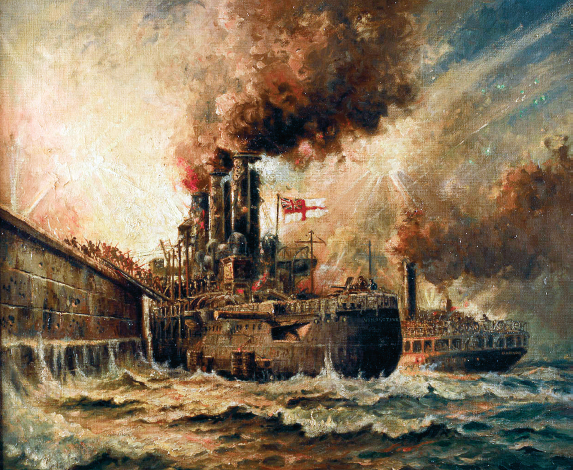
HMS Vindictive at Zeebrugge mole.
Zeebrugge was the larger target – it had a wider channel and was a greater threat. It was also heavily defended, with a garrison of 1,000 men stationed on the huge curving ‘mole’ that protected the harbour entrance, which was equipped with a battery of guns that posed a direct threat to any attacking force. To take on the harbour, the navy would need to ensure that its blockships were guided into position, while simultaneously assaulting the mole, its battery and its connecting bridges. The attack on Zeebrugge and Ostend was launched on 23 April 1918 – St George’s Day.
The bow of HMS Vindictive stands close to Ostend harbour. With so many other monuments to the war in Belgium, until recently the Vindictive stood a little out of the limelight, rusting, perhaps not venerated as those battle monuments of the Ypres Salient. Yet the actions this memorial commemorates are every bit as significant; renovated in 2013, it has been given greater prominence.
The Vindictive was a light cruiser that was committed to the Zeebrugge raid as a means of taking on the German garrison on the masonry mole. At 29ft high, this was a formidable target. Equipped with howitzers, flame-throwers and specially constructed gangplanks, the Vindictive operated with the shallow draught Mersey ferries the Iris and the Daffodil, both commissioned into naval service. While the Daffodil pushed the Vindictive against the mole, the Iris carried part of the naval landing party. The intention was that 200 Royal Marine Light Infantrymen would storm the gun battery, while two elderly submarines packed with explosives would destroy the bridge that connected the mole with the harbour. And all to let the three blockships – Thetis, Intrepid and Iphigenia – pass through the harbour entrance to block the channel. The assault was terrifying in its intensity.
All three ships were scuttled, though the Thetis sat outside the channel. The submarines did their job – and the action of the Vindictive in the storming of the mole was held up as one of the most daring acts of the war. In all, eight Victoria Crosses were awarded for this action. And while the channel was blocked, that at Ostend remained open, for the Germans, using a ruse de guerre, moved the navigation buoys, leaving blockships grounded outside the harbour. With this channel still open, the patched-up Vindictive itself was sent to block it in a second raid at Ostend two weeks later. It only partially succeeded – but the noble ship’s bows remain today as a memorial to the men who carried out these raids in defence of the coasts of Britain from the U-boat menace.