Chapter 2
Poking Around at Settings
In This Chapter
![]() Knowing how to use gestures
Knowing how to use gestures
![]() Going to the Home screen and Daily Shelf
Going to the Home screen and Daily Shelf
![]() Getting familiar with the status bar
Getting familiar with the status bar
The NOOK Tablet’s tappable, swipable, scrollable touchscreen allows you to truly enter the virtual world. You can tap a picture of a book cover to read or buy it. You can flick your way through web pages with your pointing finger. You can swipe from left to right (or vice versa) to slide through menus. And you can scroll up or down on a list of options.
Keeping the Gestures Polite
I’m not talking about using your hands or fingers in a particular way to express your opinion of a great work of literature or the latest piece of pointless piffle by a pompous politician. The gestures are pretty easy to master, and essential. You’ve got no choice: They’ve taken away your keyboard, mouse, fountain pen, stylus, and chisel.
Here is the basic set of gestures; not every page offers the same set of features, but you’ll quickly learn how to tap-dance your way anywhere you want to go.
Tap
A tap is a quick strike by the tip of your finger. Think of poking at a key on a computer keyboard.
Double tap
 Bet you figured this one out, right? A double tap is two pokes by the tip of your finger in quick succession.
 Double-tapping the Home screen cleans things up and arranges book and periodical covers in a grid.
If you’re at the Home screen, Daily Shelf, or Library, double-tapping a book cover displays details about the item. You get the same result double-tapping a book cover in the B&N online bookstore.
On the web or in the picture gallery, double-tapping an image zooms you in. The same happens when you’re reading a PDF file, including some books that are stored in that format.
Double-tapping an enlarged image or page from a PDF will return the image or page to its original size.
Press and hold
Touch a finger to the screen and hold it there for 2 seconds. Oh, and then lift your finger off the screen; your finger doesn’t have to become a permanent part of your NOOK Tablet. See Figure 2-1. On some other tablets and smartphones, the press-and-hold gesture is called a long press.
Depending on what’s onscreen, a press-and-hold usually opens a menu.
Press and hold a book cover and then release to show a menu with options such as Open the Book, Recommend It, or Lend It.
Press and hold on an item on the Daily Shelf to get the opportunity to remove the book from display.
Press and hold, then lift, from a word in a book to open the Text Selection Toolbar. This particular menu lets you look up a word in the NOOK Tablet’s dictionary, or go online to Wikipedia (or a more general search through Google) to read more about a word, name, or phrase. The same toolbar allows you to add a note to the beginning or end of a passage in a document, or to bookmark that page.
A press-and-hold on the cover of a book or periodical in the Library allows you to send that publication to your personal archive. (It’s not deleted, but you can’t see it in your listing of current reading material.) Or you can delete a file using the same menu.
When you’re typing, press and hold a letter on the virtual keyboard to display accents, diacritical marks, and special characters.
To open a file stored on a microSD/microSDHC memory card, go to the Library, tap the My Files icon, and press and hold a filename.
A press-and-hold on the Home screen’s wallpaper lets you choose a different background image: one of your own pictures, a supplied image, or an animated scene you can buy from the B&N app store.
In the music player, a press-and-hold allows you to add a track to a playlist.
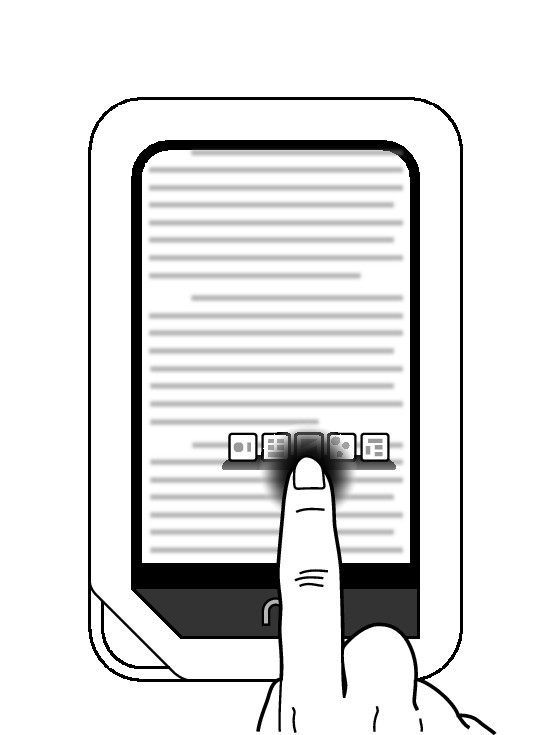
Figure 2-1: The press-and-hold is also known as a long press.
Swipe
I’m not advising you to steal a book. Swiping in this case means sliding your finger across the screen. See Figure 2-2. Think of it as using the left- or right-arrow keys on a computer keyboard. You can swipe to the left or to the right; you get a different effect depending on what type of file is open or where you are in the operating system.
Here are some examples of a swipe in use:
In the Daily Shelf or your Library, swipe to move through a collection of items (such as a row of book covers).
On the status bar, swiping to the left brings your NOOK Tablet back to the previous activity.
When reading, swiping to the left will flip the page forward. Swiping from left to right takes you back a page.
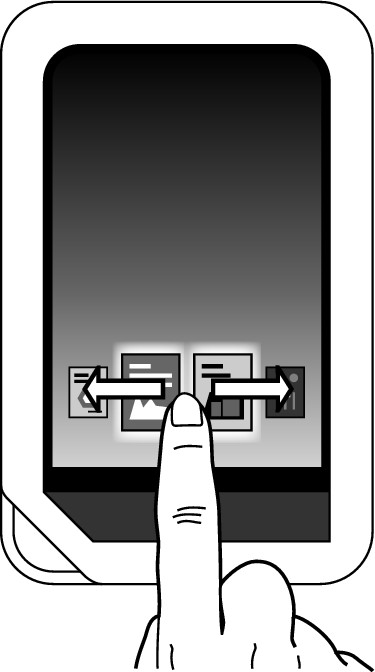
Figure 2-2: Swipe to move side to side.
Scroll
A scroll is a vertical form of swipe; you move your finger up or down on the screen to go through a list. Think of it as using the up- or down-arrow keys on a computer keyboard.
For example:
Scroll up or down through a list of menu options.
Move down or go back up a set of thumbnail images of books, book pages, bookmarks, photos, or music tracks.
Go through a magazine piece in Article view, zipping through the text without illustrations or photos.
Drag
When you drag on a touchscreen, you are — in an electronically metaphoric way — touching an object and pulling it to another location. Touch an object and keep your finger on it as you drag it where you want it to go; when the object is where you want it, lift your finger from the screen to leave the object in its new location.
Drag to these ends:
Drag to check out additional web search results.
Drag a piece of reading material from the Home screen to the Daily Shelf.
Drag a slider left or right (or up or down) to adjust things like volume.
Zip through the pages of a book by dragging the location slider right or left.
Select a phrase by dragging a vertical bar (at either end of a word) until a pair of bars are around it.
Drag crop marks to frame the part you want to keep of an image.
Drag the virtual green  symbol on the screen (not the physical one on the frame below) to the right to unlock the tablet and display the status bar.
Lift
You lift your finger from the screen when you’re done making certain gestures such as dragging or pressing and holding. I tell you this just as a precautionary measure so that you don’t feel you have to walk around for the rest of the week with your finger pressed tightly to the touchscreen.
Pinch
Ouch! A pinch is where you touch the two fingers on the touchscreen and bring two of them toward each other (or away from each other — aka a pinch out). Most people use their thumb and pointer finger. Pinch your fingers toward each other to shrink an image — a book cover or a photo, for example. Spread your fingers apart to zoom in on or enlarge an image on the screen. See Figure 2-3.
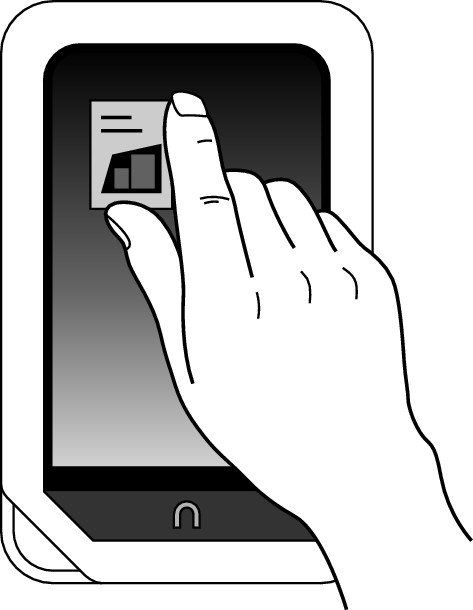
Figure 2-3: Pinch to zoom in or out on text or an image.
Press
The NOOK Tablet has four physical buttons: switches that you actually press. You don’t tap, swipe, pinch, or anything else — just press.
The first is the power button, at the top of the left side.
Across the tablet, at the top of the right side, are pair of + and – volume control buttons.
The button sits at the bottom of the screen as you hold it in portrait mode.
Seeing the Parts of the Whole
Aristotle, who to the best of my knowledge did not own a NOOK Tablet, is credited with saying, “The whole is greater than the sum of its parts.” He said it in ancient Greece and in ancient Greek, but he could well have been considering the beauty of a modern electronic device.
Here’s what I mean by that: The whole of the NOOK Tablet is made up of hundreds of different screens and uncounted features. The options screen for the web browser is completely different from the one for the music player, yet they share the same brain and screen and memory. In this section, we go through the main parts. See Figure 2-4.
Home screen
The Home screen is the default NOOK Tablet display (like the desktop on a personal computer). See Figure 2-5. The Home screen has two main areas:
A desktop you can change, customize, and update.
The Daily Shelf, which spreads across the bottom of the screen.
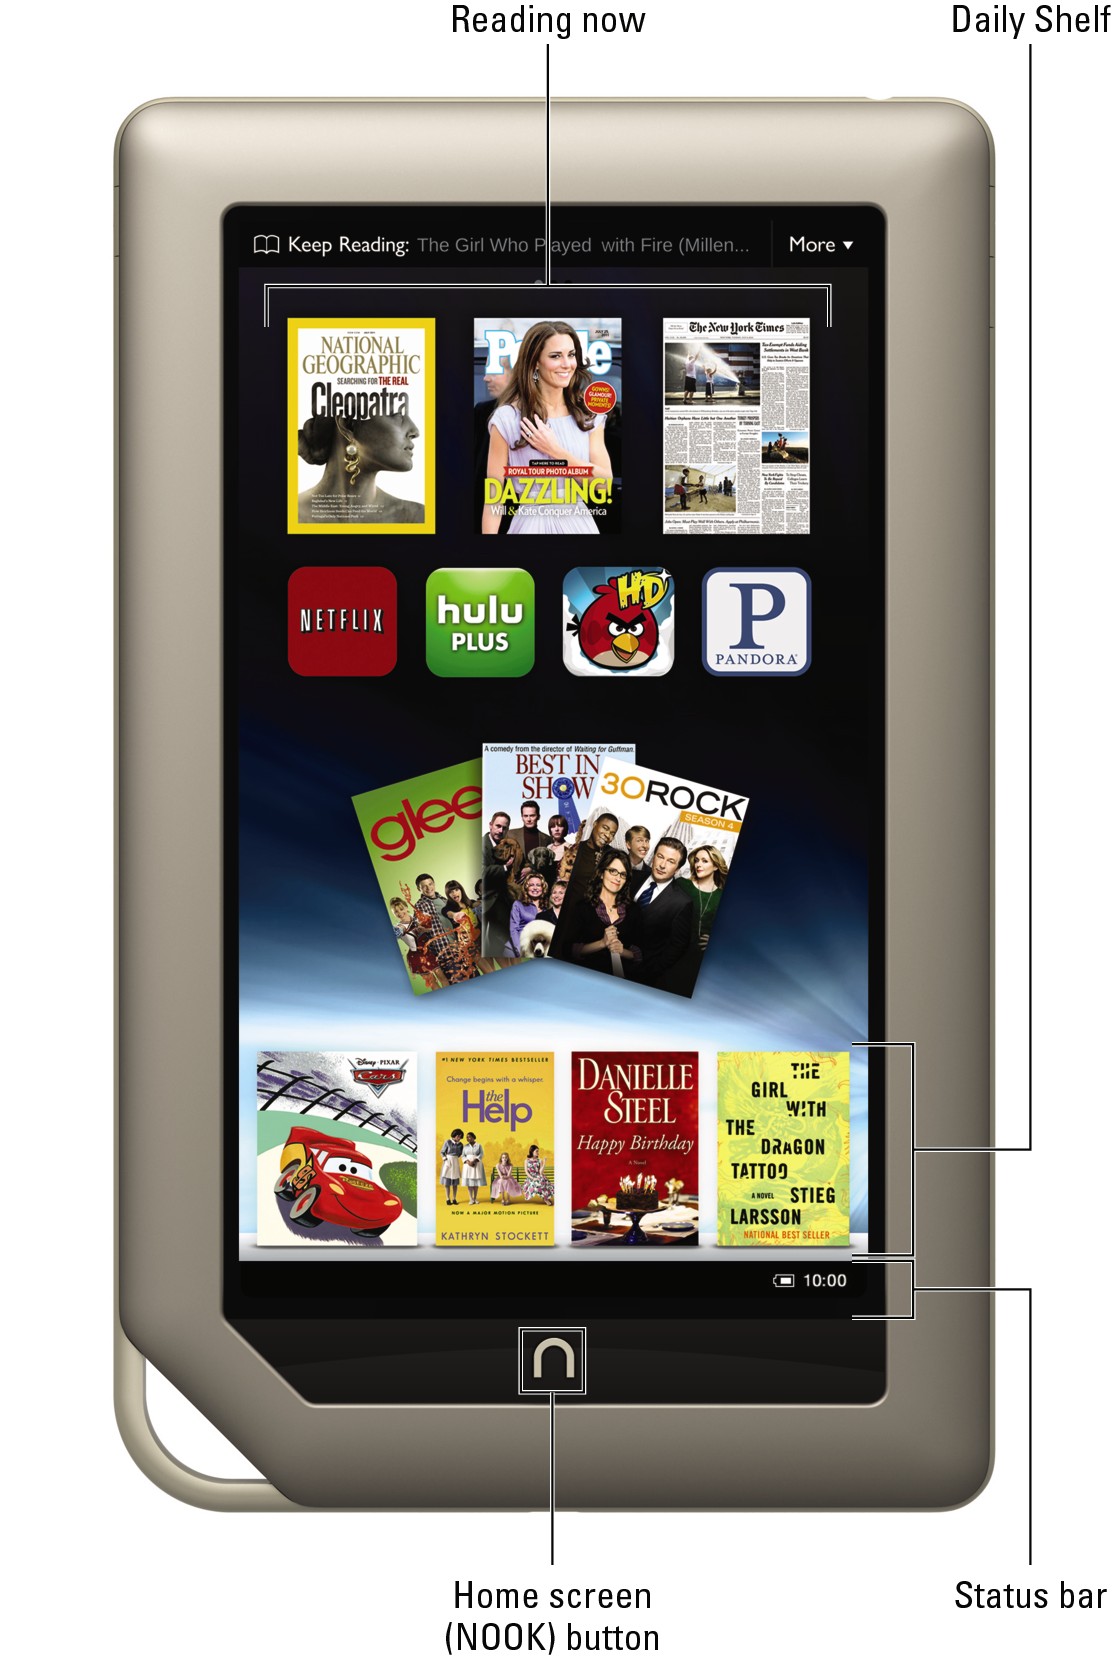
Photo courtesy of Barnes & Noble
Figure 2-4: The essential elements of the NOOK Tablet screen.
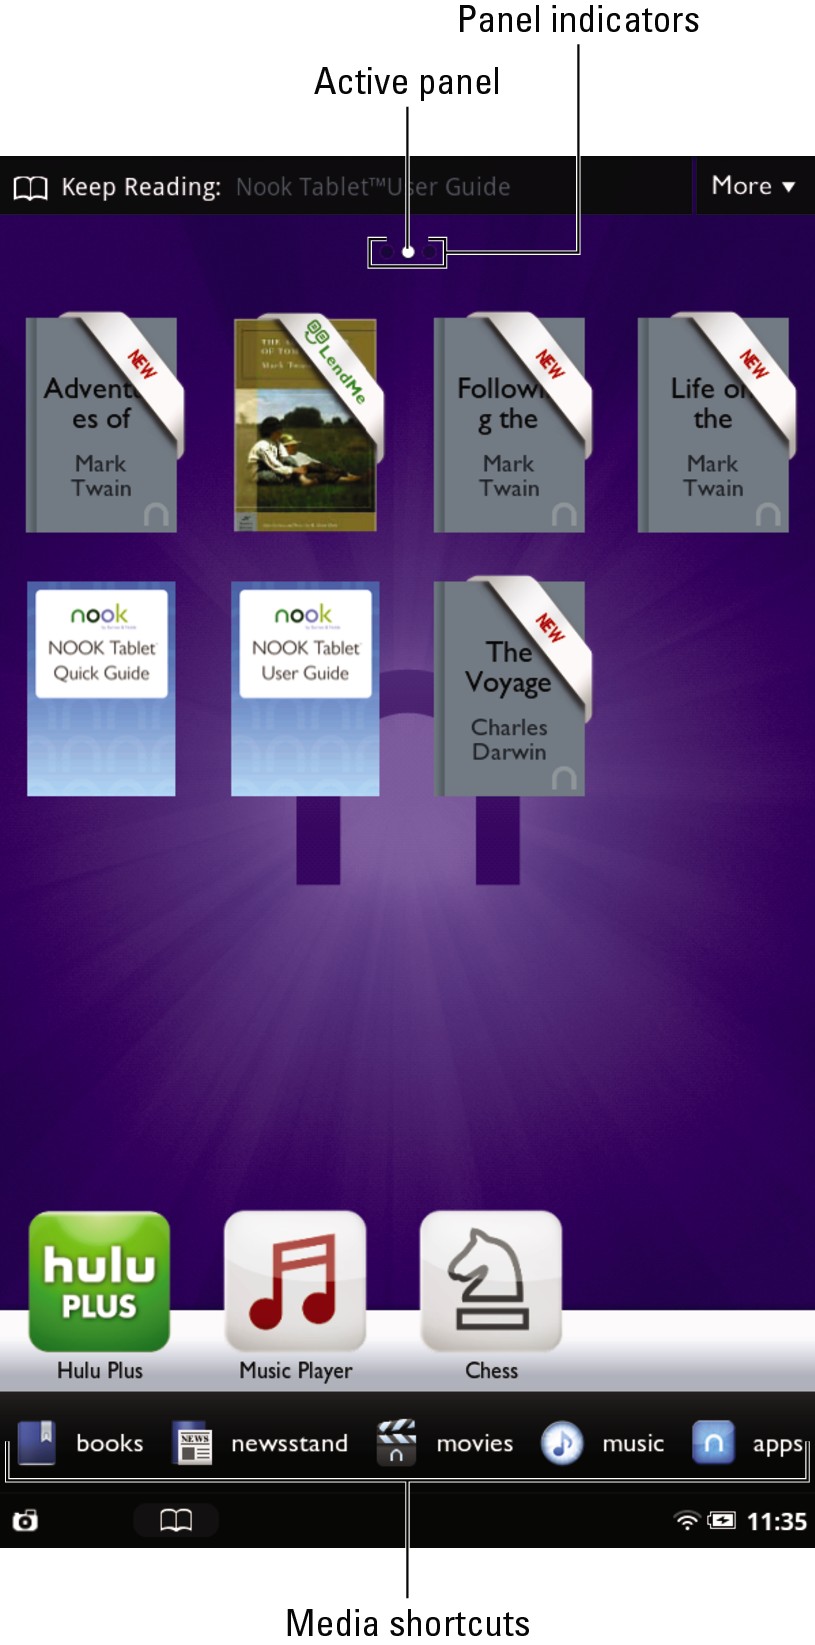
Figure 2-5: The NOOK Tablet’s Home screen includes the desktop and the Daily Shelf.
The desktop of the Home screen and the Daily Shelf scroll independently of each other. Now I did just say that there were two main areas, and I’m not about to contradict myself in my own book. But there are a couple of less-than-main but still important sections of the Home screen:
The Keep Reading menu, which is a small ribbon at the very top.
Media shortcuts at the bottom.
I explain all four parts, plus more, in the following sections.
You can get back to the Home screen from anywhere by pressing the button on the front of the device.
Home screen desktop
The Home screen is subdivided into three panels you can use in most any way you want; only one of the three is active at a time, but the other two are waiting in the wings. You can drag and drop a book, magazine, newspaper, or document to any one of the panels if you want it immediately available for tapping.
Which of the panels are you looking at? Check the easily overlooked panel indicators at the top of the screen; they’re pointed out in Figure 2-5. You’ll see three small circles. The solid white circle shows which panel is active; the other two panels, available but not active, are shown as an open circle. To move from one panel to another, swipe your finger left or right across the screen.
Opening an item on the Daily Shelf or Home screen
Opening a book, magazine, newspaper, or app on the Home screen or Daily Shelf requires that you do one of these:
Tap the icon for the item.
Press and hold the icon for an item to display a menu. Then select Read. (Other choices, which may vary depending on the type of media or app, include View Details, Recommend, LendMe, and Remove from Home.)
Organizing your Home screen
The desk in my office is a pretty scary place, with piles of paper from each of the half dozen or so projects I’m usually working on at the same time. Don’t let this happen to your Home screen. Organize and rearrange items.
Here’s how to remove an item from the Home screen:
1. Press and hold the item.
A menu appears.
2. Tap Remove From Home.
The item is no longer shown on the Home screen, although you can get it if you burrow down into the stacks of your NOOK Tablet Library.
 But wait, there’s more. How about rearranging and neatening your Home screen? You can ask the tablet to do these housekeeping tasks:
Stack. You can make your own pile of books, one on top of another. Just drag covers or icons on top of each other… up to a point: You can’t completely hide any cover.
Grid. If you want the tablet to automatically arrange all the covers in a neat grid, just double-tap any open area of the Home screen.
If you’ve got books stacked atop each other or haphazardly scattered around, you can also clean up an individual panel of the Home screen. See Figure 2-6. Here’s how it appears onscreen:
1. Press and hold a part of the wallpaper in the panel you want to clean up.
A menu appears.
2. Tap Clean Up This Panel.
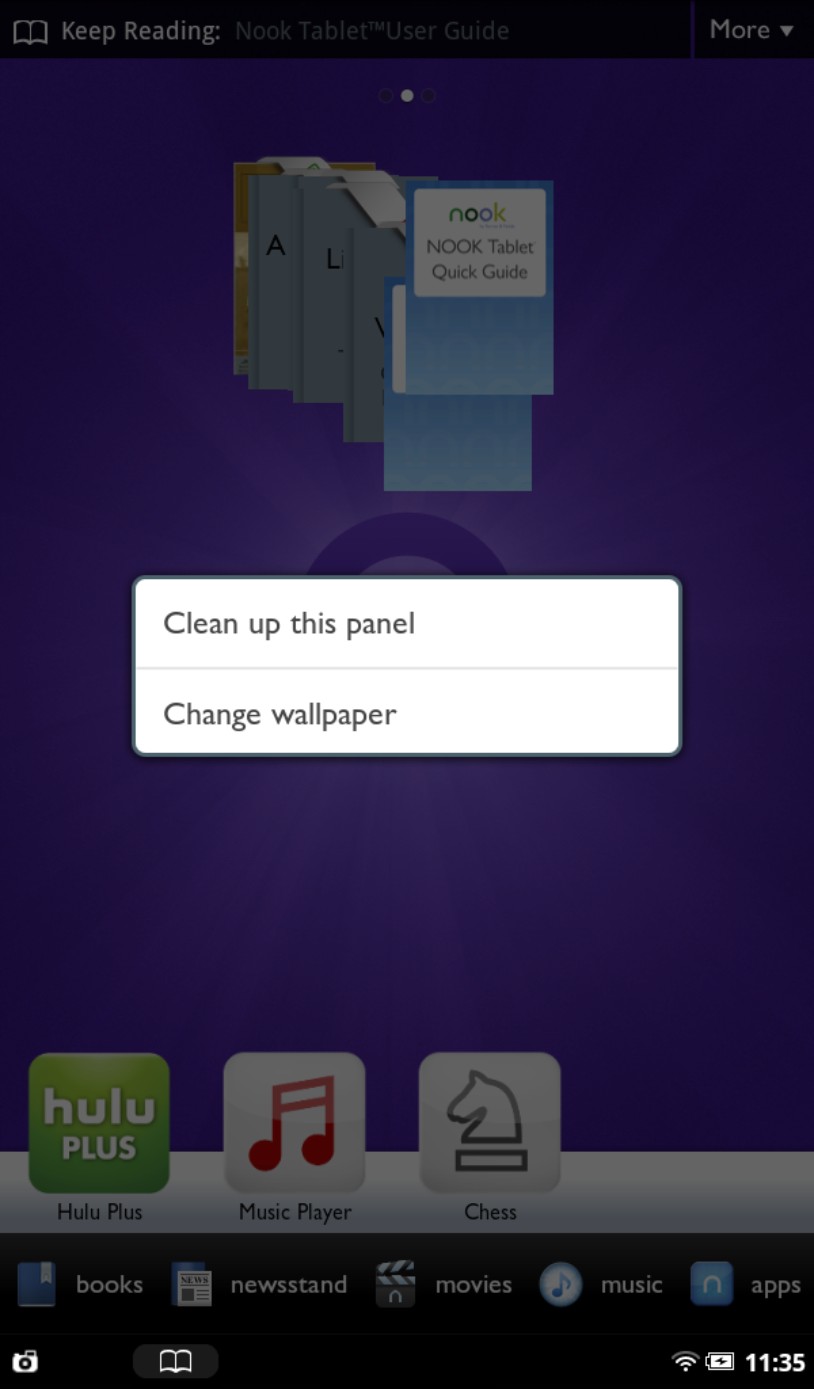
Figure 2-6: You can ask the system to clean up your Home screen. It won’t ask for an allowance in return.
The Keep Reading (and More) Ribbon
Regardless of which panel of the Home screen you’re consulting, you can access the Keep Reading ribbon at the top, as well as the More menu.
The Keep Reading ribbon lists whatever you were most recently reading. When you first start using your NOOK Tablet (or after you’ve done a major housecleaning project), there won’t be any books or periodicals to keep reading, because you can’t keep on keeping on with something you haven’t yet begun. The ribbon will somewhat cryptically indicate: Keep Reading: None.
When you go to the Home screen, you’ll see the title of your most recent piece of reading right there next to Keep Reading. And then, on the right side of the Keep Reading ribbon, you’ll see the very promising More button.
To open the menu, tap the little down arrow next to More, which is in Figure 2-5. Here’s what you’ll see:
Books. Titles and authors of the three books you most recently opened.
Periodicals. Titles and publication dates of the three most recent periodicals you read.
Files. Titles and types of the three files you most recently opened in the My Files folder.
Netflix. Three recommendations from Netflix streaming video service, along with a link to log in to that service. (If you are already logged in, the menu shows your personal Netflix queue — movies you want to see — and three recommendations from it.)
If you haven’t opened any books, newspapers, periodicals, personal files, documents, or Netflix movies, those categories won’t appear on the menu.
The Daily Shelf
Give us this day our Daily Shelf, a row of books, magazines, newspapers, and applications that runs along the bottom of the Home screen. These are items that you have recently opened, bought, downloaded, borrowed, or otherwise received. You can manually move an item from your Library to the Daily Shelf. The latter holds only one issue of a magazine or newspaper; clicking The New York Times or Sweet Potato Monthly will open the most recent issue.
Leaving aside those that you have manually (digitally, actually, when you use your digits) moved there, the following brings an item into the leftmost place of honor on the Daily Shelf:
Buying a book, magazine, newspaper, or app. Also, automatically receiving a new issue of a magazine or newspaper for which you have a subscription.
Downloading a free book or app.
Lending or borrowing a book. Getting a LendMe offer.
Getting a recommendation from a friend.
Opening an app that came with the tablet or one you bought from the NOOK Store.
New publications or apps are marked with a little flag. The Daily Shelf automatically puts the newest items on the left; that doesn’t mean you have to keep the items in that order. To rearrange covers, place your finger on an item and drag it up about an inch and then left or right and down to a new position. This is a lot of fun — you’ll feel very much like Moses parting the Red Sea: As you bring the item down, the books and magazines below it will move to make room. Just lift your finger and the book will go to its new home. Refer again to Figure 2-5.
Applications, or apps, are programs you can load onto your tablet to do certain things (play games, get directions, and so on). Read more about apps in Chapter 4.
When you remove an item from the Daily Shelf (or if it is automatically taken away because you have reached the limit of 50), it remains in your Library. Think of it like this: When something goes away from the Daily Shelf, it is returned to its regular place on the back shelves until you ask for it once more.
Media shortcuts
I know, I know: I said there were four main areas. This one is a fifth, but it’s not a main one, and it’s actually part of the Daily Shelf, and only sometimes. Media shortcuts are quick access to different types of media you recently accessed (as well as some brazenly commercial recommendations of similar items you just might want to buy from the NOOK store).
Tap any one of the icons if you want to see what your NOOK Tablet has in mind for you:
Books
Newsstand (magazines and newspapers)
Video
Music
Apps
If you’d rather not have these on your Home screen, follow these steps:
1. Touch the button.
The quick nav bar comes up.
2. Tap the Settings icon.
3. Tap the Home settings button.
4. Tap in the Media Shortcuts check box.
Removing an item from the Daily Shelf
You don’t have to wait for an item to be bumped from the Daily Shelf because of lack of room. If you want to get rid of a book shown there, you can remove it manually.
1. Press and hold the item.
A menu appears.
2. Tap Remove From Home.
That’s it. The cover is removed from the Daily Shelf (and the Home screen, if it’s also there). The item stays in your Library.
Going from the Daily Shelf to the Home screen, or vice versa
You can drag items from the Daily Shelf onto the Home screen. Items placed on a panel of the Home screen are always there to be seen (until you remove them), even if you pan left or right through the Daily Shelf. Here’s how: Press and hold an icon in the Daily Shelf and keep your finger on it as you drag into an open area of the Home screen. When you lift your finger, the icon stays where you put it, and the Daily Shelf neatens itself up. To return an item from the Home screen to the Daily Shelf, press and hold the item and drag it back down to the bottom.
Wallpaper
The 16-million-color high-resolution display that sits behind the Home screen is a terrible thing to waste. You can select from patterns and pictures that come with the tablet, but why not post one of your own photos as the wallpaper?
You can change the wallpaper from the Home screen or by going to the Settings screen.
1. On the Home screen, press and hold the existing wallpaper.
A menu appears.
2. Tap Change Wallpaper.
Another dialog box offers two choices.
3. Tap Wallpaper Gallery or Photo Gallery.
Wallpaper is already on the NOOK Tablet. The photo gallery has images that come from one of these sources:
• An image you have directly downloaded to your NOOK Tablet from a website or grabbed as a screen capture. (I explain how to do this in Chapter 5.)
• An image you transferred to the NOOK Tablet from a personal computer. (The image could, in turn, come from your digital camera or from a download from the Internet.) I use as my wallpaper a photo I took of a field of sunflowers near Seville, Spain; I processed it on my desktop computer to make it appear in the style of painter Georges Seurat. See Figure 2-7.
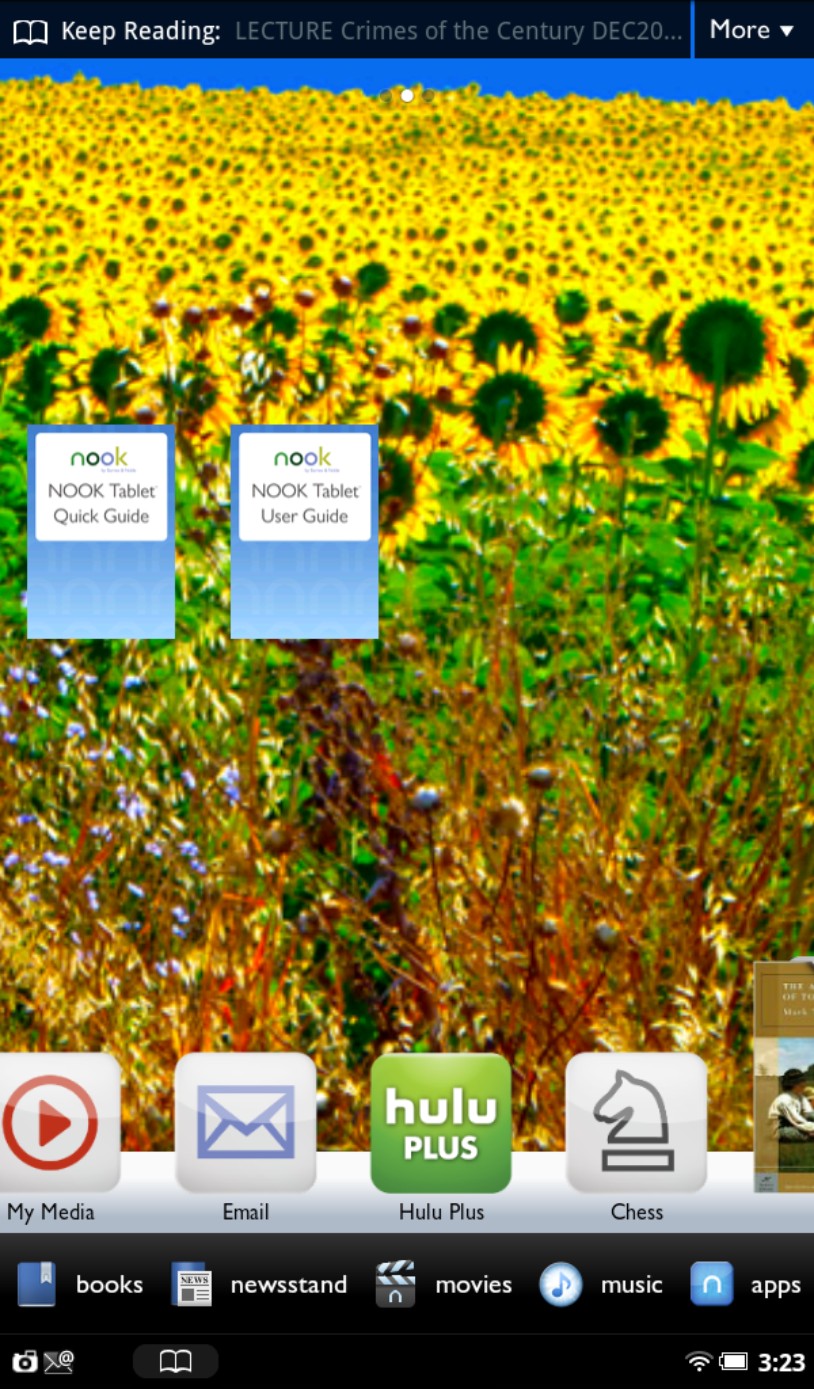
Figure 2-7: My wallpaper is a photo I took in Spain.
After you choose between Wallpaper Gallery or Photo Gallery, a new screen allows you to scroll through images until you find one you want to use. If you choose an image from the photo gallery, you can crop it to fit best. You need a vertical photo or drawing to fill the Home screen. (Images in the wallpaper gallery are already fitted for prime time.)
If you decide you don’t want to change the wallpaper, tap anywhere outside the dialog box to close the menu. Or click the Cancel button in the gallery menu.
4. Tap the Set Wallpaper button.
Checking Your Status Bar
The status bar is on the bottom of the touchscreen and shows up when you need it; in general, it stays out of the way when you want to do something else (like read a book, watch a video, or browse the Internet). See Figure 2-8. When describing the status bar, I divide up the information by left, center, and right side.

Figure 2-8: The status bar looks different depending on what you’re doing.
Left
No, your other left.
At the left side of the bar you may see a green symbol, which tells you new software updates have been installed. All by themselves.
An envelope with an @ is a pronouncement that “You’ve got mail.”
Downward-pointing arrows tell you that new books, periodicals, or apps are in the process of downloading (being put on your tablet).
An open book stands ready to return you to the book you were most recently reading.
A red circle with a number informs you of notifications your tablet has received for LendMe, recommendations, software updates, or other system information.
If you’re listening to Pandora, a stylized P tells you music is in the air. (And unless you have the volume turned off, you already know that.)
When the music player is doing its thing, an icon or red musical notes appears; tap it to return to the controls for that program.
A pair of heads appears when the NOOK Friends app has gotten an update; new contacts or other social items may have arrived.
Depending on what you’ve most recently been doing, you may see a left-pointing arrow that can take you to a previous activity. (If not, there hasn’t been an activity the NOOK considers worth revisiting.)
Right
And then over there on the right, here’s what you’ve got:
The stack of little curves is your wireless connection indicator. The higher the stack, the stronger the signal. No curves, no connection. Two or three curves are a good connection.
If the battery is full, so too is the actual battery in the tablet. If it is half-full, that’s half as good. If the battery is nearly empty, find an electrical outlet and attach the charger.
The clock is set like usual, but if you visit the Time Settings screen you can change it to a 24-hour clock.
 The clock has to display the correct time. The official time on your NOOK Tablet is used in regards to updates, downloads, and synchronized bookmarks.
A small speaker with a slash through it means you’ve muted the sound. You can unmute or adjust the volume of the audio in the Quick Settings window or in the full Settings menu.
Another as-you-need-it menu is available from the status bar. Tap the right corner of the bar near the battery status indicator to open the Quick Settings dialog box. To close the Quick Settings dialog box, tap anywhere outside the box. That dialog box is even quicker than the quick nav bar. See Figure 2-9.

Figure 2-9: The Quick Settings dialog box usually offers a logical guess at immediate needs.
The Quick Settings dialog box has these settings:
Battery. Right off the bat is an entry that’s not really a setting. Its bar graph and percentage tell you the status of the rechargeable battery. A full bar and 100% are roughly twice as good as a half bar and 50%. The display also tells you if the NOOK Tablet is currently (get it?) being charged.
WiFi Toggle Switch. Drag the WiFi toggle to On to turn on the wireless radio; Off shuts its down, which helps save battery power. When your NOOK Tablet is connected to a network, you will see the name of the network in use.
Mute. Tap the check box to mute or unmute beeps or squawks from the system meant as notification.
Auto-Rotate Screen. When you go online or read certain documents, the NOOK Tablet automatically switches orientation when you rotate it. The standard orientation for the NOOK Tablet is what computer folk call portrait mode (as in a painting of a human being in an art gallery). If you rotate the tablet, it switches to landscape mode. That brings you to the Auto-Rotate Screen check box: Tap it to turn the feature on or off.
Brightness. Tap to open a dialog box that has a slider, so you can make the screen brighter or dimmer. A dimmed screen may be easier on your eyes and save a bit of battery power, allowing you to read longer between recharges. After moving the slider, tap OK to put your preference into effect.
In the middle: Quick nav bar
There when you need it (but absent when you don’t), the quick nav bar is the superhighway to some important functions. To display the bar, touch the button on the lower front frame of the tablet. You can get to most of what the quick nav bar has in other ways, but here they’re quicker (imagine!) to navigate to. See Figure 2-10. Once the bar appears, tap one of these choices:
Home
Library
Shop
Search
Apps
Web
Settings
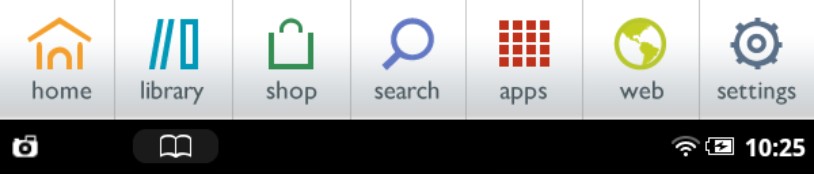
Figure 2-10: You can jump from the quick nav bar to any of the tablet’s main functions.
Home
If, perchance, you should happen to be away from home — on any other page of the NOOK Tablet or out on the Internet — tap this virtual button to go back to the main screen, which holds the Daily Shelf. The Home screen also has any other books, publications, or apps you copied onto it.
Library
Tapping here opens the portal to all your tablet’s literary content. Buttons at the top take you to shelves. For each, you can choose an organizational scheme. Four of the six sections here (Books, Magazines, Newspaper, and My Stuff) let you choose how the titles are displayed. That organization becomes more important as you acquire more to read. See Figure 2-11.
The button that looks like a stack of books is the icon for the Library itself. Tap that button and choose among these options:
A three-by-three grid of book covers.
Shelves that separate books and other documents by the date you last read them.
A detailed list of documents, with a small cover and a summary of the contents.
A list of even smaller documents, along with the title and author’s name.
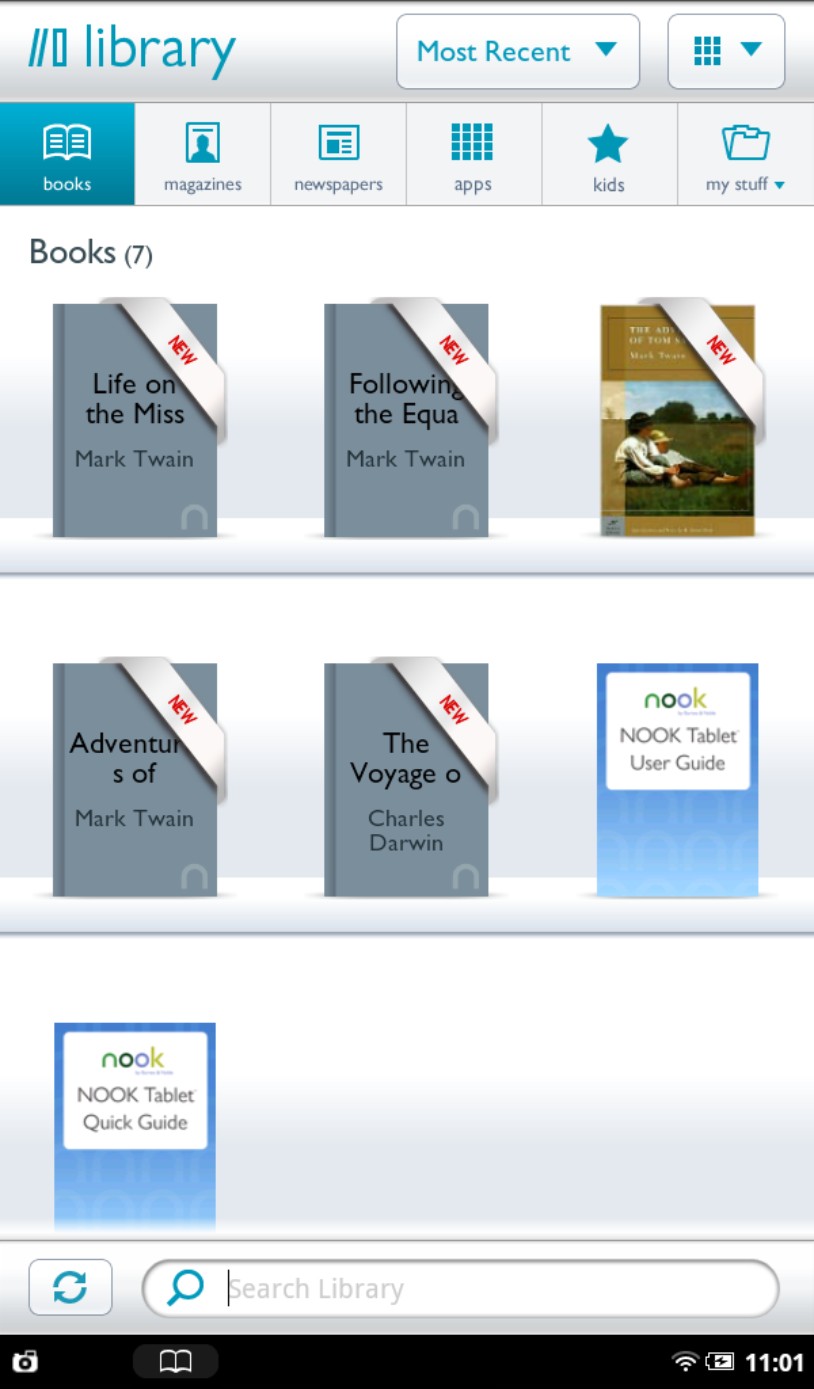
Figure 2-11: The Library neatly organizes books, magazines, apps, and other content.
These categories are in the Library:
Books. All the documents that are classified as books. Generally, this means EPUB and some PDF files. If you have your own files or imported public-domain books, they may show up here as books or they may appear in My Files.
Magazines. The covers of the most recent editions of magazines you subscribe to, or individual issues you bought.
Newspapers. The front pages of the most recent editions of newspapers, whether you bought just a single edition or you’re subscribed.
Apps. You can add new features by installing apps (short for applications, which are small software programs). I discuss apps in detail in Chapter 4.
Kids. Because even if they can’t read, there are books out there for them. See Chapter 3 for more.
My Stuff. As the great George Carlin more or less said, your NOOK Tablet is just a place to hold your stuff. My Stuff holds the following:
• My Shelves. No assembly required. Tap the virtual onscreen keyboard to label shelves. I added a Faves shelf. Another shelf, titled Lectures, holds presentation notes that I carry on the device.
• My Files. Here is any content that you’ve side-loaded onto your tablet from a laptop or personal computer. You will see icons for the folders, very much like you would see on a personal computer; see Figure 2-12. Tap one of the folders to open it. I explore side-loading in Chapter 3.
• LendMe. Here you can see the books in your collection that you can loan to others, any books you’ve borrowed, and any offers made or received for lending or borrowing. I discuss the lending program in Chapter 3.
• Archived. Here are books or other files you have archived. Your files are still on the tablet and available but they’re no longer among current titles.
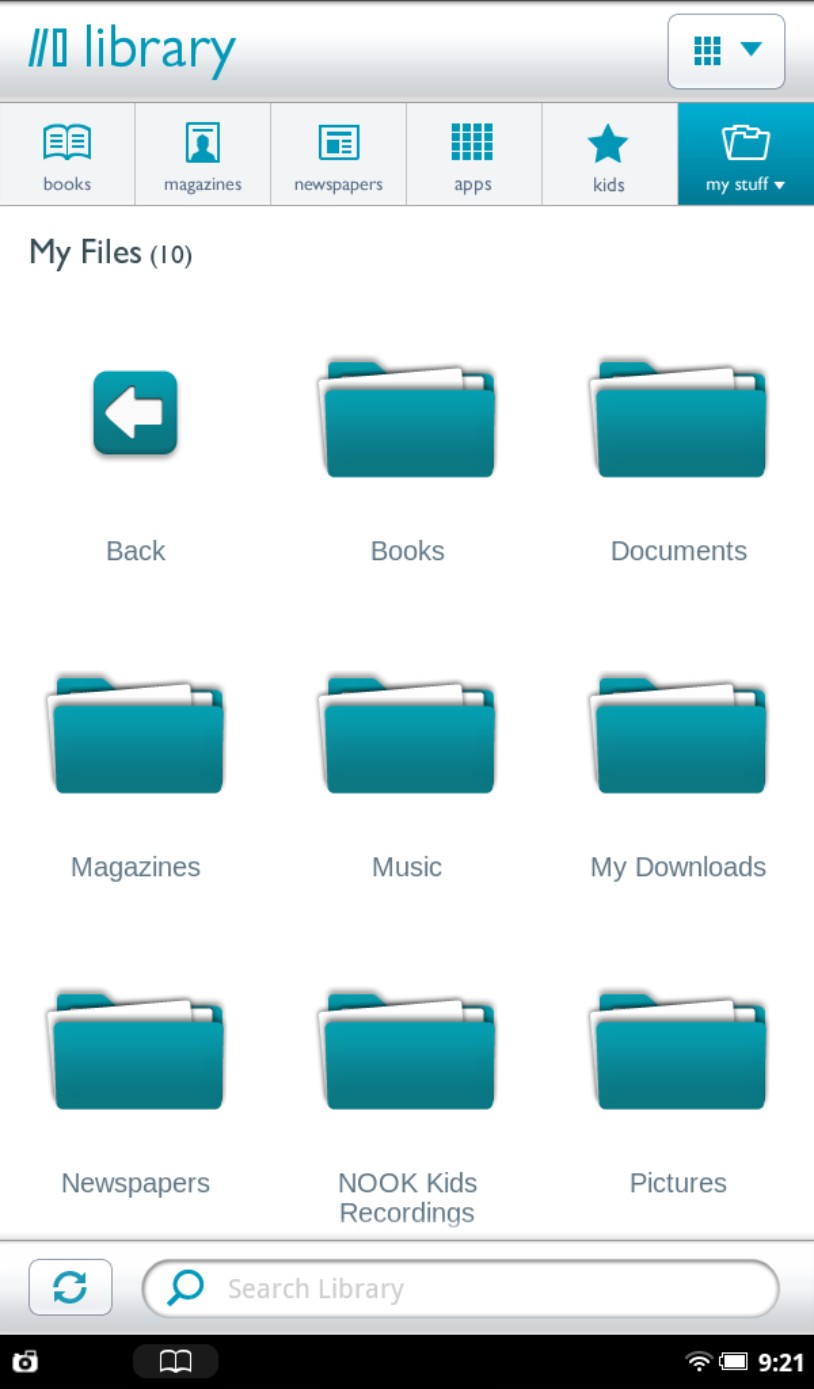
Figure 2-12: My Stuff has documents, downloads, photos, and other material you have added to your tablet.
Shop
Click here to move to the Barnes & Noble NOOK store. (If you haven’t enabled the WiFi system, you end up at the screen where you can turn it on. And, of course, you have to be within range of a WiFi network that will allow you to connect.) Just about every time you visit the site, you’ll see a different display; some of the recommendations are based on your previous purchases and others are ads for books being promoted by the store. I discuss the shopping experience in Chapter 4.
If you shop at another store, not owned and operated by B&N, you’ll have to get to that site by using the web browser.
Search
The tab gets you into the NOOK Tablet’s search screen, where you can hunt for any file or app on your device, as well as on the Barnes & Noble NOOK store or the web. Use the onscreen virtual keyboard to enter some of the name you’re looking for; the screen will almost immediately begin listing possibilities. The more letters you enter, the narrower the list becomes. You can tap any item in the list to go to it, and you can also tap Search Web or Search Wikipedia to go out on the Internet (with an active WiFi connection) to find out more.
Apps
Here’s where the NOOK Tablet shows that it’s more than a mere eBook reader. Apps add new features to your device. Tapping here gives you access to extras supplied with the NOOK Tablet (including Contacts, Email, NOOK Friends, Hulu Plus, Pandora, and games), as well as apps you may buy from the NOOK store.
I discuss the supplied apps and the B&N NOOK Store in detail in Chapter 4.
Web
Tap here to open the NOOK Tablet Web Browser and move onto the Internet, through an enabled WiFi connection. Read more in Chapter 5.
If the Web button is grayed out (not all bright and colorful) and it shows “Disabled,” the browser can’t respond. The solution: Reactivate it. To do that, go to Settings and choose the browser control panel; from there, reactivate the browser.
Settings
From here you can navigate, quickly, to the myriad settings panels for everything from the screen brightness, audio volume, WiFi connection nitty-gritty, and much more. I discuss configuring your NOOK Tablet in the following section.
Configuring Your NOOK Tablet
The basic control panel is the Settings tool, which lets you customize your NOOK Tablet’s wireless, screen, sound, security, keyboard, and other features.
Take these steps to display the Settings menu:
1. Tap the button to open the quick nav bar.
2. In the quick nav bar, tap the Settings icon.
From any customization section, you can return to the main settings screen by tapping the back arrow at the top-left corner of a page. From the Settings panel, press the button to return to the Home screen or one of the other options including your Library, the web, or apps.
The main settings page is divided into two parts: Device Settings and App Settings. See Figure 2-13.
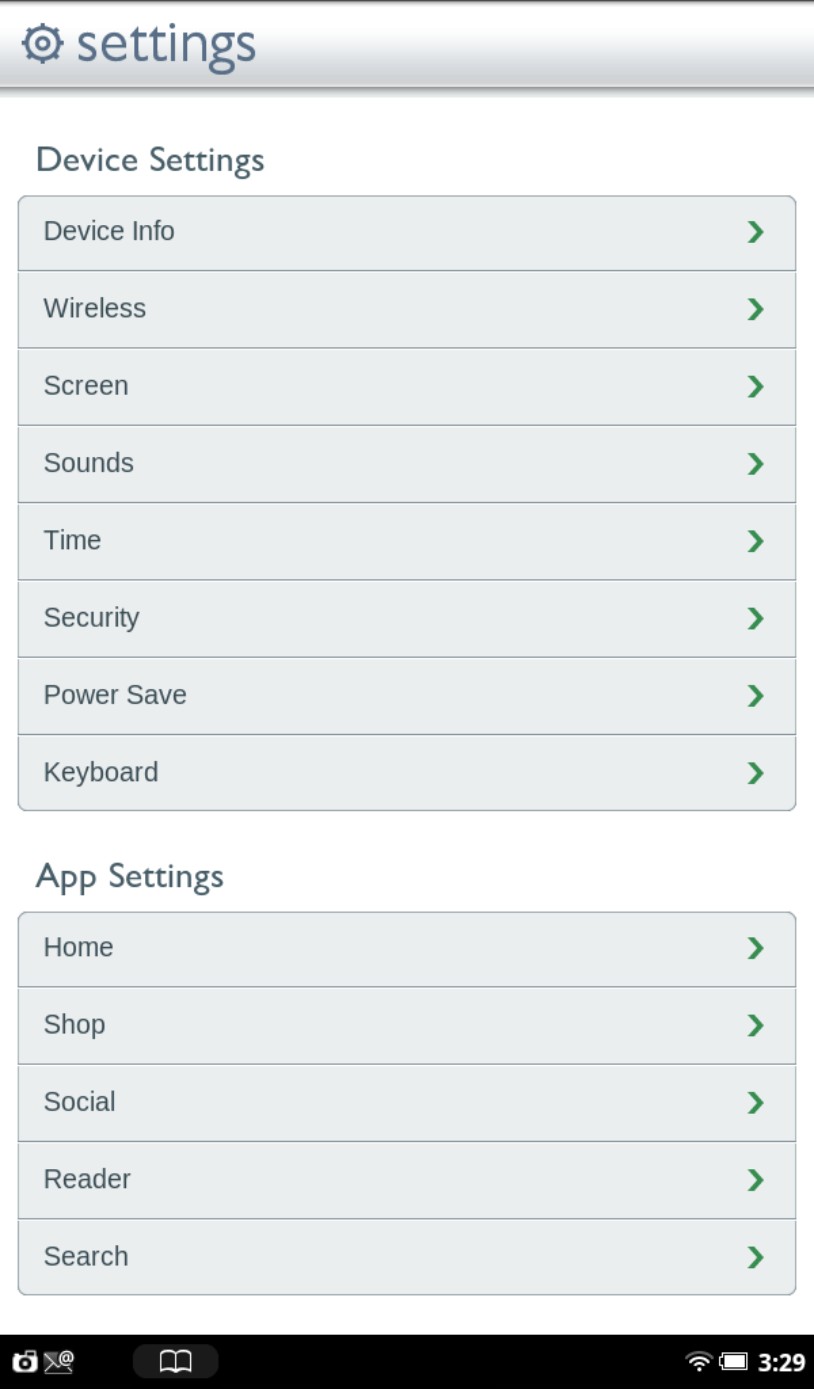
Figure 2-13: The main portal to your tablet’s personality is the Device Settings menu.
Device Settings
Device settings help you customize some of the essential hardware features, including the battery.
Device Info
The data displayed here, shown in Figure 2-14, includes the following:
Battery. A precise measurement of the percentage of charge remaining in the internal battery. If the device is charging, you’ll see that (along with a bright orange on the USB cable near the port where it connects to the NOOK Tablet). Otherwise, you can see the battery is being used.
B&N Content Storage Available. The total amount of available flash memory in the device that is available to hold items purchased from Barnes & Noble. It is expressed as an absolute number (11.60GB of 11.87GB, for example) as well as a percentage (98%) in this example. When you delete a book or file, the memory space devoted to it is made available for other uses.
Other Storage Available. About 1GB of the built-in (internal) memory is available for documents, pictures, music, video, and other files. Again, you’ll see an absolute number and a percentage.
SD Card. If you’ve installed a microSD or microSDHC card in the available slot, its capacity and available storage space are listed here. This storage space is yours, yours, yours. If you install a 32GB card (the maximum), you can use as much of it as you want for whatever you want.
About Your NOOK. Tap the right-facing arrow to see the name of the owner and the Barnes & Noble account title, as well as hardware specifics, including the model number, serial number, WiFi MAC address, and the operating system version number.
Erase & Deregister Device. Stop. Wait. Don’t tap this option unless you have a real good reason to do so. Any personal files you have moved to the NOOK Tablet will be deleted from the device. The command also removes all books (no matter their source), and removes the details that your device uses to identify itself to the Barnes & Noble website. However, any titles you bought from Barnes & Noble are linked to your account, and if you re-register your NOOK Tablet to that account, the previously deleted books go back onto your NOOK Tablet.
You may want to use Erase & Deregister in two situations:
• Your device gets corrupted or unresponsive and customer support suggests you use it.
• You sell or give your NOOK Tablet to someone else but want to keep your associated B&N account.
Legal. If you’re really, really bored and are completely out of anything else to read, you might want to peruse the legal notices and credits listed here. Or perhaps you need something to help you fall asleep. Great literature is found elsewhere.
Wireless
This page has a virtual switch for the WiFi circuitry; tap it to turn on the radio; tap it again to turn it off. When the WiFi switch is on, you can see all the wireless networks the NOOK Tablet can find in its neighborhood. I discuss wireless communication in detail in Chapter 5.
Screen
Three important touchscreen controls are here:
Auto-rotate screen. Tell the NOOK Tablet to switch to landscape if you’ve rotated the reader to horizontal and then back to portrait when you rotate it to an upright position. This feature generally works only in the web browser, magazines, and the photo gallery. You can turn this feature on or off by checking the Orientation check box. When unchecked, the NOOK Tablet stays in portrait mode at all times.
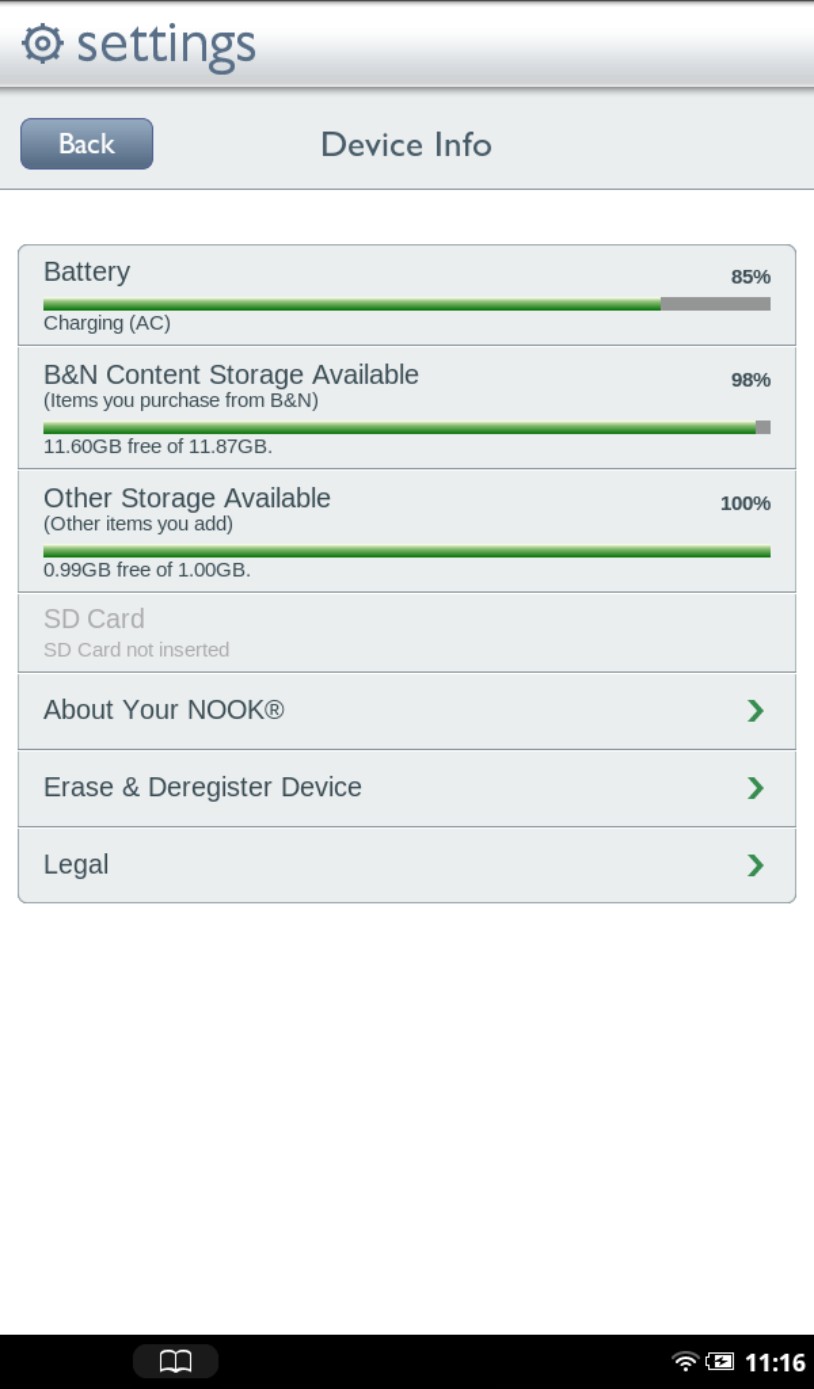
Figure 2-14: Device Info tells you about battery status and available storage space.
Brightness. This, of course, has nothing to do with the IQ of your tablet, but rather with the intensity of the backlighting. Drag the slider from dim to bright or back. A bright light might help in a dark room, but you may find it causes eyestrain; a dimmer backlight may improve readability outdoors. In any case, a lower level of brightness will use less battery power. Choose the lighting level that works best for you and adjust it as needed when conditions change.
Screen timeout. To save battery power, the NOOK Tablet will turn off its screen after you haven’t done anything with it; the standard setting is 2 minutes. You can change it to 5 minutes, 15 minutes, or 1 hour. See Figure 2-15. You’ll have a few seconds’ advance notice before the tablet goes to sleep: The screen dims slightly. When the screen shuts off, you can turn it back on again by pressing the Home button and swiping the wake-up bar from left to right.
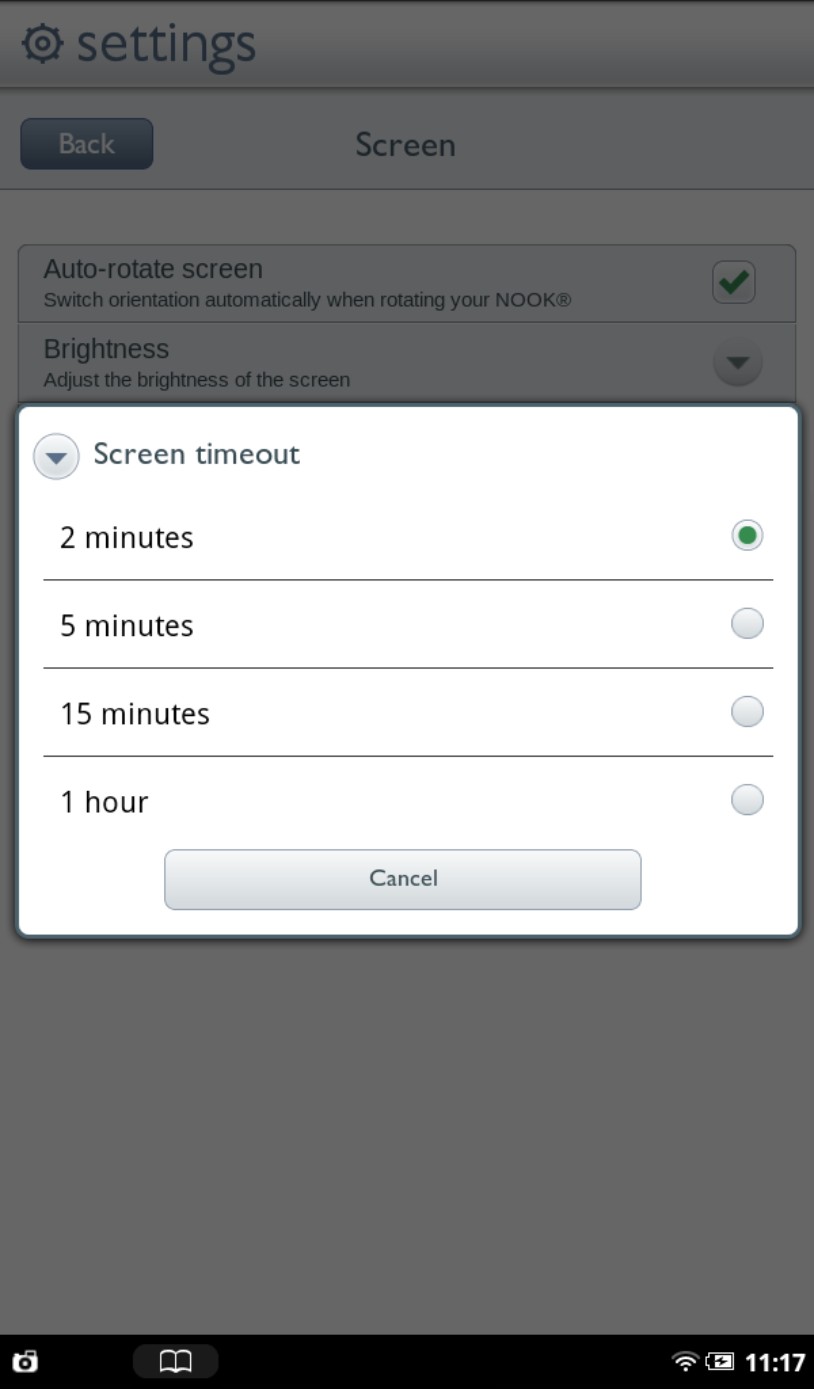
Figure 2-15: Adjusting Screen Timeout to match your use patterns can help save battery power.
Sounds
If only I could have installed this control on my children as they grew up; it would have added years to my life. Under Sounds, you can mute or unmute the system notification beeps that the tablet makes, as well as the speaker volume for music and video. Read Chapter 4 for more on sound.
These are the controls:
Mute. Tap here to turn on or off system notification sounds and keyboard clicks. When the check box is checked, these sounds are muted; when the box is empty, they’re on. If you’re reading in a library (can you imagine?), you might want to shush your NOOK Tablet before Marian the Librarian does it for you.
Media. Press the slider to control the volume for music and videos. You’ll hear a sound to indicate the loudness you’ve chosen. Tap OK to make the setting.
Notification. Press the slider to control the volume for system notifications (such as low battery level). A sample sound indicates the loudness you have chosen. Tap OK to make the setting.
Control the speaker volume with the + and – volume buttons on the right edge of the device. The volume controls on the Sounds settings page also control volume. If you turn down the volume on the Settings page, you can turn up the noise with the physical buttons (or the other way around).
Time
Your clock in the lower-right corner is used for the alarm and calendar apps. And it is also part of the synchronization process when you get new reading material from Barnes & Noble. That’s why you have to make sure it’s set correctly; you don’t want to accidentally get rid of books. You can set the clock format and time zone.
Use 24-hour format. Tap in the box to turn on a 24-hour clock; see you at 17:30 for cocktails in the office lounge.
Select time zone. As delivered, the device shows only time zones in the United States; to see a list of all time zones around the world, tap the Show All World Time Zones check box. It’s a pretty complete list, including Newfoundland time, which sits half an hour between Greenland and Atlantic time, and even Kathmandu, which operates at Greenwich Mean Time +5:45. See Figure 2-16.
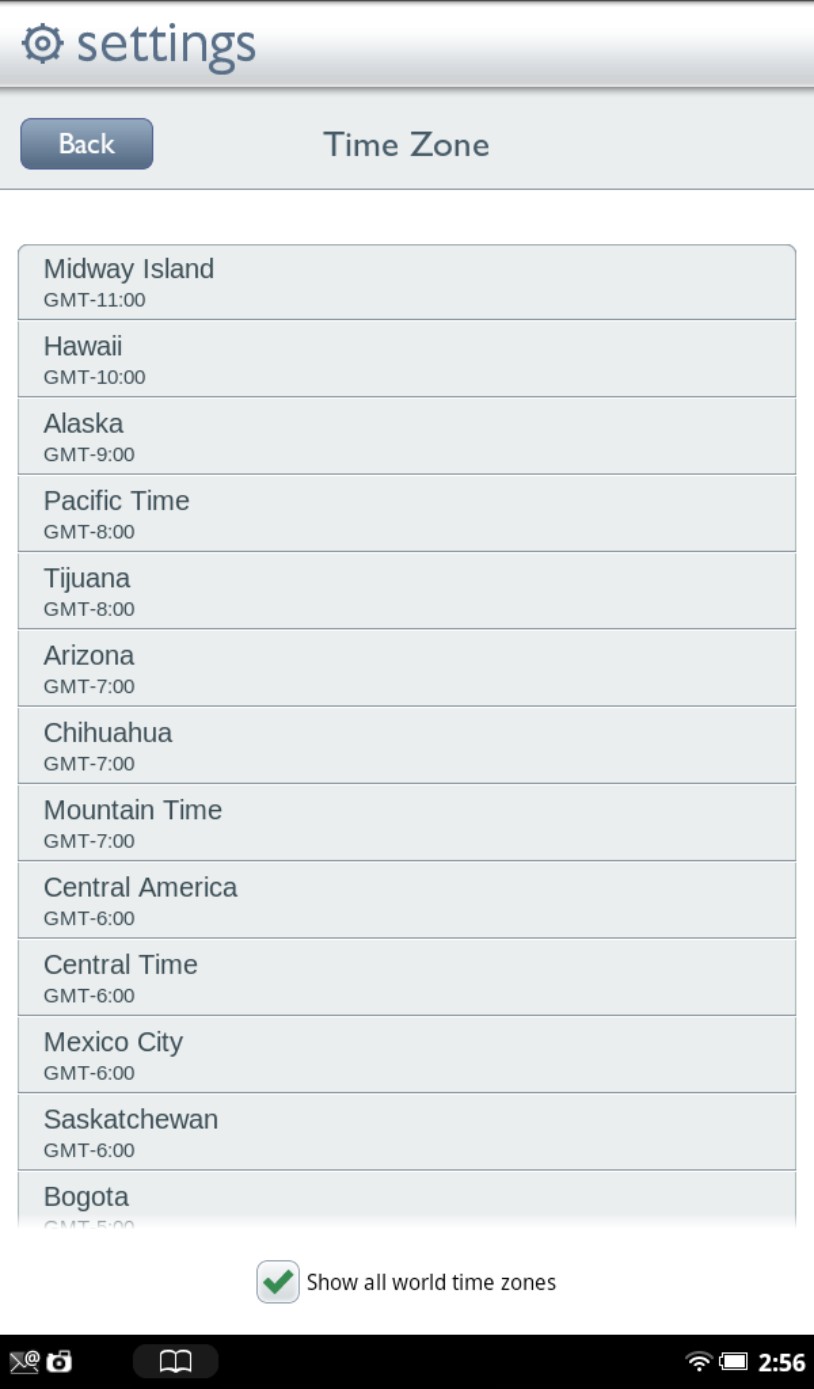
Figure 2-16: Keep your NOOK Tablet on time by selecting the local time zone.
Security
Life used to be so much simpler (though not necessarily better) when all we had to worry about was losing a wallet that held walking-around money and a driver’s license. Now we carry smartphones, tablets, and laptops that hold our entire financial, medical, and personal details. That’s why I believe deeply in passwords that look like expletives: 6h!x%r^&#.
Device Lock Passcode. Here you can require that any user enter a four-digit password to turn on the NOOK Tablet or wake it from sleep. Use this feature if you worry that unauthorized people may try to use your reader: strangers or your children, for example.
Restrictions. You can add a secondary password that locks away access to the web browser and/or social media like Facebook and Twitter and also prevents the sharing of recommendations. You might want to do this to keep the kids away from unsupervised surfing or to protect personal information from unauthorized eyes.
Want a good reason to add a device lock passcode? Your Barnes & Noble account has your credit card number stored away. That means someone else could, in theory, buy something at B&N without your permission.
Power Save
Although you can adjust things like screen brightness, screen timeout, and other features, tapping the Power Save check box will turn on a preset scheme that’s supposed to help the battery last.
Keyboard
Here’s where you can customize the virtual onscreen keyboard. To configure the keyboard, tap Keyboard from the Settings screen. The available options are listed here:
Keyboard Sounds. Turn on or off a clicking sound when you tap the keys. The click is pretty quiet, but it does confirm that your taps have registered.
Auto-Capitalization. The system will capitalize names and initial words in recommendations and reviews.
Quick Fixes. The computer can correct some typing errors. Tap the check box by any option you want to change. A checkmark means the option is turned on; the absence of a checkmark shows it’s disabled.
App Settings
The group of settings here help you customize some of the personality of the operating system that runs on your NOOK Tablet as well as some of the supplied apps.
General Home Settings
There’s no place like it. See Figure 2-17.
Set Wallpaper. This is one way you can choose a predesigned background for your Home screen, or select an image you’ve loaded into the photo gallery of the NOOK Tablet from a laptop or personal computer. Tap the down arrow to see a menu with two tabs: Wallpapers and Photo Gallery (images you put on the tablet). If you’ve bought live wallpapers, which dance and fly and are otherwise animated, there will be a third collection from which you can choose.
Clear Keep Reading List. You’ll be asked to confirm your decision.
Clear Daily Shelf. You’re sure?
Media Shortcuts. If you don’t want to see that extra level of shortcut icons that appear below the Daily Shelf (including both recently accessed items for books, music, video, and the like as well as recommendations for similar items you might like to purchase), clear the check box here.
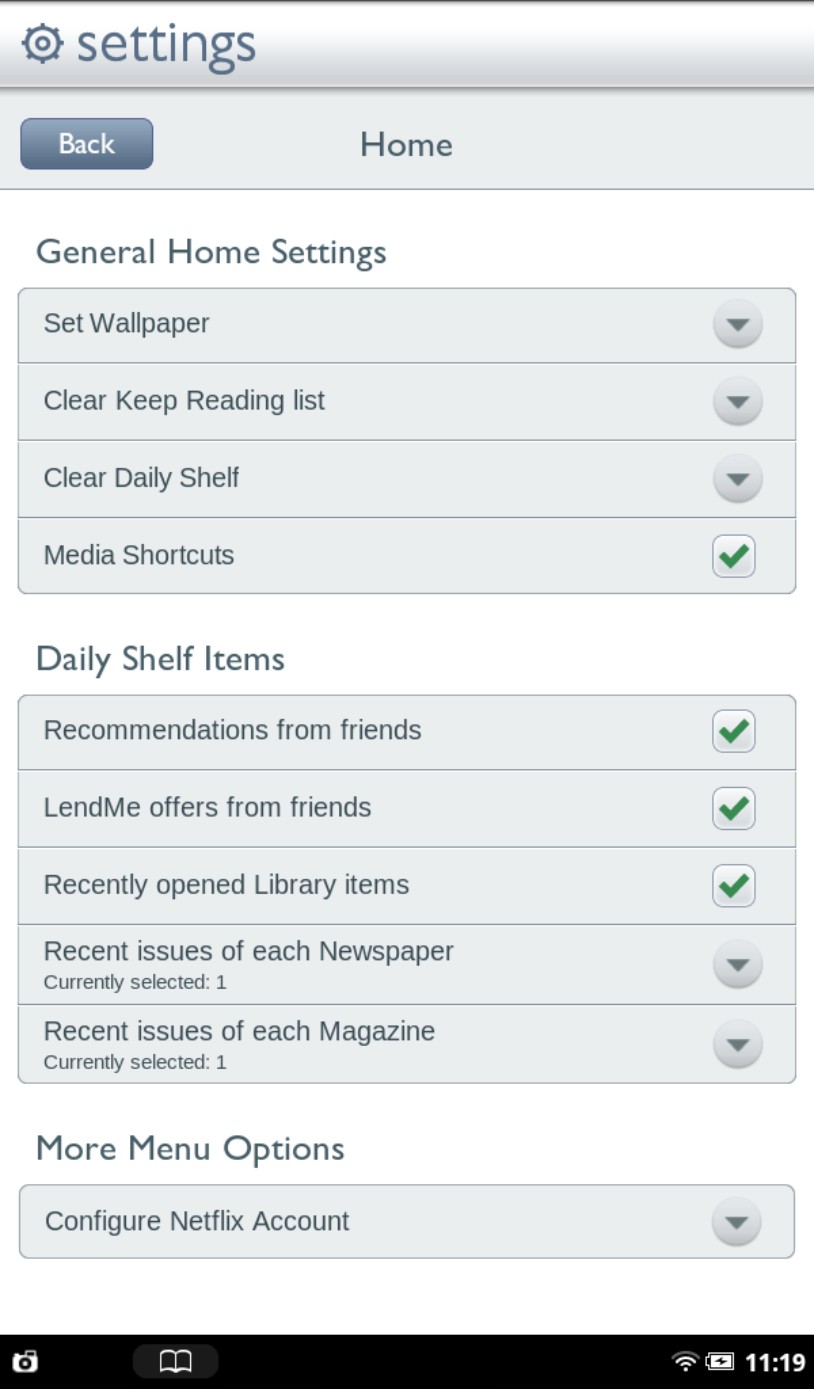
Figure 2-17: The general Home Settings allow you to personalize the components of the desktop and Daily Shelf.
Daily Shelf Items
Here you can turn on or off, or for some options, make selections that affect the way the Daily Shelf appears. The changes you make here don’t block any items, but just move them a bit deeper so you don’t have to see them except when you want to.
Recommendations from Friends. Clear the check box to avoid seeing them on the Daily Shelf.
LendMe Offers From Friends. Yes or no.
Recently Opened Library items. Again, your choice.
Recent Issues of Each Newspaper. Press the down arrow to select the number of issues you want to be noted: 1, 2, 3, or all.
Recent Issues of Each Magazine. Just like for newspapers, except for magazines.
More Menu Options
Well, the screen uses the plural, but when the NOOK Tablet came out there was just a single option:
Configure Netflix Account. Tapping the down arrow connects you to a login screen for a pre-existing account with Netflix. What you’re doing here is linking your Barnes & Noble account to Netflix so you can get recommendations and place orders. I discuss Netflix and other supplied apps in Chapter 5.
Shop
For some, their home away from home. You know who you are.
Require Password for Purchases. If you tap this check box, you (or anyone else in possession of your NOOK Tablet) will have to enter a password before buying something from the Barnes & Noble website. Yes, I know you might have already required a Device Lock.
Manage Credit Card. To have a working account with Barnes & Noble, you must register a credit card with the company. Tapping Manage Credit Card allows you to view your current default card (all but the last four digits are blanked out). Tap the Change Default Credit Card to do just that. You can register only one card to the account, but you can change it any time on this page. See Figure 2-18.
Add Gift Card. This nice feature isn’t yet found on many other online shopping sites: you can enter the codes for as many as three gift cards, eGift cards issued electronically, or online gift certificates. The combined value of the cards is credited to your account and any future Barnes & Noble purchases you make with your online account will first be deducted from this total.
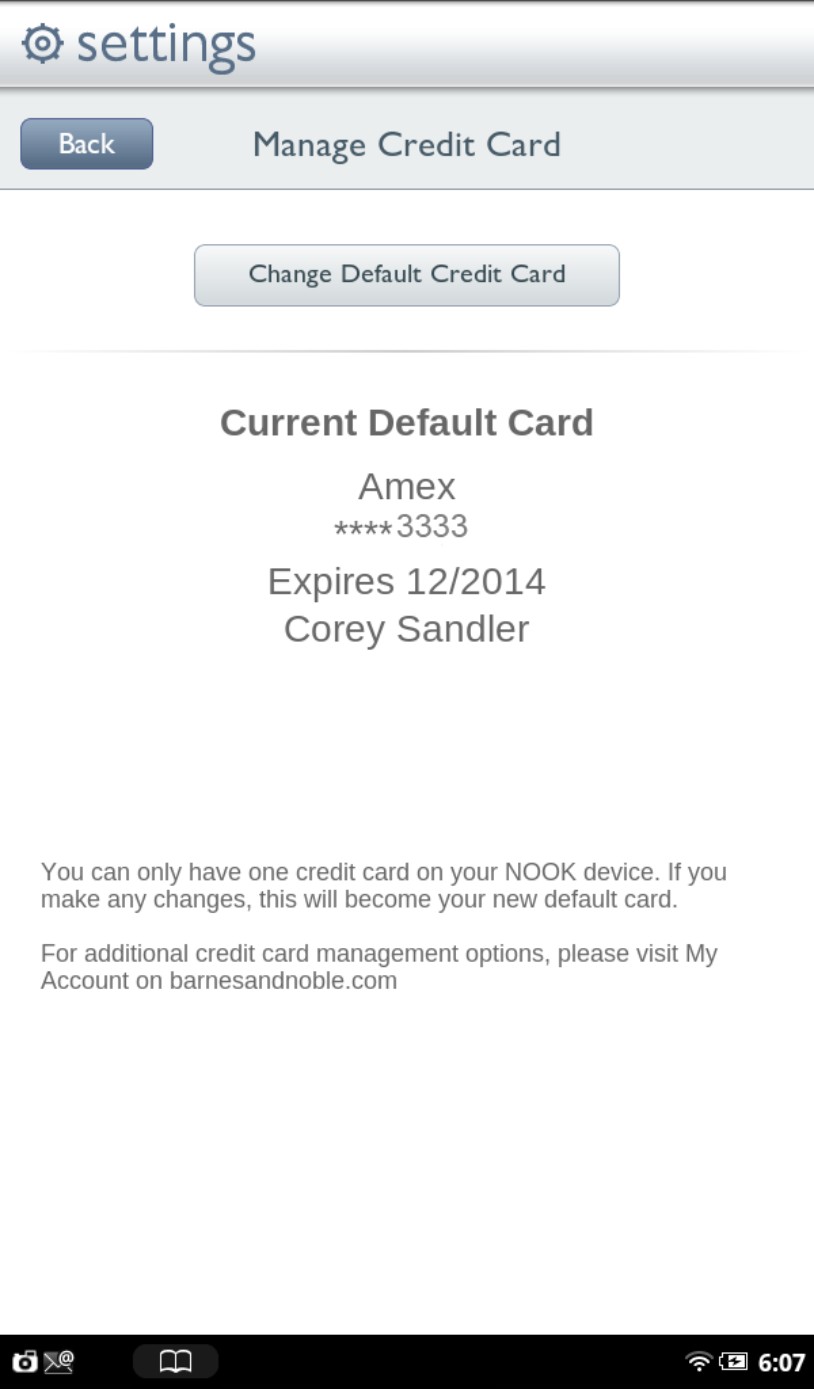
Figure 2-18: You can manage the credit card associated with your B&N account.
Clear Shop Recent Searches. A bit awkwardly phrased, this control erases the history of all searches you have made on the B&N website; you can select this as a matter of privacy or just to clean your device of extraneous information.
Social
To some, the web is their oyster. Social networking on Facebook and exchanging life’s minute details with Twitter fit seamlessly into the world of NOOK Friends. If that describes you, here are the missing links:
Manage Your Accounts. You can link your Facebook, Twitter, or Google Mail accounts, which allows quick message exchange. It also lets you make or accept LendMe offers. Enter your login and password details for each service.
Add Facebook Friends as NOOK Friends. If you’ve set up a Facebook page, and if you’ve been friended by those you know best (and some who know you least), add their connection information so they can share books, recommendations, and comments using the NOOK Friends network.
Reader
Reader is the app that lets the NOOK Tablet read eBooks. Most of Reader’s functions are set (or you can adjust them on the pages of books and magazines). But on this setting page, you have one further option: Animate eBook Page Turns. This tiny bit of micromanaging is one that some readers really enjoy: A checkmark in this box (the default) makes pages slide smoothly across the screen as you turn the pages of an eBook.
Search
Now where in the world did I put that magazine, and how can I find the song I bought because of the profile of the artist I read there? You can adjust where a Search command will hunt. You can also clear recent searches so that they don’t reappear as suggestions when you start a new hunt. Read more in Chapter 3.
In this section of Settings, you can choose Searchable Items. Tap the down arrow and indicate the system where you want to hunt:
Web. Look on the Internet as well as in your browser history and bookmarks.
Apps. Include the names of applications you’ve installed.
Music player. Check the names of artists, albums, and tracks.
 Although these two options are grayed out, your NOOK Tablet will always look in your Library of books, magazines, and newspapers, and will also always check out the B&N Shop.
Configuring security settings
If your Nook Tablet never leaves your bedside table, you might consider it safe from intrusion. That is, if you have no fears that your significant other, children, friends, family, or the cable television repair guy will ever touch it. And say you do take the device with you to work or when you travel; now you have to worry about loss or theft or unwanted intrusions.
I strongly suggest protecting access with a general password. What exactly are you guarding? All of your personal information, any files stored on the internal memory, any settings and configurations, your web browsing settings and login information, and the details you have recorded with the Barnes & Noble store. A password doesn’t protect the contents of any microSD or microSDHC memory card you have installed in the device’s expansion slot if someone were to remove that card and read it on another device. See Figure 2-19.
To tell your Nook Tablet to lock the screen after a certain number of minutes of inactivity and to require a four-digit passcode to unlock it, do this:
1. Press the button to display the quick nav bar.
2. Tap Settings.
3. On the Settings screen, tap Security in the Device Settings panel.
4. Tap the Device Lock Passcode check box.
5. Type a four-digit password.
6. Enter the code again.
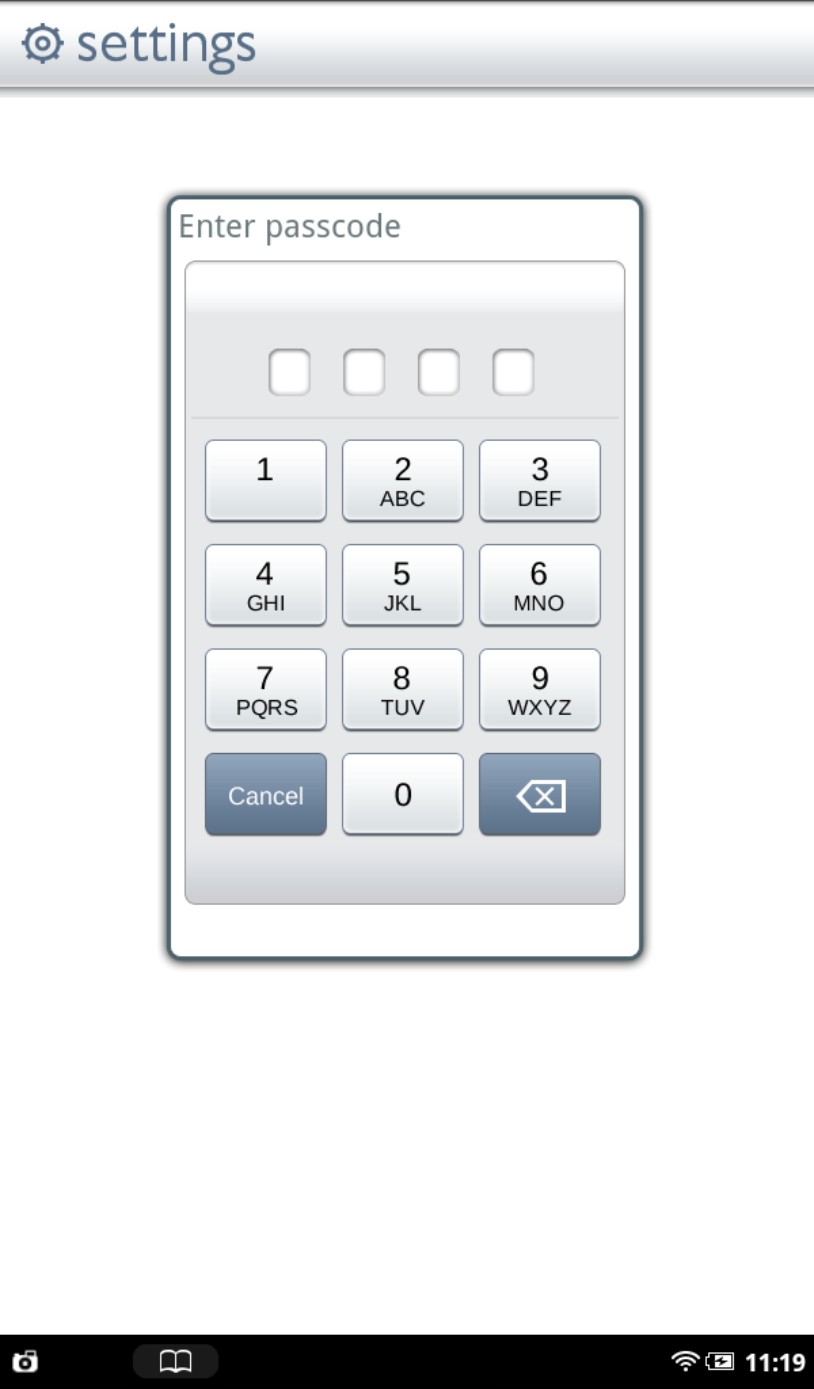
Figure 2-19: The key to unlocking a password is a four-digit number of your choice.
Choose a four-digit passcode you will remember, but not one as obvious as the last four digits of your phone number or your Social Security number. Instead, how about the last four digits (or the first four digits) of a phone number of a friend or a business not directly associated with you?
You can turn off the passcode:
1. Press the button to display the quick nav bar.
2. Tap Settings.
3. On the Settings screen, tap Security in the Device Settings panel.
4. Tap the Device Lock Passcode check box.
The checkmark is removed.
5. Type the four-digit password you had been using.