Chapter 4
Stocking Shelves and Adding Apps
In This Chapter
![]() Going to
Going to www.BN.com
![]() Using password security
Using password security
![]() Buying things to read and use
Buying things to read and use
![]() Loaning and borrowing books
Loaning and borrowing books
Man — and woman — cannot live on bread alone. We also need great books. It’s not pretty to own a perfectly capable tablet and not have it stocked with books, magazines, newspapers, and the occasional comic book.
In this chapter you explore ways to fill those shelves with bestsellers, literary classics, dozens of For Dummies books, and obscure research material of interest only to you. I will also tell you how to find free eBooks. You also read about how to download apps so you can expand the capabilities of your NOOK Tablet.
For most of this chapter, I talk about Barnes & Noble and www.BN.com because it’s the prime seller of the NOOK Tablet and because you can easily get to its store by tapping the Store icon on your tablet. However, nearly all of the other online booksellers are similar.
Welcome B&N Shoppers!
The first time you turn on your NOOK Tablet, devote a few minutes to basic setup. You’re offered a short video about NOOK Tablet features. Then come the formalities:
 Accepting the terms of service (TOS). You have to accept the terms of service in order to use the NOOK Tablet. There’s nothing out of the ordinary in the terms, other than turning over all rights to your next bestselling Great American Novel, your dog or cat, and your most comfortable pair of shoes. (Actually, they left all of that stuff out.)
Setting the current time and time zone. Again, you’ve got to make sure you get this right.
Registering your NOOK Tablet to a Barnes & Noble account. This lets your tablet get to any eBooks and periodicals already in your account, and it lets you shop for new ones. You can set up a B&N account two ways:
• Directly from the NOOK Tablet, using a WiFi link to the Internet.
• From a desktop or laptop computer, connecting to the Internet by cable, wire, or WiFi.
 In addition to the eReader on the NOOK Tablet, Barnes & Noble offers free software that lets you read (and buy) publications on devices including desktop and laptop PCs, Macintoshes, iPads, iPhones, and various Android devices.
However you set up your B&N account, registration has to be done using the WiFi connection; there are no ifs, ands, or wires about it. So here are your options:
Configure your NOOK Tablet at a Barnes & Noble store; you’ll find a free and open WiFi system specifically aimed at you.
Use a WiFi system at home, work, school, library, or café. In nearly all of these situations you need a login and password from the system owner or administrator (or the person behind the counter).
After you set up an account, here’s how to go to the store from your NOOK Tablet:
1. Make sure you have a working WiFi connection to the Internet.
2. Tap the Sign In button.
3. Enter the e-mail address and password for your account.
4. Tap Submit.
After you link your NOOK to your account, you don’t have to do it again. That link is protected behind the password you have to enter to use the tablet. I strongly suggest that you do that. I explain in the very next section.
Once you start using your NOOK Tablet, synchronization (or syncing) takes place in the background — you don’t have to do anything. You can request an update while a wireless connection is established. Do this by tapping the Sync icon (a pair of arrows chasing each other around in a circle) on the Library page.
Locking Things Down
Please allow me to ask a few questions:
Will you ever loan your NOOK Tablet to someone else?
Will anyone (family, friends, acquaintances, or perfect strangers) ever have access to your NOOK Tablet when you’re not around?
Can you conceive the possibility that your NOOK Tablet might someday (perish the thought) be lost or stolen?
 If the answer to any of these questions is Yes or Maybe, I recommend creating a password and making anyone who’s going to buy something enter that password. Make it a pretty tough password, too. The best password is so complex and unobvious that no one can guess it. My favorite type of password is a phone number or an address that has no direct connection to you but which you can recall from memory. Oh, and don’t write it down on a sticky note applied to the bottom of the NOOK Tablet.
Requiring a password to make purchases
To configure your NOOK Tablet to require a password for purchases:
1. Press the  button to display the quick nav bar.
2. Tap the Settings button.
3. On the Settings screen, tap Shop.
It’s in the App Settings section.
4. Tap the check box next to Require Password for Purchases.
If the check box is bold, rather than grayed out, the option is already turned on; you don’t need to tap it.
5. In the dialog box that appears, type your B&N account password.
6. Tap OK.
Removing the requirement for a password to make purchases
If your tablet asks for a password when someone tries to buy something, but you want to remove that requirement, here’s how to unring that bell. Follow Steps 1 through 4 from the process for “Requiring a password to make purchases.” Then continue as follows:
1. Press the button to display the quick nav bar.
2. Tap the Settings button.
3. On the Settings screen, tap Shop.
It’s in the App Settings section.
4. In the dialog box that appears, type the password.
5. Tap the check box next to Require Password for Purchases.
6. Tap OK.
Shopping on Your NOOK Tablet
The bottom line, of course, is that without books, magazines, videos, music, apps, or document files, your NOOK Tablet is simply a fancy way to play Sudoku. You’re going to want to fill it up. See Figure 4-1. Here’s how to shop in the B&N Store:
1. Press the button to display the quick nav bar.
2. Tap the Shop button.
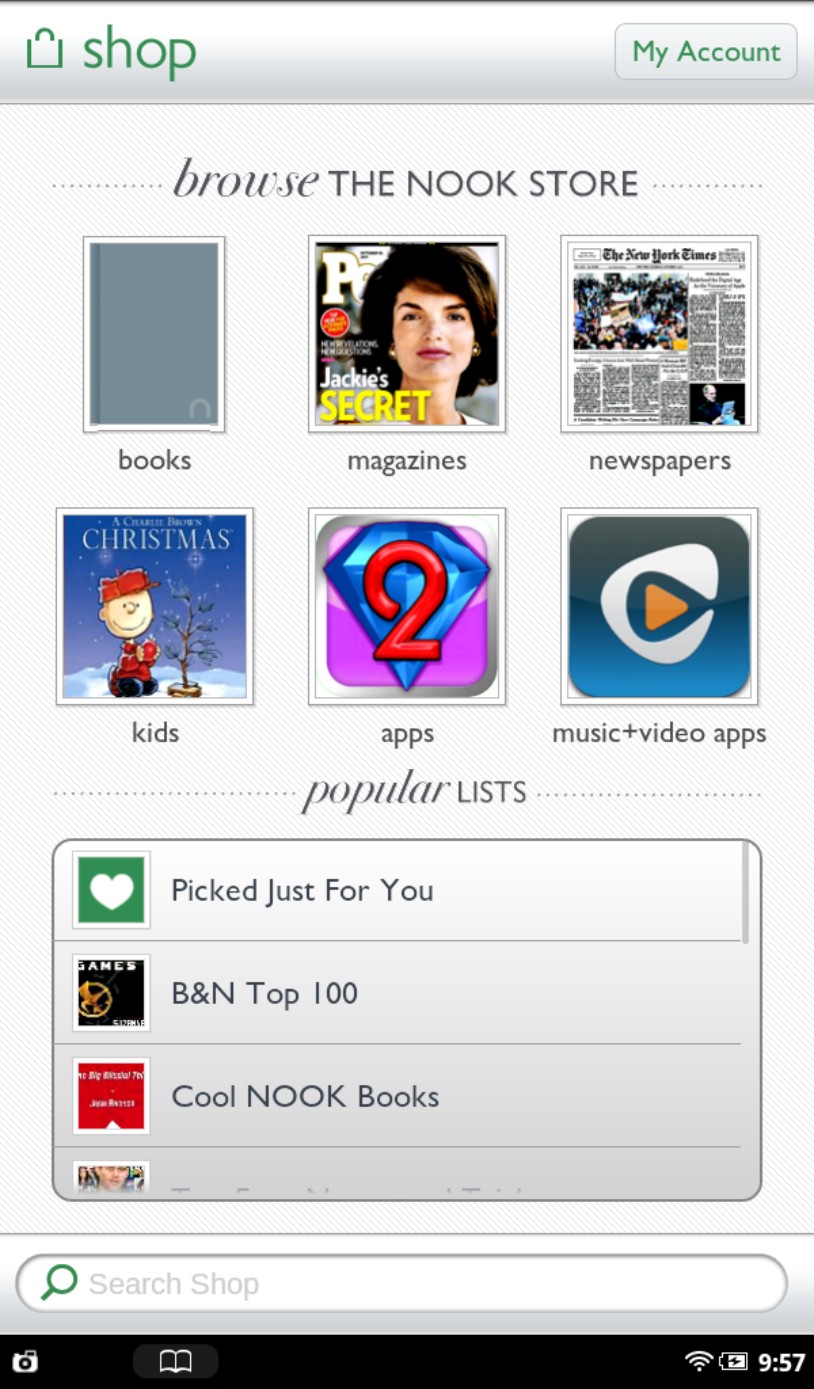
Figure 4-1: You can browse the changing NOOK store by category or list.
Just as you do when you walk into a brick-and-mortar bookstore, you have to make your way past promotions for new titles and specials. What you see today is likely to be different from what you saw yesterday or will find tomorrow. Here are some typical offerings for browsing:
Books. Choose from romance, mystery, crime, science fiction, biography, memoir, business and personal finance, history, humor . . . think of it as strolling the aisles of a store. Also included in the book department: comics.
Magazines. Choose Cosmopolitan to Maxim, from National Geographic to Southern Living, from Bon Appetit to Fitness Magazine. In most cases, you can buy one issue or subscribe.
Newspapers. Choose from The New York Times, Financial Times, and The Onion. You’ll find not just national papers but also regional publications.
Kids. Several hundred books (picture and chapter) are there for pre-readers through teens. Included are Read and Play Books, which add narration, sound effects, and interactive features. Chapter 3 tells more about kids’ books.
Apps. A growing selection of small programs (apps) is what you find here. B&N says it wants to concentrate on book-related apps as well as carefully selected games and utilities for people on the go.
Music+Video Apps. This special section of apps is supposed to enhance audio and video on the NOOK Tablet.
In addition, you can go through Popular Lists to find things like the B&N Top 100, The New York Times bestsellers, and new releases. Again, these lists change over time and include things like seasonal specials (Christmas, Mother’s Day, Father’s Day, and the like). Tap any of the lists to explore. To read more about a suggestion, double-tap the cover.
Searching for a specific book
As much as I love to browse the aisles (physical or electronic) of a good bookstore, sometimes I know exactly what I want. See Figure 4-2.
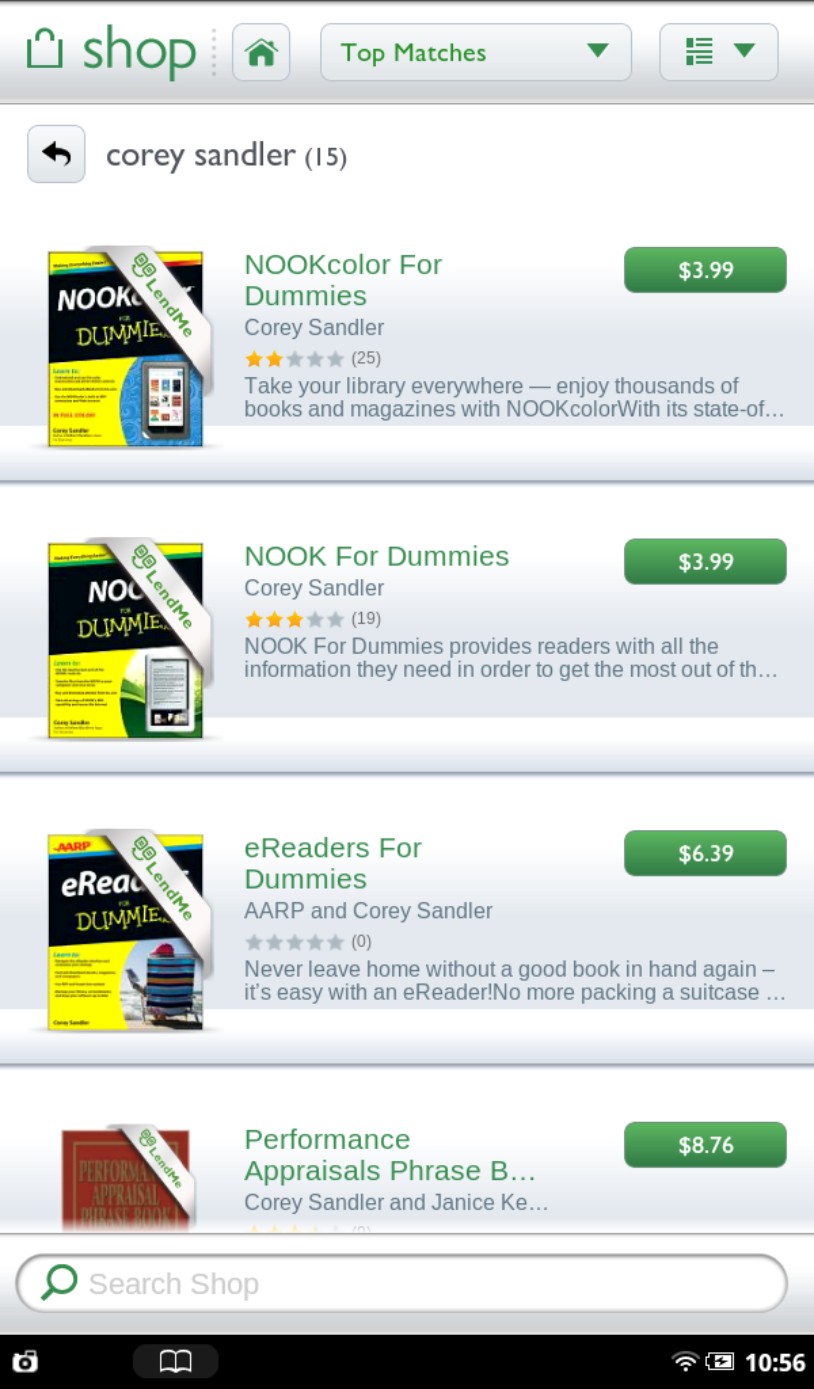
Figure 4-2: You can search by author name, subject, or title. The B&N store comes up with a customized list.
To search for a particular book or periodical:
1. Tap the Search Shop field at the bottom of the Shop screen.
The virtual onscreen keyboard appears.
2. Type the title, author, or subject you’re looking for.
You don’t have to distinguish between a title, author, or subject. The search engine will sort through all of the possibilities.
3. Tap the Search button.
Scroll through the results by dragging your finger up or down. A green button shows the prices on the B&N site. If you see a gray Purchased label, you already bought that title for the current account; once you’ve paid, you can always download it again.
Buying a book
Find a book you want. Here’s what else to do:
1. Tap the cover to see its details.
Sometimes you can see a sample from the book — an entire chapter or a hop, skip, and jump through the pages. See Figure 4-3.
Tap the Share button to tell people what you’ve found. (Perhaps you’d like to drop a hint about the perfect birthday gift for you?) You can rate and review your thoughts about the title, posting them to Facebook or Twitter.
2. Tap the green button that shows the price.
The button will change its label to Confirm.
3. Tap the Confirm button.
Your credit card is charged; the book starts coming to your tablet; a progress bar shows you how much has arrived. (If a download is interrupted because of a problem with the wireless connection or other causes, it will automatically resume the next time it gets a chance.) The new item appears on the left of the Daily Shelf and in your Library. And it wears a New badge until you open it.
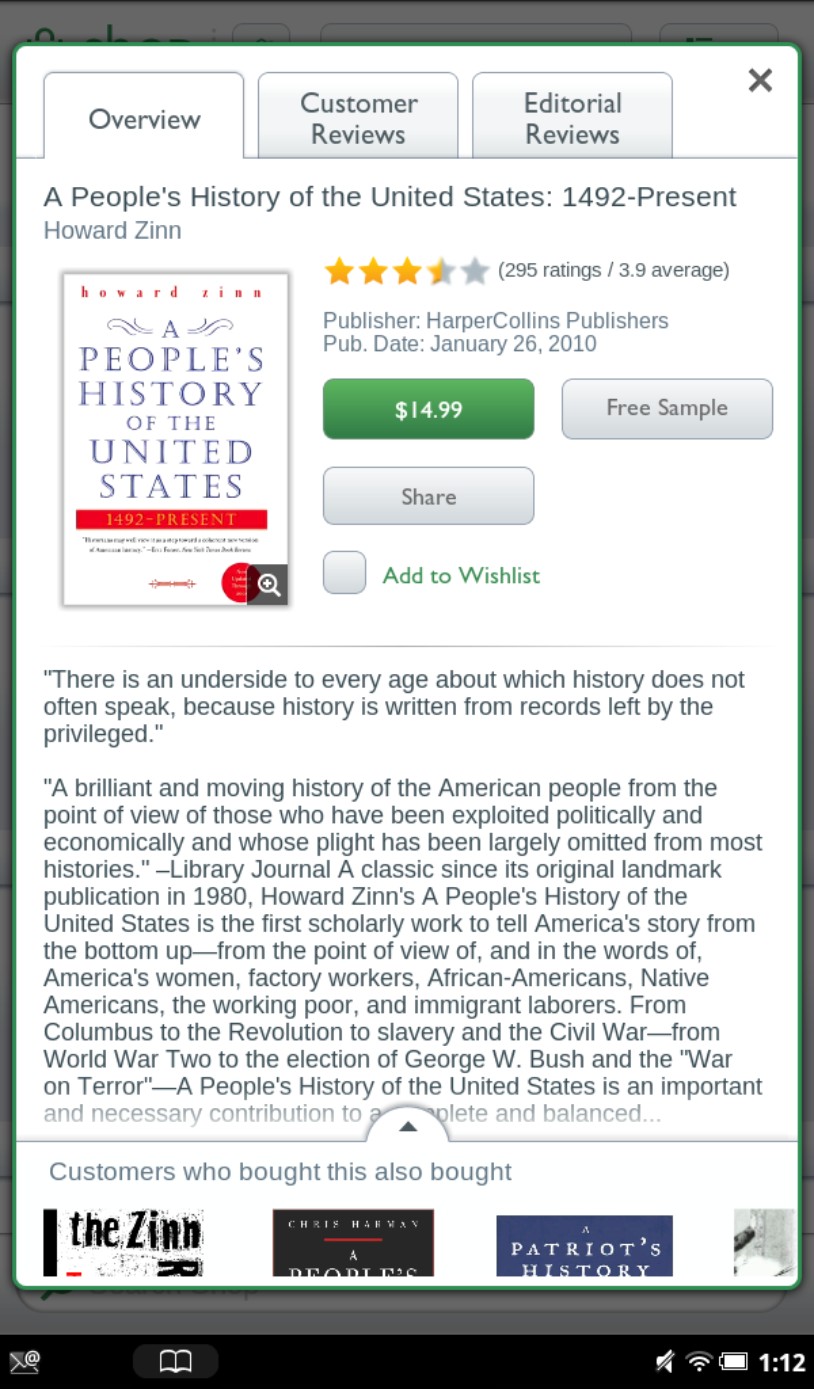
Figure 4-3: A book’s details page lets you access a sample (in some books) and the all-important green (Buy Me Now) button.
 If you’re asking to download a copy of a free book at the Barnes & Noble store, you still go through the “purchase” process; the cost will register as $0. If you pre-order an eBook, you’re charged when it’s officially published.
Buying magazines or newspapers
You can buy individual issues of a newspaper or magazine, or subscribe to daily, weekly, or monthly delivery of the periodical. Just as in the world of paper and ink, the best deals come with longer-term subscriptions. Once you buy, the first issue downloads immediately; see Figure 4-4.
 Nearly every magazine and newspaper offers free 14-day trials; you can get one free trial for each publication. If you cancel the subscription before the end of the trial, your credit card isn’t charged. Otherwise, deliveries continue and your credit card is charged automatically at the monthly subscription rate. To cancel a periodical subscription, go to your account at
 www.BN.com, log in, and go to the Manage Subscriptions section.
Buying a single issue
To buy a single issue, follow these steps:
1. Tap the cover and open the Details page.
2. Tap the Buy Current Issue button.
3. Tap Confirm.
The issue downloads.
4. Tap the Read button.
Subscribing to a periodical
The subscription process begins with a free trial; if you don’t cancel before the end of the trial, you are automatically subscribed. See Figure 4-5.
1. Tap the cover and open the Details page.
2. Tap the Free Trial button.
3. Tap Confirm.
4. Tap the Start My Free Trial button.

Figure 4-4: A small green bar shows how far along a magazine download has gotten. This issue is completely downloaded.
You can always return to the Shop page by tapping the Shop icon in the upper-left corner of the screen.
Paying the bill
Unless you say otherwise, your credit card is charged when you buy something from Barnes & Noble. It’s all done for you; there are no receipts to sign.
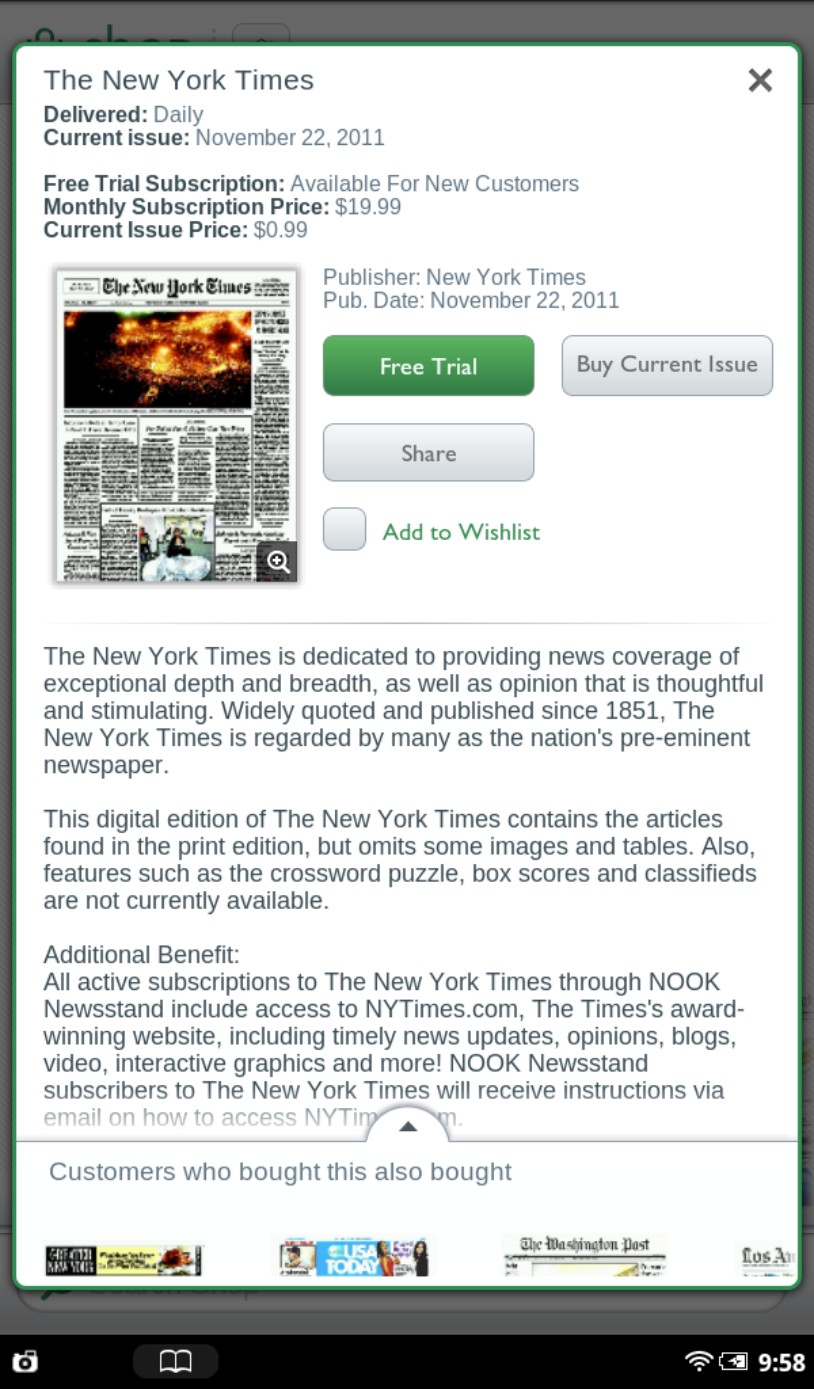
Figure 4-5: The New York Times, like most publications, offers a two-week free trial.
If you have a Barnes & Noble gift card, you can add its value to your account. The gift card is used before your credit card is charged. See Figure 4-6. Here’s how to associate a gift card with your account:
1. Press the button to display the quick nav bar.
2. Tap the Settings button.
3. In the App Settings section, tap Shop.
4. Tap Gift Cards.
5. Tap Add Gift Card.
6. Type the identifying number for the gift card (or other credit).
7. Type the PIN from the card.
You can register three gift cards, eGift cards, and online gift certificates at any one time. If you have more than that in your wallet, enter them after you’ve spent the others. When in doubt, call Barnes & Noble customer service for help.
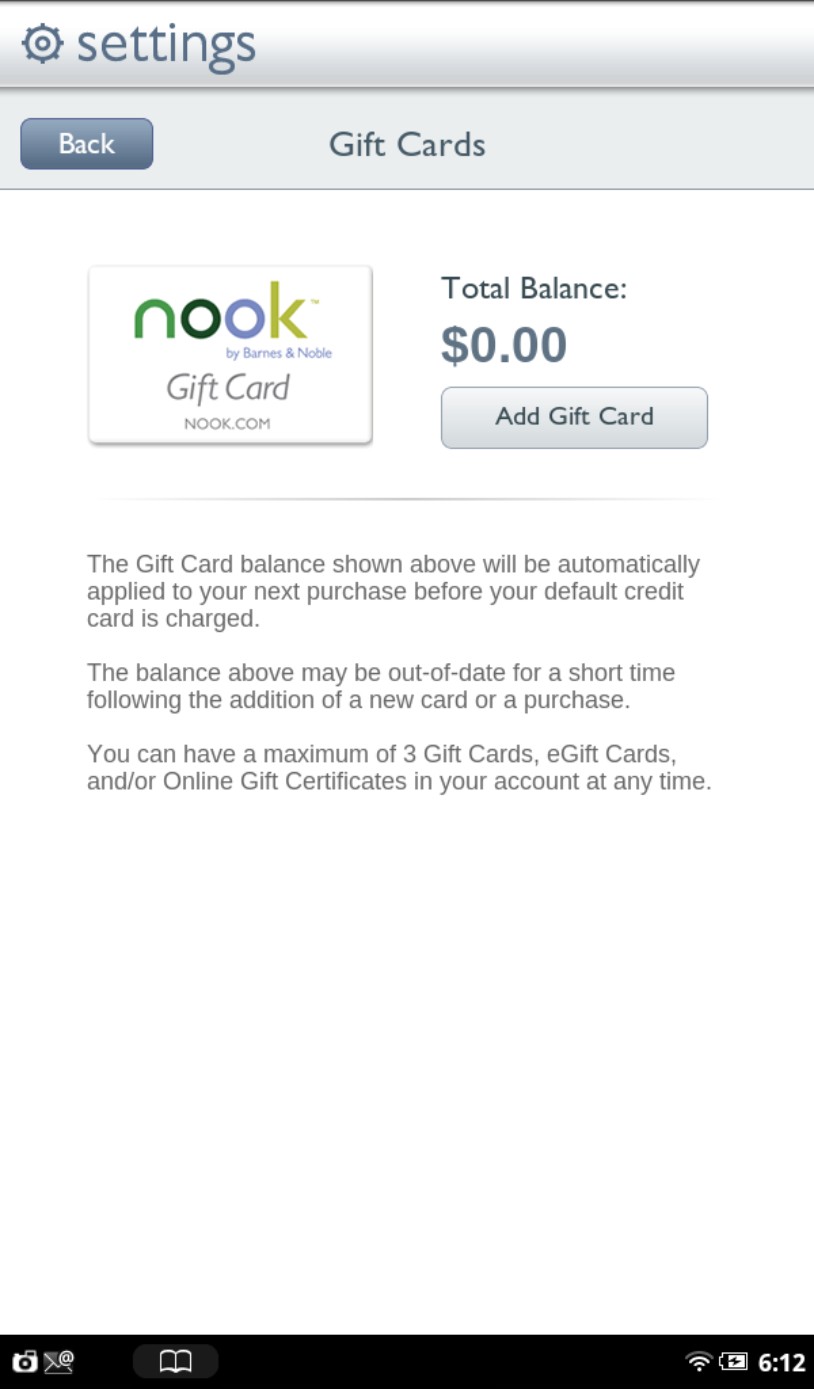
Figure 4-6: You can add gift cards and other certificates to your account, and purchases will be deducted from the current value.
Managing periodical subscriptions
You can cancel a subscription anytime and get credit based on the number of remaining issues in the billing period. Go to the magazine’s offering page on www.BN.com to cancel the subscription.
If you buy an individual copy of a magazine or newspaper, you own it. It stays on your NOOK or in your B&N account for as long as you’d like. However, if you subscribe, the tablet only holds on to a specific number of issues.
The deletion of periodicals occurs automatically, whether you’ve read an issue or not. The oldest issue is deleted to make room for the newest. The number of issues your tablet keeps depends on how often issues come out.
That is, unless you archive your periodicals. (See this chapter’s “Archiving and syncing your books.”) When you archive a periodical, it’s deleted from your tablet. You can always get it back, but you have to request it from deep storage.
Buying apps from B&N
The NOOK Tablet can accept new programs that teach it new tricks: apps. An app (short for application) is a small software program. Where do you get apps? Well, in the case of the NOOK Tablet, www.BN.com is the only official available source.
It remains to be seen how broad a range of apps the company will offer. At the launch of the NOOK Tablet, the app options were relatively insubstantial: no Skype, no online banking, no direct access to other reading material sources. There were some utilities that allow basic editing of Microsoft Office files, a few calendar and e-mail utilities, some cute games, and the first of what I expect will be a group of airline and travel apps. We can hope for more.

Figure 4-7: Apps extend and enhance the capabilities of the NOOK.
Here’s how to buy an app:
1. Press the button to display the quick nav bar.
2. Tap the Shop button.
3. In the Browse section, tap Apps.
Look at categories (Education & Reference, Games, Entertainment, Productivity, Tools & Utilities, Social, or News and Weather) or tap in the Search bar at the bottom of the screen and try to find what you’re looking for.
Tap the name of an app to find out more details.
4. Tap the green Buy Now button.
You get to tap the Free button if it doesn’t cost anything.
The file downloads to your tablet. If there’s an interruption, the downloading starts back up when your WiFi is working properly. See Figure 4-8.

Figure 4-8: On the Daily Shelf, apps that are ready for download have a label saying just that.
You can shop for apps from your desktop or laptop computer, or from another device that can connect over the Internet to the B&N store (like a NOOKcolor eReader). Any purchases (or free apps) are included in your account; the next time you use your NOOK Tablet, you’ll see the apps on the Daily Shelf with a Download badge. Tap the apps and they’ll get to your tablet.
A number of hackers succeeded in rooting the NOOKcolor. Expect the same with the NOOK Tablet. When a device is rooted, users can install apps that come from other sources (like Android Marketplace or directly from a programmer) and make other changes. The downside: B&N could update its operating system or refuse to honor warranty claims for a device that’s been altered this way. (If you can use Erase & Deregister, that should remove all traces of rooting.) I’m not recommending you root your NOOK Tablet; in my opinion, if you feel you need a more capable tablet, it makes more sense to buy a different device.
Making a WishList
You can’t always get what you want…but you can make lists about it. In fact, you can make multiple lists of wishes: one on your NOOK Tablet and one on www.BN.com. The most important difference between the two is that the NOOK Tablet’s WishList is only for downloadable files. The website list can include paper books and other items you want to have shipped to you, as well as eBooks, magazines, and newspapers that can be downloaded to the NOOK Tablet. See Figure 4-9.
Adding to your WishList
To add a publication to your WishList:
1. Go to www.BN.com.
You can visit from your NOOK Tablet, a desktop or laptop computer, or another web-capable device.
2. Tap the cover to display details.
3. Tap the WishList check box.
The title is added.

Figure 4-9: Your WishList can have media you want to buy later.
Checking your WishList
To view your WishList:
1. Go to www.BN.com.
2. Tap the My Account button.
3. Tap the My WishList button.
A list shows the cover, title, and price of each item, along with the date each was added to your list.
4. To buy something on your WishList, tap the price button next to the item.
5. Tap the Confirm button.
Archiving and Syncing Your Books
Once you buy a book from Barnes & Noble, you own the license to that title on any device or application (up to the limit of six) registered to your account. You can leave the book file on your NOOK Tablet, or you can archive it back to your account, which removes it from the tablet but keeps it in your available material at www.BN.com.
You can also update, or sync, your NOOK Tablet to your BN.com account; doing so keeps it up to date with all of your currently purchased content — except for those you archived. Performing a sync lets you know about tablet updates, book loan offers, and other notices.
Performing a sync
Follow these steps:
1. Make sure your NOOK Tablet’s WiFi system is enabled and the device is successfully connected to the Internet.
2. Press the button to display the quick nav bar.
3. Tap the Library button.
4. Tap the Sync button.
It’s in the lower-left corner and has an icon of two curved arrows forming a circle. The symbol reminds me of a dog who chased his own tail.
Archiving a publication
Follow these steps:
1. Make sure your NOOK Tablet’s WiFi system is enabled and the device is successfully connected to the Internet.
2. Press the button to display the quick nav bar.
3. Tap the Library button.
4. Press and hold on the book cover.
A menu offers several options.
5. Tap Archive.
The book disappears from the Library, but it’s on a shelf called Archived. See Figure 4-10.
Unarchiving a publication
Follow these steps:
1. Make sure your NOOK Tablet’s WiFi system is enabled and the device is successfully connected to the Internet.
2. Press the button to display the quick nav bar.
3. Tap the Library button.
4. Tap the My Shelves button.
5. Scroll through and find the Archived shelf.
6. Press and hold on the cover.
A menu appears.
7. Tap Unarchive.
The book is removed from the Archived shelf and goes back to the Library.

Figure 4-10: Archived books are removed from your desktop and Library, but you can get them.
Lending and Borrowing Books
The key to the LendMe program is the NOOK Friends network — people who are in your circle. You’ve invited them or they’ve invited you. Once they accept an invitation, you can lend and borrow books. See Figure 4-11.
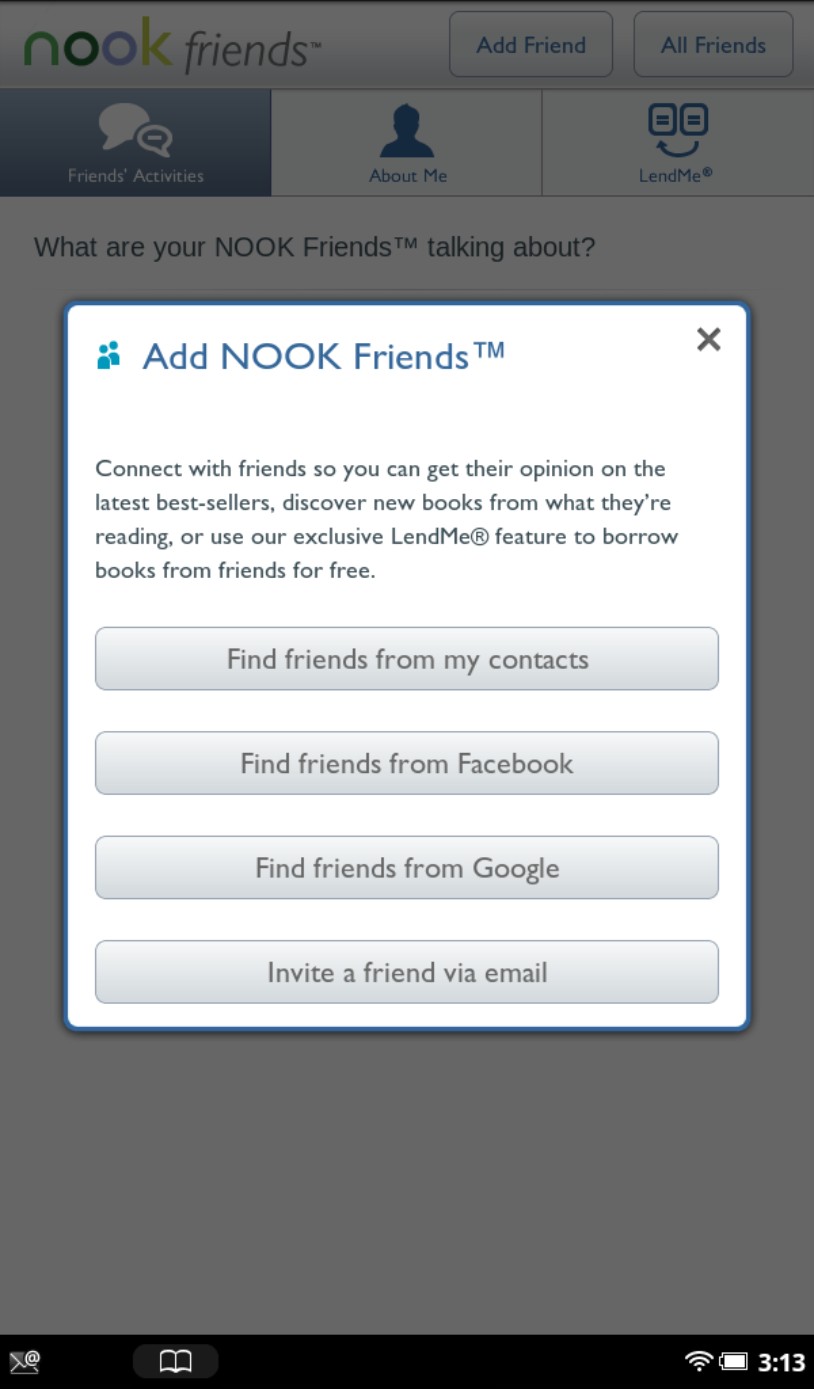
Figure 4-11: You can add NOOK Friends from various sources on your tablet.
You can invite friends from your Contacts list, from Facebook or Google, or by e-mail:
1. Make sure your NOOK Tablet’s WiFi system is enabled and the device is successfully connected to the Internet.
2. Press the button to display the quick nav bar.
3. Tap the Apps button.
4. Tap the Social Apps icon.
Getting the tablet to its native area
What happens if you take your NOOK Tablet to an actual Barnes & Noble store (where there are walls and floors and ceilings)?
The device asks if you’d like to connect to the InStore network. (Tap the Connect button to agree; tap the Dismiss button disagree.)
If you do connect to the WiFi network at the store, you can get:
A free pass to read or sample most NOOK eBooks for one hour per day free. You can read as many books as you want while you’re in the store, although the 60-minute limit applies for each title.
Exclusive content and offers available only to NOOK owners using the in-store network.
5. Tap NOOK Friends.
6. Tap the Add Friend button.
7. Choose a source of friends:
• Find Friends from My Contacts
• Find Friends from Facebook
• Find Friends from Google
• Invite a Friend Via Email
Lending a book
To lend a book from your Library, open the LendMe app. You can open it several ways:
On the Home screen or the Daily Shelf, press and hold the book’s cover. Tap LendMe in the menu that appears.
In your Library, press and hold the book’s cover. Tap LendMe in the menu that appears.
In the book itself, tap the center of the page to display the reading tools. If a small blue flag appears at the right end of the slider, tap the blue flag. Tap the LendMe button.
A dialog box appears. From there, tap the icon that indicates how you want to notify someone of the LendMe offer:
Send an e-mail by selecting one of your contacts. If you haven’t entered any contacts or linked your account, select Contacts and press the Add Contact button.
Post an offer on the person’s Facebook wall. You must have previously linked your NOOK Tablet to your Facebook account.
Send a notification by Google Gmail if you’ve linked your NOOK Tablet to that account.
Here are the conditions for the LendMe program from Barnes & Noble:
While your book is loaned out, you can’t read it on your own device.
Not all books can be loaned. Look for a LendMe badge on a book cover.
You can loan a book just once, and for no more than 14 days. A user can return the book any time during the loan. If it hasn’t been returned at the end of 14 days, it’s automatically returned.
You can only loan one book at a time; you have to wait for a book to be returned before you can make another offer.
You can only lend from a registered NOOK Tablet to users of other registered B&N devices, or applications that run on other devices such as desktop or laptop computers, smartphones, and certain other tablets.
You can lend a book from anywhere with supported wireless connectivity (including WiFi hotspots outside of the U.S., U.S. territories, and Canada).
You can send LendMe offers to any e-mail address, but to accept, the recipient must have an e-mail address associated with a Barnes & Noble online account, and that means a resident of the United States or Canada. An offer expires after seven days if it hasn’t been accepted.
You can’t loan a book that has been loaned to you.
You can’t archive or save a borrowed book to the microSD card.
Another way to loan a book without restriction is to lend the actual NOOK Tablet device to a trusted friend or acquaintance. If you do this, be aware that the person will have access to the Barnes & Noble store under your account name (but can’t buy anything if your account requires a password to do so).
Borrowing a book
You can also reach out and ask someone to lend you a book from their Library. To find out who has lendable books, launch the LendMe application. See Figure 4-12.
Here’s how:
1. Make sure your NOOK Tablet’s WiFi system is enabled and the device is successfully connected to the Internet.
2. Press the button to display the quick nav bar.
3. Tap the Apps button.
4. Tap the Social button.
5. Tap NOOK Friends.
You’ll see three shelves:
• My Lendable Books. Books of yours that you can loan.
• Friends’ Books to Borrow. All the libraries combined of friends who have posted books for loan.
• Offers from Friends. Specific offers from friends who are suggesting you borrow one of their titles.
6. Tap the Borrow button next to the name of the book you want to read.
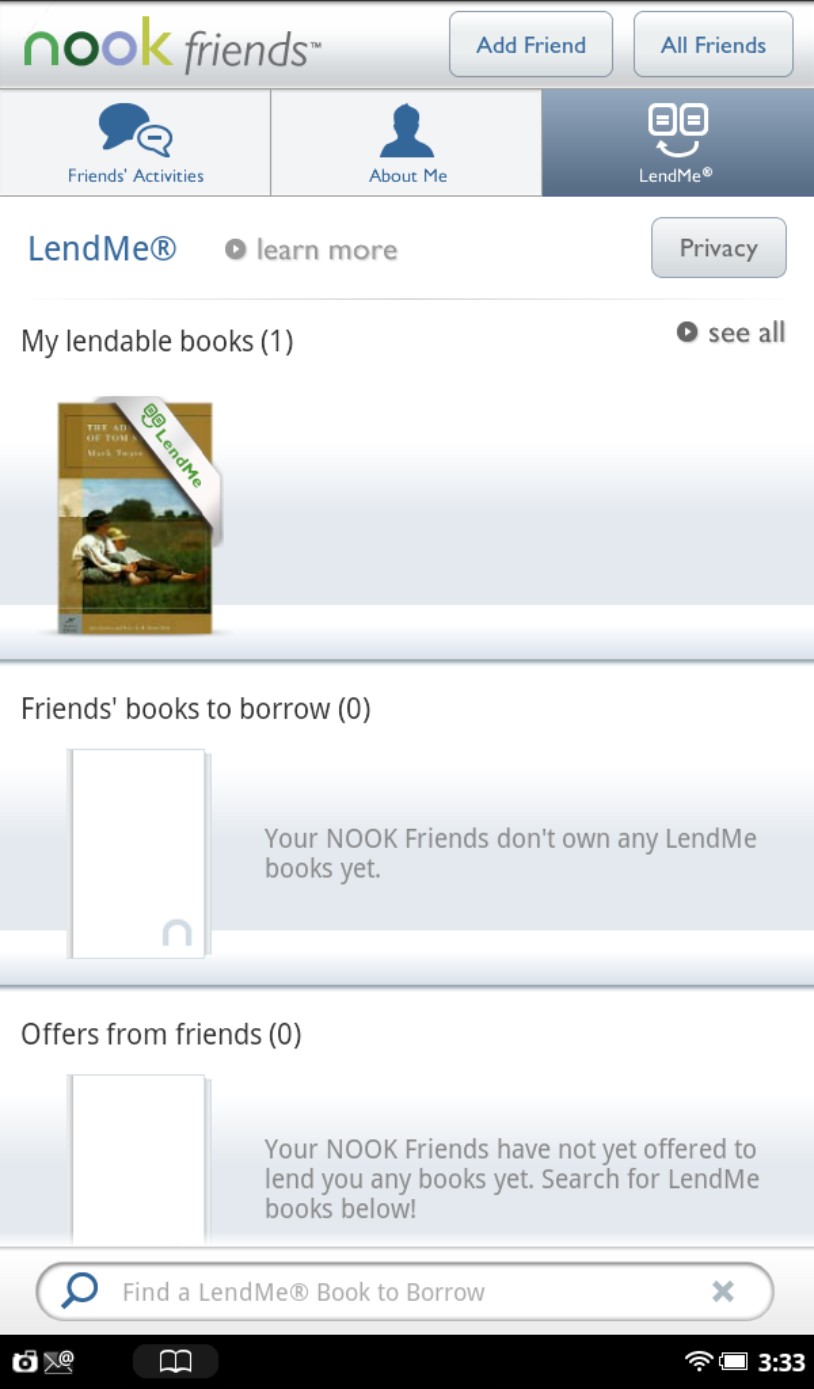
Figure 4-12: The LendMe page shows books available for loan or borrowing.
Setting Library privacy
Do you really want all of your friends to know the titles of all the books you have available for borrowing? Think it over: You may be disclosing some personal interests, political leanings, or other information you might want to keep to yourself.
Knowing What File Goes Where
You don’t have to decide where everything goes.
Books and periodicals that you buy are stored in your NOOK Tablet’s Library.
If you have a registered account with B&N, a copy of any books you buy is out there on the Internet. Visit it any time by signing in to your online account. That lets you read the same material on other devices registered to your account, and lets you recover your library if your tablet fails or goes missing.
Another part of your Library is called My Files. Get there by pressing the button; tap Library in the quick nav bar; then tap My Stuff. A folder called My NOOK is where you should find My Files. The subfolders in My Files can include books and documents that you loaded to your tablet from a laptop or personal computer, files obtained from sources other than Barnes & Noble, and files downloaded from a website.
To decide what to keep to yourself, follow these steps:
1. On the NOOK Friends page, tap the Privacy button.
The Privacy Settings page opens.
2. Select (or deselect, if you want no books to show) the Show All of My Lendable Books to My NOOK Friends check box.
Or: Tap or drag a slider alongside the names of each of the lendable books in your Library. The switch toggles between Show and Hide.
The online library maintained in your name by Barnes & Noble keeps copies of all your purchases for a particular account, which lets you share titles across other devices (NOOKcolor, for example) or a NOOK application that runs on another device (including NOOK for PC, NOOK for BlackBerry, NOOK for iPhone, and NOOK for iPad). The key is that all devices or applications must be registered to the same account; as many as six devices are allowed.
Managing Your Library
The Library is where all documents live on your NOOK Tablet, including books, magazines, newspapers, and personal files. The Library is all inclusive, while the individual panels for Books, Magazines, and Newspapers hold only files that the system recognizes as fitting that description.
To some extent, you actually can tell a book by its cover on the NOOK Tablet: not so much about what’s inside, but a great deal about its status or stature in your collection. See Figure 4-13.
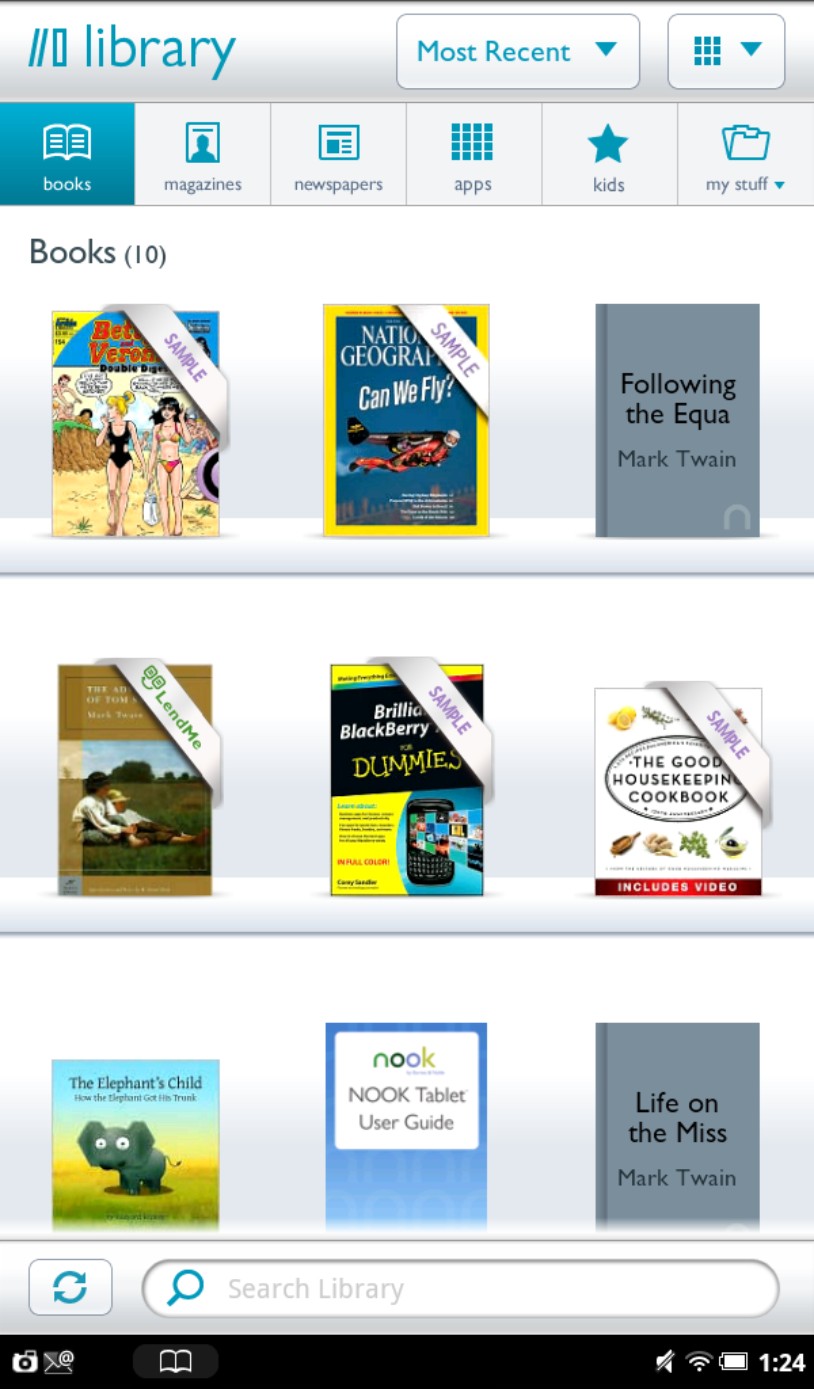
Figure 4-13: Books and other publications can bear a badge that tells you more about their status.
New. Freshly downloaded and ready to be opened. This badge goes away after the first time you open the document.
Sample. A free sample of a book or other publication.
Download. A publication that’s either downloading or is waiting to be downloaded from www.BN.com.
Pre-order. A title has been announced and is for sale, but isn’t available for download yet. If you buy it, the book or publication will arrive at the first opportune moment.
Recommended. A friend or contact has suggested that you check out this title.
LendMe. A book that you can loan to someone.
Lent. A book you are borrowing; the badge also indicates the number of days remaining on the loan. (While a book is loaned out, the original owner can’t open it.)
Any search you start from your Library is done there only; if you start from the Home screen, the search expands, even looking at the B&N store if it can’t find the title you want already on your tablet. To access the Search tool, tap the button to display the quick nav bar. Then tap the Search button.
Asking for a manual download
You might need to manually download content in certain situations, instead of relying on it to automatically appear. Here are some:
You bought digital content and it wasn’t automatically downloaded to your NOOK Tablet. This might have happened if your WiFi connection was terminated before the content was fully downloaded.
You subscribed to a periodical but you (and your NOOK Tablet) have been out of WiFi reach.
Your NOOK automatically deleted content because its internal memory was nearly full.
You unregister and re-register your device to the same Barnes & Noble online account.
If an automatic or manual download fails (most often because of wireless connection problems), the NOOK Tablet will retry several times. If the download doesn’t succeed, wait for a while and retry a manual download in an area where you have a strong WiFi signal.
The only way to connect to the Barnes & Noble website or elsewhere on the Internet from your NOOK Tablet is through a WiFi network. The NOOK Tablet eReader doesn’t offer a cellular connection. And the supplied USB cable can transfer files from your computer; you can’t connect through that computer to the Internet from the NOOK Tablet.
Building your own shelves
You can build your own shelves. Separate them as you see fit to organize your collection. When your NOOK arrives, it includes just one shelf: Favorites. But how about adding shelves to hold your vast collection of For Dummies eBooks, a few dozen of your favorite books by Corey Sandler, a special place for your cookbooks, and a separate group of emergency first aid guides in case something goes wrong in the kitchen but you are still able to read? See Figure 4-14.
Creating a shelf
You can create any shelf you want and call it anything you like. To create a shelf, do this:
1. In My Library, tap My Stuff.
2. Tap Create a New Shelf.
3. Type a name for the shelf.
4. Tap Submit.
Adding items to a shelf
Now you need to move things to your shelf. To add items:
1. Highlight a book in the list of items in your Library.
2. Tap Shelves.
3. Tap Place On or Remove From Shelf.
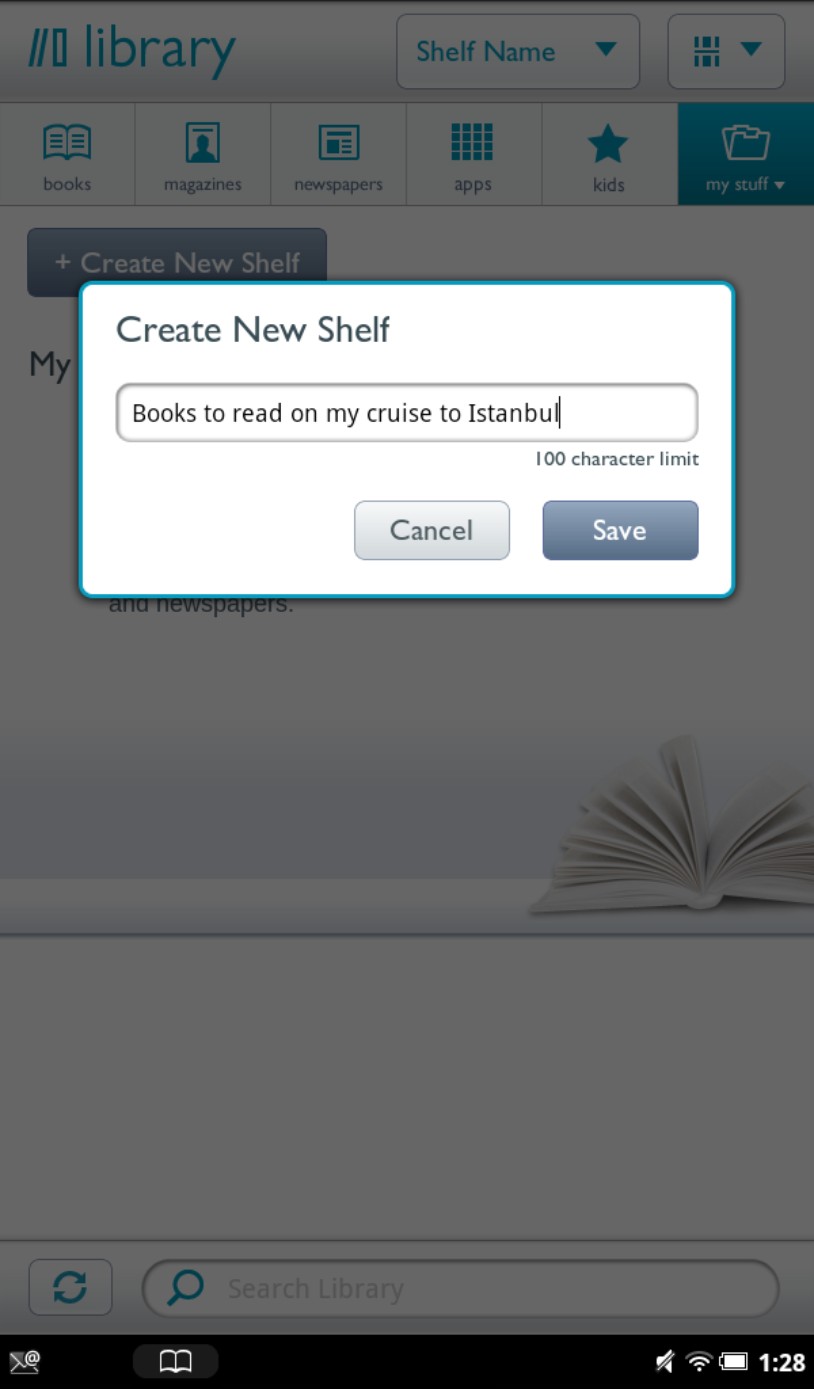
Figure 4-14: You can add custom shelves to hold particular groupings of publications.
4. Tap a shelf.
You can rename a previously created shelf by tapping Rename a Shelf on the touchscreen. To remove a shelf, tap Remove a Shelf; tap OK to confirm.
In some rare cases you may need to unlock a book or periodical that you bought through Barnes & Noble and that’s protected using Digital Rights Management (DRM). In that case just enter your name, the e-mail address associated with the B&N account, and the credit card number that you used to make the purchase.
Going Elsewhere to Buy or Borrow
You can buy books from other sellers and download them to your NOOK Tablet. Many public libraries and educational institutions allow you to borrow reading material. Most of the files are in EPUB or PDF format, and they usually have Digital Rights Management (DRM) restrictions (to put a time limit on the loan of materials).
Lots of companies manage eBook loans with lots of tools. The leaders include Adobe Digital Editions and Overdrive. In addition, Amazon introduced in late 2011 a lending library for who bought their newer eReaders; that company, as is its wont, manages the lending process with its own Kindle tools. Other vendors of books, like Kobo, have their own systems.
About Adobe Digital Editions
The Adobe Digital Editions software is free and easy to use. See Figure 4-15.
Preparing to use NOOK Tablet with Adobe Digital Editions
Follow these steps to get ready:
1. On a desktop or laptop computer, use a web browser connected to the Internet and go to www.adobe.com/products/digitaleditions.
2. Download the Adobe Digital Editions program.
Make sure it’s the right version for your computer.
3. Install the program on your desktop or laptop computer.
4. Follow the instructions to authorize your computer.
5. Turn on your NOOK Tablet.
6. Plug in both ends of the USB cable that came with your NOOK Tablet.
One end goes into the computer and the other end goes into the NOOK Tablet. Make sure to use the right USB cord.
Adobe “recognizes” the tablet.
Installing book files using Adobe Digital Editions
When you’ve put Adobe Digital Editions on your laptop or desktop computer, you can use it to buy or borrow books from stores or libraries that require it. Follow the store’s or library’s instructions to download files to your computer. Then do the following:
1. Launch Adobe Digital Editions on your desktop or laptop computer.
2. Turn on your NOOK Tablet.
3. Plug in both ends of the USB cable that came with your NOOK Tablet.
One end into the computer and the other into the NOOK Tablet. Make sure you don’t force things!
4. Drag files you have downloaded from their location on your computer’s desktop or a folder onto the ADE library bookshelf.
They will be available for reading on the computer, but your goal is to get them onto your NOOK Tablet.
5. Follow the instructions to move those files to an authorized NOOK Tablet.
Diving into Overdrive
Some stores and libraries use a program called Overdrive. In one version it works a lot like Adobe Digital Editions. A second version goes directly on tablet computers.
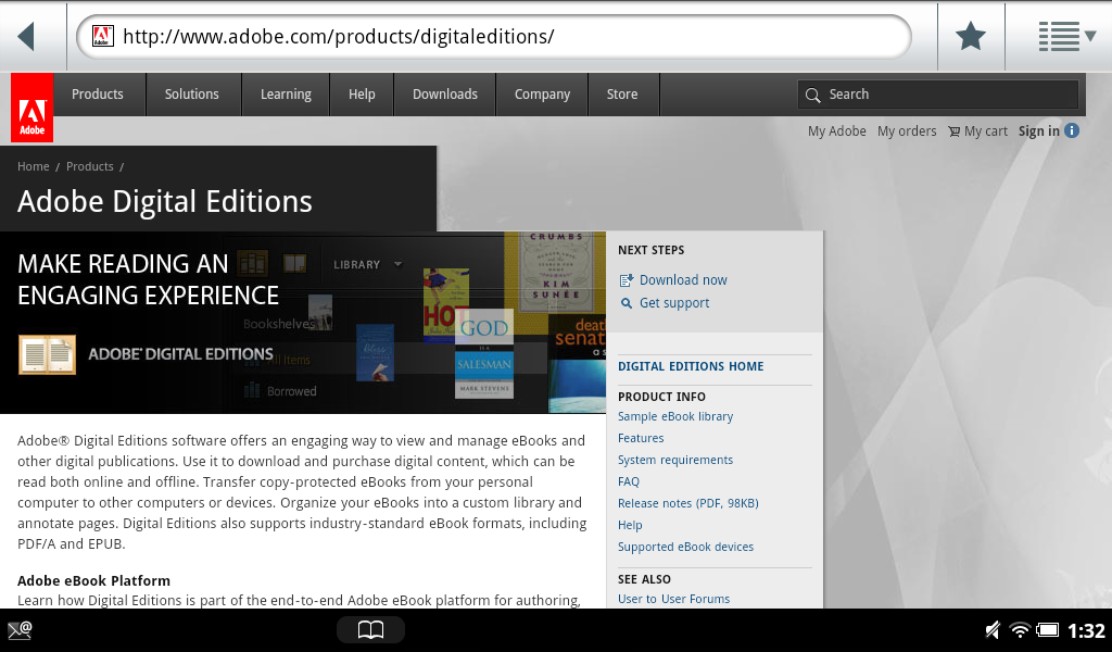
Figure 4-15: Adobe Digital Editions is downloaded to a desktop or laptop computer and used to authorize and then side-load files to your NOOK.
That said, as this book is being published, Overdrive isn’t yet available for the NOOK Tablet. If and when it is, look for an app that you can install on your device. And then it will work like this:
1. Download and install the Overdrive app on your NOOK Tablet.
2. Start Overdrive.
3. With your NOOK Tablet, go to a store or library where you have an account.
4. Choose and download book files to your device.
If you’re borrowing from a library, the book may come with a time limit. If you’re buying from a store, the cost is charged to the account associated with the Overdrive app.
Overdrive is available for many Android-based tablets, but the NOOK Tablet is not amongst them, at least right now. Keep on the lookout, though.
Using Google ebookstore
You can buy a book at the Google ebookstore and start reading it on a NOOK Tablet. Maybe you want to continue reading the same book on your iPhone as you commute to work, read some more on the computer at your desk (during lunch hour, of course), and go out to dinner with a Sony eReader. As with the NOOK store, the books are tied to your account — not to a specific piece or brand. See Figure 4-16.

Figure 4-16: The Google ebookstore can provide current and classic literature.
Reading a public domain book via Google ebookstore
To read a public domain book, follow these steps:
1. Go to http://books.google.com/ebooks.
2. Choose the book.
3. Save it to your personal computer.
4. Connect your NOOK Tablet to the computer using the USB cable.
Careful there. Make sure the cable came with your NOOK Tablet and make sure the right end goes into the right device.
5. Load the file from the computer to the tablet.
Read how to side-load in Chapter 3.
6. Install the latest version of Adobe Digital Editions on your laptop or personal computer.
If you haven’t already, I explain how to do that earlier in this chapter.
7. Enter an Adobe ID if prompted.
If you don’t have an Adobe ID, you’ll see a link onscreen to get one. From that point, anytime you buy an item online with a service (like Google ebookstore) that requires Adobe Digital Editions, the item is automatically associated with your Adobe ID, rather than your computer.
Buying on Google ebookstore
And now, here’s how to buy a book on Google and move it to your NOOK Tablet:
1. Go to http://books.google.com/ebooks.
2. Open a free account with Google.
The same account tags along if you use other Google tools, including Gmail.
3. Select a book.
4. Click Buy.
5. Pay for the license to own a copy of the book.
The file is added to your Google account.
6. In the list, find the book you want to transfer to the NOOK Tablet.
7. Click the About This Book button.
8. Click Read On Your Device.
You may see an EPUB version, a PDF version, or both.
9. Click one of the links to transfer the ACSM file onto your computer.
Be sure you know where the file is stored. You need the file to unlock the book. If you’re given a choice between an EPUB or a PDF file format for an electronic book, go with EPUB: It is more likely to include most or all current features for the NOOK Tablet, like reflowable type, adjustments to typefaces, and more.
10. Find the ACSM file on your computer.
It may be in a Downloads folder or on the desktop. If you can’t find the file, search for *.acsm.
11. Click the ACSM file.
The document should open in Adobe Digital Editions. If clicking the file doesn’t open the Adobe software, find ADE on your computer (in My Programs) and start the program. Then select Add Item to Library from the Library menu, and find the ACSM file on your computer.
12. If you aren’t in Library view, click the icon in the top-left corner.
The book you bought from Google ebookstore doesn’t show up in the All Items bookshelf in the Library view.
13. Turn on your NOOK Tablet.
14. Connect your NOOK Tablet to the computer with the provided USB cable.
Adobe Digital Editions should recognize your NOOK Tablet as an authorized device and display it on the left pane of the software. If you don’t see your NOOK Tablet, close Adobe Digital Editions and then reopen it with the USB cable in place, connected to your NOOK Tablet, which should be on.
15. Click and drag the Google eBook in the right pane onto the NOOK Tablet icon in the left pane.
If you can’t drag a book from the library to the NOOK Tablet, the Adobe software hasn’t recognized your tablet as an authorized device. Consult the Adobe help screens.
If you want to confirm the transfer, click the NOOK icon and find the book file there.
16. Eject the NOOK Tablet from your laptop or personal computer before unplugging it.
Windows users can go to Explorer to find the NOOK and its memory card; right-click each and choose Eject. Macintosh users will find similar icons for the tablet in the Finder.
Getting something for nothing
Here are some worthy sites to visit for great free reads from authors who no longer need the money:
Project Gutenberg at www.Gutenberg.org. Some of the files are plain text that you have to format and change to use. See Figure 4-17.
Manybooks.net at www.Manybooks.net. Some of the same books you’ll find on Project Gutenberg along with some new work by current authors.
Feedbooks at www.Feedbooks.com. Plenty of 19th- century classics.
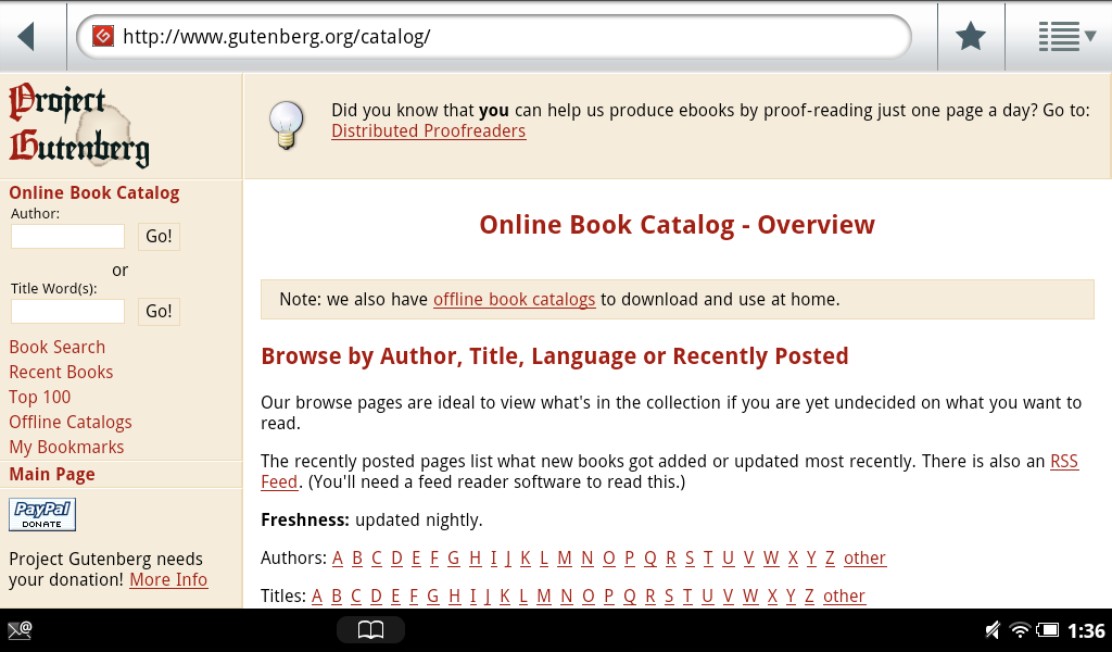
Figure 4-17: Project Gutenberg is a worldwide cooperative aimed at digitizing older, out-of-copyright books and publications.
Loading the right calibre
calibre is a free program you can download and install on your personal computer (Windows, Macintosh, or Linux). It converts files into EPUB or PDF format. With it you can also convert a PDF to a more flexible EPUB file. Get a copy of calibre at http://calibre-ebook.com.