Chapter 5
Going Wireless and Out on the Web
In This Chapter
![]() Using the web browser to go online
Using the web browser to go online
![]() Getting and sending e-mails
Getting and sending e-mails
![]() Playing music, videos, and games
Playing music, videos, and games
If you have a WiFi system in your home or office, you should be able to connect to it and use your NOOK Tablet and pay nothing extra (beyond what you’re already paying). When you travel, though, you may have to pay for time somewhere. All NOOK Tablet owners can use their device for free at a Barnes & Noble store.
 Your NOOK Tablet works perfectly well as an eReader and for many of its apps without a connection to a WiFi network. Here’s what WiFi lets you do: browse the web, visit the online stores, and use e-mail.
Working Without a Wire
The Wireless Settings screen lets you turn WiFi on or off and it lists all the wireless networks your NOOK Tablet can find. The system asks if you want it to reconnect to any other network you have already used. The list of WiFi networks includes the name assigned by its owner and how strong the signal is (a stack of curved lines). The more dark lines you see, the better the signal. See Figure 5-1.
 To connect to an open or unsecured network, tap the network’s name.
To connect to a secured network (one that requires a password), tap the network name and then tap in the Password box. Type the required password (sometimes called a key) and tap Connect.

Figure 5-1: The Wireless Settings screen is the gateway to WiFi systems.
Some free networks offered at retail establishments give you the login information when you buy a drink or other item (not truly free, then, eh?); some hotels offer free service to registered guests. When you use this service, you may see all or none of the following:
Terms and conditions
A login screen
Credit card information page (or other payment)
 The NOOK Tablet will detect this sort of network, but you have to open a web browser window to enter the required details.
Using the web browser
The NOOK Tablet lets you visit web sites. The tablet’s web browser is relatively fast and can show movies, news, and music. (For those who need to know: It supports Adobe Flash Player.)
To access the web browser, follow these steps:
1. Make sure your NOOK Tablet is connected to a WiFi network.
2. Sign in if necessary.
3. Press the  button to display the quick nav bar.
4. Tap the Web button.
If the Web button on the quick nav bar looks gray and says Disabled, that means you can’t choose it. You’ll have to visit the Wireless Settings panel to fix that.
The NOOK Tablet’s web browser should be familiar to anyone who has used a browser to cruise the web on a personal computer. Just like you can on a laptop, for example, you can open additional windows to quickly move from one page to another.
To open a new browser window, tap Options and then tap New Window. See Figure 5-2.

Figure 5-2: The NOOK web browser has most of the features that computer users expect.
The features are pointed out in Figure 5-2:
Address bar. To visit a different page, tap in the address bar. Type an address and tap Go.
Back button. To the left of the address bar, tapping the left arrow takes you to the page you most recently visited.
Favorites. To the right of the address bar, tapping the star opens a window where you can mark favorite sites. You can view and edit the places you’ve visited (browsing history) and organize your favorites. Tap the thumbnail for the page you want to visit.
On some computer browsers, favorites are called bookmarks. However, because the NOOK Tablet has an eReader, here they’re called favorites. Same difference.
Options menu. At the far right of the address bar, the down arrow opens a menu that lets you open a new window, open the Favorites list, and refresh the screen.
Marking your favorite spots
You can create a favorite (also known as a web bookmark) two ways. See Figure 5-3.
Adding a bookmark
To note the current web page as a favorite, do this:
1. Press and hold anywhere on the page.
Do it anywhere except sections that are active (such as links or fields on a form). A good choice is usually a blank piece of the screen.
2. From the menu that appears, tap Bookmark This Page.
A dialog box opens. And yes, I know it says Bookmark (at least in the first release of the software). It’s a Bookmark/Favorite.
3. Enter a name for the bookmark.
4. Accept the web address (URL) for the current location.
Or you can edit the name via the keyboard.
5. Tap in the Name field.
6. Type something that identifies the bookmark.
7. Tap OK. See Figure 5-3.
To create a favorite or a bookmark of the current page from the Options menu, do this:
1. Tap the Options menu.
2. Tap the Bookmarks option.
The browser shows three tabs: Bookmarks, Most visited, and History. The Bookmarks tab is set to automatically open, and you will see rows of bookmarked web pages.
3. Tap the Add+ thumbnail in the upper left of the window.
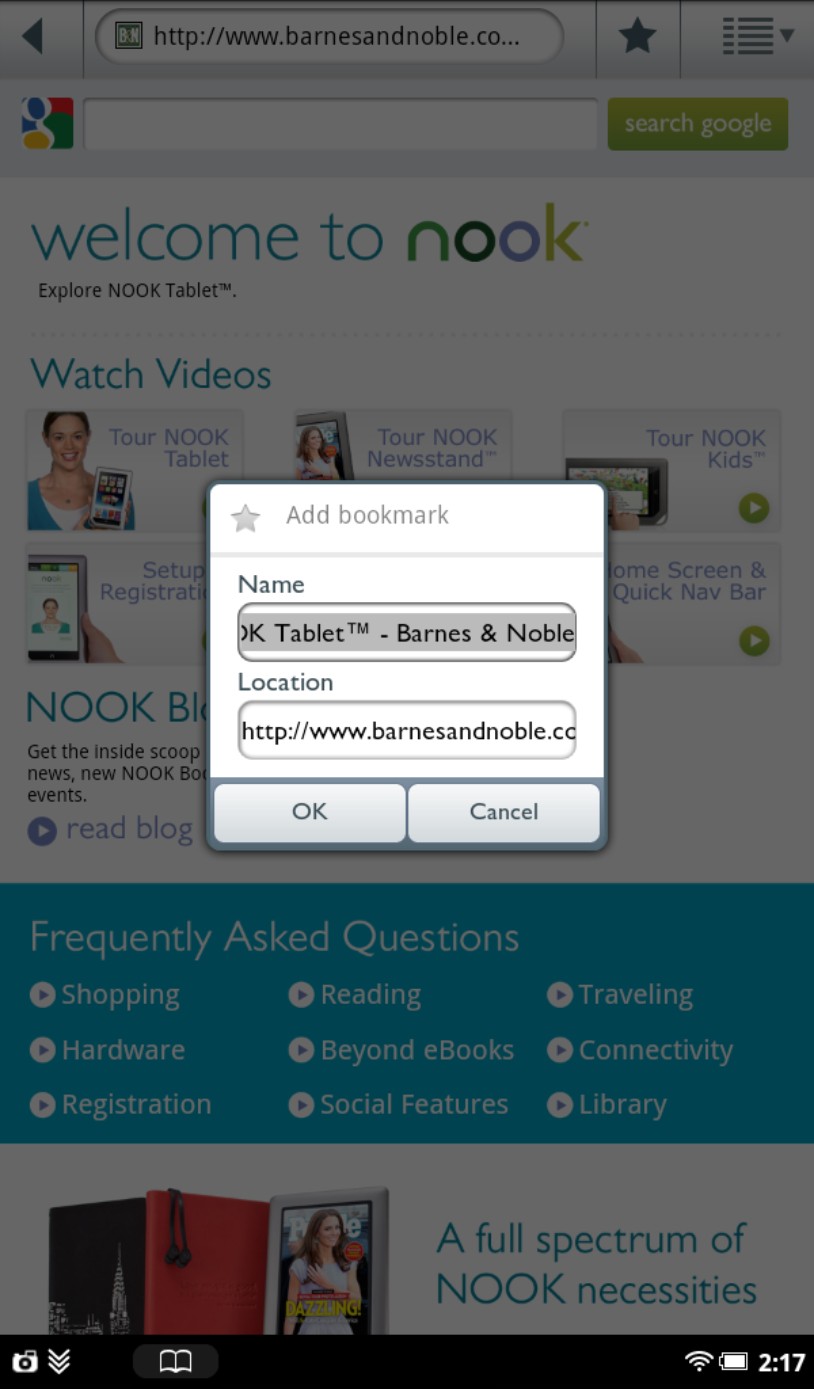
Figure 5-3: Bookmarks allow you to quickly jump to a favorite page on the web.
Deleting a favorite
Delete a web page bookmark this way:
1. Tap the Options menu.
2. Tap the Bookmarks option.
3. Press and hold the thumbnail for the bookmark you want to delete.
A pop-up menu appears.
4. Tap Delete Bookmark.
5. Tap OK.
Adjusting the web browser’s hair
The NOOK Tablet browser offers up five text sizes for web site text. Keep in mind that choosing a larger text size will make it easier to read but means you’ll have to move around to see all the information on a page. See Figure 5-4.
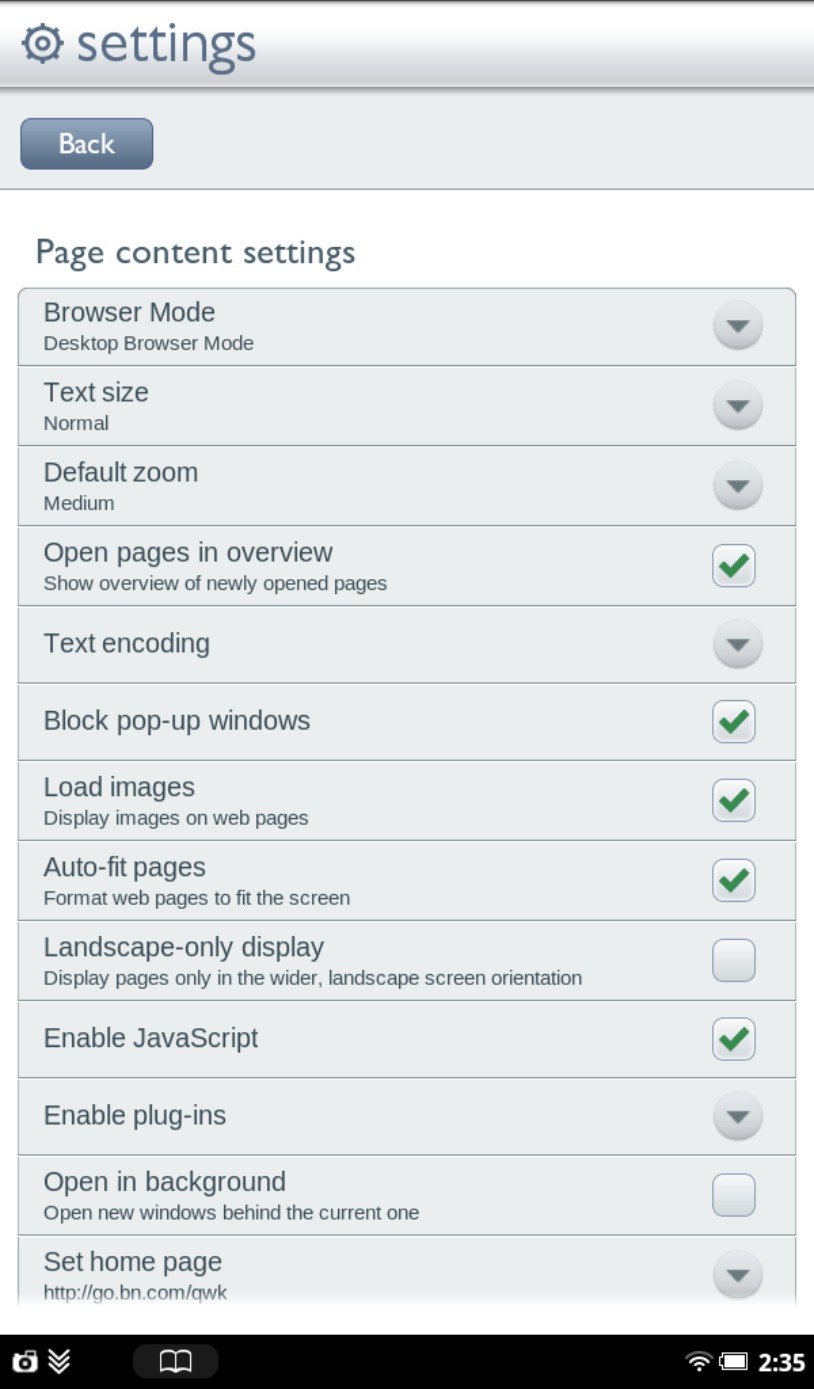
Figure 5-4: Page settings let you customize the web browser.
To change the text size, follow these steps:
1. Tap the Options menu.
2. Tap More Options.
3. Tap Settings.
4. Tap Text Size.
5. Tap the text size you want to see in the browser.
Your choices are nicely named: Tiny, Small, Normal, Large, and Huge.
6. Tap OK.
You can zoom in and out on an entire web page. On some pages that makes more sense than enlarging the text type.
To zoom in on a web page, quickly tap two times on the part you want to enlarge. Zoom out by tapping twice. After you zoom in, you can swipe left, right, up, or down to move around on the page. When you start moving around, plus (+) and minus (–) icons appear in the lower-left corner. Tap the (+) to zoom in more. Tap the (–) to zoom out.
Setting your home page
When you first use your NOOK Tablet’s web browser, the home page is the Barnes & Noble store, which is devoted to all things NOOK. You’re almost certainly going to want to return to there at some time, but speaking for myself I don’t need to be assaulted by advertising every time, all the time. I suggest making it a bookmark for easy access.
Consider changing your home page to something that makes broader use of the wonders of the web. I prefer my daily web-based newspaper as my home page, or sometimes my personal website of photos. You can choose your own.
To change your home page:
1. Tap the Options menu.
It’s at the far right of the address bar; refer back to Figure 5-2.
2. Tap More Options.
The Options menu closes and another menu opens.
3. Tap the Settings option.
4. On the Settings screen, tap Set Home Page.
A dialog box opens.
5. Type the web address (URL) for the page you want as your home page.
6. Click OK.
Configuring web privacy and security
There are people out there who know if you’ve been sleeping and know when you’re awake. What’s more, they know if you’ve been bad or good. For goodness’ sake — or at least for your own confidentiality — pay attention to your web browser’s privacy settings. See Figure 5-5.
 The NOOK Tablet doesn’t have a bunch of security tools for Internet use. A clever Internet pirate may be able to get some of your personal information. Thieves are more attracted to laptop computers, but I recommend being picky about the information you store on your NOOK Tablet, and about any information you type into the Internet.
Your first line of defense: Use tough passwords on any accounts you visit (like www.BN.com), and change the passwords from time to time.
Your second line of defense: Pay attention to privacy settings on the NOOK Tablet and clear out personal information (like cookies) on a regular basis.
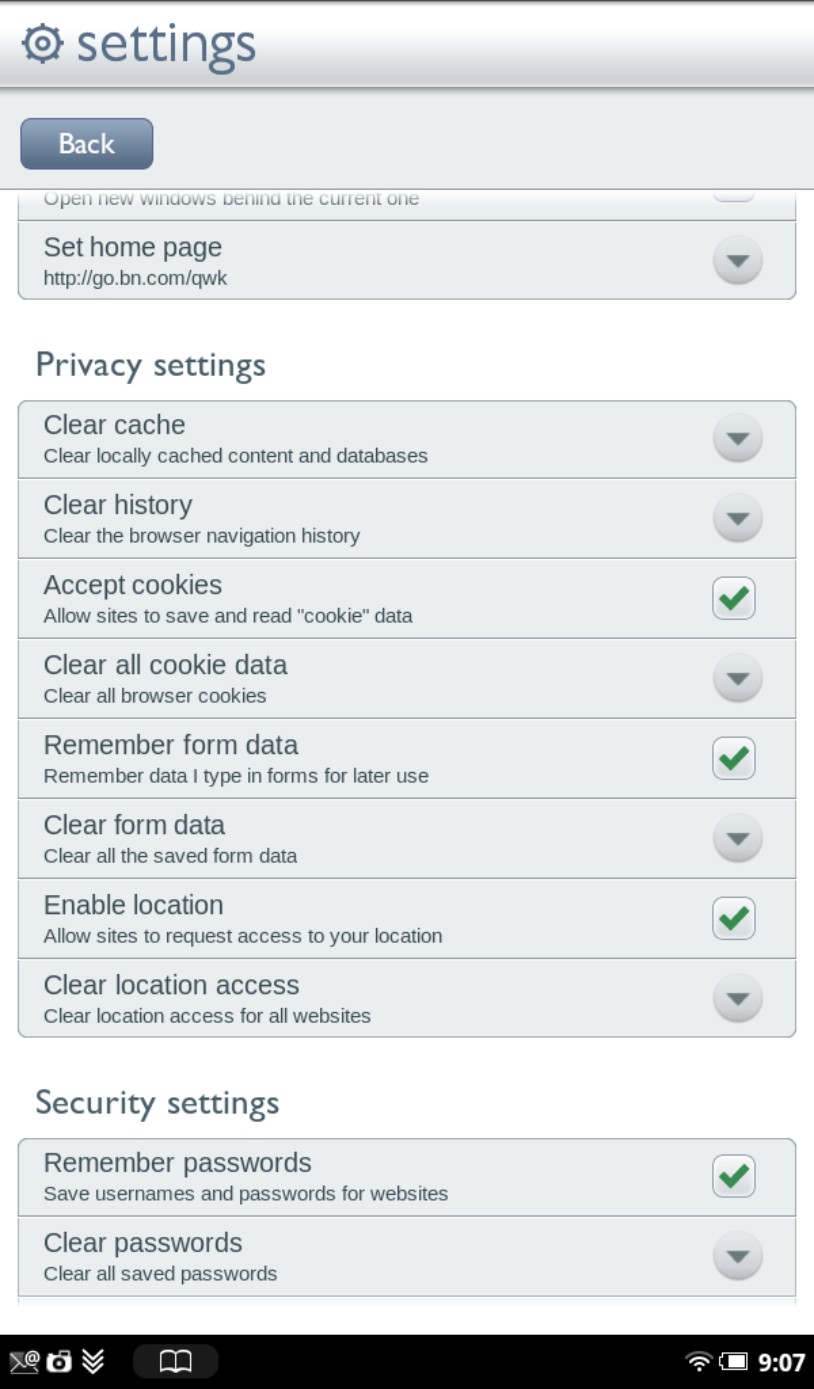
Figure 5-5: Privacy settings let you clear web pages, cookies, and history stored on a NOOK Tablet.
To get to either web privacy or security settings, follow along:
1. Start the web browser.
2. Tap the Options menu.
The Options menu is in the top-right of the address bar; refer back to Figure 5-2. When you click the arrow, a menu opens.
3. Tap More Options.
4. Tap Settings.
5. Go to Privacy settings or Web Security settings.
With your finger, drag the screen up, past Page Content settings.
6. Choose among options.
The options for web privacy and security settings are listed in the following sections.
Web privacy options
You can get to web privacy settings from the web browser’s Options menu. Again, choose wisely (and conservatively):
Clear Cache. If you tell the NOOK to clear the cache (pronounced cash), it will erase information about sites you have visited. To clear the cache, tap the down arrow and then tap OK.
Clear History. To remove a list of recently visited web pages, tap on the down arrow and then tap on OK.
Accept Cookies. This is turned on by default. To turn off this feature, clear the checkmark. (Note that some websites may not respond properly if you turn off cookies.)
 Some websites send a marker, a cookie, back to your tablet to indicate that you have visited the site, and sometimes to indicate choices or specific pages on the site you’ve explored.
Clear All Cookies. To delete cookies, tap the down arrow and then tap OK.
Remember Form Data. Your tablet can store data you’ve already typed into forms: things like your name, address, and phone number. This is turned on by default. To turn off this feature, clear the checkmark.
Clear Form Data. To clear any stored form data, tap the down arrow and then tap OK.
Enable Location. This allows sites to determine your general location by figuring out the location of the WiFi router you are using. To block this, clear the checkmark.
Clear Location Access. Tap the down arrow and then tap OK to remove information about your location.
Web security options
You can get to web security settings from the browser’s Options menu. Choose wisely.
Remember Passwords. If you tap to place a checkmark in the box, the browser will ask you if you want to store usernames and passwords for websites. (Not all sites let you do this.)
Clear Passwords. Tap the down arrow and then tap OK to clear all saved usernames and passwords.
Show Security Warnings. Tap to place a checkmark in the box to be warned if there’s a possible problem with a site’s security certificate.
In most cases, warnings about security certificates aren’t cause for concern. However, if you have any doubts, accept the warning as real and close the browser.
Adjusting web page content settings
The NOOK Tablet’s browser has some features that not even the most advanced and costly tablets offer — among them, full-screen pages rather than the small versions aimed at smartphones.
To get to the web security settings:
1. Start the web browser.
2. Tap the Options menu.
The Options menu is in the top right of the address bar; refer back to Figure 5-2. When you tap the Options arrow, a menu opens.
3. Tap More Options.
4. Tap Settings.
5. In the Page Content settings section (at the top), choose an option:
• Browser Mode. Tap the down arrow and select between Tablet Browser Mode and Desktop Browser Mode, which will give you full websites.
• Text Size. Tap the down arrow to choose a standard text size. Your choices are Tiny, Small, Normal, Large, or Huge.
• Default Zoom. Tap the down arrow to adjust how the tablet reacts to a double-tap for a zoom-in. Choices are Far, Medium, or Close.
• Block Pop-Up Windows. The browser automatically blocks pop-ups (boxes that unexpectedly appear, and mostly to your annoyance). However, you may need or want to see them. You can block on or off from the Page Content settings of the web configuration options.
• Load Images. Uncheck the box to load web pages with placeholders — not actual images. This makes most pages come up faster. You can tap the markers to show individual images.
• Auto-Fit Pages. This nice option arranges web pages to fit the shape of your tablet automatically.
• Enable JavaScript. Many websites use JavaScript to display animation or special effects. You’ll probably want to keep this on, although you might try shutting it off if you encounter problems with certain pages.
• Set Home Page. The NOOK Tablet has the Barnes & Noble welcome page as its home (starting page) anytime you open the web browser. To change the home page, tap the down arrow. Either tap the Use Current Page button or type a web address in the address bar.
Disabling and re-enabling the browser
Some users worry about leaving the door to the World Wide Web open all the time to all users. That might include parents who want to let the kids borrow the NOOK Tablet.
If you disable the browser, the tablet will still go to the B&N Store, although you can make sure someone has to enter a password to buy anything. However, you won’t be able to do any of the following things:
Surf the Internet
Search the web from the quick nav bar
Watch tutorial videos
Use the Look Up feature (in the reading tools) for research in Google or Wikipedia
To disable the web browser, the first step is to set up a restrictions passcode that protects the browser setting. (Otherwise someone could just re-enable your NOOK Tablet’s browser, despite your intentions.) Here are the steps:
1. Press the button to display the quick nav bar.
2. Tap Settings.
3. Tap the Security option.
4. Tap Restrictions.
5. Tap the Restrictions check box.
6. Enter a four-digit code.
This passcode is different from the one you may have set as a device lock.
7. Type the same code again when you’re asked.
8. Tap the Restrict the Browser check box so that it’s checked.
You can also put a mark in the Social Apps check box.
When the browser is disabled, the Web button in the quick nav bar will be grayed out and labeled Disabled.
To re-enable the web browser, follow these steps:
1. Press the button to display the quick nav bar.
2. Tap Settings.
3. Tap the Security option.
4. Tap Restrictions.
5. Tap the Restrictions check box.
6. Enter the four-digit code for Restrictions.
7. Tap the Browser check box so that it’s unchecked.
Sending and Receiving E-mail
The NOOK Tablet comes with e-mail that lets you send and receive from most other e-mail programs: an account you have set up on your own or a web-based e-mail service like Gmail. See Figure 5-6. A few important notes:
Your tablet must be connected to a WiFi network to receive and send e-mail.
Barnes & Noble doesn’t provide e-mail accounts.
You can see the 25 most recent messages for each account (that you’ve linked to the NOOK Tablet, anyway).
Using the E-mail app
These steps assume you’ve set up an e-mail account with a provider (like Google for Gmail or your ISP). To launch and use the Email app, do this:
1. Press the button to display the quick nav bar.
2. Tap Apps.
3. In the Apps window, tap Email and choose the automatic setup.
You’re taken to the Inbox. If you haven’t visited the Email app yet, you’re taken to a screen so you can set it up.
4. Type the address for your e-mail account.
5. Enter the password for the account.
6. (Optional) Tap the check box for Send E-mail from This Account by Default.
7. Tap Next.
The NOOK Tablet tries to connect. This will usually succeed if you’re using one of the common web-based services like Gmail, Hotmail, or Yahoo! Mail. You’re notified if all goes well; if not, you will see an error message. If you get an error message, try setting up manually. Those instructions are in the next section of this chapter.
8. (Optional) Type a name for this account.
A name can help you distinguish among multiple accounts. If you don’t want to name the account, leave the option blank.
9. Enter your name as you want it to appear in e-mail messages that you send.
Recipients see this name in the From field on their Email app.
10. Click Done.

Figure 5-6: Choosing an e-mail protocol is an essential element of configuring an account.
Setting up an account manually
If automatic setup doesn’t work, set up your Email app account manually. You have to know the exact name of your provider’s e-mail server for sending and receiving. You should be able to find that by consulting help or FAQ pages for the provider, by calling their help desk (some are more helpful than others), or by examining the Properties setting on an existing e-mail program on your desktop or laptop computer. See Figure 5-7.
To set up an e-mail account manually, follow these steps:
1. Press the button to display the quick nav bar.
2. Tap Apps.
3. In the Apps window, tap Email.
You’re taken to the Inbox. If you haven’t visited the Email app yet, you’re taken to a screen so you can set it up. You have to choose between automatic and manual configuration. Both ways are described next.
4. Type the address for your e-mail account.
5. Enter the password for the account.
6. (Optional) Tap the check box for Send E-mail from This Account by Default.
7. Tap Manual Setup.
The Server Settings screen opens.
8. Choose an account type: POP or IMAP.
9. Tap OK.
10. Enter the name of the POP or IMAP server.
For example, it might be something like IMAP.isp_server.com.
Some systems have extra security requirements or use a non-standard port (the gateway from your tablet to the Internet). Unless your provider has told you otherwise, leave these settings unchanged.
11. Tap Next.
If the NOOK Tablet connects with the e-mail provider, it shows you another setup screen.

Figure 5-7: Get your server name and other specific information from your e-mail provider.
12. Enter the name of the SMTP server.
An example might be something like SMTP.isp_server.com.
If all goes well, you see one final page.
13. Make a time selection.
This is how often the tablet will check for new e-mail.
14. Indicate whether you want to hear a chime when you get new e-mail.
15. Tap Next.
16. Tap Done.
Sending an e-mail
Sending a message is very simple.
1. Tap the pencil icon in the upper-left corner.
The icon is pointed out in Figure 5-8.
2. Type an address in the To box.
Or you can tap the Contacts icon and choose an address. Separate additional names with a comma.
If you’ve set up more than one e-mail account, you can switch by tapping Account (at the top of the Email screen). Choose the inbox for the account you want to check. You can also select Combined Inbox to see all messages from all established accounts in a single listing.
3. Type a message.
4. Tap Send.
Replying to or forwarding a message
Forwarding a message sends a copy of the message to someone else. The process is nearly identical to that of Reply. Here’s how:
1. Open an e-mail message.
2. Tap Reply.
Some day you’re going to thank me for this one: Be very careful before you choose Reply All if you intend to crack wise, complain, or pass along some comment you may someday regret. Choose Reply All only after you have duly considered all of the potential consequences and studied all of the addresses to which your response will be sent.
3. Tap Forward.
The Compose screen opens.
4. Type the e-mail addresses to send the message to.
You can add a note of your own, like “This is the funniest joke I’ve ever heard.” The original subject line goes along with the message, along with Fwd:. You can edit the subject if you’d prefer. See Figure 5-8.
5. Tap Send.
Look carefully at a message before you send it. Do you really want all recipients to know all the information it has? Are you possibly violating someone’s expectation of privacy by passing along all e-mail addresses? Remember, too, that a recipient of a forwarded message might choose to forward it to a new group of people, spreading its contents (and e-mail addresses) to people you don’t know. I generally edit out all unnecessary information from messages I forward.

Figure 5-8: The NOOK Tablet e-mail panel shows unopened messages in bold.
Deleting e-mail
To get rid of a message you have open, tap the Delete button at the bottom of the screen.
If the message you want to get rid of isn’t open, go to the Inbox and follow these steps:
1. Tap the check box next to the message(s) you want to delete.
2. Tap the trash can icon at the upper-right corner of the screen.
Getting attached
Can you remember your first attachment? The thrill of victory, the agony of defeat.
Enough about high school. Let’s talk about our mature, modern lives. A time when we use our high-tech computer tablets to send photographs of the grandchildren, video clips of cats stuck in shoe boxes, and singing birthday cards. Most of those are sent as attachments to e-mails, which means you’re sending a separate file along with the text of a message.
If you get a message with attachments, tap the View Attachments button.
The NOOK Tablet can work with PDF files or Microsoft Office word processing, spreadsheet, and simple PowerPoint files. The NOOK will store e-mail attachments in the MyFiles/Downloads folder. In the first release of the operating system for the NOOK Tablet, you can receive attachments but cannot send them. This oversight may be fixed in later updates.
Putting Your Social Affairs in Order
Your NOOK Tablet comes ready to work with some Facebook or Twitter features; you can import your contacts from a Google Gmail account. All of this, of course, requires that your NOOK Tablet be connected to a WiFi network and signed in. See Figure 5-9.
On Facebook you can post recommendations, comments, quotations, and LendMe offers on your own wall or on a friend’s who’s given you that access. In Facebook lingo, you can “like” a book to declare your feelings. You can even tell the world of your “reading status” if you think it’s important to declare that you’ve reached page 125.
Then there are the tweets that tumble to your tablet from Twitter. If you let your NOOK use your account, you can read Tweets, see the online names of the people you follow, follow someone new, and update your profile.
The Twitter exceptions: You can’t get to your direct messages or set your Twitter password from the special app on the NOOK Tablet. However, you can go to the NOOK Tablet’s web browser and sign into Twitter if you want to do those tasks.
The world of Google is burgeoning. When you link your account to the NOOK Tablet, you can move amongst most of the Google apps, including Gmail.
To link a NOOK Tablet to one of these social networking accounts:
1. Press the button to display the quick nav bar.
2. Tap the Settings button.
3. In the Settings panel, scroll down to App Settings and tap Social.
4. Tap Manage Your Accounts.
5. Link your Facebook, Twitter, or Google accounts.
Each website has a different login screen, and their features will change over time: I guarantee you.
If you don’t have an account with Facebook, Google, or Twitter, you can sign up through the page displayed on your NOOK Tablet. You may find, though, that it’s easier to sign up, customize, and enhance your page from a personal computer. Wherever you connect to one of these services, all your actions are linked.

Figure 5-9: The NOOK Tablet can link to Facebook, Twitter, and Google.
App-lying Yourself
Your NOOK Tablet runs the Android operating system. That’s a very good thing, because Android (developed by Google) has been adopted by a wide range of smartphones and tablets; because of that, lots of people have made applications (or apps — small programs) that can run on these devices.
At least officially, the only source of add-on programs for the NOOK Tablet is through the NOOK App Store.
Some users of the NOOKcolor eReader, which is the older and cousin to the NOOK Tablet, have rooted their device so they can have access to most of the Android device apps without having to go through the B&N Store. (Neither the NOOKcolor or the NOOK Tablet has a camera, which eliminates one large category of apps.) If you explore this route to rooting, be aware that Barnes & Noble may void your warranty if your tablet becomes unusable. For that reason, I’m not recommending you root; that said, you’ll find abundant information about rooting a NOOK if you look on the web.
The supplied apps
The NOOK Tablet comes with some applications. Press the button to display the quick nav bar and then tap Apps. Here are the apps that came with the first release of the tablet:
Chess. This well-designed version of the classic game lets you play against the computer at easy, normal, or hard levels. You can apply a clock to the game and select color schemes.
Contacts. A manager for names, addresses, phone numbers, and e-mail addresses. Once you add a contact, you can use it in the Email app as well as the social network apps.
Crossword. 56 Across: Lots of fun for logophiles. The clue appears when you choose a column or row. I especially like that the font looks like handwriting. The games are challenging, though not quite up to the level of The New York Times. See Figure 5-10.
Music Player. With this program you can play music files that you’ve downloaded (or side loaded; see Chapter 3) to your NOOK. I discuss the player in the next section of this chapter.
My Media. (Also called the Gallery in some references on the tablet and in the instruction manual.) This all-purpose picture collector and video player works with files you downloaded or side loaded to your NOOK. (Again, see Chapter 3 for side-loading instructions.)
NOOK Friends. This is Barnes & Noble’s own version of a social network combined with a lending library. You can communicate with those you have befriended, sharing recommendations and comments and lending books —subject to certain restrictions.
Sudoku. The addictive — to some — Japanese number puzzle is here on your tablet. If this is what you’re looking for, this is a fine example.
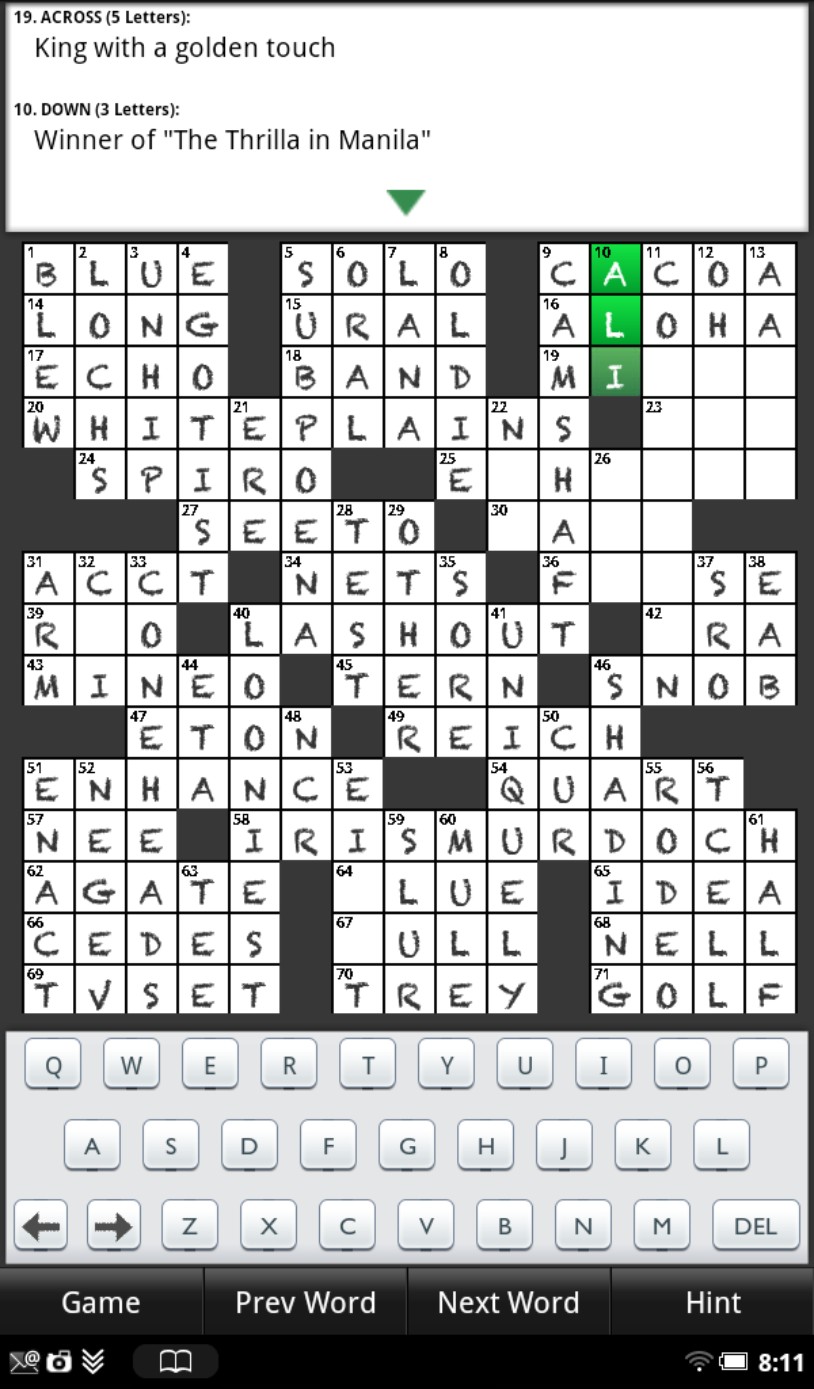
Figure 5-10: Crossword is a worthy complement to an educated reader.
This chapter already explores the Email app, part of the basic operating system. The NOOK Tablet also comes with three preinstalled links to streaming video and music services:
Pandora
Hulu Plus
Netflix
I discuss those later in this chapter.
Music player
Audio sounds a little better if you plug a set of earbuds into the headphone output jack. (Figure 1-1 in Chapter 1 can help you find it.) See Figure 5-11. The NOOK plays most of the common file formats, including MIDI, MPEG, WAV, AAC, and AMR.
Moving audio files onto the NOOK Tablet
To transfer audio files onto the NOOK Tablet:
1. Connect your NOOK Tablet to a personal computer using the microUSB cable.
Use the cable that came with the device or an identical cable; don’t use a generic cable. (The cable detaches from the AC adapter; that end is a standard USB plug that you can attach to a desktop or laptop computer.)
On your desktop or laptop computer, the NOOK Tablet shows up as a new disk drive called MyNOOK (or, on some devices, as a Removable Drive with a letter code). If a microSD(HC) memory card is in your NOOK Tablet, it will also show up in My Computer (Windows) or in the Finder (Macintosh).
2. Drag the files onto the MyNOOK drive or the memory card.
Put audio files in the Music folder in My Files.
3. Eject the media drive.
The official instructions say this is a must. Microsoft Windows usually has a Safely Remove Hardware icon in the system tray. Or go to My Computer, highlight and right-click the drive, and choose Eject.
4. Unplug the USB cable.

Figure 5-11: The controls for the music player are simple and obvious.
Playing an audio file from the Library
You can start the music player
By tapping a music file
By tapping the music player icon
From the Library shown in Figure 5-12
Here’s how to do the latterest:
1. Press the button to display the quick nav bar.
2. Tap My Stuff.
3. Tap the My Files icon.
4. Find and tap the Music folder.
5. Tap the file you want to play.
The music starts up.
Launching the music player directly
To launch the music player application directly:
1. Press the button to display the quick nav bar.
2. Tap the Apps icon.
3. Tap the music player icon.
The music app has two modes: Browse and Now Playing. A red (not rock) band tells you which mode you’re in. To switch modes, tap the icon in the upper-right corner of the screen. Tap three times on the ceiling if you’re a Tony Orlando fan.
In Browse mode, you can choose from these options:
Shuffle. (Icon: two crossed arrows) The tablet randomly selects and plays songs from your collection.
Repeat. (Icon: two arrows in a loop) Tap once to repeat all your songs; tap tap twice to repeat the current track.
Album art. (Icon: a box) See artwork for the track that’s playing.
Browse. (Icon: a stack of horizontal lines) See available tracks.
Search. (Icon: a magnifying glass) Hunt through your NOOK Tablet files to find a particular song or artist.
List. (Icon: musical note) See songs and times.
Artist. (Icon: microphone) See songs by the artist’s name.
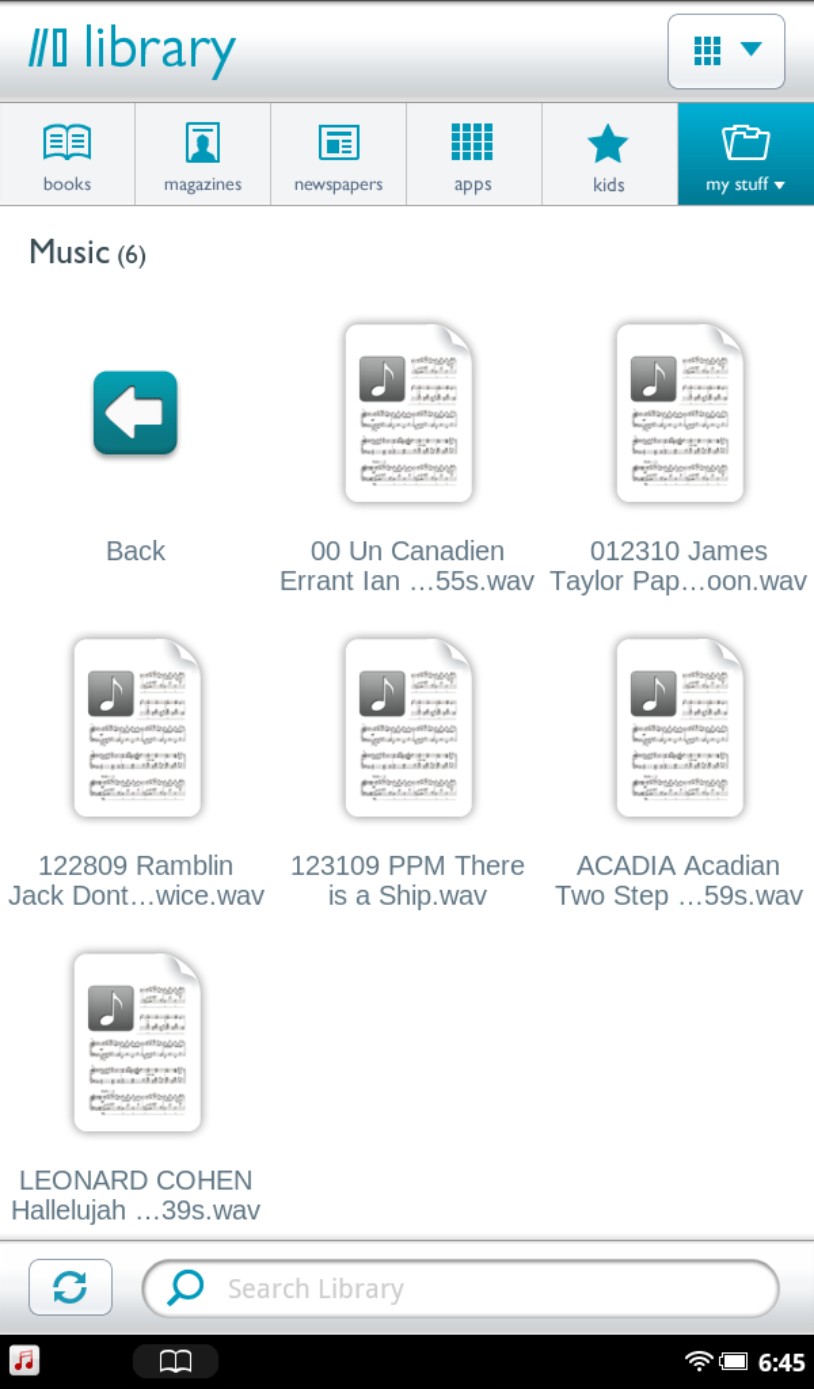
Figure 5-12: Music files are considered media, like other items in the NOOK Library.
When you’re using the music player in Now Playing mode, you can press and hold the gray arrow (to the left of a song title) and drag the file up or down in the list to change the song order.
Opening That Box: Pandora Radio
I am old enough to remember radio; in fact, I remember the days before they were portable; big boxy things with a plug. But Pandora has opened another box. See Figure 5-13. Think of it as your personal electronic disk jockey that starts with a few songs or artists you like and then finds music that’s similar or shares certain attributes.
You get to create and fine-tune your own stations. You can have as many as 100 channels and play just one, or rotate through them all, or ask the tablet to play randomly. The basic Pandora Internet Radio service is free, but an enhanced, commercial-free subscription is sold for certain devices. As this book goes to press, the Pandora app on the NOOK Tablet only runs the free (with advertising) version; however, if you go to the web browser on the NOOK Tablet and visit www.pandora.com, you can use the full site for free or sign up for ad-less music for a reasonable annual fee.
To use Pandora (and Hulu Plus, about which you read about shortly) you must have a membership; it’s separate from your account with Barnes & Noble. If you have a previously established Pandora account, you can sign in to it from the NOOK Tablet; if not, you can set up one from the tablet or from a desktop or laptop computer.
You must have an active WiFi connection to listen to Pandora; it can play in the background while you read or shop or use other elements of the NOOK Tablet. Use the Home button on the quick nav bar to move somewhere else. While Pandora plays, a small P icon appears on the right side of the status bar. Tap this icon to return to the Pandora app.
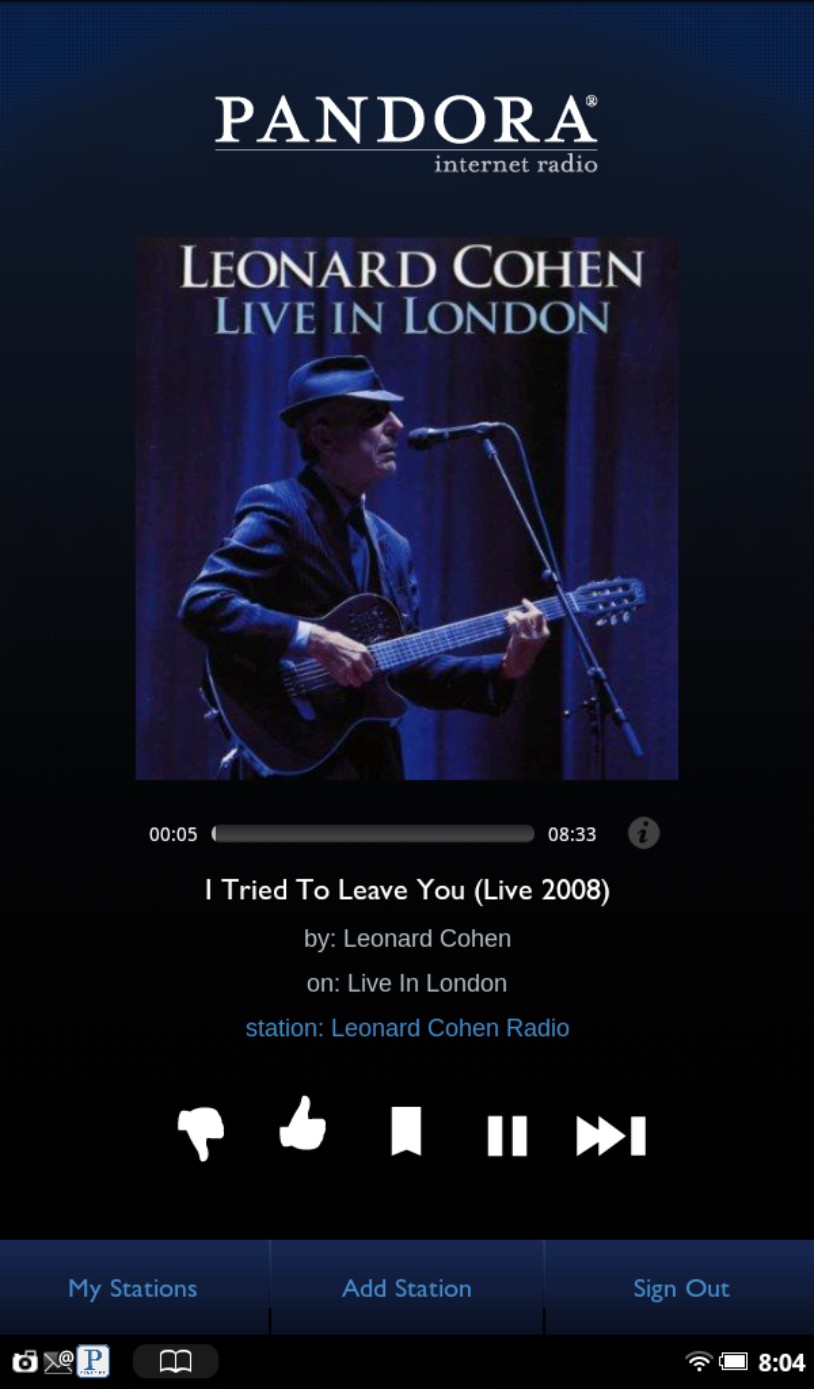
Figure 5-13: Pandora gives you a personal musical curator on the Internet.
Video Playing On
The NOOK Tablet’s high-resolution, full-color screen is quite capable as miniature TV, although the screen size is obviously more suited for solo watching up close.
You can use this facility three ways:
Visit websites that offer free video on demand. These include sites like www.youtube.com, computer and electronics review sites like www.cnet.com, and TV networks like www.nbc.com. For best results, choose a file intended for a tablet.
Subscribe to services like Hulu Plus and Netflix. (I discuss these in the following sections.)
Watch videos that you’ve side loaded. (See Chapter 3 for instructions.) The videos may be ones you took with your video camera or cellphone, or they may be works you got (legally). Transfer compatible video files from a personal computer using the USB cable; follow the same instructions you would for transferring music and audio files. Those instructions are in this chapter’s “Moving audio files onto the NOOK Tablet” section.
The best quality videos are in MP4 and M4V file formats. The other acceptable file formats come from the small-screen world of smartphones, including 3GP. To play a video that you’ve loaded onto your NOOK Tablet, find and tap it. (One route: Tap the button; tap Library, and then tap My Stuff. Find the file in the Video or Downloads folder.) If you try to load and run a file that isn’t supported, it simply won’t play.
In most cases you can’t enlarge a video that you’re playing from a file that’s stored on the NOOK Tablet; the pinch-out gesture may work with some streaming video websites, though.
Subscribing to Hulu Plus
Hulu Plus brings current and older TV shows, and some movies, to your tablet over the Internet on a monthly subscription basis. See Figure 5-14. Shows generally have limited advertising.

Figure 5-14: Catch up on certain TV shows and movies using Hulu Plus.
Hulu Plus and Netflix videos are streamed to your device and not stored on it. The only way to watch television shows or movies offered by these services is with an active WiFi connection to the Internet.
Your NOOK Tablet has an app that takes you directly to the Hulu Plus website; you can also get there by using the web browser and going to www.hulu.com/plus. You can sign up for the service from your NOOK Tablet or from a desktop or laptop computer. (The original free service, Hulu, isn’t available on the NOOK Tablet.)
Subscribing to Netflix
Netflix is one of the main providers of streaming video (and they’re streaming to everything from PCs to Internet-connected TVs, to handheld devices — including your NOOK Tablet. You can sign up for a monthly subscription.
Netflix shows only in landscape mode on the tablet, and offers thousands of movies. Not all the Netflix library is available to stream; some are offered only in DVD form. Visit www.netflix.com and explore some of the library.