
HTTP REQUESTS AND ROUTING
This chapter shows you how to make HTTP requests in Angular applications and how to work with Observables in Angular applications. The code samples show you how to obtain data from various sources, and how to create an Observable from a Promise. If need be, you can access various online tutorials containing introductory material about Observables and Promises.
The first section briefly discusses Dependency Injection (DI) and the @Injectable decorator. The second section shows you how to make an HTTP request in an Angular application to read JavaScript Object Notation (JSON)-based data defined in a text file.
The third section shows you how to make an HTTP request in an Angular application to retrieve information about a GitHub user. You will also see how to make multiple concurrent requests via the forkJoin() method. The final section in this chapter discusses routing in Angular applications.
NOTE

When you copy a project directory from the companion disc, if the node_modules directory is not present, then copy the top-level node_modules directory that has been soft-linked inside that project directory (which is true for most of the sample applications).
Dependency Injection in Angular
Angular provides a simple mechanism for dependency injection: a dependency is injected into the constructor of a class. You can inject multiple dependencies by specifying each dependency as an argument in a constructor of a class.
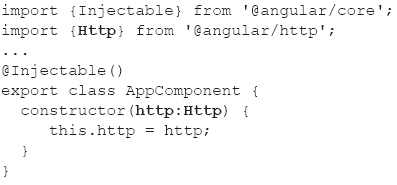
DI involves specifying the @Injectable decorator above a TypeScript class, and a constructor with a type that you want to be injected. The code samples in this chapter use the Http service, which is also imported in TypeScript files.
There are two simple steps that you need to perform: First, import Http in app.component.ts (and possibly other custom classes) and then update the contents of app.module.ts.
For example, the following code block (which is Step 1) injects an instance of the Http class (shown in bold):
NOTE
The Http module uses rxjs to return Observables in Angular.
As you can see in the preceding code block, the Injectable service is in @angular/core, whereas the Http service is in @angular/http.
NOTE
You must also update the contents of app.module.ts when you import Http.
Step 2 involves updating app.module.ts, as shown here:
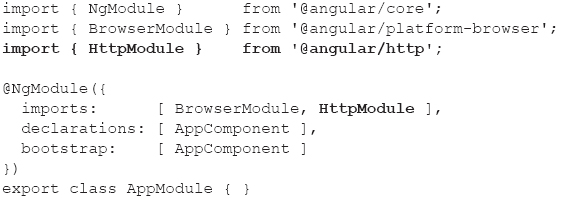
Notice that the preceding code block imports HttpModule from @angular/http and specifies it as a dependency in the imports property, whereas Step 1 imports Http from @angular/http. Later in this chapter, you will see code samples that require the providers property in app.module.ts.
Flickr Image Search Using jQuery and Angular
The code sample in this section shows you how to use jQuery in an Angular application, which is relevant for existing Web pages that perform HTTP requests via jQuery.

Copy the directory SearchFlickr from the companion disc into a convenient location. Note that the file index.html contains the following code snippet, which enables the use of jQuery in this project:
<script src="http://code.jquery.com/jquery-latest.js"> </script>
Listing 4.1 displays the contents of app.component.ts that illustrates how to make an HTTP GET request to retrieve images from Flickr. This request is based on text string that users enter in a search box.
LISTING 4.1: app.component.ts
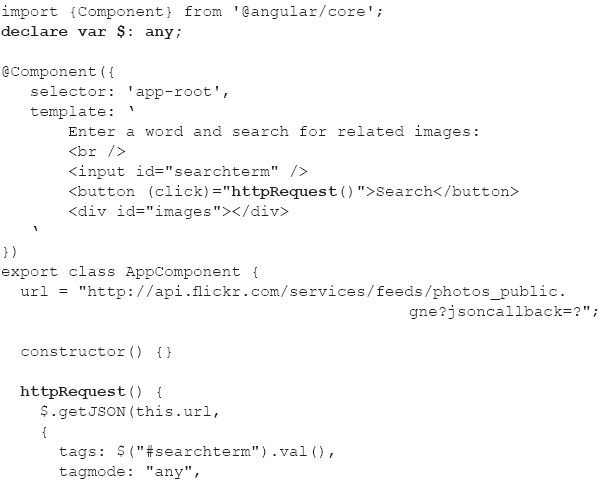
Listing 4.1 contains a standard import statement, followed by this code snippet:
declare var $: any;
The preceding snippet is necessary for TypeScript to “find” jQuery, which is loaded via a <script> element in index.html. If you remove the preceding code snippet, you will see the following error:
app/app.component.ts(20,5): error TS2304: Cannot find name '$'.
The next portion of Listing 4.1 is the @Component decorator, whose template property contains <input>, <button>, and <div> elements to capture the user’s search string, perform a search with that string, and display the results of the search, respectively.
The next portion of Listing 4.1 is the exported class @AppComponent that defines the url variable that is initialized with a hard-coded string value that “points” to the Flickr website.
Next, an empty constructor is defined, followed by the httpRequest() method that is invoked when users click the <button> element. This method invokes the jQuery getJSON() method that performs a Flickr image search based on the text string entered in the <input> element because of this code snippet:
tags: $("#searchterm").val()
When the matching images are retrieved, they are available via data.items, and the jQuery each() method iterates through the list of images. Each image is dynamically inserted in the <images> element via this snippet:
$("<img/>").attr("src", item.media.m).prependTo("#images");
FIGURE 4.1 A partial list of images showing pasta.
Take a minute or two to absorb the compact manner in which jQuery achieves the desired result.
Figure 4.1 displays the output from launching this Angular application and searching Flickr with the keyword pasta.
Combining Promises and Observables in Angular
The code sample in this section shows you how to retrieve JSON-based data, convert that data into a Promise, and then convert the Promise into an Observable. In addition, you will see two techniques for handling the data: One code block handles the data as a Promise, and another code block handles the data as an Observable (so you have a choice of either style). Remember that the Http service in Angular returns an Observable that supports a subscribe() method.
Navigate to the following website to sign up for the free application programming interface (API) key that you will need for the code sample in this section:

Now copy the directory SearchNYT from the companion disc into a convenient location. Listing 4.2 displays the contents of app.component.ts that illustrates how to convert a Promise (that is returned from a custom service) into an Observable and then display the returned data as a list of links.
LISTING 4.2: app.component.ts
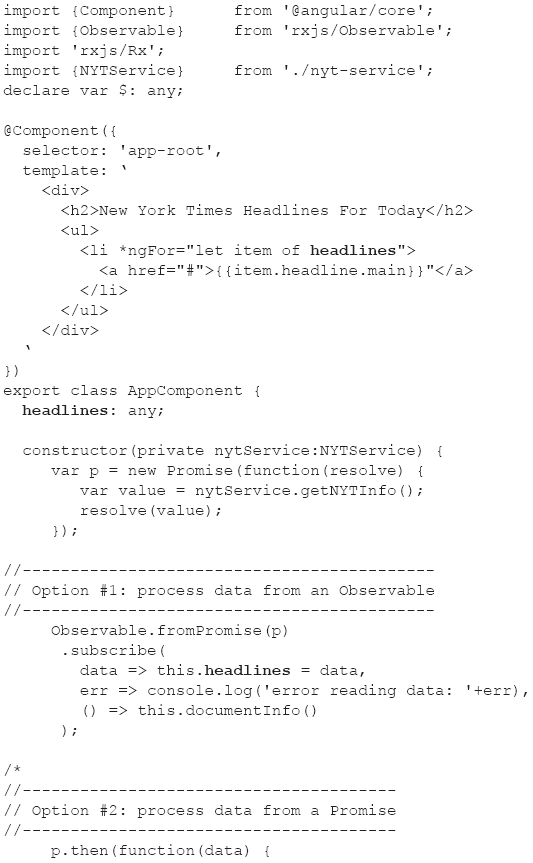
Listing 4.2 contains an @Component decorator whose template property displays an unordered list of headlines from articles that are retrieved from the New York Times website.
The AppComponent class contains three parts. The first part defines a Promise p that invokes the getNYTInfo() method (defined in the NYTService class shown below) to obtain a set of articles. The second part defines an Observable from the Promise p, whose subscribe() method initializes the variable headlines with the list of headlines from the retrieved articles via this code snippet:
data => this.headlines = data.response.docs
The *ngFor statement in the template iterates through the items in headlines to display the list of article headlines.
The third part obtains the list of articles from the Promise p, and initializes the variable headlines with the list of headlines from the retrieved articles.
Listing 4.3 displays the contents of nyt.service.ts that uses jQuery to make an HTTP GET request from a New York Times endpoint, which then returns a Promise to the parent component. Note that the endpoint will return a JSON string, and that the return statement (shown in bold in Listing 4.3) converts that JSON string into a Promise.
LISTING 4.3: nyt.service.ts

Listing 4.3 initializes the variables apiKey and nytURL with the value of the registered API key and the New York Times URL, respectively. The main focus is the gettNYTInfo() method, which that populates various attributes (such as fq and fl) that are required by the New York Times, and then invokes the jQuery get() method to retrieve articles from the New York Times.
Here’s the interesting part: Because of the return statement (shown in bold), the JSON-based data is returned as a Promise. The docsArray contains an array of articles that is accessed in the code in Listing 4.2.
Listing 4.4 displays the updated contents of app.module.ts that imports the NYTService class and the Angular HttpModule.
LISTING 4.4: app.module.ts
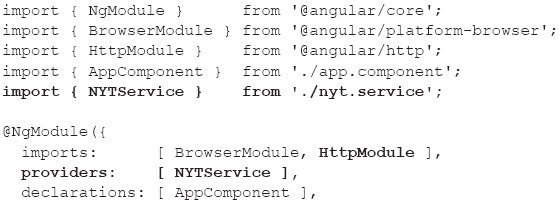
The main thing to notice in Listing 4.4 is that the custom NYTService class is listed in the array of providers, whereas the Angular HttpModule is listed in the array of imports, both of which are specified in the @NgModule decorator.
Note that the Web service is less than 100% reliable, and you might see an error message similar to this one:
ERROR in SearchNYT/src/app/app.component.ts (36,39): Property 'response' does not exist on type '{}'.)
webpack: Failed to compile.
Wait a short while and reload the Web page and eventually you will see the correct results.
Figure 4.2 displays the output from launching this Angular application and retrieving a set of articles from the New York Times (admittedly the user interface [UI] portion can be greatly improved).

FIGURE 4.2 A list of article headings from the New York Times.
Reading JSON Data via an Observable in Angular

This section shows you how to read data from a file that contains JSON-based data. Copy the directory ReadJSONFile from the companion disc into a convenient location. Listing 4.5 displays the contents of app.component.ts that illustrates how to make an HTTP request (which returns an Observable) to read a JSON based file with employee information.
LISTING 4.5: app.component.ts
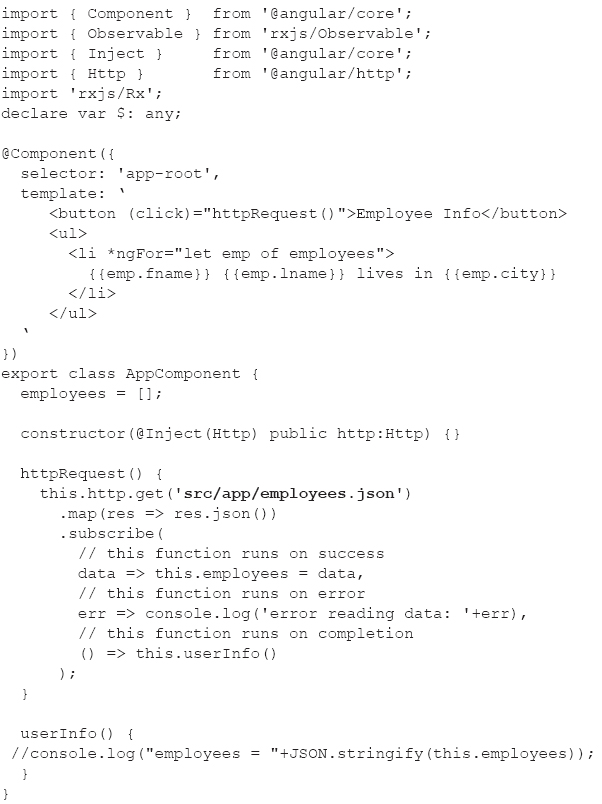
The template property in Listing 4.5 starts with a <button> element for making an HTTP GET request to retrieve information about employees. The template property also contains a <ul> element for displaying an unordered list of employee-based data.
The AppComponent class contains the variable employees, followed by a constructor that initializes the http variable, which is an instance of the Http class. The httpRequest() method contains the code for making the HTTP GET request that returns an Observable. The subscribe() method contains the usual code, which in this case also initializes the employees array from the contents of the file employees.json in the subdirectory app/src.
Listing 4.6 displays the contents of employees.json that contains employee-related information. This file is located in the src/app subdirectory, as shown in bold in Listing 4.5.
LISTING 4.6: employees.json
[
{"fname":"Jane","lname":"Jones","city":"San Francisco"},
{"fname":"John","lname":"Smith","city":"New York"},
{"fname":"Dave","lname":"Stone","city":"Seattle"},
{"fname":"Sara","lname":"Edson","city":"Chicago"}
]
Listing 4.7 displays the contents of app.module.ts that imports the Angular HttpModule.
LISTING 4.7: app.module.ts
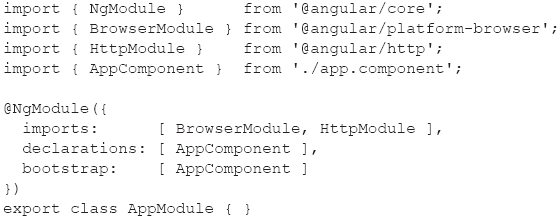
Listing 4.7 contains the standard set of import statements, along with HttpModule, which is listed in the array of imports in the @NgModule decorator.
FIGURE 4.3 A list of employees from a JSON file.
Figure 4.3 displays the output from launching this Angular application and retrieving JSON-based employee data from a file.
The next section contains an example of using forkjoin(), and the code is similar to the contents of Listing 4.5.
Multiple Concurrent Requests with forkJoin() in Angular
The code sample in the previous section reads the contents of a single file. However, in some cases you might need to load data from multiple sources, and delay the post-loading logic until all the data has loaded. Observables provide a method called forkJoin() to “wrap” multiple Observables, and make multiple concurrent http.get() requests. Note that the operation fails if any individual request fails. The subscribe() method sets the handlers on the entire set of Observables.

Copy the directory ForkJoin from the companion disc into a convenient location. Listing 4.8 displays the contents of app.component.ts that illustrates how to reference the custom component FileService, which reads the contents of employees.json and customers.json.
LISTING 4.8: app.component.ts
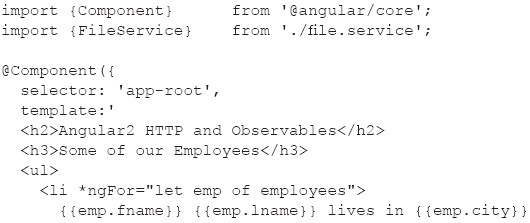
The template property in Listing 4.8 contains an unordered list of employees and an unordered list of customers, both of which are retrieved via the method getBothFiles() in the custom AppComponent component. Notice that the retrieved data is an array of two elements, where the first element contains customer-related data and the second element contains employee-related data.
The getBothFiles() method is invoked in the ngOnInit() lifecycle method, and the actual HTTP GET request is performed in a method (also called getBothFiles()) that is defined in the FileService custom component.
Listing 4.9 displays the contents of file.service.ts that defines the class FileService. This class contains a method getBothFiles() that uses forkJoin()to read data from two JSON-based files.
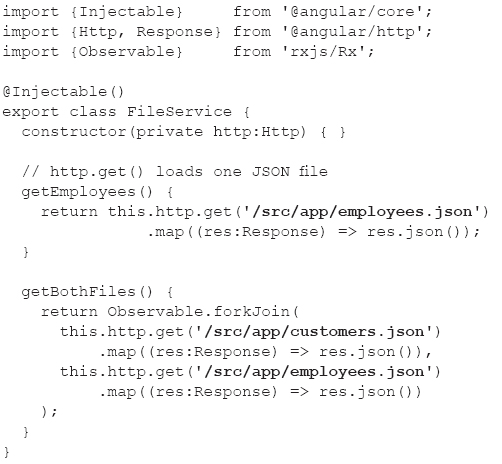
Listing 4.9 contains the getBothFiles() method, which invokes the forkJoin() method of the Observable class to retrieve the JSON data in the file src/app/customers.json and the file src/app/employees.json.
The following code snippet appears three times in Listing 4.9, and in every case it returns JSON-formatted data inside an Observable:
.map((res:Response) => res.json())
The employee-related data is displayed in Listing 4.6, and Listing 4.10 displays the contents of customers.json that contains customer-related information.
LISTING 4.10: customers.json
[
{"fname":"Paolo","lname":"Friulano","city":"Maniago"},
{"fname":"Luigi","lname":"Napoli","city":"Vicenza"},
{"fname":"Miko","lname":"Tanaka","city":"Yokohama"},
{"fname":"Yumi","lname":"Fujimoto","city":"Tokyo"}
]
Launch the Angular application via the ng serve command. You will see the following output in a browser session at the address localhost:4200:
Angular2 HTTP and Observables
Some of our Employees
 Paolo Friulano lives in Maniago
 Luigi Napoli lives in Vicenza
 Miko Tanaka lives in Yokohama
 Yumi Fujimoto lives in Tokyo
Some of our Customers
 Jane Jones lives in San Francisco
 John Smith lives in New York
 Dave Stone lives in Seattle
 Sara Edson lives in Chicago
Now that you have a basic grasp of how to work with Observables in Angular applications, let’s see how to represent JSON data in a TypeScript interface.
TypeScript Interfaces in Angular
The JSON file customers.json contains record-like information about customers, each of which can be modeled via something called an interface, which exists in many programming languages. Interfaces are somewhat analogous to a struct in languages such as Apple Swift, Google Go, or the C programming language.
In general, a TypeScript interface specifies a list of variables and their type, along with one or more methods. A TypeScript interface is a useful construct whenever you want to associate logically related data items (i.e., pieces of information). Many examples of entities with multiple data items are available, such as customers, employees, students, purchase orders, and so forth. You can model all of them (and many others) with a TypeScript interface, an example of which is discussed in the next section.
Listing 4.11 displays the contents of employee.ts that contains an interface for a hypothetical employee. A real-life example would contain many other pieces of information (and methods) in such an interface, whereas this highly simplified example is intended to illustrate how to use TypeScript interfaces in Angular.
LISTING 4.11: employee.ts
export interface Employee {
fname: string,
lname: string,
city: string
}
Notice that the structure of the interface Employee in Listing 4.11 matches the contents of the rows in Employees.json.
JSON Data and TypeScript Interfaces
Listing 4.12 displays the contents of employees.ts that contains an array of Employee instances. The file employees.ts illustrates how to populate an array with hard-coded data values that conform to a TypeScript interface. Note that Listing 4.10 is not used in the current code sample. Its purpose is to merely demonstrate that it’s possible to load “seed data” (which can be useful for testing purposes) from a static file.
LISTING 4.12: employees.ts

An Angular Application with a TypeScript Interface
This section discusses how to create an Angular application that uses a TypeScript interface.
Create an Angular application called ReadJSONFileTS by cloning the Angular application ReadJSONFile and then make two small changes to the contents of app.component.ts in ReadJSONFileTS.
The first change is to include the following import statement:
import {Employee} from './employee';
The second change is to replace the code snippet in bold in Listing 4.10 with the following code snippet, which declares the employees variable to be an array of objects that conform to the Employee interface:
employees : Employee[];
Launch the application and you will see the same results. Keep in mind that the only significant difference in this project involves a TypeScript interface. Although the use of a TypeScript interface in this example does not provide a significant advantage, consider the case of Angular applications that contain multiple TypeScript interfaces, some of which might contain dozens of elements. In such scenarios, TypeScript interfaces simplify the task of keeping track of related data, which is useful when you need to perform create, read, update, and delete (CRUD) operations.
There are some useful facts to keep in mind about TypeScript interfaces. First, they can contain method definitions that are implemented in a class. Second, a TypeScript interface can extend an existing interface (so it’s possible to create a hierarchical structure). Third, a TypeScript interface can extend a TypeScript class. Although this chapter does not contain examples that illustrate any of these additional features, you can perform an online search to find relevant code samples and tutorials.
Getting GitHub User Data in Angular

Copy the directory GithubUsers from the companion disc into a convenient location. Listing 4.13 displays the contents of app.component.ts that illustrates how to make an HTTP GET request to retrieve information about GitHub users.
LISTING 4.13: app.component.ts

Listing 4.13 contains code that is similar to the code in Listing 4.5. The difference is in the httpRequest() method, which makes an HTTP GET request from a live endpoint instead of reading data from a file. Another difference is that the only data that is displayed is shown in the console tab of the browser.
Launch the code in this section; in the console tab, you will see something similar to the following output:
followers = 16
following = 2
created_at = 2011-07-14T23:06:31Z
The code in this section gives you a starting point for displaying additional details regarding a user, and displays the information in a more pleasing manner.
HTTP GET Requests with a Simple Server
This section shows you how to work with the command line utility json-server, which can serve JSON-based data. This program performs the function of a very simple server: clients can make GET requests to retrieve JSON data from a server. Moreover, a simple command in the console where json-server was launched enables you to save the in-memory data to a file.
Although json-server does not perform the functions of a node-based application that contains Express and MongoDB, json-server is a convenient program that helps you learn how an Angular application can interact with a file server.
You need to perform the following steps:
 Step 1: Install json-server.
 Step 2: Launch json-server.
 Step 3: Launch the Angular application.
Install json-server via the following command:
[sudo] npm install –g json-server
Navigate to the directory that contains the JSON file posts.json and invoke this command:
json-server posts.json
The preceding command launches a file server at port 3000 and reads the contents of posts.json into memory, making that data available to HTTP GET requests.

Copy the directory JSONServerGET from the companion disc into a convenient location. Listing 4.14 displays the contents of app.component.ts that illustrates how to make an HTTP GET request to retrieve data from a file server.
LISTING 4.14: app.component.ts

Listing 4.14 contains code that is similar to earlier code samples. The first difference involves the details of the unordered list that is displayed in the template property.
The second difference involves the local endpoint http://localhost:3000/users in the HTTP GET request. This endpoint provides JSON data via the json-server that is listening on port 3000.
Listing 4.15 displays the contents of posts.json that is retrieved during the HTTP GET request in Listing 4.14.

The next section shows you how to make an HTTP POST request to a local file server in an Angular application.
HTTP POST Requests with a Simple Server
This section shows you how to make an HTTP POST request with the utility json-server, which can serve JSON-based data. Keep in mind that the server in this code sample only handles basic data requests; “universal” JavaScript (sometimes called “isomorphic” JavaScript) is not covered in this chapter.
Navigate to the src/app subdirectory, which contains the JSON file authors.json and launch this command:
json-server authors.json
The preceding command launches a file server at port 3000 and reads the contents of authors.json into memory, making that data available to HTTP GET requests.

Now copy the directory JSONServerPOST from the companion disc into a convenient location. Listing 4.16 displays the contents of app.component.ts that illustrates how to make an HTTP POST request to a local file server.
LISTING 4.16: app.component.ts
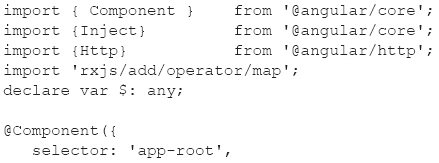
Listing 4.16 contains the same import statements as Listing 4.14, followed by a template property that displays a table of author-based data. When users click the <button> element, the postAuthorData() adds a hard-coded new author to the list of authors. This method performs a standard jQuery POST request instead of using an Observable. Note that this method increments the value of the id property of each author so that they are treated as distinct authors (even though the names of the new users are almost the same).
On the other hand, the getAuthorData() method does involve an Observable for retrieving author-related data (shown in Listing 4.17) from the file server that is running on port 3000.
NOTE
The current functionality only supports the insertion of one new author. As an exercise, modify the code to support the insertion of multiple new authors.
One other minor point: The browser is reloaded after each invocation of the postAuthorData() method, so you need to click the “Author Info” button to see the newly added author.
Listing 4.17 displays a portion of the contents of authors.json, whose contents are displayed in this Angular application.
LISTING 4.17: authors.json
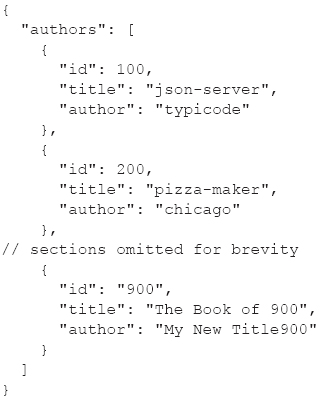
As you can see, Listing 4.17 is a very simple collection of JSON-based data items, where each item contains the elements id, title, and author.
This concludes the portion of the chapter involving code samples that use json-server as a local file server. The next section of this chapter discusses how routing is supported in Angular.
Routing in Angular
Web applications can have different sections that correspond to different URLs, and supporting those sections programmatically is called routing. When you see a Web page that contains tabs or a set of horizontal links that display different sections of an application, it’s quite likely that the Web page is using some form of routing.
For instance, a Web page might provide an “about” section, a “login” section, and an “orders” section. Suppose that you want to allow access to the orders section only after users have logged into the application. Routes can restrict access to the orders section, and maintain state in order to simplify the code that makes the transitions between sections.
Routing in Angular applications involves adding a “mapping” between routes and actions in app.module.ts, an example of which is shown in the variable appRoutes below:
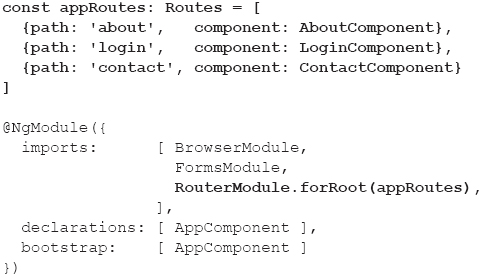
The preceding code block defines the variable appRoutes, which specifies three routes—about, login, and contact—which are mapped to the components AboutComponent, LoginComponent, and ContactComponent, respectively.
Regardless of the link that users click, the relevant component is displayed in the <router-outlet> element (specified in the template definition in app.component.ts). When users click a link, all existing content in <router-outlet> is removed and replaced with the component that is associated with the currently clicked link.
To use a tab-based analogy, when users click a tab, the current screen contents are replaced by the contents of the most recently clicked tab.
A more generalized scenario of configuring a set of routes supports rerouting and specifying parameters, as shown here:

More detailed information about Angular routes is located here:
https://angular.io/docs/ts/latest/guide/router.html
Keep in mind that routing-related code has changed from earlier versions of Angular, and might also change in the future, so it’s better to check more recent posts on the Stack Overflow site as well as the online documentation.
The next section contains a simple yet complete code sample that uses Angular routes.
A Routing Example in Angular

The code sample in this section shows you how to set up basic routing in Angular applications. Copy the directory BasicRouting from the companion disc to a convenient location. Notice the following code snippet above the <body> element in index.html:
<base href="/">
The preceding code snippet is required for any Angular application that involves routing-related functionality; in fact, Angular relies on this tag to determine how to construct its routing information.
Listing 4.18 displays the contents of app.component.ts that illustrates a simple example of routing in Angular.
LISTING 4.18: app.component.ts
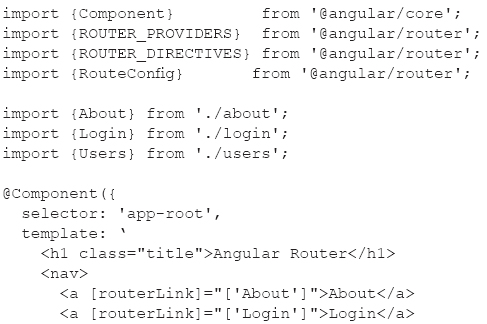
Listing 4.18 contains three import statements for route-related functionality, followed by import statements to access the custom components About, Login, and Users.
The template property in Listing 4.18 contains a <nav> element that comprises three anchor elements to set up the links to the three custom components. The template property also contains the <router-outlet> element, which is where the output for each custom component will be rendered.
The last portion of Listing 4.17 contains the RouteConfig mapping that makes the association between the custom components and the path elements.
Listing 4.19 displays the contents of about.ts that is a component for allowing users to log into the application.
LISTING 4.19: about.ts
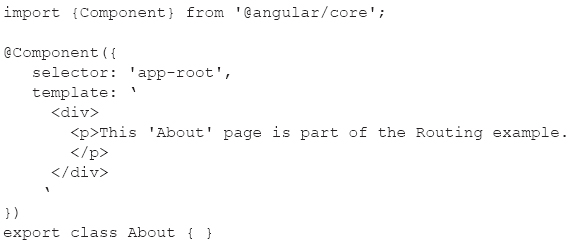
Listing 4.19 is straightforward: The template property contains a <p> element with a text string that is displayed in the <router-outlet> element of the root component.
Listing 4.20 displays the contents of login.ts that is a component for allowing users to log in to the application.
LISTING 4.20: login.ts
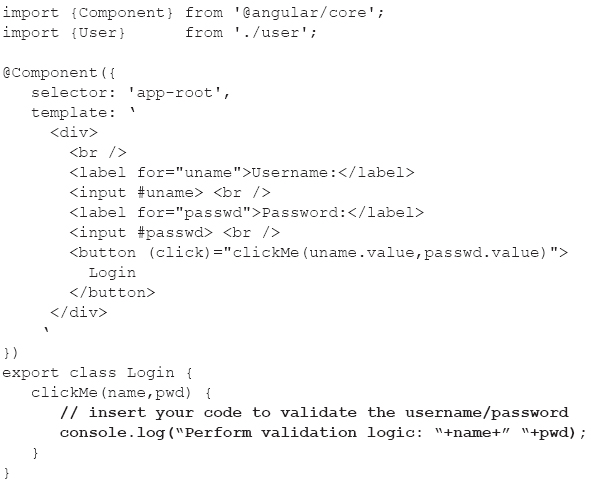
Listing 4.21 contains a template property that simulates the login process for a user. Input fields for the user name and password are supplied, and when users click the <button> element, the clickMe() method is invoked but no actual validation is performed in that method.
LISTING 4.21: users.ts

Listing 4.21 contains a template property that displays the list of names of the users in the users array, which is initialized in the Users class. Each user is created as an instance of the User class, which currently contains only the first name of a user; a realistic example would obviously contain many more user-related properties.
Listing 4.22 displays the contents of user.ts that is a component for allowing users to register themselves in the application.
LISTING 4.22: user.ts
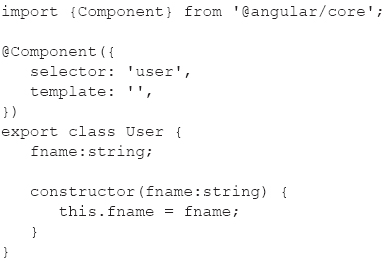
Listing 4.22 defines the User class, which contains a constructor for initializing the first name of a user.
If you use Webpack in conjunction with Angular applications, you can perform Angular routing with Webpack using the following router loader:
https://www.npmjs.com/package/angular2-router-loader
The GitHub repository is located here:
https://github.com/brandonroberts/angular2-router-loader
An article that describes how to use the preceding router loader is located here:
https://medium.com/@daviddentoom/angular-2-lazy-loading-with-webpack-d25fe71c29c1#.8srgkl44h
Summary
This chapter started by showing you how to make an HTTP GET request to read the contents of a JSON-based file. Next you learned how to make an HTTP GET request to retrieve information about a Github user, and how to make HTTP POST requests. You also learned how to retrieve JSON data from a website, convert that data to a Promise, and then convert the Promise into an Observable. Finally, you learned how to set up routing in an Angular application.