CHAPTER 10
MISCELLANEOUS TOPICS
This chapter contains an eclectic mix of Angular features, including a brief description of two configuration files for Angular applications, ahead-of-time (AOT) compilation, the ngc compiler, the “tree-shaking” feature, the Webpack utility, and an assortment of other topics. These topics are covered lightly, in part because the details will probably change after this book has gone to print. However, you can search the relevant online documentation (or for blog posts) that contain the latest changes.
The first part of the chapter briefly discusses the configuration files package.json (required for the npm utility) and tsconfig.json (optional for the tsc utility). The second part of this chapter discusses AOT, its advantages, and two ways of invoking AOT.
The third part of this chapter discusses tree shaking and the rollup utility, as well as how to reduce the size of Angular applications. The fourth part of this chapter introduces you to Webpack, and how it’s used with AOT. You will also learn about hot module replacement (HMR), which can shorten the development cycle, and some useful Angular utilities.
The final section delves briefly into deep learning via an Angular application that provides container-like functionality for the TensorFlow playground, where the latter provides an interactive visualization of highly customizable neural networks.
Angular 4.1.0
Angular version 4.1.0 was released as this book went to print. However, this version is a minor release, which means that there are no breaking changes. In addition, this version is a drop-in replacement for 4.x.x.
New Features
Version 4.1.0 adds full support for TypeScript 2.2 and 2.3; in fact, Angular is built with TypeScript 2.3. Fortunately, this change does not affect Angular 4.0, which was shipped with TypeScript 2.1.
In addition, Angular is now compliant with StrictNullChecks in TypeScript. Consequently, you can enable StrictNullChecks in Angular projects if you wish to do so.
The complete list of features and bug fixes for Angular 4.1.0 is available here:
https://github.com/angular/angular/blob/master/CHANGELOG.md
Angular Configuration Files
This section discusses the configuration files package.json (required for npm) and tsconfig.json (optional for tsc), which are part of every Angular application.
The package.json Configuration File
Listing 10.1 displays the JavaScript dependencies and their current version numbers in package.json, which are automatically generated by the ng command-line utility. Note that some version numbers may be slightly different by the time this book goes to print.
LISTING 10.1: package.json
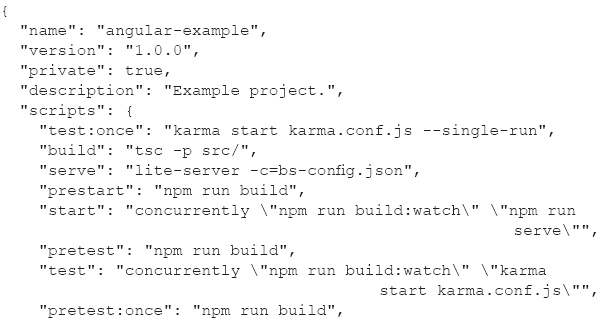


The scripts section in Listing 10.1 specifies various commands that you can invoke from the command line. The next section in Listing 10.1 is a dependencies section that lists the modules that are required to compile and launch an application. The modules in this section are installed when you invoke npm from the command line. Notice that this section contains 12 Angular-specific modules that have version 4.0.0. The dependencies section is updated (always in alphabetical order) whenever you invoke npm install with the –-save switch from the command line.
NOTE
The devDependencies section of package.json installs some executables on your machine that are referenced in the scripts section of package.json.
If you want to use the lite-server executable as the server for this application, you can manually invoke npm to install lite-server in case it is not already installed on your machine.
The devDependencies section specifies modules that are only required for development, such as karma-related modules for performing tests.
The tsconfig.json Configuration File
The TypeScript compiler tsc uses the values of parameters in the tsconfig.json configuration file to transpile TypeScript files into JavaScript files, instead of specifying parameter values from the command line.
Keep in mind that sometimes an Angular application does not work correctly, but no compilation errors are displayed in your browser’s inspector. If this happens, invoke tsc from the command line to check for unreported errors.
Listing 10.2 displays the contents of tsconfig.json that contains configuration-related properties that will enable you to invoke tsc from the command line without specifying any arguments.
LISTING 10.2: tsconfig.json
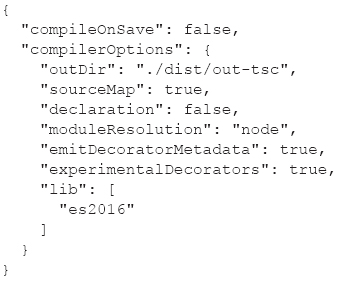
Listing 10.2 contains various compiler-related properties and their values for the TypeScript compiler. Notice that the outDir property specifies the dist/out-tsc subdirectory as the location of generated files. The sourceMap is true, which means that a source map is generated during the transpilation process. The src subdirectory contains more configuration files whose contents you can peruse at your convenience. This concludes the brief section regarding configuration-related files in Angular applications.
What Is AOT?
Angular AOT is an acronym for ahead-of-time compilation, which involves compiling the application once (before the application is loaded in a browser), resulting in a faster load time.
As you have already seen, Angular compiles an application in a browser as it loads via just-in-time (JIT) compilation. However, JIT compilation incurs a runtime performance penalty, and the application is bigger because it includes the Angular compiler and a lot of unnecessary library code. JIT compilation can discover component–template binding errors at runtime, whereas AOT discovers template errors early and also improves performance via build-time compilation.
In addition, AOT is well-integrated with the Angular command-line interface (CLI). For example, the following command uses AOT compilation during the creation of a production build of an Angular application:
ng build --prod --aot
Advantages of AOT
Some of the advantages of AOT are listed below:
 Faster rendering
 Fewer asynchronous requests
 Smaller Angular framework download size
 Detect template errors earlier
 Better security
 Better performance
 Compile-time error reporting for templates
 Reduced application size
 Removal of dead code (tree shaking)
Until recently, mistakes in ng templates fail at runtime (sometimes silently), which made debugging Angular templates difficult. AOT will now report template errors at compile time, but currently AOT can only be used with Webpack 2. This situation might change at some point in the future.
AOT Configuration
There are two ways to enable AOT in Angular applications: use @ngtools/webpack (discussed below) or use the ngc utility (discussed in another section). The first approach provides more granular control, whereas the second approach is simpler and involves less configuration. Keep in mind an important point: Angular AOT will only work on code and metadata that is statically analyzable.
After reading the following sections you will be in a better position to decide which technique best suits your needs. You can refer to the following for additional information:
https://github.com/UltimateAngular/aot-loader
Setting up @ngtools/webpack
Install @ngtools/webpack and save it as a development dependency, as shown here:
npm install -D @ngtools/webpack
Next, add the following code to the configuration file webpack.config.js (Webpack is discussed later):
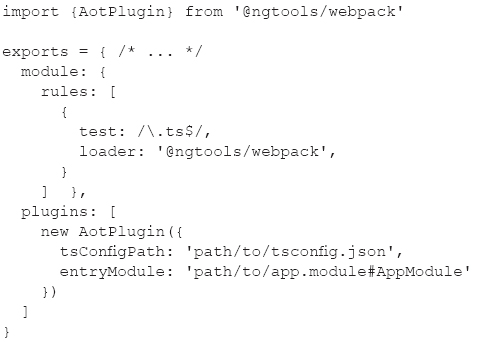
The @ngtools/webpack loader works with AotPlugin to enable AoT compilation. Note that the Angular CLI does not support custom configuration in every scenario.
Working with the ngc Compiler
The ngc compiler is a replacement for tsc and is configured in a similar fashion.
However, ngc attempts to inline cascading style sheets (CSS) without having the necessary context. For example, the @import basscss-basic statement in index.css results in an error because there is no indication that basscss-basic is located in node_modules.
On the other hand, @ngtools/webpack provides AotPlugin and a loader for Webpack that shares the context with other loaders/plugins. Consequently, when ngc is invoked by @ngtools/webpack, ngc can obtain information from other plugins (such as postcss-import) to compile things like @import 'basscss-basic'.
The tsconfig-aot.json File
The ngc utility relies on tsconfig-aot.json, which is a variant of tsconfig.json. The file tsconfig-aot.json contains AOT-oriented settings, an example of which is shown here:
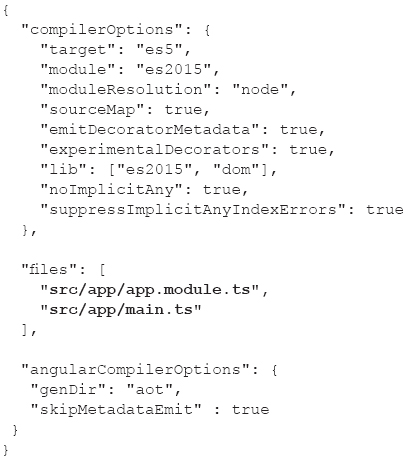
Notice the two lines in bold that specify app.module.ts and main.ts, both of which are in the src/app subdirectory.
The Compilation Steps
Now, open a command shell and install these npm dependencies:
npm install @angular/compiler-cli @angular/platform-server --save
Next, invoke the ngc compiler in node_modules/@angular/compiler-cli, which creates AOT-related files via the following command:
./node_modules/.bin/ngc –p .
After the preceding command has completed, you will see an aot directory whose contents are shown here:
./aot
./aot/src
./aot/src/app
./aot/src/app/app.component.ngfactory.ts
./aot/src/app/app.component.ngsummary.json
./aot/src/app/app.module.ngfactory.ts
./aot/src/app/app.module.ngsummary.json
In brief, the component “factory” files create an instance of the component by combining the original class file and a JavaScript representation of the template in the component. Moreover, the generated factory references the original component class.
An example of AOT and dynamic Angular components is available here:
http://angularjs.blogspot.co.il/2017/01/understanding-aot-and-dynamic-components.html
Status of AOT, CLI, and Angular Universal
The Angular CLI does not support Angular Universal. A separate fork for a version of the Angular CLI supports Universal, but that fork does not support AOT. However, some of the key portions of Angular Universal will be placed in the Angular core.
Tree Shaking and the Rollup Utility
AOT compilation converts a greater portion of an Angular application to JavaScript. The next step invokes so-called tree shaking, which involves the removal of redundant code, thereby reducing the size of an Angular application. Keep in mind that tree shaking only works on JavaScript code.
Angular provides the tree-shaking utility called rollup, which performs a static code analysis to create a code bundle that excludes all exported code that is never imported. The rollup utility only works on ES2015 modules that contain both import and export statements.
Now install the rollup dependencies with this command:
npm install rollup rollup-plugin-node-resolve rollup-plugin-commonjs rollup-plugin-uglify --save-dev
The rollup-config.js File
Create the configuration file rollup-config.js in the project root directory with the following contents:
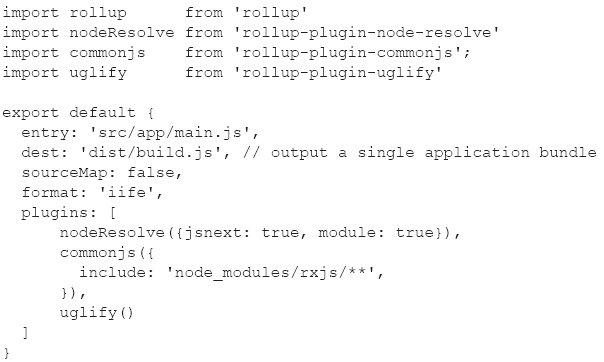
The entry attribute in the preceding file specifies app/main.js as the application entry point, and the dest attribute causes rollup to create the file build.js in the dist subdirectory.
Invoking the rollup Utility
Invoke the rollup utility from the command line by invoking the following command:
node_modules/.bin/rollup -c rollup-config.js
The preceding command creates the file dist/build.js, which you can reference in the HTML page index.html, as shown here:
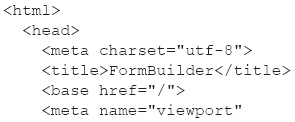
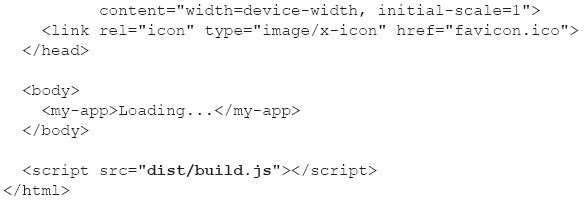
Now launch the Angular application with this command:
npm run lite
After a few moments you will see a new browser session, and if everything worked correctly, you should see the Angular application.
Reducing the Size of Angular Applications
The use of Angular AOT, in conjunction with tree shaking, can reduce application code size and enable code to execute faster. The simplest option is to build a project for production with this command:
ng build --prod
However, you can reduce the file size even further with this command:
ng build --prod --aot
The preceding command removes unused code and the Angular compiler.
More information regarding the AOT compiler is available here:
https://angular.io/docs/ts/latest/cookbook/aot-compiler.html
Reducing the Size of Bundles
This section describes a simple process for measuring the bundles in an Angular application. The first step is to perform the following installation:
sudo npm install -g source-map-explorer
Next, build the application with the source maps, as shown here:
ng build --prod -sm
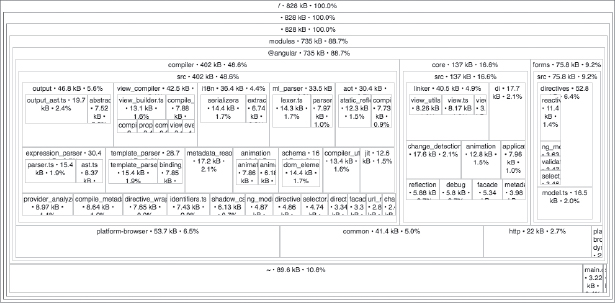
FIGURE 10.1 A map with the size of code in an Angular application.
Third, inspect one of the bundles, an example of which is available here (the name will be different for your application):
source-map-explorer dist/main.d357e5f7797d112767e6.bundle.js
The preceding command will launch a Chrome browser session and display the total code size, along with the percentage of that total that is attributable to various modules in the bundle.
Figure 10.1 displays the output from launching the preceding command, as displayed in a Chrome browser.
Angular Change Detection
Change detection in Angular is based on zone.js, which monitors all asynchronous events. Every component has its own change detector. Change detection (by default) checks if the value of any template expression has changed. Change direction is unidirectional and makes one pass, from top to bottom of component tree. Keep in mind that changes can only come from a component.
You can also programmatically specify the change detection strategy as shown in the following code snippet:

The preceding code block contains the changeDetection property, whose value is ChangeDetectionStrategy.OnPush, which means that the component is re-rendered only when data in the component is modified.
As you already know, an Angular application is a hierarchical tree of Angular components, each of which has its own change detector. Whenever a component is modified, a change detection pass is triggered for the entire tree. In fact, Angular traverses the tree (from top to bottom) while scanning for changes.
The value ChangeDetectionStrategy.Default is the default value for changeDetection and ChangeDetectionStrategy.OnPush is another possible value. According to the Angular documentation (unfortunately, an explanation of “hydration” doesn’t appear to be available in the documentation):
OnPush means that the change detector’s mode will be set to CheckOnce during hydration.
Default means that the change detector’s mode will be set to CheckAlways during hydration.
The preceding quote is from the following Angular documentation:
https://angular.io/docs/ts/latest/api/core/index/ChangeDetectionStrategy-enum.html#!#OnPush-anchor
However, if an Angular application uses immutable objects or Observables, it’s possible to modify the change detection system to increase performance. Moreover, you can modify the behavior of the change detector of any component by specifying that checks are performed only during a change in one of its input values. Recall that an input value is an attribute that a component receives from elsewhere in the application.
Consider this code sample:
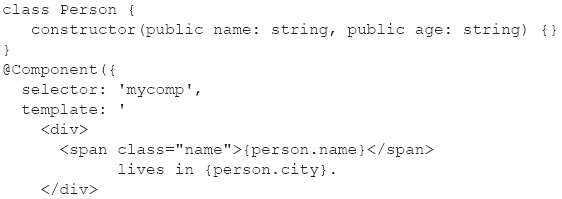
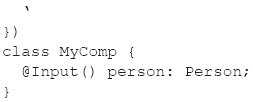
To make change detection occur when a person changes (an input attribute), set its changeDetection attribute to ChangeDetection Strategy.OnPush, as shown here:

The zone.js Library
Angular uses the zone.js library for change detection in the following situations:
 When a Document Object Model (DOM) event occurs (such as click, change, and so forth)
 When an HTTP request is resolved
 When a timer is triggered (setTimeout or setInterval)
However, there are some situations where zone.js cannot detect changes, such as the following:
 Using a third-party library that runs asynchronously
 Immutable data
 Observables
What Is Webpack?
Although this chapter does not contain projects that rely on Webpack, it’s the de facto utility for Angular applications, and its home page is located here:
https://webpack.github.io/
Webpack is a module bundler, which means that Webpack takes modules with dependencies and generates static assets representing those modules. Webpack is considered the latest “hotness” in Web application development, and in many ways Webpack supersedes the functionality of Gulp (but the latter is still relevant and useful). Fortunately, you can also combine Webpack with grunt, gulp, bower, and karma (see the online documentation for examples).
The goals of Webpack are as follows:
 Split the dependency tree into chunks loaded on demand.
 Keep initial loading time low.
 Every static asset should be able to be a module.
 Integrate third-party libraries as modules.
 Customize nearly every part of the module bundler.
 Suitability for big projects.
The mantra in Webpack is simple: Everything is a loader.
In addition, you can use AOT in conjunction with Webpack. An example of a Webpack configuration file for AOT is available here:
https://github.com/blacksonic/angular2-aot-webpack/blob/master/webpack.aot.config.js
Working with Webpack
The Webpack binary executable searches for a default configuration file called webpack.config.js is in the directory where you launch webpack. This configuration file contains an assortment of properties so that you do not need to specify them from the command line. Webpack supports many options, and you can see the entire list by invoking the following command:
webpack --help
Although version 2 of webpack was released in late 2016, you will still encounter tutorials that use version 1.x of webpack.
A Simple Example of Launching Webpack
Make sure you have already installed npm and then install Webpack with the following command:
npm install webpack -g
Next, install the Webpack development server with this command:
npm install webpack-dev-server -g
After completing the preceding steps, navigate to an empty directory and create two files:
entry.js
index.html
The contents of entry.js are here:
document.write("It works.");
The contents of index.html are here:

Now invoke the following command:
webpack ./entry.js bundle.js
After the preceding command has completed, you will find the file bundle.js in the same directory.
A Simple webpack.config.js File
Listing 10.3 displays the contents of webpack.config.js that is a sample Webpack configuration file.
LISTING 10.3: webpack.config.js
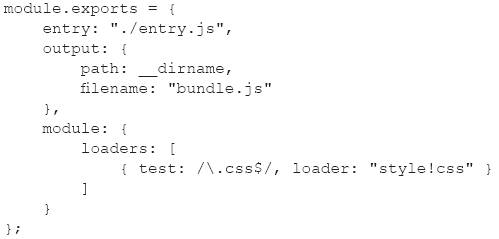
Listing 10.3 contains information about the name of the generated output file (in this case it’s bundle.js) and a loader for CSS stylesheets.
Hot Module Reloading (HMR) and Webpack
Hot Module Reloading refers to dynamic recompilation of files. You can invoke HMR from the command line or specify HMR properties in webpack.config.js.
Specifically, there are three ways to invoke HMR from the command line.
The first option involves the webpack-dev-server utility (which you can install globally via npm), an example of which is shown here:
//Option #1: WDS is installed globally
webpack-dev-server --inline --hot
The second option involves installing webpack-dev-server as a dependency in package.json, as shown here:
//Option #2: WDS is installed as a dev-dependency
node_modules/webpack-dev-server/bin/webpack-dev-server.js --inline –hot
The third option involves specifying webpack-dev-server as one of the targets in the scripts element in package.json, as shown here:
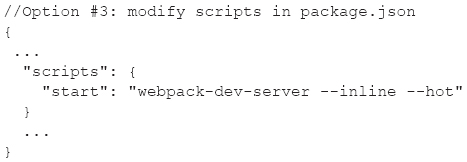
Use whichever option best suits your needs.
AOT via a Modified webpack.config.js
In addition to the three ways of using AOT that were covered in the previous section, you can modify webpack.config.js to support AOT, as shown in Listing 10.4.
LISTING 10.4: webpack.config.js
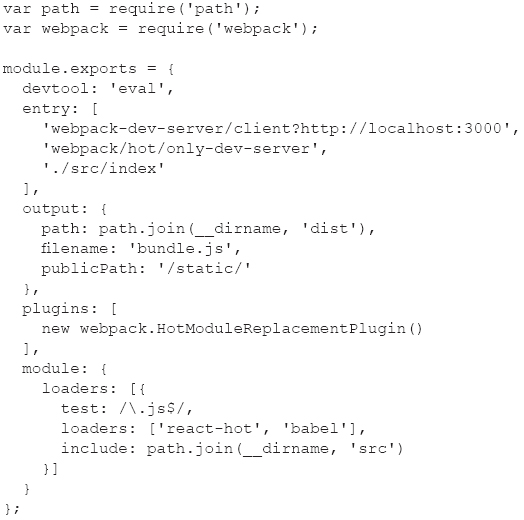
Listing 10.4 expands the contents of Listing 10.3 by adding a plugins section and additional loaders in the loaders section. After making the preceding modifications to webpack.config.js, you can invoke HMR from the command line using one of the options described in an earlier section.
Because Angular 4.1.0 supports TypeScript 2.1 and above, please read the following caveat regarding AOT, TypeScript, and Webpack:
http://stackoverflow.com/questions/43276853/angular-4-aot-with-webpack/43282448
This concludes the section on AOT and the Webpack utility. The next section contains an Angular application that uses Angular Material.
Angular Material
Angular Material consists of Material Design components for Angular applications; its home page is located here:
https://github.com/angular/material2
Download and uncompress the zip file from the preceding link in a convenient location. Note the dependency on HammerJS in package.json for this code sample.
Navigate into the material2-master directory and install the dependencies with this command:
npm install
Next, launch the application with this command via npm (and not ng):
npm run demo-app
Navigate to the URL localhost:4200 and you will see the output displayed in Figure 10.2.
Figure 10.2 displays examples of rendering user interface (UI) components using Angular Material (in a Chrome browser).
Click on the hamburger menu (top left corner of the screen) and you will see a list of various UI components, such as Button, Card, Checkbox, Dialog, Grid List, and Menu. Click any of these items and you will see examples of that UI component rendered with Angular Material.
You can look at the contents of package.json, which is almost two pages in length (so it won’t be listed in this chapter).
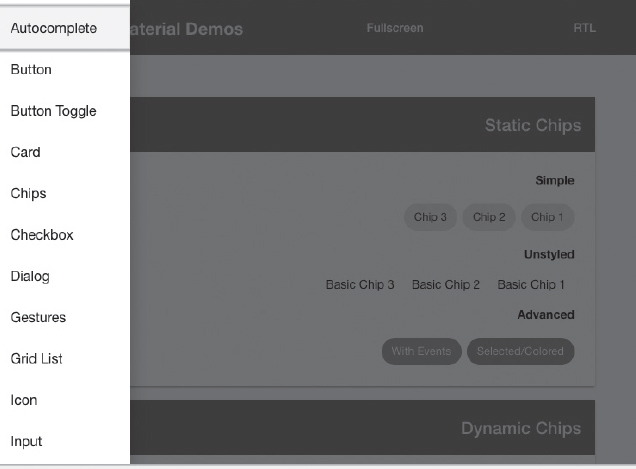
FIGURE 10.2 Some UI components with Angular Material.
The src/demo-app/demo-app subdirectory contains the code for the demo-app code sample, which contains more than 30 subdirectories, one for each of the UI components (including those that are listed above).
The preceding subdirectory also contains the TypeScript file demo-app-module.ts (also close to two pages in length), whose material-related import statement is shown here:
import {
MaterialModule,
OverlayContainer,
FullscreenOverlayContainer,
MdSelectionModule,
} from '@angular/material';
This code sample provides a good starting point to help you incorporate Material-based functionality in your own Angular applications.
Other Angular Functionality
There are several other topics that you can explore when you have the time to do so, and they are briefly mentioned in the following subsections (in no particular order of importance).
Support for I18n and L10n in Angular Applications
Localization (called L10n) and internationalization (called I18n) are both supported in Angular. Localization refers to displaying text in different languages, whereas internationalization refers to displaying the correct formatting and symbols, such as currency, date/time, symbols for numbers (decimal points and commas have different meanings in different languages), zip codes, and telephone numbers.
In general, L10n also involves I18n. For instance, if you switch from American English to French, then the symbols for currency, date/time, and symbols in numbers change (and other symbols as well). Although l18n can also involve L10n, sometimes the changes are “smaller.” For example, the difference between American English and Australian English is regional, with relatively minor differences (obviously far less than the differences between American English and French).
The default language on an Android device (as well as laptops and desktops) depends on the country in which the device is used (e.g., American English in the United States and British English in the United Kingdom). Fortunately, users can easily change the default language via a menu option.
Working with a Component Container
The ViewChild Decorator
The ViewChild decorator enables you to access child elements in an Angular application, as shown here:
@ViewChild('input') input: ElementRef;
Angular supports the @ViewChild decorator to search the template for an element whose name is input. Notice that the type is ElementRef because a specific class name is not available.
A variant of the preceding code, when only one element exists, is shown here:
@ViewChild(ElementClassName) variableName: ElementClassName;
You also need to import ElementClassName in your Angular application.
Where to Specify a Service
There are several ways that you can specify a service, depending on what you intend to do with that service, as briefly discussed below.
 Option 1: Specify a service in providers in NgModule if you want a single instance of the service to be used/shared throughout the application.
 Option 2: Inject a service in the providers of a Component if you want every instance of the class to use the same instance of the service.
 Option 3: Inject a service in the constructor of a class if you want every instance of that class to have a different instance of the service.
 Option 4: Inject a service in the viewProviders of a Component if you want one instance per component and shared only with the component’s view children, but not with the component’s content children.
Consult the online documentation for more detailed information regarding the preceding scenarios.
Testing Angular Applications
Useful Angular Utilities
There are various third-party utilities available that provide additional features, as a Chrome extension, as an installable module (via npm), or as a command-line executable. Two utilities that are briefly discussed below are the Augury Chrome extension, which that provides debugging support, and the ngd utility for displaying a dependency tree of components in Angular applications.
The Augury Chrome Extension
The Augury Chrome Developer Tools extension provides very good debugging support for Angular applications, and it can be downloaded from this link:
https://augury.angular.io/
The augury tab displays two panels where you can decide to view either the component tree or the router tree (if there is one) of an Angular component in the left panel. When you select a component in the left panel, the details of that component (including variables) are displayed in the right panel. In addition, you can dynamically modify the values of variables in the right panel and then apply those modifications in the current Angular application.
Figure 10.3 displays the sample contents of the augury console tab for a simple Angular application in a Chrome browser.
Figure 10.4 displays the sample contents of the augury Component Tree tab for a simple Angular application in a Chrome browser.
Displaying a Dependency Tree of Angular Components
The ngd utility is an open source utility that provides a hierarchical display of the components in an Angular application, and its home page is located here:
https://github.com/compodoc/ngd
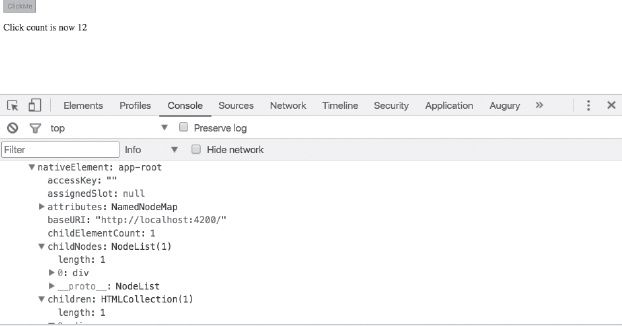
FIGURE 10.3 The Augury Console tab for an Angular application.
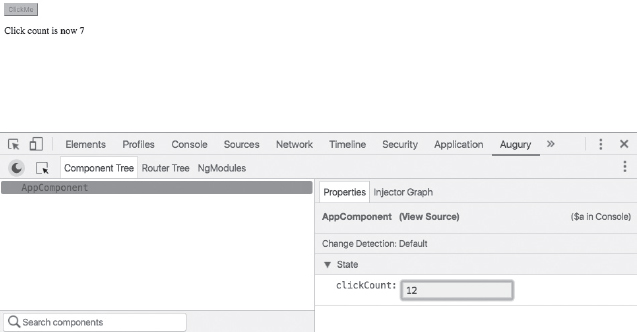
FIGURE 10.4 The Augury Component Tree tab for an Angular application.
Install ngd as follows:
npm install -g @compodoc/ngd-cli OR
yarn global add @compodoc/ngd-cl
Next, include some additional ngd-related code in an Angular application (as described in the README.txt file) to use the ngd utility. After adding the required code, navigate to the root directory of your Angular application and perform the following steps.
Step 1: Launch ngd as follows:
ngd OR
ngd -p ./tsconfig.json
Step 2: Specify the file that contains the root component:
ngd -f src/main.ts
You can also see some samples by navigating to the screenshots subdirectory, which contains the following samples:
 dependencies-1.png
 dependencies-2.png
 dependencies-3.gif
 dependencies-4.png
 dependencies.html
 dependencies.material2.svg
 dependencies.ng-bootstrap.svg
 dependencies.soundcloud-ngrx.svg
Compodoc
Compodoc is a documentation tool that generates static documentation of Angular applications, and its home page is located here (which includes a live demo):
https://github.com/compodoc/compodoc
Compodoc automatically generates a table of contents and provides various other features, such as themes, search capability, JSDoc light support, and it’s also Angular CLI–friendly.
The website for the official documentation is located here:
https://compodoc.github.io/website/guides/getting-started.html
Angular and Deep Learning
This section contains the Angular application AngularDLPG, which is based on the code in the following “deep playground” GitHub repository. This repository provides neural networks based on Deep Learning:
https://github.com/tensorflow/playground
Deep playground is an interactive visualization of neural networks that is written in TypeScript using D3.js. In essence, the AngularDLPG application acts as a container for this interactive visualization.
The AngularDLPG application was created in three steps, starting with the ng utility, to create the baseline application. Next, the files package.json and index.html from the preceding GitHub repository were merged into the corresponding files in the AngularDLPG application. Third, the TypeScript files in the src subdirectory in the GitHub repository were copied into the src subdirectory of the AngularDLPG application.

Copy the AngularDLPG directory from the companion disc to a convenient location. This application contains the following TypeScript files (copied from the GitHub repository) in the src subdirectory:
 dataset.ts
 heatmap.ts
 linechart.ts
 main.ts
 nn.ts
nn.ts
 playground.ts
 polyfills.ts
 seedrandom.d.ts
 state.ts
 typings.d.ts
The preceding TypeScript files (excluding typings.d.ts) were also modified by the addition of the following code snippet:
import * as d3 from 'd3';
The preceding code snippet enables the TypeScript files to access the D3-related code, which is in the node_modules subdirectory.
Launch the Angular application by navigating to the src subdirectory and executing the following command:
ng serve
Figure 10.5 displays the contents of the TensorFlow playground in an Angular application in a Chrome browser.
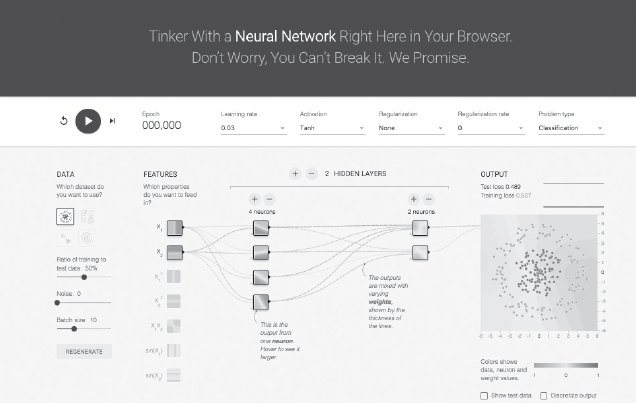
FIGURE 10.5 The TensorFlow playground in an Angular application.
Summary
This chapter started with an update regarding Angular 4.1.0, followed by an introduction to configuration files for the npm utility and the tsc utility. Next, you learned about AOT, which is a sophisticated part of Angular for optimizing the size and performance of Angular Web applications.
You also saw how to use the ngc compiler, the purpose of the tree-shaking feature and the rollup utility. Next, you learned about Angular change detection and the Webpack utility. You also learned about HMR (hot module reloading) in conjunction with Webpack. Then you saw an example of using Angular Material, which can enhance the aesthetic value of Angular applications.
You also learned about an assortment of other topics in Angular, such as support for I18n, the Augury Chrome Developer Tools extension for debugging, and the ngd utility for displaying the dependency tree of an Angular application.
Finally, you saw an Angular application that contains an interactive visualization of Deep Learning neural networks.


 Faster rendering


