The Compass Star
Designed by Michael G. LaFosse
Eight-pointed stars are a natural development in modular origami because of the common division of a right angle by folding in half. Only eight units will close the shape in a flat form. Indeed, there are many eight-point origami stars. Here is one that is among the simplest to fold and build, and once built it is especially sturdy. The geometric pattern on the front is different from the back; both sides are well suited for display. You can experiment with this star-making method to come up with many interesting variations.
You will need eight congruent squares for this project. Select one, two, four or eight different colors. This project can be folded from small or large squares. Begin with the white side up if using standard origami paper.


1 Valley-fold in half, diagonally. Unfold.

2 Valley-fold the bottom edges to meet at the middle crease, forming a kite.

3 1. Valley-fold the top right edge of the kite to the middle crease. Unfold. 2. Turn over, left to right.

4 Valley-fold the top right edge of the kite to the middle crease.
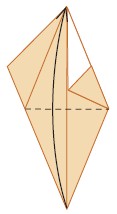
5 Valley-fold the bottom corner to the top.
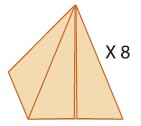
6 The completed module.You will need a total of eight.

7 From the front view: Insert the bottom left obtuse corner of one module part way into the slot on the front of another. Turn over, left to right.
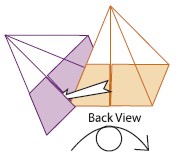
8 From the back view: Insert the bottom left acute corner into the short slot on the back. Turn over.

9 Once the two modules are registered firmly in place they can be locked together with two mountain folds. 1. Mountain-fold the top corner of the first module behind the top edge of the second module. 2. Mountain-fold the combined module layers, following the folded edge of the star point on the right.

10 Two modules locked together.

11 Add and lock modules until you have a group of four. Build a second group of four, taking care to follow the same color sequence as the first group.
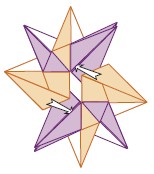
12 Slide the two groups of four together using the same sets of corners and slots that you used to add unit modules.
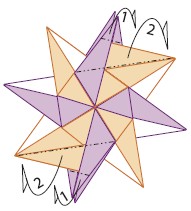
13 Mountain-fold to lock the groups together.

14 The completed Compass Star.
The Aster
Designed by Michael G. LaFosse
Flower blossoms folded from a single, uncut square tend to be complex and time consuming. Many flowers have five or six petals, and single sheet models folded from squares often have four or eight petals, and often seem clunky. Modular flowers, on the other hand, are easy to fold and the elements lock together quickly with just a tuck or fold. The modular flower repertoire in origami is now huge, especially when compared to the published set of blossoms folded from single squares. This stunning design makes a great ornament or attention-getter. You could wear a smaller aster as a brooch or as a background for a nametag. Enjoy this abstract aster design by folding a few petals whenever you have some free time while waiting for something or someone. When they do arrive, you will have an attractive gift for them!
You will need eight congruent squares for this project. Select one, two, four or eight different colors. This project can be folded from small or large squares. Begin with the white side up if using standard origami paper.


1 Valley-fold in half, diagonally. Unfold.

2 Valley-fold the bottom edges to meet at the middle crease, forming a kite.

3 Unfold the two right triangle flaps.
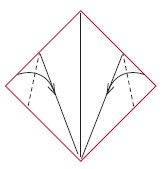
4 Valley-fold the right angle corners of the right triangle flaps to the nearest crease.

5 Use the existing creases to valley-fold the flaps to meet at the center crease.
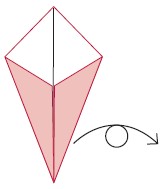
6 Your paper should look like this. Turn over, left to right.

7 Valley-fold the bottom corner to the level of the two obtuse corners.

8 The completed module. You will need a total of eight.

9 From the front view: Insert the bottom left obtuse corner of one module part way into the slot on the front of another. Turn over, left to right.

10 From the back view: Insert the bottom left obtuse corner into the short slot on the back. Turn over.

11 Once the two modules are registered firmly in place they can be locked together. Mountain-fold the combined module layers, following the folded edge of the star point on the right. Continue adding modules until all eight are locked together.

12 The completed Aster, back view. Turn the model over.
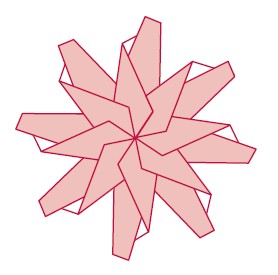
13 The Aster.
The Mette Unit Ring One
Designed by Mette Pederson
Mette Pederson has enriched the fans of modular origami with several self-published booklets about her innovative elements. Many of the more complex units can be assembled in various ways, producing a huge number of gifts to the origami community. Mette’s Ring designs have inspired and delighted many folders.
You will need 18 congruent squares. Small papers work best. You can cut larger squares into quarters, making more sheets from fewer. There are lots of possibilities for color patterns here: 1, 2, 3, 6, 9 and 18.


1 Begin with the white side up. Valley-fold in half, edge to edge, both ways, unfolding after each.

2 Valley-fold the top two corners to meet at the middle.

3 Valley-fold the bottom edge up to meet the bottom edge of the triangular flaps. Unfold.

4 Use the horizontal center crease to mountain-fold the top corner to the back.

5 Valley-fold the top edge to the horizontal crease below. Allow the triangular flap to come to the front.
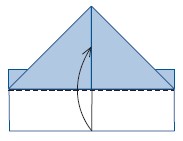
6 Use the horizontal crease to valley-fold the bottom edge up in front of the triangle.

7 Turn over, left to right.

8 Move the indicated folded edge down.

9 1. Valley-fold the left and right square corners over the sloping edges of the big triangle. 2. Valley-fold the bottom edge back up.

10 Mountain-fold.

11 Notice the pockets and tabs on the front and back side of the unit. You will need eighteen units.
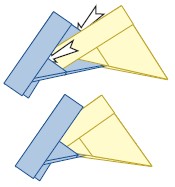
12 Insert the tabs from one unit into the pockets of another. Move the pieces together for a snug fit. Keep adding pieces until the ring is closed.

13 The completed Mette Unit Ring.
The I-Ching Wheel
Designed by Michael G. LaFosse
Eight elements signify the stages in our lifetime. This I-Ching Wheel is a variation of the Calendar Wreath, but the folding pattern for each element is altered slightly to change the attitude of each inserted piece. See if you can use the technology I developed here to make these wheels with any prescribed number of vanes.
You will need nine congruent squares for this project: eight for the wheel and one extra to fold a measuring tool. Select one, two, four or eight different colors. This project can be folded from small or large squares. Begin with the white side up if using standard origami paper.


1 First we must fold the measuring tool. Valley-fold the measuring tool paper in half, bottom edge to top. Unfold.

2 Valley-fold the bottom edge to the horizontal center crease. 2. Rotate the paper 180 degrees, so that the folded edge is at the top.

3 This is the finished measuring tool. Use it to install two parallel creases in the middle of each of the twelve project papers.
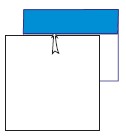
4 Place one sheet, wrong side up, firmly and squarely into the top fold of the measuring tool.

5 Valley-fold the bottom edge of the project paper to meet the bottom cut edge of the top flap of the tool.

6 Unfold.

7 Rotate the project paper 180 degrees to place the opposite edge into the top fold of the tool.
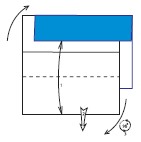
8 1. Valley-fold the bottom edge of the project paper to meet the bottom cut edge of the top flap of the tool. Unfold. 2. Remove the project paper. 3. Rotate the project paper 90 degrees so that the parallel center creases are vertical.

9 Valley-fold the top corners to the nearest crease.

10 Valley-fold the bottom edge up to meet the bottom edges of the triangle flaps.
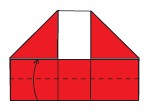
11 Valley-fold the new bottom edge up to meet the bottom edges of the triangle flaps.
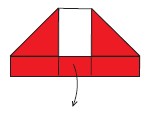
12 Unfold the rectangular bundle.
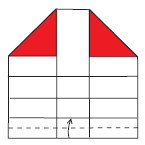
13 Valley-fold the bottom edge to the bottommost horizontal crease.

14 Using the topmost horizontal crease, valley-fold the bottom edge up.
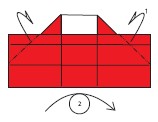
15 Your paper should look like this. 1. Mountain-fold the left and right square corners tightly over the sloping folded edges. 2. Turn over, left to right.

16 Using the bottommost horizontal crease, valley-fold the bottom edge up.

17 Using the parallel vertical center creases, mountain-fold the left and right sides square to the center panel.

18 The finished module. You will need eight to complete the wheel. Notice the tabs and pockets on the left and right sides of the modules.
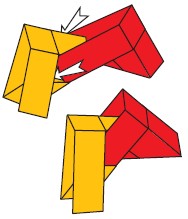
19 Slide the two tabs of one module into the pockets of another, joining the eight pieces.

20 The I-Ching Wheel.
The Lightning Bolt Octahedron
Designed by Michael G. LaFosse
Use four congruent squares of paper for this project. Small squares of stiff paper work best.


1 Valley-fold in half, corner to corner, and unfold.

2 Valley-fold the bottom left and the top right edges to the vertical center crease.

3 Valley-fold the bottom right and the top left edges to the vertical center crease.
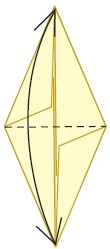
4 Valley-fold the bottom corner to the top. Return the corner to the bottom.
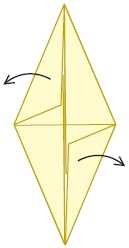
5 Open the top left and bottom right triangle flaps so that they stand 90 degrees to the rest of the paper.
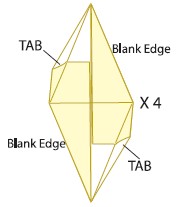
6 The completed module. You will need four. Notice the two tabs and the two blank edges on each module. Tabs will wrap around the outside of the blank edges.

9 Assembly begins by holding two modules together, with their facing tabs set against the facing blank edges. The tabs must be against the outer surfaces of the paper.
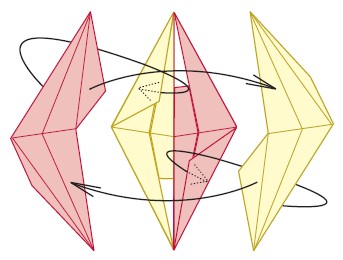
10 While cradling the two joined pieces in one hand, like a toy boat, add another module in the same manner. Hold the construction carefully while adding the last piece. Once the last module is in place the model will be stable.
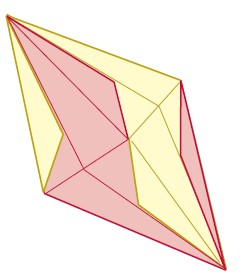
11 The Lightning Bolt Octahedron.
The Alexander Modular Dish
Designed by Richard L. Alexander
At the Origamido Studio, our youngest folders were fond of griping about the dreaded “sinks” in some of the diagrams they would encounter. I developed this simple modular design for them to explore various ways of “precision sinking” the simple waterbomb base. It develops skills that make more complex works look less “worked over”.
This dish is both decorative and useful! You can fold and build larger examples and use them to contain snacks, potpourri, or an assortment of items to accent your décor. It is a wonderful item to make from found paper and for recycling.
You will need four congruent squares.


1 Begin colored side up. Valley-fold in half, edge to edge, both ways, unfolding after each. Turn the paper over and rotate the square 45 degrees.

2 Valley-fold in half diagonally both ways, unfolding after each. Rotate 45 degrees.
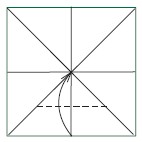
3 Move the bottom edge to the center.

4 Crease only between the diagonal creases. Unfold.

5 Repeat with the other three edges. Turn the paper over. Crease all four sides.

6 Mountain-fold each of the four corners in half, stopping at the corners of the creased center square. Sharpen the mountain creases of the center square.
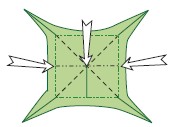
7 Push the center of the paper down while pushing the left and right edges inward. Let the creases guide the shape. Look ahead at step eight.

8 The finished module. You will need four.
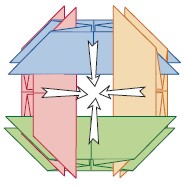
9 Weave the four units together and center them.
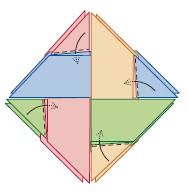
10 Tuck one corner of each unit into an open pocket.

11 Turn the model over.
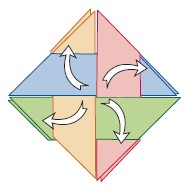
12 Pull open the top layer of each unit, forming canoe-shapes.
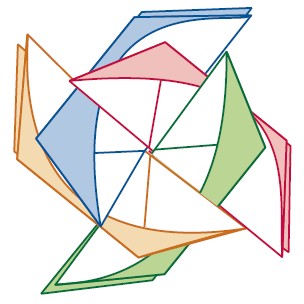
13 The finished dish.
The Butterfly Ball
Designed by Kenneth Kawamura
What can you do with an element that has only 3 simple folds? Plenty! The Butterfly Ball is one of the most famous and beloved modular origami of all time. Once built, it can be tossed into the air and slapped, producing a shower of colorful paper. Since it is made of twelve units it is the perfect origami for any celebration with a cycle of twelve: twelve months in a year for New Years, a birthday or anniversary; twelve years in Zodiacal cycles… I like to prepare a Butterfly Ball for each guest at a New Years party. Each piece of paper containing a resolution or fortune. The countdown at midnight begins: ten, nine, eight…”Happy New Year!” All the guests pop the Butterfly Balls in the air. It’s like indoors fireworks! The guests must catch a single unit from the air and read their fortune or resolution for the New Year. Try it. It
This model is best built with stiff papers. You will need twelve, small squares, approximately 3 ½ to 4 inches, three pieces each of four colors. As an extra challenge, try making a Butterfly Ball from twelve pieces of one color.


1 Valley-fold in half, bottom edge to top. Unfold. Turn over and rotate 45 degrees clockwise.

2 Valley-fold in half diagonally, both ways, unfolding after each. Rotate 45 degrees clockwise.
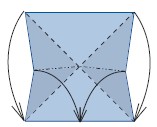
3 Using the mountain and valley creases, collapse the square closed, like an umbrella.
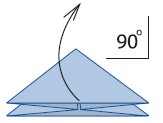
4 Open the paper so that the two large triangular surfaces, top and bottom, are perpendicular to each other.

5 The completed Butterfly Ball unit, looking at the inside. You will need twelve.
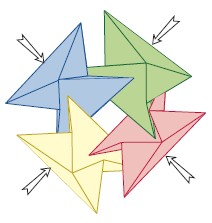
6 The Butterfly Ball is built in three levels: bottom, middle and top. Each level will use four units, one of each color. Begin by weaving the bottom corners of four units as shown. Notice that the bottom corner of the blue unit is inside the green unit; green is inside red, and so on, proceeding in a clockwise order. Push the units closed at the bottom It is important to follow this order for this demonstration. The mirror of this assembly is possible, but all of the other steps must be mirrored, too.

7 Your base should look like this. You have established a color order now, so let’s learn the color rule for the middle level. Always add the middle layer units to the lower right corner of the base. Chose the color unit that matches the color of the unit in the top, or North position of the base. The middle layer units are to be held vertically for insertion into the base. Corner “A” will go inside the base while corner “B” will stay on the outside of the base. Use the slot at the base corner to accommodate the new unit.
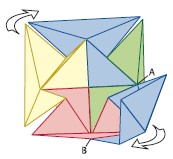
8 Your model should look like this. Adding new pieces may make the model spread open and fall apart. Always tighten the pieces together before adding new ones. Rotate the base one quarter turn clockwise, in order to provide yourself with a new, empty bottom right base corner.

9 Add the next unit, taking care to match its color with the top color of the base; in this case, yellow. Rotate one quarter turn, add the next unit, and repeat until all four units of the middle level are in place.
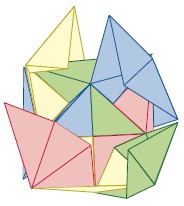
10 Your model should look like this. Check your color arrangement and be sure that your construction is snugly together before adding the top layer units.

11 First, look at the face of the model and notice which of the four colors is missing; also, notice the slit in the face of the model. Blue was missing on this face so a blue unit will be added. The top layer units are to be held horizontally and turned so that the long, bottom edge can be slid into the slot.

12 Once the new unit is centered in the slot it can be rotated into position. Rotate the unit so that the protruding bottom corner travels to the right and adds its color to the top right portion of the face. The bottom, inside corner must travel to the left, and hide behind the top left portion of the face.
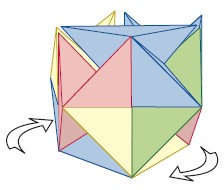
13 The first top layer unit is in place. Rotate the model one quarter turn clockwise.
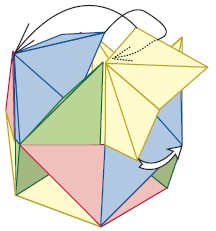
14 Add a new unit using the same rule as for the previous units, corners but this time you will face a collision between the top units’ corners on the left. The rule here is to tuck the old corner into the new corner. Notice that the blue (old) corner will have to go inside the yellow (new) corner. Look at the next step for reference.
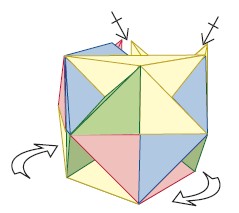
15 You model should look like this. Rotate the model one-quarter turn clockwise and add the next unit. Repeat to add the last unit.

16 Almost done! The last thing to do is to stabilize the model with a corner swap. You will notice that the top face of the model is missing one color, in this case, blue. Notice that there is too much of one color, green, both in the top and in the triangular dimple in the top right. The missing blue is hidden under the right half of the green corner. Carefully open the model at this corner and retrieve the blue corner, tucking the green corner under it.
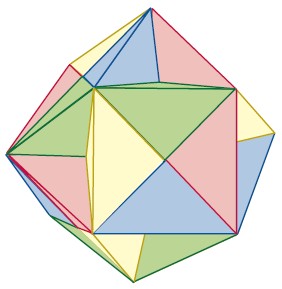
17 The completed Butterfly Ball. Toss it in the air. Hit it with the palm of your hand as it descends, like serving a volleyball. The Butterfly Ball will explode in a shower of colorful, butterfly-shaped origami.
The Borloz Ball 1 & 2
Designed by Andrew Borloz
This photo is of the inverted form of Borloz Ball 1. The resulting structure makes a stunning decoration (or gift box when folded from transparent or translucent materials, such as plastic sheet). These are also great skill-builders, since the assembly goes much more smoothly when every piece is folded perfectly, and each piece conforms to the correct shape during assembly.
You will need six congruent squares for this project. It will be helpful to use three different colors, two squares of each. Organizing the same color opposite itself in the model will let you keep track of the units, their placement and the proper layering required for a stable construction.

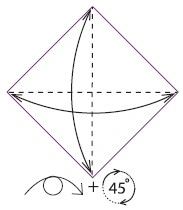
1 Begin with the white side up. Valley-fold in half diagonally both ways, unfolding after each. Turn the paper over and rotate 45 degrees.
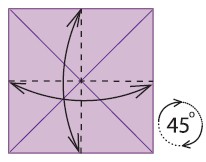
2 Valley-fold in half, edge to edge both ways, unfolding after each. Rotate 45 degrees.

3 Using the existing creases, independently mountain-fold the left and right corners, “B” and “C”, and move them to meet the bottom corner, “D”. Corner “A” must move to the bottom with B and C.
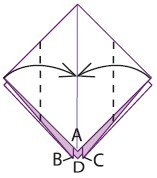
4 You paper should look like this. Valley-fold the left and right corners of the top layer to meet at the middle.

5 Return the corners to the outside.
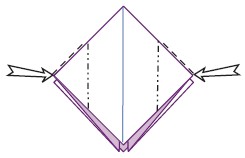
6 Inside-reverse fold the two corners.
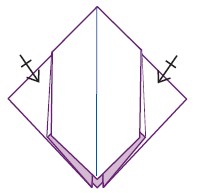
7 Repeat with the two back corners.

8 Exercise the center valley creases by turning the top left layer to the right and the back right layer to the left.

9 Turn the unit inside out so that the colored side is displayed on the outside.
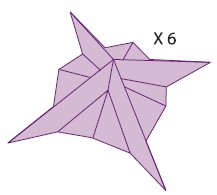
10 The complete unit. You will need six.
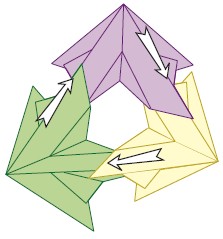
11 Organize three units, one of each color, so that they come together to form a triangular dimple at the center. Notice that each unit has one corner on top and another underneath the corners of another unit. This under/over weaving is essential: the model will stay firmly together because of the equal opposition of force.
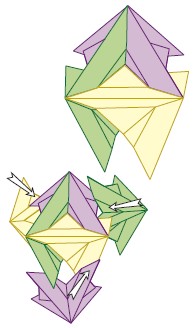
12 Three units are joined. Notice the triangular pyramid in the center of the construction: an equal amount of each color is displayed there. You can now add the other units, one at a time. Install units of the same color opposite each other. Notice that the color pattern in this demonstration: yellow always covers green; green always covers purple; purple always covers yellow. The last unit is always a challenge to add.
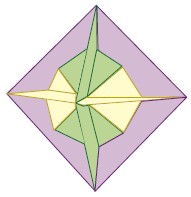
13 The complete Borloz Ball 2.

14 Fold six squares up to step 9, with the color on the outside, and open without turning the paper inside-out.
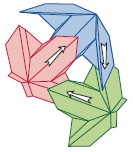
15 Fit together, overlapping the modules in the same manner as for Borloz Ball 2.
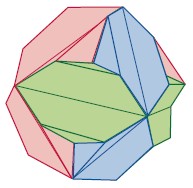
16 The Borloz Ball 1!
The Picture Cube
Designed by Mette Pederson
Simple flaps tucked inside adjacent elements make this structure quite rigid and useful. Mette has provided a way to produce origami with a personal flair. Fold them and load them with photos of a special trip or event with a friend. These make thoughtful thank you gifts that are sure to be displayed and cherished.
This project is unusual in that you will be required to fold equal thirds in your unit papers—not an easy task, unaided! Remarkably, there is an origami solution to equal thirds; it is ingenious yet simple. This folding method hints at some of the awesome math and geometric treasure that the art of origami contains.
You will need seven congruent squares: one for a measuring tool and six for building this project. Larger papers work best. You can insert pictures behind the six open, square windows.


1 Let’s first make a measuring tool that will make folding your papers into equal thirds quick and easy. Begin white side up. Valley-fold in half diagonally, bottom corner to top. Unfold. Rotate the paper 45 degrees counterclockwise.

2 Valley-fold in half, left edge to right.

3 Move the bottom corner of the top layer to the left, making a right-triangle flap. The fold should span from the bottom left corner to the top right.

4 Your paper should look like this. Unfold.
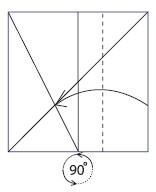
5 Look carefully at the crease pattern and make it match the drawing. Find the point of intersection where the diagonal crease and the last crease cross. Valley-fold the right edge to this point of intersection. Rotate the paper 90 degrees, so that the folded edge is at the top.

6 This is the finished measuring tool. The folded rectangular flap is one-third the area of the original square.
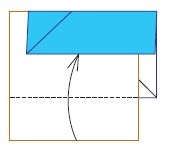
7 Let’s use this measuring tool to install creases in equal thirds in each of our six project papers. With the white side facing up, insert one edge of a square up into the measuring tool. Valley-fold the bottom edge up to meet the bottom edge of the one-third flap.

8 Unfold and remove the paper. Rotate the paper 90 degrees.
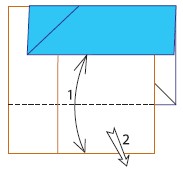
9 1. Insert the new top edge into the tool and fold as before. Unfold. 2. Remove the paper. You can process your other five papers in this manner while the tool is handy.
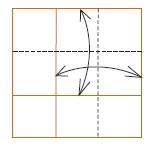
10 Let’s form a nine-square grid. Valley-fold an edge that is parallel to a crease, Unfold. Do the same with the other edge and crease.

11 Valley-fold diagonally in half, corner to corner each way, unfolding after each.
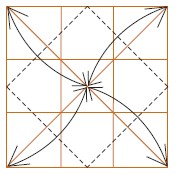
12 Valley-fold each of the corners to meet at the middle. Unfold.
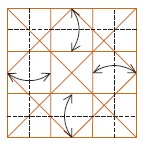
13 Valley-fold each edge to its nearest crease, unfolding after each.

14 Valley-fold each corner to meet the nearest intersection of creases.

15 Using the creases from step 15, valley-fold the four blunted corners toward the middle, forming the window of a frame.

16 Mountain-fold two opposite corners behind, using the indicated creases, to form the tabs. Open each of the other two corners and squash-fold them to form the rectangular pockets.
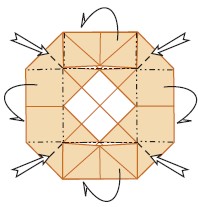
17 Look carefully at your creases. You will mountain-fold along the grid to form a shallow box lid. You will need to valley-fold the diagonals in the center of each beveled corner.

18 The completed unit. You will need six. Move the two corner tabs out where you can best use them.

19 Notice how two units will be perpendicular to each other when being joined. The tab of one unit fits into the rectangular pocket of another.

20 Two unit together look like this. They will not stay together well until you have the whole cube built. You must carefully hold the construction together while you add new units.
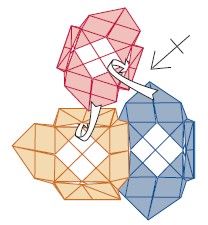
21 A good strategy is to first build a three-unit cube corner, then add the rest of the units to the other side. You can cradle the cube corner in one hand while adding new pieces with the other.

22 The completed Picture Cube.
The WXYZ
Designed by Tung Ken Lam
Folding this model is a fun way to attain precision folding skills. When completed properly, it appears to be a flawless and precise, simultaneous collision of four large equilateral triangles. If the folder does not use proper care, the imperfect construction is a dead give-away.
See if you can fold this model so neatly that someone looking at it for the first time will say: “How in the world did they do that without cutting?”

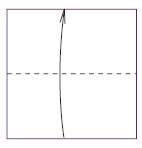
1 Valley-fold in half, bottom edge up to the top edge.

2 Valley-fold in half, left edge to right. You will have a square, two-page book.
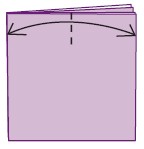
3 Make a halfway mark by valley-folding a short crease at the top edge of the first page of your little book.

4 Valley-fold the bottom right corner of the first page to touch the crease mark, while making the new crease travel to the bottom left corner of the book.
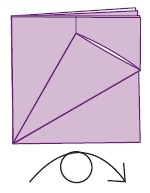
5 Turn the paper over, left to right.
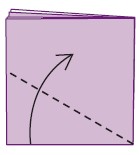
6 Fold the bottom left corner up, matching the angle of the folded edge from the other side.
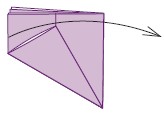
7 Move the top layer to the right.

8 Valley-fold the bottom edges to meet at the center crease.
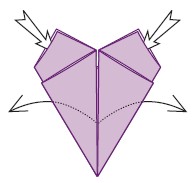
9 Open the layers of the left and right flaps and squash-fold symmetrically. Use the existing creases to guide the shape.

10 Mountain-fold the left and right flaps behind the model.
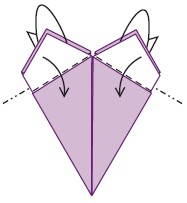
11 Your paper should look like this. Valley-fold the two front flaps along the edges of the top layers. Mountain-fold the two back flaps behind to match.
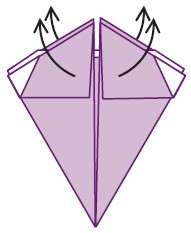
12 Lift all four flaps up, perpendicular to the rest of the paper.
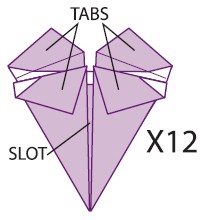
13 This is the completed module. You will need 12. Each module has four tabs, a slot in the front and a slot in the back.
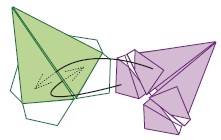
14 Modules are locked together by inserting two tabs from one unit into a slot of another.
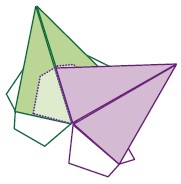
15 Two modules connected.
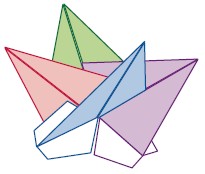
16 Begin by connecting four modules together, thus setting up the plan for four intersecting triangular planes. Continue to build the model by adding modules to complete each of the four, colored triangular planes.

17 The WXYZ.
The Modular Crane
Designed by Miyuki Kawamura
You will need four congruent squares for this puzzle project.

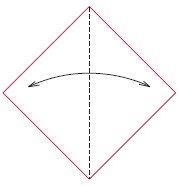
1 Valley-fold in half, corner to corner. Unfold.
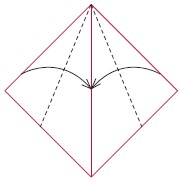
2 Valley-fold two adjacent edges to meet at the crease, forming a kite.
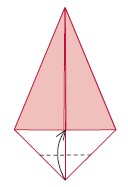
3 Valley-fold the square corner of the kite to meet the square corners of the two triangle flaps.

4 Valley-fold the two obtuse corners to meet at the square corners. Do this symmetrically, forming a neat right-angle at the bottom and two trapezoidal flaps.
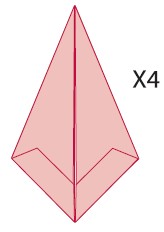
5 This is the module base form. You will need four.
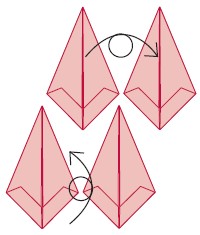
6 Turn two base forms over, left to right, and the other two over, top to bottom.
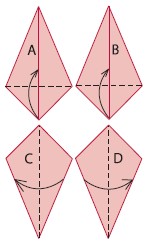
7 Valley-fold the bottom square corners of bases “A” and “B” up, allowing the extra paper to come out from behind. Look ahead at step eight for the shape. Valley-fold bases “C” and “D” in half vertically. It is helpful here to have a left and a right version. Modules C and D are complete.

8 Unfold the trapezoid flaps from bases A and B.
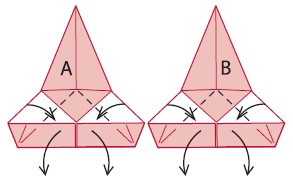
9 Move the bottom layers of A and B down, while moving the left and right layers inward to flatten. Look ahead at step ten.
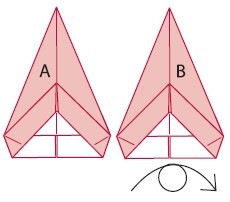
10 Modules A and B are now complete. Turn module B over, left to right.
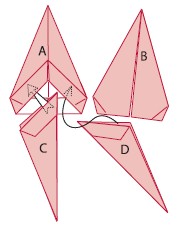
11 Begin the assembly by sliding the back layers of the C and D modules into the front pockets of module A.

12 Slip the pockets of module B over the front layers of C and D.

13 You now have a construction that effectively resembles the classic Crane or Bird Base, from which you can develop many origami models that are made from this classic form.
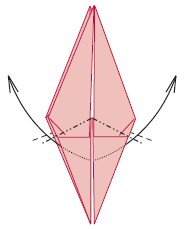
14 Let’s first make the simple “Flapping Bird”. Inside-reverse fold the bottom two points up, one for a tail and the other for the neck.
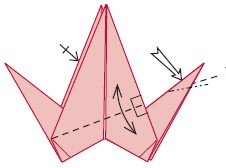
15 Inside-reverse fold one point for the head. Valley-fold the front wing down and at a forward angle, aligning the front edge on itself while guiding the fold to hit the back corner of the wing. Lift the wing back up. Repeat behind.

16 The Flapping Bird.
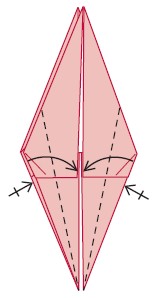
17 Now let’s make the classic Crane. Begin with a modular crane base from step 13. Valley-fold the bottom front edges of the rhombus form to meet at the split. Repeat behind.
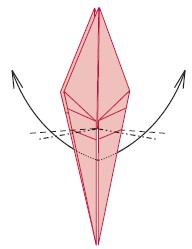
18 Inside-reverse fold the bottom points up, forming a tail and a neck.
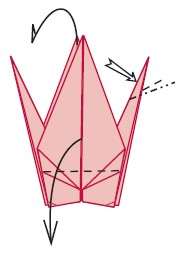
19 Inside-reverse fold one point down for a beak. Fold the wings down and pull open the body.
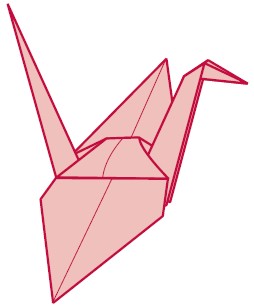
20 The Modular Crane
The HOU-SAN-CHUU (Radiolaria)
Designed by Miyuki Kawamura
The example given here uses twelve congruent squares. However, you can construct a radiolarian with as few as six modules; thirty modules will make a spectacular display piece! Use the larger paper for this model.


1 Begin with the paper color side up. Valley-fold in half diagonally both ways, unfolding after each. Turn the paper over.
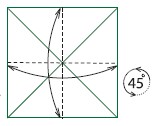
2 Valley-fold in half edge-to-edge both ways, unfolding after each. Rotate the paper 45 degrees.

3 Using the existing mountain and valley creases, collapse the square like closing an umbrella, making all four corners meet at the bottom.
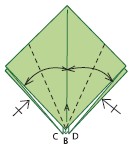
4 Valley-fold the bottom edges of the first two layers to meet at the center crease. Unfold. Repeat behind.

5 Inside-reverse fold the triangle flaps formed in step four: two in the front and then in the back.
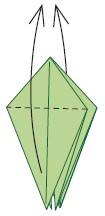
6 Valley-fold the front and back flaps up, forming a tall rhombus shape with a split in the bottom half.

7 Valley-fold the bottom front edges of the rhombus to meet at the split. Unfold. Repeat behind.

8 Valley-fold the top flap: 45 degrees to the right and 45 degrees to the left, unfolding after each. Use the hidden right isosceles triangle flap as a guide. Repeat behind.
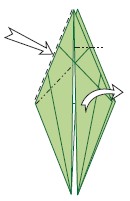
9 Following the 45-degree angle crease from step eight, inside-reverse fold the left side of the top flap while opening the right half for clearance.
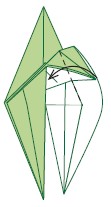
10 Push the reverse-folded layers neatly inside the right half of the paper, then close flat.

11 Your paper should look like this. Repeat on the other side.
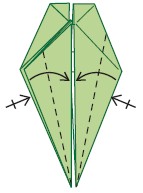
12 Using the existing creases, valley-fold the bottom front edges into the middle. Repeat behind, narrowing the bottom points.

13 Inside-reverse fold the bottom points up. Look ahead at step fourteen for the shape.

14 Re-fold and unfold the indicated 45-degree crease, making it flexible. Repeat behind.

15 Valley-fold and unfold the top square corner of the front “wing.” Repeat behind.
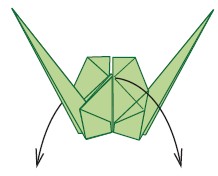
16 Hold the two wing flaps and simultaneously pull them apart, spreading the body paper open.

17 The completed module. You will need twelve to build the example depicted here. Notice the pockets and tabs on the wing flaps.

18 Assemble three modules at a time, slipping tab ends into the pockets. It is a good idea to partially insert each and then simultaneously slip them tight together. The hub will form a triangular pyramid. Join groups of three until all of the available wing flaps have become part of a triangular pyramid. You can build a six, a twelve or a thirty-module radiolarian!
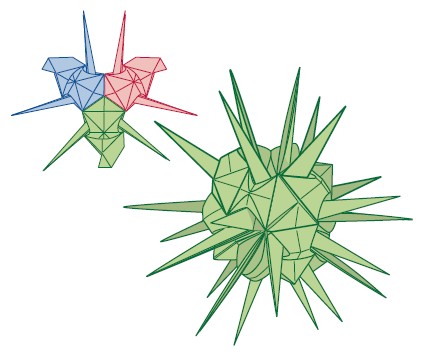
20 The twelve unit HOUSAN-CHUU (Radiolaria)
The Sonobe Module and Cube
Designed by Mitsunobu Sonobe
Mitsunobu Sonobe is one of the pioneering geniuses in modern origami and is probably responsible for inspiring the advent of the modular origami movement. This cube, and the origami unit that makes it, are among the earliest multi-piece geometric origami constructions. You can use as few as three units to enclose a volume, and dozens to hundreds to build a universe of geometric figures and representational models. This cube was an inspiration to Valerie Vann, in the development of here Magic Rose Cube.
You will need six congruent squares to make one cube. It will be best to use two each of three different colors, for effect and for following the instructions.


1 Vally-fold in half, bottom edge to top edge. Unfold.

2 Valley-fold the top and bottom edges to meet at the crease.

3 Valley-fold the right edge up to the top edge.

4 Your paper should look like this. Rotate 180 degrees.

5 Valley-fold the new right edge up to the top edge.

6 Unfold the triangle flaps.
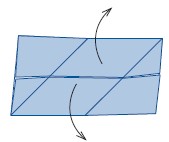
7 Unfold.
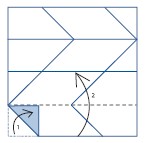
8 You will now use the crease pattern to sequentially weave the square closed. 1. Fold the bottom left corner over. 2. Fold up the bottom flap.
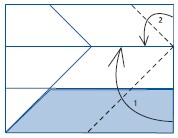
9 1. Fold up the bottom right corner. 2 Fold down the top right corner.
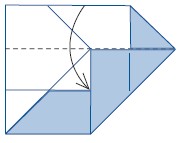
10 Fold down the top flap.

11 Fold down and tuck in the top left corner.

12 Turn over.
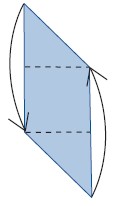
13 Valley-fold the acute corners to the obtuse corners to form a square tile.
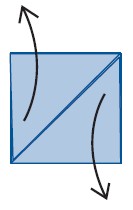
14 Move the triangle flaps away for the square center.

15 Set the triangle flaps at right angles to the square center. You will need six units.

16 Each unit has two tabs and four pockets. Only two of the pockets— indicated—are to be used during assembly.
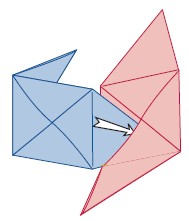
17 Two units are joined, perpendicular to each other, with the tab of the horizontal unit entering a pocket on the vertical unit.

18 Complete a cube corner by adding a third unit to the top. Notice that the tab of the top unit enters a pocket on the horizontal unit and a tab from the vertical unit is tucked into a pocket from the top unit.

19 Yellow is at the top, so a yellow unit is added opposite, at the bottom.

20 Rotate the cube to the open side.
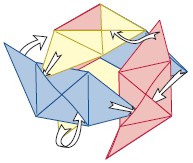
21 Add the final pieces, arranging the colors opposite each other and tucking in all flaps.
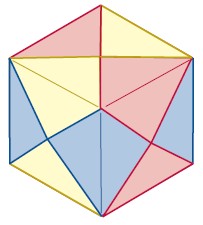
22 The completed cube.
The Magic Rose Cube
Designed by Valerie Vann
If you master but one of the amazing new origami designs by contemporary creators, it would be difficult to choose another with such universal appeal. Valerie Vann has created dozens of remarkable and popular folds. Her Magic Rose Cube swept around the world as an instant origami classic, but in the process, many learned it incorrectly (without her attention to “soft folds” and “hard folds”), so many of the resulting models lacked the beauty of her original design. We have enjoyed working with Valerie over the last several years, and the entire origami community is indebted to her genius and generosity in sharing her designs.
You will need six congruent squares, three red and three green. Small squares are best 3.5 inches to 4 inches. The papers should be colored the same on both sides. Each of the six squares will be folded identically, from step one through step thirteen. From then on, the two different colored units will receive additional folds that will differentiate them: petals from the red, and the leaf and calyx assembly from the green.

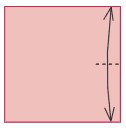
1 Mark the middle of the right edge with a short pinch mark. Make this by moving the bottom edge to the top and making a short crease on the right end. Unfold.

2 Fold two opposite edges to meet at the middle where the mark is.

3 Turn over, left to right.

4 Valley-fold the right side short edge up to the top long edge. Valley-fold the left short edge to the bottom long edge.

5 Return the edges to their former position.
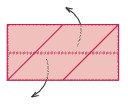
6 Without turning the paper over, open the sheet so that the rectangular flaps come out from under the middle area.

7 Look carefully at your crease pattern. The creases that run parallel to the edges of the square should be horizontal. Mountain and valley-fold the bottom right corner into the middle area.

8 Your papers should look like this. Unfold.
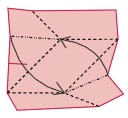
9 Inside-reverse fold the top left corner into the middle area, while simultaneously replacing the bottom right corner, weaving them together, flat.

10 Your paper should look like this. Turn over.

11 Valley-fold the left and right corner flaps over the long edges of the parallelogram. Make these folds softly, without a sharp crease. The soft fold with aid in the assembly and the working of the Magic Rose Cube.

12 Valley-fold the acute corners to their furthest obtuse corners, forming a square tile.

13 You will need three green units and three that are colored for the rose petals.

14 Let’s work on the rose petals only. Move the triangle flaps back out.
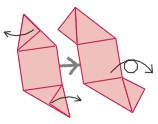
15 Unfold the triangle flap at each end. Turn over.

16 The finished rose petal unit. You will need three.
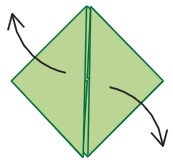
17 Now let’s complete the green units for the leaf and calyx assembly. Move the triangle flaps back out.
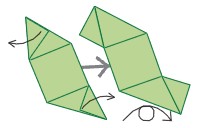
18 Unfold the triangle flap at each end. Turn over.
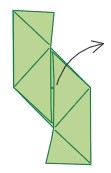
19 With the unit positioned vertically, open the layers of the right side.
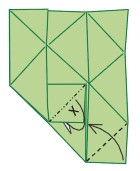
20 Using the existing creases, valley-fold the bottom right corner up. Mountain-fold the indicated corner, marked “X” in the diagram, behind.

21 Valley-fold the bottom corner up.

22 Valley-fold the bottom triangle in half, right to left, and inside-reverse fold the top right half of the paper under the layer on the left.

23 Mountain-fold the top corner tightly behind, forming the tab. The completed leaf and calyx unit. You will need three.

24 With the square corner of the unit at the top, the tab of another unit is inserted into the right side pocket. There is a hidden, triangle flap inside this pocket. It is the triangle flap marked “X” in step 20. The tab must be slipped under this flap, or your calyx cube corner will not keep its shape well. Connect all three units.

25 Form the calyx cube corner by inserting the last tab into the last pocket. It is helpful to ease all three units away from each other, slightly, as you mountain-fold the cube edges and insert the last tab.
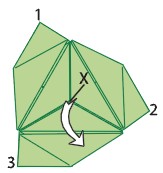
26 Bottom view of the assembled calyx cube corner. Rotate the cube corner so that it could sit flat on one side.
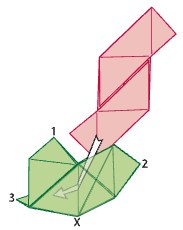
27 Insert your first rose petal unit into the pocket between leaf corners 1 and 2. There is a 45 degree angled channel in this pocket. Slide the bottom edge of the petal unit along this folded channel. Keep pushing until the top corner of the inserted end travels around the wall corner of the cube.
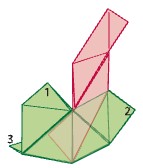
28 An x-ray view shows the situation of the rose petal tab.

29 Insert another rose petal unit into the pocket between corners 1 and 3. Mountain-fold rose petal unit “A” down and tuck corner 1 into the pocket on the side of the unit. Mountain-fold rose petal unit “B.” Tuck corner 3 into the unit pocket and tuck the end of rose petal unit “A” into the other side of “B.” You can ease open the outer layers of unit “B” to make this easier.

30 Rotate the cube so that corner 2 is pointing up.

31 Insert your last rose petal unit, “C”, into the last pocket. Mountain-fold unit “C” down and tuck corner 2 into the side of unit “C.”

32 Lift up the top layers of unit “C” to allow clearance for inserting the tab end of unit “B.”
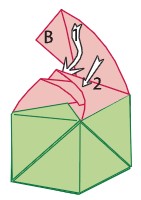
33 Insert the tab end of unit “B.” Push the open layers closed.

34 The completed Magic Rose Cube. Rotate the cube so that you are looking at the center corner of the rose petal assembly.

35 Make the Magic Rose Cube bloom by lifting up the free layers of the three rose-colored cube faces. Each face has only two free edges and they are opposite and parallel to each other. Lift simultaneously. Be careful not to open the layer too much at first.

36 Open each of the other two faces.

37 Now that the rose has blossomed you can pull out the leaves. One at a time, pull out a green triangle, which you will easily find under a set of open petals.
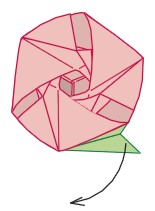
38 Pull out the free corner and swing the leaf open to full display. You can sharpen the top crease of the leaf to make it stay open.
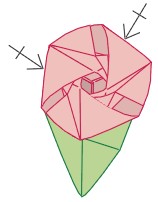
39 Repeat with the other two leaves.
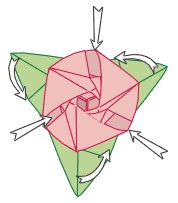
40 A Magic Rose Cube in full display. Return the cube to it closed state by first tucking the leaves back in and then flattening the petal layers down.
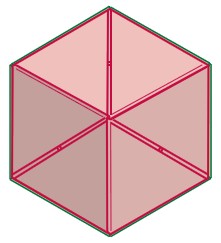
41 The closed-state Magic Rose Cube.
To Download the Colored Folding Papers, please click HERE.

