Pixlr offers high-quality, free photo editing at pixlr.com. The company offers three options: (1) a regular editor which performs much like Photoshop Elements, (2) an Express editor which gives you access to textures, filters and special effects, and (2) Pixlr o-matic which allows you to add a variety of filters and textures. Both Pixlr Express+ and Pixlr o-matic also come in app form for your mobile phone edits.
Here are four simple, creative projects you can carry out with Pixlr. They will take you no time at all, but will look like you spent hours on the edits. Ready for pure fun? Here we go!
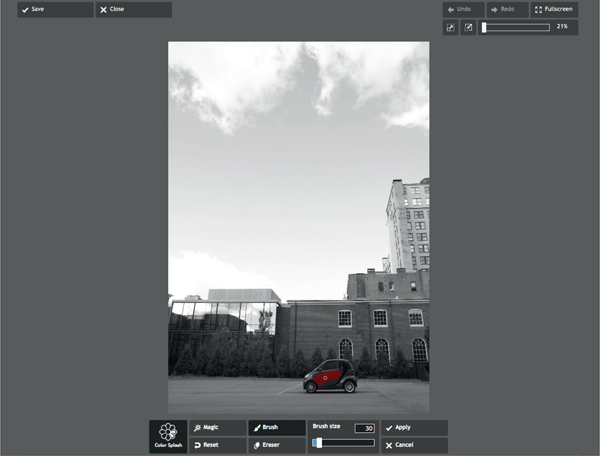
This technique allows you to maintain color in a significant object, while desaturating the rest of the photo.
What types of photos work well with the color splash technique? Any photograph with a significant object in it that you want to highlight works well. Ideas for subject matter: flower, piece of fruit in someone’s hand, pumpkins in a field, butterfly on a flower, paint on brushes, popsicle in a hand, article of clothing, a colorful structure, fall leaves on a tree and/or ground, colorful beach umbrella in the sand or a bubblegum bubble.
Open your photo in Pixlr’s Express editor and go to Adjustment> Color Splash. The program will automatically desaturate your entire photo. Choose the ‘Brush’ tool and swipe it over the area you wish to restore color to. You can adjust brush size and use the ‘Eraser’ tool to remove any unwanted color. If you have an object with well-defined edges that is set against a plain background, you can use the ‘Magic’ tool – just click on your significant object with it and watch the color magically return. Adjust the tolerance of this tool for more accurate results – a higher tolerance will bring back color in a greater area of the photo, while a lesser one will restore color in a smaller area.


HDR—what’s it stand for? High Dynamic Range imaging. What is it? (Gosh this sounds like a silly cheer.) Basically, this technique allows you to make the details of an image sharper and it allows you to properly expose all aspects of your image.
There is a popular trend that uses HDR in a more creative way, where the details are made overly-sharp and the contrasts VERY strong—essentially “overcooked” HDR (yet another example of where wrong can feel oh so right). Traditionally, HDR photography involves taking multiple photos of your subject with a variety of exposures, and then melding them together with photo-editing software (like Photoshop) to achieve the best possible exposure. For this project, I’m going to introduce you to the more creative approach. So, let’s get “cooking,” shall we?
What types of photos work well with creative “overcooked” HDR effects?
Pixlr’s regular editor has a feature that mimics HDR. Go to Filter> Mimic HDR. Click! Done! (Tip: If you run your photo through that filter twice, you can really overcook it). It’s that easy folks. What’s not as easy is figuring out what types of photos work well with this more stylistic type of HDR.


Overcooked HDR - The numerous details and colors of this landscape scene are enhanced and heightened when an overcooked HDR effect is applied
I am a huge fan of tilt-shift photography and although I don’t have an authentic tilt-shift lens (mucho bucks), I enjoy replicating the effect with photo-editing software on both my computer and iPhone. In this project I’ll show you how to use Pixlr’s Express editor to simulate tilt-shift photography. I think you will be amazed by the results you can achieve with this free online editor.
Tilt-shift photography involves selective focus, where a portion of the photo is very sharp and the rest is blurred. This often creates the look of a miniature scene. Increased saturation of color, almost to the point of gaudy in some cases, is also a characteristic of this type of photography.
What types of photographs work well when a tilt-shift simulation is applied? Photos of landscapes and cityscapes are preferable. You want to stay away from close-up shots—they just don’t work well. If you want to create a “miniaturized scene” it is best to use an aerial photograph. Try taking a photo from a rooftop overlooking a cityscape. If you can include cars and people it will enhance the miniature effect. One of my favorite locations is standing on a cliff in Harpswell, Maine, overlooking a harbor filled with lobster boats. The finished piece (as seen in the example) looks as if it’s a photograph of colorful toy boats floating about. Why not try going to the top of an observatory, or even shooting from a second story window in your home. Photos of baseball games taken from a high-up bleacher make for charming faux tilt-shift edits.
In Pixlr’s regular editor go to Filter> Tilt shift. It is super easy to us. You can control both focus size and focus location and can opt to increase saturation of your colors by simply checking the box.


Miniature Scene - I converted an aerial shot of a harbor into a “miniaturized scene” by applying a tilt-shift effect in Pixlr.
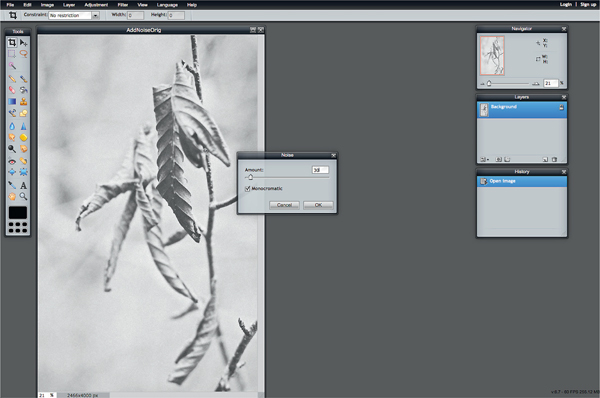
Yes, it’s true. I’m actually teaching you how to add noise to your photographs after all that touting about keeping the ISO low to avoid it. Faux “film grain” actually does add creative flare to certain types of photos, preferably ones that are black and white. Lots of photographers are purposefully adding faux noise to their photos these days to replicate the look of analog film grain.
To add some good old fashioned grain to your photos, go to Pixlr’s regular editor and choose Filter> Noise. You can adjust the noise amount – think subtle here if you want it to look like authentic film grain (I recommend not going any higher than 30 for the amount). You want to be able to see the graininess, but you don’t want it to be too obvious. My general rule of thumb is to increase the amount to the point where you can see the grain but it doesn’t overwhelm the photo. The moment your eye focuses on the grain instead of the photo, you know you’ve set the amount too high.

Add “Film Grain” - Add faux noise to your photographs to replicate analog film grain. It works especially well with black-and-white photos.