In addition to the essentials needed to take a well-exposed, in-focus photograph, your DSLR offers a variety of features to help ensure your photos are the best they can be, even in tricky lighting situations. There are also a number of helpful accessories worth mentioning. Here’s my list of these fabulous “extras,” which I refer to as the “bag of tricks!” You’ll notice that I’ve mentioned some of these items before, as well as added new ones.
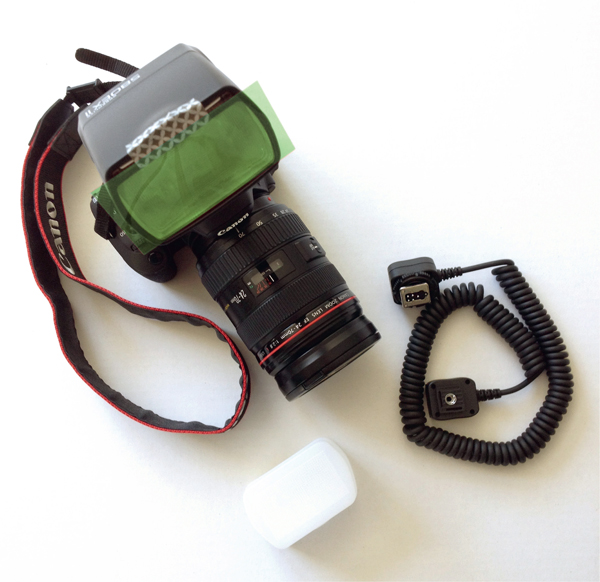
I used to only shoot in natural light situations and was not a big fan of flash, until my husband surprised me with a high-end external flash unit and diffuser dome (used for softening the flash) for my birthday a couple of years ago. My mind was changed, big time!
External flash units are preferable to your camera’s built-in flash because they have the capability to produce more natural-looking results (reducing the chances of red eye and eliminating that “ghost against a darkened background” look).
For one you have greater control when it comes to reducing the power of the flash to soften its effect. You can manipulate its angle and bounce it off of a reflective surface like a white ceiling (not a cathedral one mind you; too high) or even a reflector. This bounce flash technique is perfect for adding more light to the scene, especially in shadowy areas; I often use this method with my food photography shots.
Another technique is to remove your flash unit from your DSLR’s hot shoe (the place where it attaches to your camera), connect it to a flash sync cord (or use wireless capability if you have it), and use it as an off-camera fill flash, pointing it in any direction that is needed (you can hold the camera in your right hand and flash unit in your left).
A fill flash used in the bright light of day can brighten shadows on faces and add a stunning catchlight to the eyes. When used properly and subtly (stressing ‘subtle’ here) the results can look very natural. In order for the flash to provide proper illumination, a general rule of thumb is not to stand further than 10 feet away from your subject, especially when using a diffuser. Standing anywhere from four to 10 feet away from your subject is preferable.
Note: It’s important to share that folks use higher-end dedicated flashes in one of two ways. They either use TTL flash mode (through-the-lens metering) or Manual flash mode—I know, I know, more jargon, but the concepts are pretty straightforward. In TTL mode (referred to as E-TTL in Canons and i-TTL with Nikons), the camera selects flash output for you. You can override its choice with flash exposure compensation (it works just like your DSLR’s exposure compensation, only you’re setting it for the flash). With Manual flash, you dial in the setting. Try both methods and see which you prefer.
If you have an external flash, you will sometimes want to remove it and use it as directional light. To maintain its connection to your camera, plug it into a flash sync cord. Hold your camera with your right hand and the detached flash with your left. You may not even need a sync cord, as some DSLRs have a wireless feature built right in. Another option is a wireless flash trigger.
Flash has the same color temperature as the sun; that’s why it can look very natural when used as a fill flash outdoors. What about when you are shooting in light that is a different color temperature than your flash? Flash gels to the rescue. These filter strips (which come in a variety of shades) are placed directly over your flash head and enable you to match your flash’s light to the existing light in the room/environment, which will result in more natural-looking photos. For example, if you are using flash where the ambient light is warm-toned, you will want to attach a warm-colored gel. I have a pack of inexpensive gel strips that I attach to my flash with a small piece of Japanese washi tape. The tape comes off easily, doesn’t leave a sticky residue and is much cheaper than purchasing a fancy gel attachment system.
You can soften your flash with a diffuser cap (often called a diffuser dome) or mini softbox, both of which fit right over the flash head. I myself use a diffuser dome, as it’s smaller than the softbox option and easily fits in my camera bag.

External Flash Unit With Gel, Flash Sync Cord and Diffuser Dome - When shooting with an external flash, a few tools that come in handy are a flash sync cord (some flash units like my Canon Speedlite 580EX II can go wireless or accommodate a sync cord) which allows you to hand-hold the flash and create directional light, a diffuser dome to soften the flash, and corrective gels to help you match your flash’s light to the existing light in the scene. In this photo you can see I’ve applied a green gel, which matches the light of the flash with florescent lighting, making the resulting photos look more natural, especially if it’s used in conjunction with the ‘florescent’ white balance setting.
Use a diffuser disc to cut our bright overhead, full sun. Simply place your diffuser over your subject (an assistant can help with this) and shoot! Just make sure you can’t see the disc in the shot.
If you’re looking for nice, even light (as opposed to directional light) a ring flash is an excellent tool. It looks like a flat, white donut that attaches to your lens. Inside the ring are multiple flashes that fire simultaneously. Ring flashes work well with macro photography, as they provide even illumination of the scene and allow you to use very small apertures.
A battery grip has two important functions. Not only can it hold up to two batteries, making for more shots before you need to recharge, but it also serves as an ergonomically-correct grip for a better hold. And it makes your camera really big especially when used in conjunction with a gigantic zoom lens—observe as folks take you very seriously, thinking you must be some VIP photographer—lol.
Blinkies is photography jargon for your camera’s highlight alert feature, which is a feature of the histogram on my Canon (check your camera’s instruction manual for information on how to access it). Any blown-out highlights will blink on your LCD display screen. You can correct them by decreasing exposure (using exposure compensation if you are using P mode or one of the semi-auto exposure modes, or manipulating settings if you are in Manual mode).
For situations where you have both bright and dark areas in your scene, bracketing can be helpful in two ways. When you use the bracketing feature, your camera will take multiple exposures of one scene; at dead center (which it thinks is correctly exposed) and above and below this mark. You can later look through these photos and choose the shot with the best exposure, or you can synthesize the exposures via HDR ‘High Dynamic Range’ techniques/software to create an end result where all aspects of the photo are well-exposed. I very rarely use my DSLR’s bracketing feature, as I find that manipulating exposure in Photoshop afterwards works well. Also, if you are shooting in RAW, you may not find bracketing to be helpful, as you can make exposure adjustments in the post-processing stage. HDR for mobile devices: The iPhone 5 and 5s (which is current as I type this) have a native camera with HDR capability. I also enjoy the app HDR Pro.
You can also get perfect white balance with the use of a custom white balance tool. This tool is a cap that fits right over your lens. With the cap in place, flip the switch on your lens barrel to manual focus and take a calibration photo of your scene. The data from this photo will be converted into a custom white balance preset for the scene. Refer to the tool’s instruction manual for specifics on how to use it with your DSLR. If you’d like to use this tool for multiple lenses, buy one that fits your widest lens (it can be adjusted to fit the smaller lenses).
Let’s say you set your aperture to f/22 for a landscape shot. Remember that your aperture will stay in wide open position until you press the shutter release button. If you want to preview what the photo will look like at f/22 (or whatever aperture setting you are using), you can depress the DOF preview button and take a peek through your viewfinder or on your LCD display in Live View mode. This feature will darken the preview in the viewfinder but not the actual photo. It will not darken the LCD display preview. Using Live View takes a lot of battery power.
Inexpensive polyethylene sleeves are available to protect your camera from the elements: from mist, rain, snow and dust particles. It does not act as a full-on water-proofing device, however; no DSLR dips in the pool please.
Your DSLR’s built-in, internal light meter takes readings from light that bounces off of your scene (reflected light). For more accurate readings, you can use a handheld external light meter, which takes readings of the actual light that falls on the scene (incident light), as opposed to the reflected light. There is a free iPhone app called Pocket Light Meter that might be worth a try; it gets mixed reviews, so an actual external light meter may be a better bet. They can be quite pricey.
Most photographers have multiple lenses. Don’t make the mistake of buying filter sets to fit each one. Instead, buy filters that fit your widest lens and use step-up rings (adapters) when fitting them over your smaller lenses. You can attach a variety of filters to your DSLR lenses for help in achieving proper exposure, as well as for special effects, and even to protect your lens. They come in either circular or rectangular format. Let’s take a look at some of the important filters and the purposes they serve:
This pinkish-purple-toned filter will make scenes lit by florescent light look much more natural.
Only half of this type of filter is darkened. Grad ND filters come in handy if you are photographing landscape against a bright sky, as this extreme range in tonal value can cause exposure problems. Adjust this filter so that the darker part covers the sky, and the clear part goes over the land. This can be a nice alternative to bracketing/HDR techniques.
These filters come in different strengths and essentially darken the lens, allowing less light to hit the image sensor. ND filters are helpful for long exposure photography in bright light, as they allow for slower shutter speeds under those conditions.
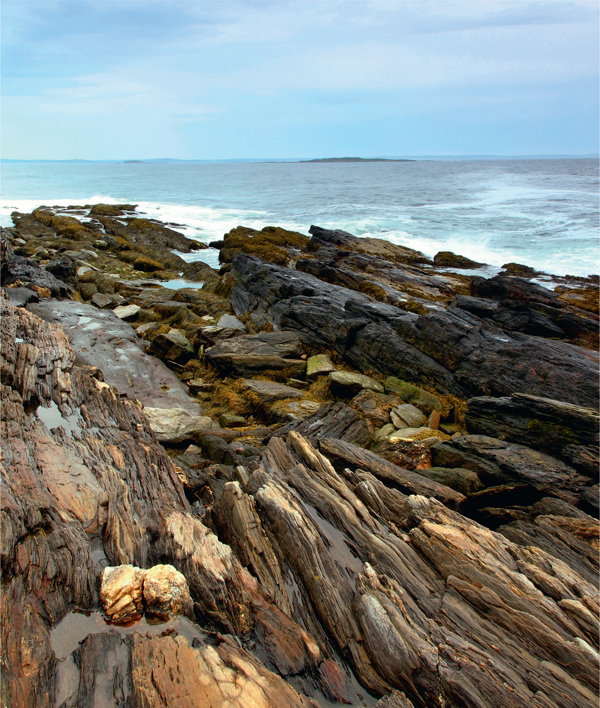
Grad ND Filter Example - I used a graduated neutral density (grad ND) filter for this photo, placing the darker part of the filter over the bright sky. With my DSLR on a tripod, I metered off of the rock formations and took the shot with my camera’s built-in self-timer. Be aware that grad ND filters can cause color casts (mine can cause a purple cast in the sky). If you don’t like the cast, you can easily make color corrections in Photoshop. 15-85mm f/3.5-5.6 lens at 15mm, ISO 100, f/16 for 1/12 sec.
Attach a polarizing filter to your lens if you are going to be photographing water, especially in overcast light or shade. It will reduce the glare that comes off the water. It’s also helpful in these situations:
It’s important to note that the polarizing filter only works when you are perpendicular to the sun, meaning when the sun hits either of your shoulders.
There is a plethora of special effects filters on the market; infrared filters, color-intensifiers, fog filters, warming and cooling filters and more. I generally don’t get into these filters, as I can make corrections and create special effects with Photoshop, however I do own one special filter – a star filter that converts points of light into pointed star shapes.
Photographers sometimes attach a circular UV filter to their lens to protect the glass from breakage. There is debate on whether or not to use one, as it becomes yet another piece of hardware to shoot through, which can compromise image quality. I only put a UV filter on my lens if I am photographing along rocky coast or other unstable terrain where there is greater potential for damage.
One should never be discouraged or excluded from experiencing the joy of photography, no matter their physical condition. Resources are available through the Disabled Photographer’s Society, online. Mobile phones, because of their size and light weight, can make the perfect device for a photographer that has trouble holding/maneuvering heavy and bulky DSLR camera equipment. They also allow children to begin exploring the joys of photography at a much younger age.
Remember that your DSLR averages out the tones it perceives in any scene to 18% gray. One of the easiest ways to get perfect white balance is to use a gray card (that is specifically calibrated for your DSLR’s built-in light meter). Using one helps your DSLR capture tones with accuracy and is especially useful if you have a lot of white tones or black tones in your scene.
If you meter off of a gray card in the scene you wish to photograph, any white or black tones in your scene will be properly exposed; without this intervention, white will appear as drab gray and black will appear as slate gray because your camera averages out the tones in the scene to achieve 18% gray. Gray cards are also helpful if you are going to take a lot of photos in one setting, to ensure the photos in the batch have consistent exposure.
How do you use a gray card? First select a white balance setting that best matches your scene. Adjust your settings according to your creative goal(s), as you normally would. Just prior to taking the photo, meter off of the gray card. You’ll want to make sure that the same light that hits your subject, hits the card when you take this reference shot.
If you are in one of the semi-automatic exposure modes, set your camera to manual focus on the lens barrel (autofocus won’t work – your DSLR will just search and search), and meter off the card. At this point you have two choices. You can either (1) use the AE Lock button to lock those exposure settings, turn autofocus back on, and take your shot or (2) you can make a note of the settings, go into Manual mode, dial in those settings, turn autofocus back on, and take your photograph.
If you are shooting purely in Manual mode, switch to manual focus and meter off of the gray card, adjusting your settings for correct exposure of the card. Turn autofocus back on and use those settings to photograph your scene. If you are going to be taking a lot of photos in one scene, using your gray card settings in Manual mode is easiest (no need to depress AE lock for the duration). Note: Know that gray cards can be used in the post-processing stage if you have shot in RAW. There is a plethora of information on this advanced technique, so do a good ‘ol Google search if this interests you.
Most DSLRs have a grid display feature that you can use to help you apply the Rule of Thirds when composing your shots. It can also be helpful for keeping horizons straight.

Mobile device camera apps with a grid feature: Camera+, ProCamera, 6x6 and 645Pro.
Your DSLR’s histogram feature displays the tonal range of your photo. It is best used for checking to see if you have any blown-out highlights that result in loss of detail (often referred to as clipped highlights). You want to avoid seeing the histogram graph touch the right edge of your display. If it does touch this edge, you will have overexposed highlights. In this case, go ahead and lower exposure a fraction of a stop (using exposure compensation if you are in P mode or one of the semi-automatic exposure modes, or manipulating settings if you are in Manual mode).
Keep in mind that small amounts of clipped highlights are okay and sometimes unavoidable (especially in photos where there are both very bright and very dark areas), as long as your subject is well-exposed and important details are not lost. In scenes where there are both bright and dark areas, many photographers use bracketing and HDR techniques to achieve proper exposure throughout the composition.
Tip: If you are capturing a piece of the sun in your photo, which I often do, the histogram will naturally display a clipped highlight. That’s usually fine, as long as you’re not trying to capture important details like visible sun rays penetrating through the clouds. Note: Remember that “wrong can sometimes feel very right” when it comes to photography and there might be situations where you choose to ignore the histogram all together. Case in point – I often take artistic shots where the sky is blown out on purpose.
Using Playback mode is an excellent way to check for proper exposure and focus. It’s difficult to see the LCD display screen in the bright light of day. LCD screen hoods are a great solution, as they essentially act like a mini awning, blocking out the sun to improve viewing.
Avoid lens flare by attaching a lens hood to your lens (and of course remove it if you are going for an artistic lens flare look). They also serve to protect your lens.
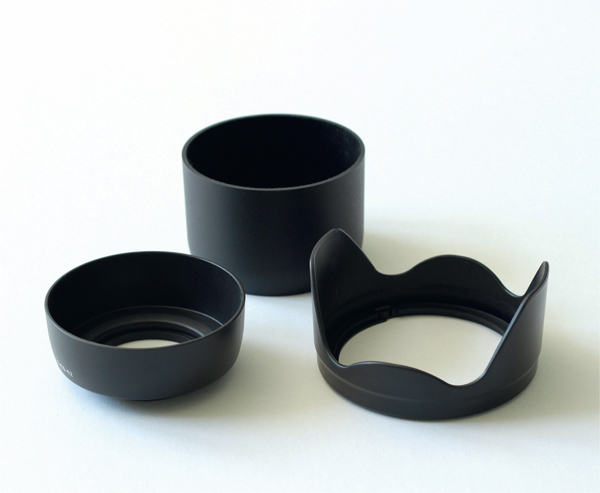
Lens Hood Collection - Attach a lens hood to your lens to prevent lens flare.
This feature displays the scene you are about to photograph on your DSLR’s LCD screen (use with Evaluative Metering mode). It’s a great way to proactively check for correct exposure and clear focus before you take the actual shot. Tips: (1) If you are using this feature to check for clear focus, know that it works best with still subjects where your camera is on a tripod. Zoom in to see if you are achieving clear focus where you desire it to be. It’s very hard to check focus without zooming in, as the display is so tiny and virtually everything looks in focus, even if it is not. (2) If you are in P mode or one of the semi-automatic modes you can easily make any exposure corrections with your camera’s exposure compensation feature. If you are shooting in Manual mode, you need to make exposure corrections by dialing in some new numbers.
Apps with general-purpose editing tools include PhotoWizard, Photogene 2, Filterstorm, Photoshop Touch, Photoshop Express and Leonardo. There are so many other apps on the market that will provide you with special effects (see the resources available at createmixedmedia.com/artofeverydayphotography).
Post-processing your photos are a must in this day and age. You can make corrections and enhance your photos with programs like Lightroom, Photoshop (Elements, CS, and Creative Cloud/CC which gives access to the latest CS and Lightroom tools, among other software) and even free online programs like Pixlr (their regular editor operates much like Elements).
Reflector discs come in white, silver and gold and are used to reflect light onto the shadowy areas of your subject. Metallic silver can produce strong results and works best in low-light scenes, white is softer and used most often (especially with flash), and gold might be your disc of choice when the light is very warm, like at sunset, and you’re aiming for a bronzed skin effect. Black discs are also available and prove useful for cutting out light to create dramatic shadows.
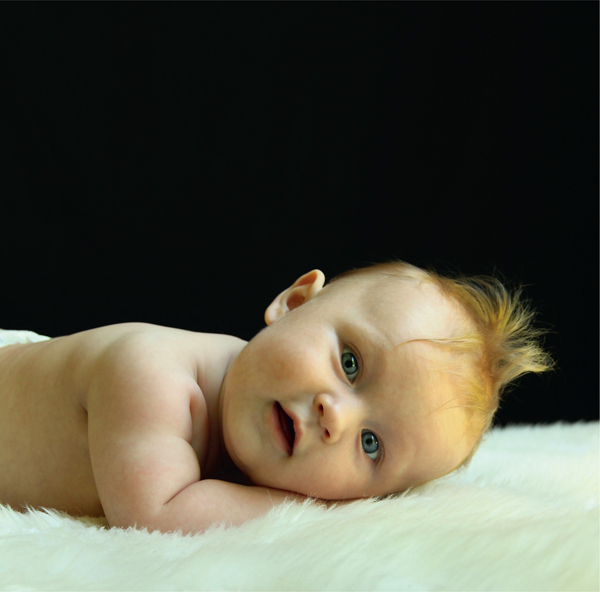
Reflector Disc Image Example - My assistant, Crystal Sullivan, used a white reflector to bounce light from the window onto the right side of the baby’s body, brightening the shadowy areas. 15-85mm f/3.5-5.6 lens at 31mm, ISO 400, f/4.5 for 1/80 sec.
Touching the camera can cause blur in photos at slow shutter speeds. Your DSLR’s built-in timer is not always the best choice, especially with more spontaneous shooting. What to do? Spend a little dough on either a shutter release cable or wireless shutter release.
We all need a little camera support when the shutter speed slows, whether it be a support you find in the environment (like a table top for instance), or a tripod or monopod. What is a monopod you ask? It’s a one-legged support that is especially useful for supporting those gigantic zoom lenses used for sports photography and nature photography. The photographer cannot let go of a DSLR mounted on a monopod for obvious reasons, where the tripod can stand on its own.
For smartphone support: There are several mobile phone support options including a mini tripod or a mount that can attach to your DSLR’s tripod or monopod.