CHAPTER 7
Photoshop Corrections
As you gain more creative control of your DSLR, you will begin to notice marked improvement in the clarity and exposure of your photography. With this milestone will also come less need for making corrections in software like Photoshop. But, even images that are near perfect can benefit from a few corrections. Here are my top five ‘go-to’ Photoshop corrections for taking your images from good to great (Pixlr.com offers a free editor that performs much like Photoshop Elements). I have applied at least three of the tips below to most of the photos in this book.
CROP UNWANTED PIXELS
Use the Crop Tool to crop out unwanted elements in your photograph. If you plan on printing your cropped image, there are a few things to keep in mind. First, decide what standard size you wish the print to be and make sure you maintain that relative size when cropping (you can set the height and width of the Crop Tool). If you plan on printing yourself, you can make the photo whatever size you wish. The Spot Healing Brush Tool also comes in handy when you need to quickly erase blemishes, food particles on a child’s face, flakes of dry skin, small specks in the background etc. Tip: Always save the original image file.
SHARPEN YOUR IMAGE
Think subtle here (overly sharpening will look unnatural and cause unwanted noise—grain and discoloration—in your photographs).
- In Photoshop Elements go to: Enhance> Adjust Sharpness and adjust the sliders to slightly sharpen the image. I recommend setting the Amount between 100 and 150%, the Radius to 1.0 pixels, and Remove to Gaussian Blur.
- In Photoshop CS go to: Filter> Sharpen> Unsharp Mask and adjust the sliders to slightly sharpen the image. For nearly all of my images I set the Amount between 100 and 150%, the Radius to 1.0 pixels, and the Threshold to 10 levels.
Sharpening Your Image
CORRECT OVER- OR UNDER-EXPOSED SHOTS
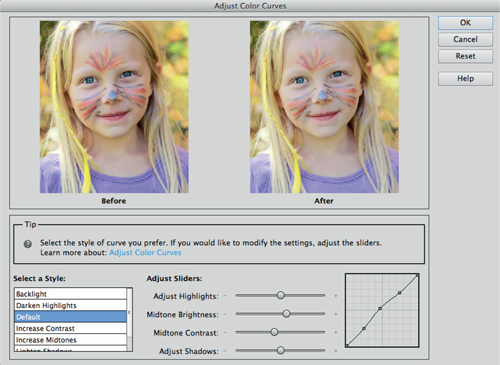
Color Curves
- In Photoshop Elements go to: Enhance> Adjust Color> Adjust Color Curves
- In Photoshop CS go to: Image> Adjustments> Curves. Use this command to adjust the tonal range of your imagery. You can adjust up to fourteen points of an image’s tonal range, from shadows to highlights, giving you more control than you get when using the Brightness/Contrast menu. Photoshop CS allows you to physically move the points on a histogram, while Elements provides adjustment sliders.
Correcting Over or Under Exposure
Brightness
- In Photoshop Elements go to: Enhance> Adjust Lighting> Brightness/Contrast or Layer>New Adjustment Layer> Brightness/Contrast
- In Photoshop CS go to: Image> Adjustments> Brightness/Contrast or Layer>New Adjustment Layer> Brightness/Contrast
- Brightness refers to the lightness or darkness of an image. Adjust the Brightness slider to either lighten or darken your image. Tip: An Adjustment Layer is essentially a duplicate of the base image. It allows you to make a variety of adjustments to your photo while keeping your original layer intact. This way, you can change or remove the adjustments later.
Adjust Brightness and Contrast
Levels
- In Photoshop Elements go to: Enhance> Adjust Lighting> Levels or Layer> New Adjustment Layer> Levels
- In Photoshop CS go to: Image> Adjustments> Levels or Layer> New Adjustment Layer> Levels. This feature allows for adjustment of color and tone. Within the format of a histogram, you can manipulate shadow values with the black point sliders, manipulate highlight values with the white point sliders, and adjust middle tones with the gray point sliders. You can manipulate red, green and blue (R, G, B) channels as a whole or adjust each color individually.
Levels
Increase Saturation
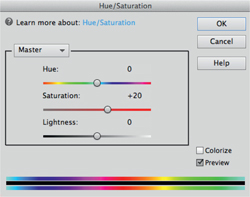
- In Photoshop Elements go to: Enhance> Adjust Color> Adjust Hue/Saturation or Layer> New Adjustment Layer> Hue/Saturation
- In Photoshop CS go to: Image> Adjustments> Hue/Saturation or Layer> New Adjustment Layer> Hue/Saturation
- Think subtle as you increase Saturation to bring your photos to life.
Increase Saturation
Increase Contrast
- In Photoshop Elements go to: Enhance> Adjust Lighting> Brightness/Contrast or Layer>New Adjustment Layer> Brightness/Contrast
- In Photoshop CS go to: Image> Adjustments> Brightness/Contrast or Layer>New Adjustment Layer> Brightness/Contrast. Increasing Contrast will make your photos pop—again, think subtle.
For making similar corrections to mobile photos, I recommend the apps PhotoWizard, Leonardo, Photogene 2, Filterstorm, Photoshop Touch, and Photoshop Express.
Pulling It All Together - I used all five tips to enhance this photo – nothing major, just subtle adjustments to improve it. I used the rule of thirds to crop the shot by placing the top left point of intersection directly over the subject’s left eye (The Crop Tool has a built-in grid feature). The Spot Healing Brush Tool helped me get rid of some of the dark branches on the right side of the image. I sharpened the image using 150% for the Amount, adjusted Brightness by +30, increased Saturation by +20, and increased Contrast by +15. 50mm f/1.8 lens, ISO 100, f/2.8 for 1/250 sec.


