Black and white photography has a timeless quality to it. Monochrome toning will give a classic and elegant feeling to your images, allow you to unify distracting design elements (like too many different colors or patterns), and infuse your imagery with a story-like quality. Although you can set your DSLR to take a photo in black and white, I do not recommend it. Better to take a color version and then convert a copy of it to black and white in a software program like Photoshop, Lightroom or Pixlr. That way you have both options.

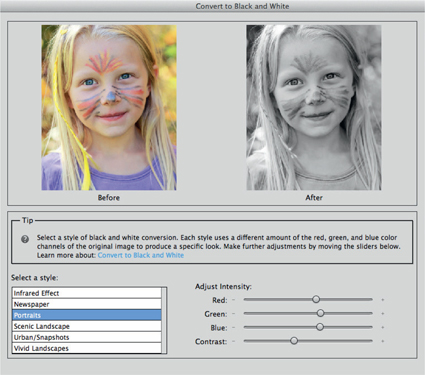
Adjust Tone Intensity - In Photoshop Elements 12, I converted my photo to black and white by going to Enhance> Convert to Black and White and chose the ‘Portraits’ style. You can adjust the intensity of tones by tweaking the sliders provided.

50mm f/1.8 lens, ISO 100, f/2.8 for 1/200 sec.

Photoshop Elements 12 - I converted the photo to black and white in Photoshop Elements 12 by going to Enhance> Convert to Black and White and chose the ‘Portraits’ style. I also increased contrast using the slider provided, to make the tones pop.
In Pixlr’s Express editor at pixlr.com go to Adjustment> Color and move the Saturation slider all the way to the left (-100). Or, try something like this: Effect> Too Old> and choose a black and white overlay.

Pixlr Express - In Pixlr’s Express editor I converted my photo to black and white by going to Effect> Too Old> and choosing the ‘Agnes’ overlay.

Pixlr also makes an app called Pixlr Express+, which is its mobile version of the Express editor found at pixlr.com.
You can give your black and white photos an interesting appearance by adding a subtle color tint. There are several ways to approach this in Photoshop, and my offering is only one way. First select a color for the ‘set foreground color’ box at the bottom of the Tools Palette and then add a Solid Color Fill Layer with this color (Layer> New Fill Layer> Solid Color). Apply a blending mode from the Layers Palette (try ‘Multiply,’ ‘Soft Light’ or ‘Overlay’ and feel free to experiment with some of the others), and reduce the fill’s opacity to achieve a subtle tint. Colors to try: brown, blue, yellow, gold

I added a sepia tint by applying a brown Solid Color Fill (color #663300) and using a Soft Light blending mode set to an opacity of 40%.

To create a yellow/golden tint I applied a golden Solid Color Fill (color #ffcc33) and used the Multiply blending mode reduced to 12% opacity.


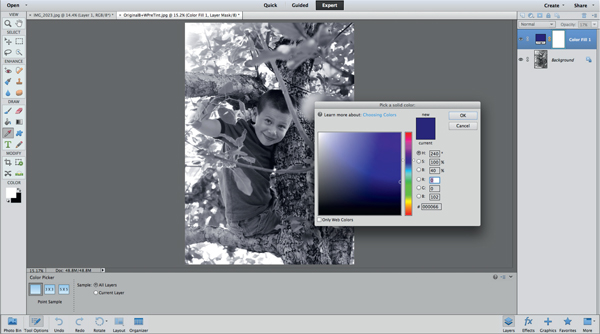
To give the black and white photo a bluish tone, I applied a dark blue Solid Color Fill (color #000066) and used the Soft Light blending mode set to 17% opacity. Refer to the screenshot to see the maneuver being carried out in Elements.
You can add tints with Pixlr’s regular editor in a similar fashion. Go to Layer> New Layer. Select a color for the ‘Set main color box’ in the Tools Palette by clicking on it and choosing the color. Select the Paint Bucket Tool and click with it somewhere on the new layer. It will fill the new layer with color and behave just like a Solid Color Fill Layer. To access blending mode and opacity adjustment, click on the triangular icon in the Layers Palette and these functions will appear.
If Photoshop or the regular Pixlr editor sounds overwhelming to you, why not try the Pixlr Express editor, which has some visually appealing options. Here’s one to try: Open your black and white photo in the Express editor and go to Effect> Unicolor and choose an overlay. Reduce the overlay’s opacity to achieve a subtle tint.
PhotoWizard, Camera+, PicFX, Snapseed, Magic Hour, Noir, VSCOcam, AfterLight, Camera Noir, and Camera Bag 2 (Camera Bag 2 also comes in a version for your Mac or PC computer)