
Chapter 2: The Scenes Tab and the Stage
In This Chapter You Will Learn:
•How to add and delete scenes in a game project
•How to organize scenes in a project
•What the stage is and how its used
•How to navigate the stage view
•How to establish some initial settings for a scene
Scenes are one of the base elements that all games are made from in Gamesalad. You will spend this hour learning what a scene is, how and when to add scenes to a project, and how to organize scenes. Once you have learned to add scenes to a project, you’ll take a look at the stage view. The stage view is where you will build a scenes’ interactive elements and make your game come to life! You’ll spend part of this hour learning to navigate the stage view and prepare to add game elements in the next chapter.
The Scenes Tab
The scenes tab is used to create and organize the various scenes of a game. You can think of a scene as an individual level in a game or any single screen of information (like a splash screen, credits screen, etc.). Any time you want to create a new screen, you’ll likely do so by creating a new scene in the scenes tab.
The scenes tab opens with one scene already created for you, the initial scene (see Figure 2.1). You can add additional scenes to a project by pressing the Plus (+) button in the lower left corner of the screen. As you add new scenes, they will be named and sequentially numbered, starting with scene 1. To rename a scene, click its name and you will be presented with a standard text box to edit. If you add too many scenes to your project, or just want to delete one for any reason, first highlight the scene by clicking on it once. Then you can either press the Delete key on your keyboard or press the Minus (-) button in the lower left corner of the screen to delete the scene. If you accidently delete a scene, don’t worry. Gamesalad has a multi-step undo so you can use the Edit » Undo menu option to bring scenes back from nowhere. If you have multiple scenes to delete, you can hold down the Shift key, as a modifier, while you are selecting scenes. This will allow you to select multiple scenes at the same time.
Figure 2.1: The Scenes tab.
Once the scenes tab is full of scenes, you will likely want to organize them in a way that makes sense for your project. You can easily move scenes around in the tab by clicking and dragging them to a new location. As you drag a scene, a thin blue line will appear on-screen. When you release the scene, it will move to the location of this blue line and all the other scenes will adjust accordingly.
The Stage View
If you have added scenes to the scenes tab, delete them all except for the default scene named “Initial Scene.” Double-Click that scene and you’ll be presented with the scene’s stage view window. You’ll see that, again, the screen contents have changed quite a bit (see Figure 2.2). The stage view is the most important screen you will work with; it allows you to see all of the contents of your game. This is where the power of Gamesalad really starts to shine; you don’t have to look at line after line of computer programming code to create games. You are able to place all of the game objects on the stage and edit them in real time, allowing you to simply drag and drop your elements to build your games!

Figure 2.2: The Stage view.
Throughout this book, you’ll spend a lot of time in the stage view, so let’s take a look at all of the new options you have been given. There are three main sections in the stage view window: the inspector palette, the library palette, and the stage itself. Let’s take a look at the actual stage first since it is the largest part of the window.
The stage represents the screen size of whichever device you chose for the project’s platform on the project info screen. The screen size in Figure 2.2 is the dimensions of the iPhone landscape platform. The stage indicates the live area (in black) of the screen (this is the area that you will see on-screen while playing the game) and also a gray area that acts as a pasteboard while working on a project. The white lines are indications of some camera settings. The outside line is the area the camera “sees” and the inside line indicates the camera’s movement leeway zone. Later in the book, we’ll look at the camera settings in more detail.
There are a few new buttons placed across the top of the stage as well; all of these buttons turn blue when they are active.
•Pointer Button: Returns you to stage-editing mode if you are in camera-editing mode.
•Camera Button: Sends you into camera-editing mode from stage-editing mode. When in camera-editing mode, you can use the on-screen handles to adjust the camera’s movement leeway zone.
•Pause Button: Pressing the pause button will pause the gameplay.
•Play Button: Pressing the play button will run the game on the stage, leaving all other tabs and information on the screen. This is different from the large green preview button above that hides all extraneous information while play testing the game.
•Show Initial State Button: When this button is active, any moving elements in the game will leave a “shadow” image at their initial location. This can be helpful when play testing; you can tell where an actor has moved to and from, that way you can make adjustments as needed. You can toggle this button on and off while the game is running.
The Inspector Palette
This palette can be separated into two tabs, the game and scene tabs, each of which have subsections
of information.
Game Tab
The game tab is separated into three subsections: actors, attributes, and devices (see Figure 2.3).
•Actors: An actor is any object that will be used in a game; it could be a sprite, a piece of text, a special effect, etc.
•Attributes: An attribute is what Gamesalad calls a variable. Gamesalad has many built-in attributes and you can also add your own as needed. Attributes can hold numerical or text data.
•Devices: Contains a list of various device-related attributes that can be accessed during gameplay.
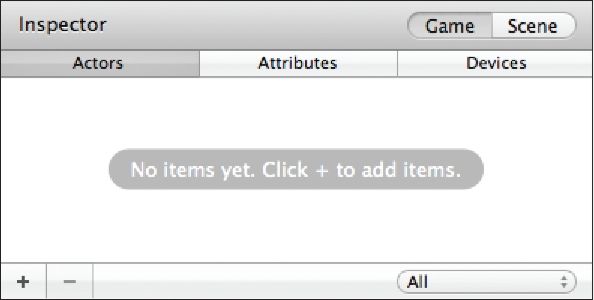
Figure 2.3: The Game tab in the Inspector Palette.
Scene Tab
The scene tab has two subsections of information: attributes and layers (see Figure 2.4).
•Attributes: This is a listing of scene-specific attributes that can be edited to customize each scene of your game.
•Layers: The layers tab lets you create multiple layers of actors in a scene to help visually organize your games.
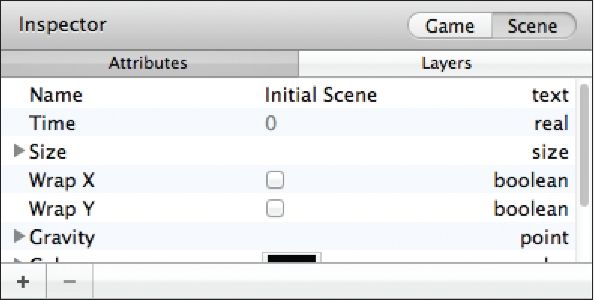
Figure 2.4: The Scene tab in the Inspector Palette.
The Library Palette
This palette is separated into three tabs: behaviors, images, and sounds. And just like the inspector palette, each of these tabs has their own subset of additional information.
Behaviors Tab
Behaviors are Gamesalad’s preset blocks of “code” that you will drag and drop onto actors to build a game’s interactivity. There is a pre-made behavior for just about any action you can imagine. If one does not already exist by the end of this book, you’ll be able to customize your own to fit your needs. Behaviors are further separated into two subcategories: standard and custom (see Figure 2.5).
•Standard: Standard behaviors are all of the behaviors that ship with the free Gamesalad license.
•Custom: This is a customizable area that you can use to store your own custom-built behaviors.
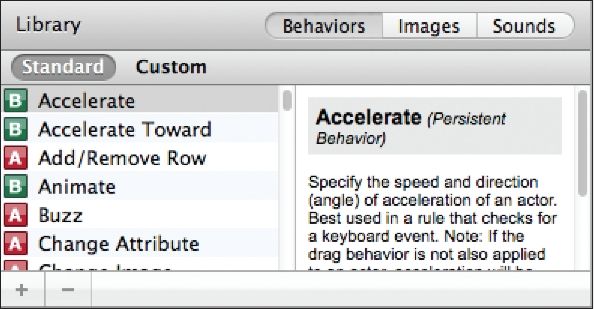
Figure 2.5: The Behaviors tab in the Library Palette.
Note–Pro Behaviors: If you purchased the Pro license for Gamesalad, you will see a third group called “Pro.” Pro behaviors offer some additional features like including advertising in a game, linking a game to Twitter, opening URL’s within a game, and more.
Images Tab
The images tab is used to store all of the images that have been imported into a project. The images tab is further separated into project and purchased (see Figure 2.6). At the bottom of the window is a slider control that can be used to increase and decrease the size of the icon preview of images that are displayed in the window.
•Project: Displays images imported into the current project.
•Purchase: Displays images purchased from the Gamesalad marketplace.

Figure 2.6: The Images tab in the Library Palette.
Sounds Tab
The sounds tab is used to store all of the audio files that have been imported into a project. The Sounds tab is further separated into project and purchased (see Figure 2.7).
•Project: Displays audio files imported into the current project.
•Purchase: Displays audio file purchased from the Gamesalad marketplace.

Figure 2.7: The Sounds tab in the Library Palette.
Tip–Organizing Your Projects: While Gamesalad helps you organize your project with these palettes, it’s also a good idea to set up a specific directory structure on your computer for each project you are working on. As you learn more and your projects get larger, all of the files can quickly get out of hand. Figure 2.8 is a screen shot of how I like to set up my file structure. As you can see there is a specific folder location for each kind of file that might be used in a game.

Figure 2.8: Sample directory structure with file locations clearly named.
Scene Inspector Details
Before we finish this chapter, let’s return to the scene tab of the inspector palette. As I briefly mentioned above, this section is used to customize each scene within a game. If you have a game with ten different scenes, each scene can have different settings in their own scene tab (these are scene-specific settings not game-specific). The scene attributes tab (see Figure 2.9) contains a few options you are likely to edit often, some of which include:
•Name: This is the name of the scene and can also be edited in the scenes tab of the home window.
•Size, Width, and Height: This is the pixel dimension of the current scene. If you want to make a scene that is larger than the device, so your game can scroll in some direction, you would increase the size of the scene here.
•Wrap X: When wrap x is active, an actor that leaves the stage on the right side of the screen will wrap around to the left side and reappear there. If an actor leaves on the left side, it will reappear on the right side.
•Wrap Y: When wrap y is active, an actor that leaves the stage on the top of the screen will wrap around to the bottom and reappear there. If an actor leaves from the bottom, it will reappear on the top of the screen.
•Gravity, X, and Y: You can apply gravity to a scene with these attributes. Gravity does not have to always move an object from the top of the play area to the bottom; you can adjust these values to make objects “fall up” the screen if you want too!
•Color, Red, Green, and Blue: You can adjust the background color of the scene by clicking on the color swatch provided and by picking a color from the color picker or you can manually adjust the values of red, green, and blue.

Figure 2.9: Details of the Scenes tab in the Inspector Palette.
Summary
In this chapter, you learned all about the scenes tab and how to add and organize scenes. You learned about the stage view, what its various parts are, and how to navigate through the palettes. Lastly, you learned how to establish some initial settings for each scene so you can have a lot of variety in your games.