Chapter 3: Game Objects and Gamesalad’s Coordinate System
In This Chapter You Will Learn:
•How the Gamesalad coordinate system works
•How to add a new game actor to a project
•How to work with actors
In Gamesald, every single object used in a game is called an “actor.” The stage and every actor placed on it have a set of coordinates that are used to place and control them. In this chapter, you will learn all about the coordinate systems of the stage and its actors. You’ll finish off the chapter by placing an actor on the stage and by learning the different ways you can manipulate that actor to control its precise appearance and placement.
Coordinates and Dimensions
When you are playing a video game, it may seem like all of the objects on the screen are placed in random locations, but in reality, the computer numerically placed them on-screen using a system of dimensions and coordinates. While you are playing the game, the computer keeps track of every on-screen element and knows exactly where they are at all times using these same systems. Gamesalad is a 2D game engine, so all of its coordinate systems are two-dimensional as well.
Note–2D vs. 3D: Gamesalad uses a two-dimensional (2D) system to create and control all of its games. The 2D system is a flat system that deals with only horizontal and vertical elements. Three-dimensional (3D) systems deal with the same horizontal and vertical elements, but add depth as an additional element.
The Coordinate System
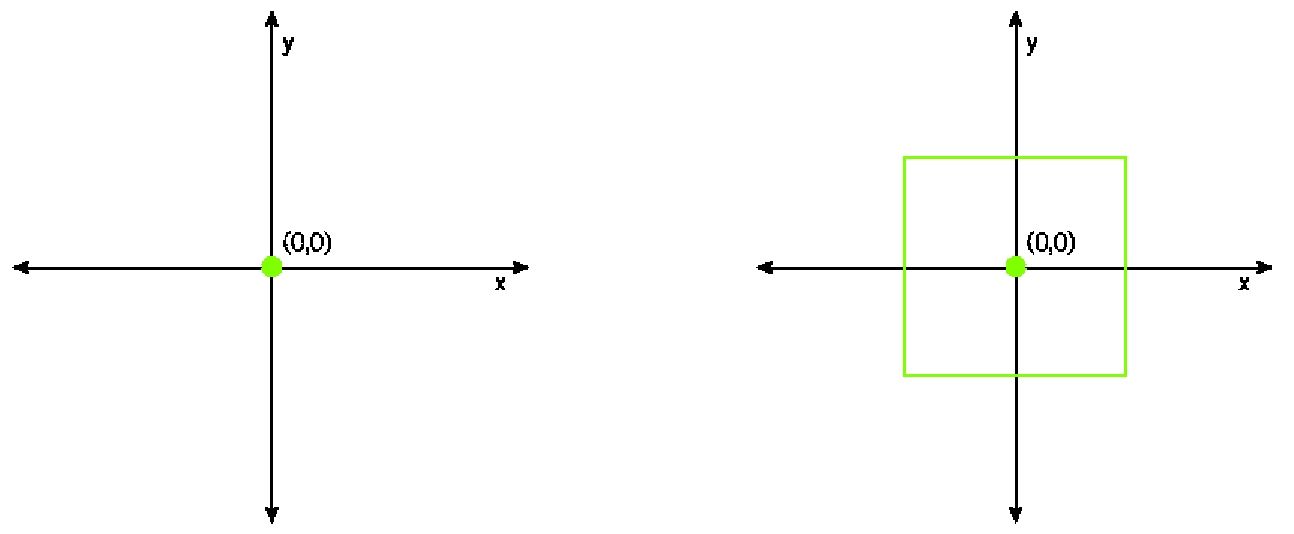
The coordinate system used by Gamesalad (and most other game engines) is a series of lines (called axes) and locations (called points). These axes and points allow every object in the game to be precisely placed and manipulated as needed. The 2D coordinate system has an x-axis and a y-axis. These axes represent the horizontal (x) and vertical (y) directions. When an object moves vertically, it is said to be moving along the y-axis. However, when an object moves horizontally, it is said to be moving along the x-axis. Figure 3.1 shows a typical 2D coordinate system.
Figure 3.1: 2D coordinate system.
As you can see in the figure above, the coordinate system has a point where the x- and y-axis meet. This point is known as the origin. The coordinates for the origin of a 2D coordinate system are always 0 on the x-axis and 0 on the y-axis.
Note–Writing Coordinates: Referring to coordinates, like I just did above, is rather long-winded and can quickly become old. It is commonly accepted to write a set of coordinates as (x,y). So, the origin of a coordinate system would be written as (0,0).
The origin of the coordinate system is important because it is the location by which all other points are determined. The coordinates for all other points are simply the distance of that point from the origin, along the correct axis. Gamesalad measures distance between points as pixels or fractions of a pixel. A point’s coordinate will get larger as it moves further away from the origin. For example, as a point moves up, its y-axis value will get larger. If that same point moves down, the y-axis gets smaller. If that point passes through the origin, it will become a negative value and begin to increase as it again moves further away from the origin. Figure 3.2 has four points plotted the origin at (0,0) and three other points. The point at (2,4) is 2 units to the right of the origin and 4 units above the origin. The point plotted at (3,-2) is 3 points to the right of the origin and two points below. And the final point plotted at (-3,-3) is 3 points to the left and 3 points below the origin.
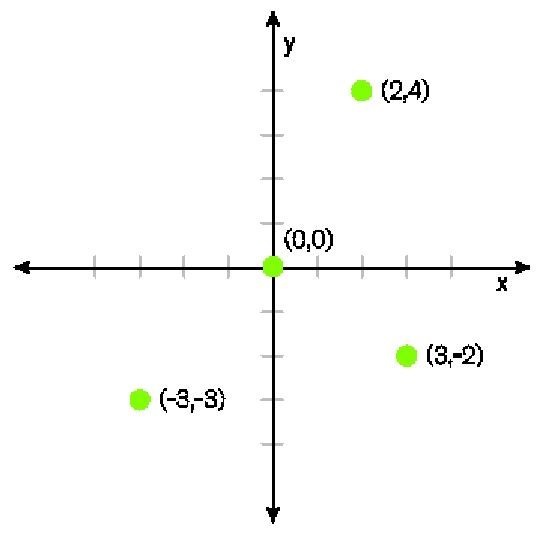
Figure 3.2: 2D coordinate system, with plotted points.
The Coordinate System of the Stage and its Actors
The stage in Gamesalad uses a coordinate system to place and manage all of the actors and elements you will place on-screen while you are building and testing a project. The origin of the stage in Gamesalad is in the lower left corner of the screen (see Figure 3.3).

Figure 3.3: Plotted origin of the Stages coordinate system.
As you can see, by placing a coordinate system over the stage, the origin is in the bottom left corner. The points on the coordinate system will extend to the right and above the origin until you reach the limits of the scene’s size. For an iPhone 5 in landscape orientation, the furthest points visible on-screen will be 568 pixels to the right and 320 pixels above the origin. If an object moves to a negative value below or to the left of the stage, or to a positive value to the right or above the origin that is greater than the scene size, it will disappear off the screen.
In addition to the coordinate system used for the stage, each actor has its own local coordinate system (see Figure 3.4).
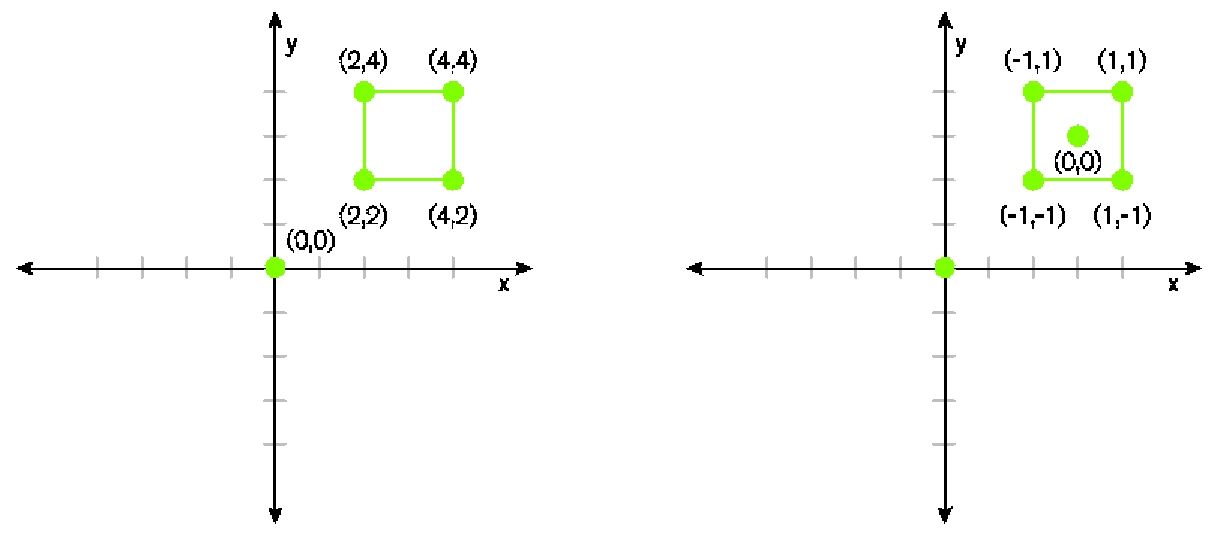
Figure 3.4: (Left) points plotted from the origin of the stage, (right) points plotted from the actors origin.
The stage’s coordinate system, on the left, represents a square actor placed on the stage. The four corners of the square are plotted from the origin of the stage. The actor’s coordinate system is shown on the right, with the origin of the actor as its center and the four corners of the actor plotted from its own origin. In the next section, you’ll see why it is important to keep the stage and actor’s coordinate systems in mind as you create your projects.
Actors (Game Objects)
In Gamesalad, every object you place on the stage (such as sprites, text, backgrounds, sounds, etc.) are all considered actors. Anytime you want to place a new object of any kind in a game, you will need to create
a new actor to do it.
When you create a new actor, it is really nothing more than an empty square box with a collection of attributes associated with it. The magic of Gamesalad is that by adding images, behaviors, and custom attributes to these actors, you can quickly and easily turn them into useful and amazing elements in your game. A large part of this book will be spent learning how to create amazing actors for your projects.
––––––––––––––––––––––––––––––––––––––––––
Exercise 1: Create Your First Actor
In this exercise, you’ll create an actor, place it on the stage, and examine its initial settings.
1Open Gamesalad and create a new blank project.
2For the Platform, choose iPad Landscape. This will give you a nice, big area to experiment with.
3Click the Scenes tab and Double-Click the Initial Scene to go to its Stage.
4In the Actors tab of the Inspector palette, Click the Plus (+) button in the lower left corner to add a new Actor to the project.
5Actor 1 is automatically named and added to the list of actors.
6Double-Click Actor 1 and you’ll see that Gamesalad gives every actor a basic set of components (Attributes) that define the Actor.
7Don’t worry about making any changes to these at this moment; we’ll take a detailed look at all this information later in the book.
8Click the Back button to return to the Stage.
9Drag Actor 1, from the Actors tab, onto the black area of the Stage and let it go.
10Congratulations, you have just created and placed your first actor in Gamesalad!
––––––––––––––––––––––––––––––––––––––––––
Fine-Tuning Actors on the Stage
Now that you have your first actor placed on the stage, let’s take a few minutes and look at the various ways you can control its placement and appearance so you can make your games exactly like you imagine them.
Movement
Once you have placed an actor on the stage, it has a plotted location on the coordinate system of the stage. When you move an actor on the stage, you are changing its plotted position. You can move actors along the x-axis, the y-axis, or some combination of both. Moving along both axis results in a diagonal line of movement. To move an actor on the stage, click it once and drag it to a new location.
Select the square Actor you placed on the Stage in the previous exercise by clicking it once. When clicked, you’ll see that a set of lines and circles appear around the actor’s edge. This indicates that an actor is “active” and also acts as a set of controls for moving and adjusting the actor (see Figure 3.5).

Figure 3.5: An active actor displaying its control handles.
The open circle in the direct center of the actor represents its local origin. To move an actor, click on it and drag it to a new location. Make sure you DO NOT click on any of the highlights, circles, or lines, or else you may accidently rotate or resize the actor. Move the Actor so its center circle is overlapping the red plus sign in the center of the Stage. When you move the Actor, you are really just moving its center point of origin.
NOTE–Actor Controls: All adjustments (movement, rotation, and scaling) made to actors take place from their local origin (its center point).
You can also move an actor by pressing the arrow keys on the keyboard. With the Actor still highlighted, press the Right Arrow key a few times. Each press of the arrow key moves the actor along its axis, one pixel at a time. This is great for pixel perfect adjustments.
Rotation
To rotate an actor, click it once to activate it and note the white line and circle that extends out of the actor’s center. This acts as a rotation control for the actor. After clicking on the circle at the end of the line (not the origin), you can drag that circle around the origin to rotate the actor (see Figure 3.5 above).
As you drag the circle around the origin, you can also move the circle into or away from the origin. As you move the circle toward the origin, the actor will rotate more quickly and as you pull the circle away from the origin, the actor will rotate more slowly. When you are finished rotating the actor, release the rotation control.
Scaling
Scaling an actor will make it larger or smaller on the stage. The 8 circles located around the edge of the actor are the scale controls (see Figure 3.5 above). Click one of the circles and drag the actor to make it larger or smaller. Selecting one of the circles at the corners allows you to scale the actor both horizontally and vertically at the same time. The circles in the center of the sides will only scale the actor horizontally and the remaining two circles in the top and bottom center will scale the actor vertically. When scaling an actor, the opposite side from where you click remains in place and the rest of the actor changes size. However, note that the origin moves as the actor scales. Remember, the origin is always located at the center of the actor.
TIP–Modifier Keys: When adjusting an actor’s placement on the stage, you are able to use the Shift and Option (Alt) keys as modifiers to certain actions.
The Shift Key
&csMarker;When moving an actor, hold down the Shift key to limit its movement to only the x- and y-axis.
Hold down the Shift key during rotation to limit the actor’s rotation to 45° increments.
Use the Shift key when scaling an actor from its corner point to scale proportionally in that direction.
The Option (Alt) Key
Holding down the Option (Alt) key while moving an actor will make a copy of that actor.
When scaling an actor using a corner point, holding down the Option (Alt) key will scale the actor in all four directions at once.
Holding down the Option (Alt) key while scaling an actor using a side point will scale the actor equally in both directions along that axis.
Adjusting the actor’s attributes gives you even more precise control over all of these settings, rotation, scaling, and movement. We’ll look at that, in much more detail, later in the book.
Summary
In this chapter, you learned all about the coordinate system of the stage and the local coordinate system of actors. You learned how these coordinates are used to place and control all of your game’s elements. You then created and placed an actor on the stage and learned the various ways to control, place, and size that actor.