Chapter 5: Game 1–Pachinko/Plinko
In This Chapter You Will Learn:
•How to design a simple game
•How to apply your knowledge of the stage and actors
•How to add interactive elements to the game
•The importance of play testing the finished game
In this chapter, you will take what you have learned so far and apply it to your first full game using Gamesalad. We will start by discussing game design/planning and how it applies to this game. Afterwards, you will build the environment for the game, build and add the actors to this environment and finally play test the game.
What is Game Design?
Put simply, the design phase of a video game is the act of planning the rules, content, gameplay, environments, storyline, etc. of the game ahead of time. Not every game will cover all of those elements. For example, the game you are about to create will not have any storyline since it’s an arcade game. During this phase, the planning of the project is often done on paper, with flow charts for interactions, level designs drawn up, characters illustrated, and even coding rules roughed out. Since this game is very straightforward with one screen and ten Actors, you won’t need to do all of that detailed pre-planning. But keep in mind, as your projects grow in size and detail, the more up-front planning you can do, the easier the project will flow. For this game project, we are going to plan the gameplay, the asset requirements, and the rules of the game.
The Gameplay
For your first game, you are going to create a simple version of Pachinko. Pachinko is similar to a pinball style game. A ball is dropped through a field of pegs, falling down the screen to a group of score cups at the bottom of the screen. This game will be easy to assemble with the knowledge you have so far, but will teach some new and important concepts as well.
The Asset Requirements
An asset is any object that will be needed to produce the final game. It can be an art element, a sound file, or a piece of text. Often times, a large group of people work on a video game—many people may work on completing the different assets at the same time. But, as I mentioned in the beginning of this book, it’s likely you are either a solo developer or part of a very small team, so you may be creating every asset in your games yourself. All of the assets for Pachinko are already created for you and included in a starter project.
NOTE–Starter and Complete Project: The starter project for Pachinko is located in the book assets for Chapter 5. This starter project contains some of the elements you’ll need to complete this chapter’s work. If you get stuck building the game, or things don’t seem to be working correctly, there is also a fully-completed project in the book assets for Chapter 5 that you can use for reference.
Below is a list of the assets that are required for Pachinko:
•A game board. This board will be a single scene in Gamesalad.
•Art for the ball, pegs, wood planks, and background. This art is provided for you in the starter project.
•Actors for the ball, pegs, wood planks, and background.These are part of the starter project.
•A game control actor. This is part of the starter project.
The Rules of the Game
Whether it’s a board game, a sports game, or a video game, every game must have rules. The game’s rules let the players know how to play the game and also let you, as the game’s developer, know how to create the game. Once you have planned your game’s rules, you can use that plan to code the rules and behaviors in Gamesalad (or any other programming language you choose).
TIP–Coding: Whatever you choose to call it—coding, scripting, or programming—it is the act of telling a computer how to interpret events in a game. If you don’t specifically tell the computer what to do when an event occurs in your game, nothing will happen when that event occurs. For example, if you don’t tell the computer what to do when the ball hits a peg in this Pachinko game, the ball will just pass through the peg as if it wasn’t there.
The rules of Pachinko are below:
•The ball will start at the top of the screen and continuously move side to side until the player clicks the mouse button.
•When the mouse button is clicked, the ball will drop down the screen.
•When the ball collides with a peg or a board, the ball will bounce.
•A bounce sound will play whenever the ball bounces off of a peg or board.
As you can see, by reading through the rules, each one relates to the previous and they cover every action possible in the game. As your games get more complex, it may be beneficial to create a flow chart of rules to show how they relate to each other.
NOTE–Definitions: Game development contains a lot of specialized terms; a few are mentioned in the sections above:
Game Controller: A game controller is a special actor in a game that “watches” for certain events to happen and triggers other events at the correct times. A game controller can be any actor in the game–often it is a special actor that is created specifically for this purpose and is placed on the pasteboard in Gamesalad.
Collide: Colliding is a term used to describe when two or more objects touch each other during a game.
Spawn: Spawning is when a new actor is added to the stage during a game.
Creating the Game
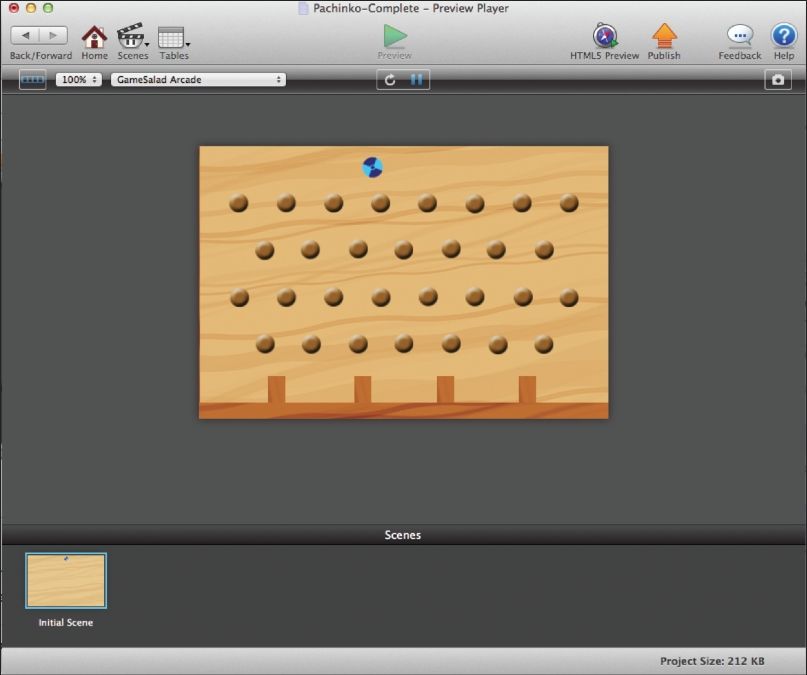
With all of the pre-planning complete, it’s time to start building the actual, working game. Since this is your first game project, there is a starter project named “Pachinko-Starter” located in the book assets for chapter 5. Some of the elements are already built for you. However, there is a lot of work remaining to be done. When you have completed the project, it should look like Figure 5.1.
Figure 5.1: The completed Pachinko game.
Open the Starter File
Open the file named “Pachinko-Starter.” Before you start building the game, note that this game is set up for the Gamesalad Arcade Platform type. Remember that you can check this in the project info tab. Go to the Scenes tab and Double-Click the Initial Scene to go to its Stage. At this point, you should see an empty stage on the right and five blank/empty actors in the actors tab of the inspector palette.
Completing the Actors
First, you must import the images you’ll need for the actors so you can build the game board that all of the action will take place on. These images are provided for you in the images folder located in the assets for chapter 5 folder.
1Click on the Images tab in the Library Palette.
2Click the Plus (+) button and navigate to the Images folder for chapter 5.
3Import the images named “background-guide.png,” “ball.png,” “board.png,” and “peg.png.”
NOTE–Group Selecting: In the open dialog box, you can hold down the Command key on your keyboard and select all four of the images at the same time (that way you don’t have to import them one at a time).
4Next, drag the images to each of the Actors of the same name. The image named “background-guide” should be dragged onto the Actor named “background.”, etc.
Make sure to drag these images ONTO the actors provided. DO NOT create new actors with them. The Actors tab should now look like Figure 5.2. Some of the actors provided for you already have behaviors applied to them; these behaviors are going to make the game work properly.
Note–Behaviors: In this chapter, you will be adding one of the behaviors yourself, but since you have not learned about behaviors yet, I have provided you with the others needed to complete this game.

Figure 5.2: The Actors Tab with images applied to each actor.
Building the Game Board
Now that you have completed the actors by adding their images, you should build the game board next.
1First, drag the Actor named “background” and place its origin point so it is over the red plus at the center of the Stage.
2Double-Click the background Actor that you just placed on Stage. In its Attributes editor, change Position x to 240 and Position y to 160 (this is the exact center of the Stage).
Note–Center Stage: The coordinates of the stage’s center depend on the scene size. Because the Gamesalad Arcade Platform is 480 x 320 pixels, the center of that stage is (240,160). You can calculate the center of the stage by dividing each of its dimensions by 2. If the platform was something different, the center point of the stage would be different as well.
With the background actor placed, the next thing to do is place all of the pegs on-screen. As you can see, the background actor has four lines of gray circles placed on it. These circles are guides indicating where to place all of the peg actors. Take a couple minutes and drag 30 peg actors onto the Stage, placing them on top of each gray circle (see Figure 5.1 above).
Note–Peg Placement: It’s not critical to cover each circle with the pegs you place. The circles are only there as a guide. Remember, if you want to do small adjustments to an actor’s placement, you can nudge them one pixel at a time using the arrow keys on the keyboard.
Finally, you’ll place the boards on-screen and the game board will be complete.
3Drag a copy of the “board” Actor and place it at the very bottom of the Stage.
4Double-Click this board and make its Position (240,10). This board will act as the base for the game board when the ball falls from the top of the screen. This board will stop the ball from completely falling off the bottom of the screen.
5Next, you’ll add the four divider boards that will make up the score cups. Drag a new board actor onto the Stage and release it anywhere. Single Click the board to highlight it. Once highlighted, use the board’s rotation handle (while holding down the Shift key) to rotate the board 90°.
6Now, Double-Click this board and change its Position to (91,-190).
7Return to the Stage and highlight this new board. Make a copy of it by holding down the Option key and dragging the new copy slightly to the right. Change its Position to (192,-190).
8Make two more copies of this board and set their Positions as (289,-190) and (385,-190).
Now, you’ll need to adjust the layer order of these boards. In the Inspector palette, Click the Scene button and then Click the Layers tab. Click the Arrow icon next to the layer named “Background”. This will open the background layers’ contents, showing you every actor that is placed on the stage so far in the game. Like most layer systems in other software packages, the top item on the list is above all the other items below it on stage. You’ll need to drag the first board placed, to the very top of this list, so it looks like a continuous floor across the bottom of the screen. Grab the fifth board from the top of this list and drag it to the top position. Once you have placed the bottom board at the top of the list, Click on the gray pasteboard of the Stage to deactivate any active actors. Your screen should look like Figure 5.3.
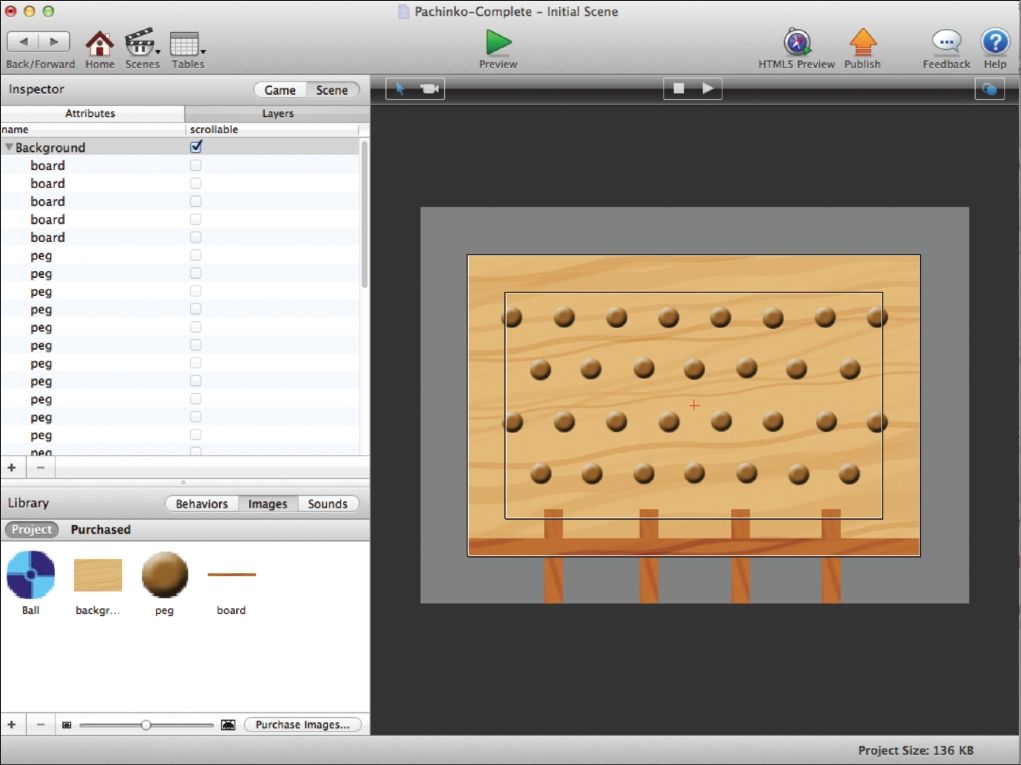
Figure 5.3: The Layers Palette showing the contents of the Background layer.
To complete the game board, return to the Actors tab and drag two more copies of the board Actor onto the screen and rotate each one 90°. On the Pasteboard, place one directly to the left of the Stage and the other directly to the right of the Stage. These boards will not show on-screen during gameplay, but they will act as walls to keep the ball from falling off the edge of the play area. The game board is now complete and should look like Figure 5.4.
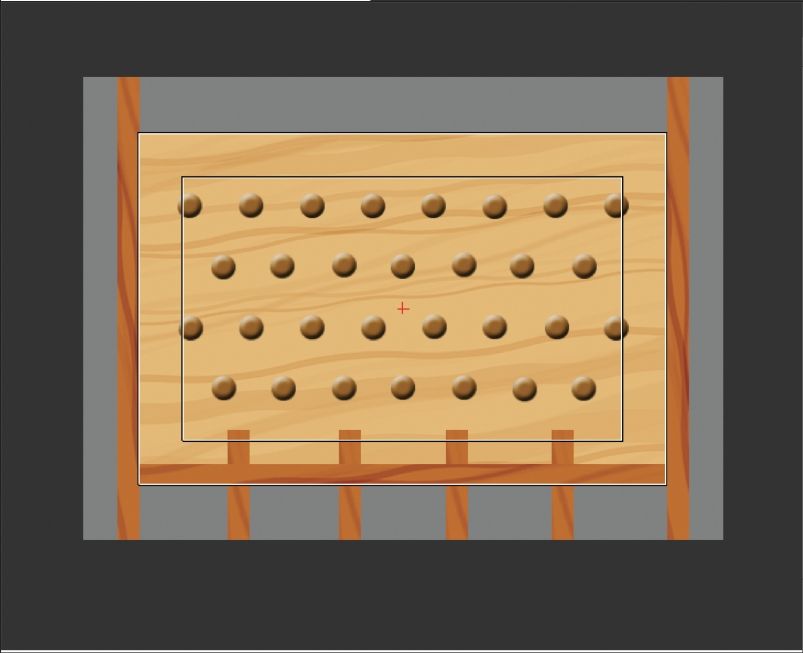
Figure 5.4: The completed game board with all 30 pegs and 7 boards in place.
Adding the Game Controller
Now that you have completed the game board, it’s almost time to take your first look at the game in action. But before you do that, you need to add the game controller so there is something more to look at besides just a static screen.
Scroll through the list of actors and find the one named “game controller.” Drag this Actor onto the Stage anywhere and drop it. You’ll see it’s the default Gamesalad actor, just a big, white square. This is fine for use as a game controller since the player will never see it. If you have deselected the game controller, Single Click it to activate it. Drag one of its corner resize points and make it much smaller, so small that you can move it off the Stage and place it on the pasteboard like in Figure 5.5.

Figure 5.5: The Game Control actor placed on the pasteboard of the game board.
Typically, a game control actor is not placed in the live area of the stage so their appearance is meaningless. As long as the actor is placed somewhere on the stage, it’s behaviors will run while the game is playing. The purpose of the game controller in the Pachinko game is only to spawn the players’ ball as needed. Click the Preview button at the top of the Gamesalad window and check out how the game looks so far. Hopefully you see the completed game board with a blue ball hovering across the top of the screen (see Figure 5.1 above). Click the Mouse button anywhere in the stage area, the ball will drop and bounce off the pegs you took such great effort in placing. Eventually, the ball will come to rest on the board at the bottom of the screen.
Everything should be working just like it was planned in the rules of the game. But nothing brings a video game to life like sound; it sure would be nice to give the player a little audio feedback to liven the experience of playing the game. For the final step of building the game, you’re going to add a new behavior that will play a bounce sound when the ball hits any solid surface. So far, we have only mentioned behaviors a couple times. In later chapters, you will spend a lot of time working with them since they are a cornerstone of Gamesalad.
Since it’s the ball that is going to make the sound, you’ll add the sound behavior to the ball actor. Double-Click the ball Actor to open its Actor Editor and then select the Sounds tab in the Library Palette. Your screen should look like Figure 5.6.
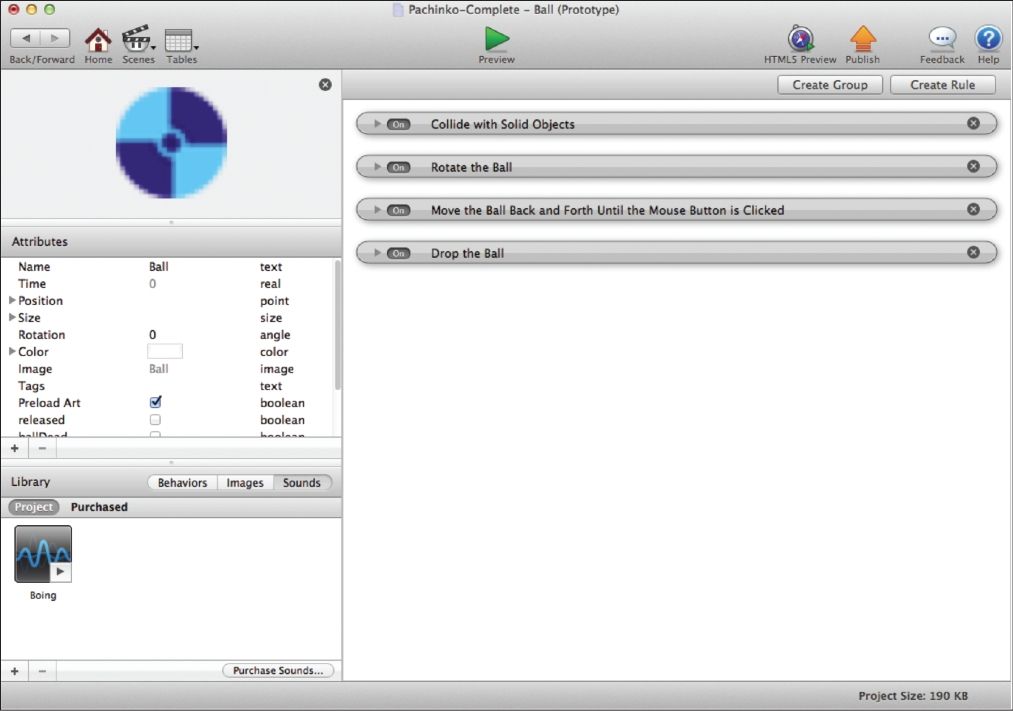
Figure 5.6: The Actor Editor for the Ball actor.
The right side of the screen contains all of the behaviors that the ball uses during the game. Don’t worry if you don’t know what these do yet; by the end of this book, you’ll be able to customize them all and add your own to make the ball behave anyway you can imagine.
To add the new Behavior, Click the Create Rule button that is in the top right corner of the widow. This will add an empty Rule to the window (see Figure 5.7). It is a good idea to name Rules and Behaviors so Double Click the current name “Rule” and name it something more appropriate, like “Play Bounce Sound.”

Figure 5.7: An empty Rule has been added to the ball actors list of Behaviors.
Next, change the drop-down menu that says “mouse position” to “overlaps or collides.” When you do that, the menu structure will slightly change. In the new “Actor of type” menu that appears, select the option “Actor with tag.” The last menu should auto-fill with “solid.”
Now, Click the Plus (+) button in the upper right corner of this rule. Do not click the “X” button, that will delete the entire rule. The plus button will add a second series of conditions to the rule. First, change the drop-down menu that says “Actor receives event” to “Attribute.” When you do this, a new empty box will appear. Click the three dots next to the empty box. A new window called “Attribute Browser” will open. Click the word “Ball” in the first column. In the second column that displays, scroll down to find the option “released.” Double-Click this option and the window will close. Finally, drag the sound named “Boing” from the Sounds tab and drop it in the rule you just created where it says “Drag your Behaviors here.” The completed behavior should look like Figure 5.8.

Figure 5.8: The completed “Play Bounce Sound” Rule.
Now, when you Preview the game, everything should be exactly like it was before, but this time there should be some sound!
Play Testing the Game
It is important to play your games as you develop them so you can continually make small edits and adjustments instead of leaving all the testing until the end of a project. As you worked through the steps of this chapter, you already had some experience play testing your game. Leaving all the editing towards the end can make things very difficult. You don’t want to have too many things to fix at one time or else you may lose track of what you want to edit. Or worse yet, you may have introduced a bug early in the development process that is nearly impossible to track down at such a late date.
In addition to looking for errors (bugs) during testing, it is also important to consider what is fun about the game, what might not be fun, and what else could be added or changed to make the game even better. You want to make the best game you can. No matter how hard you worked on something, don’t be afraid to change something in the game (or even throw something away) if it doesn’t feel like it belongs in the game. It’s a good idea to have other people play test your games as well—they will often find things you have missed or offer ideas you may not have considered.
Spend some time play testing the Pachinko game and consider taking notes about what you’d like to change or add to the project. Even though you may not feel comfortable adding these new elements now, you’ll be able to return to the project, once you have finished this book, and add them.
Summary
While reading this chapter, you created your first game using Gamesalad. You used what you’ve learned so far to design and plan the rules for the game. You imported the images for use in the game and created the game board. You edited the actor attributes to change their look and placement on the gameboard. Then you added and edited your first behavior to the ball actor, telling it to play a sound when it collides with other solid actors. Finally, you play tested the game and took some notes about what you’d like to change.