
Chapter 11: Game 2 – Space Shooter
In This Chapter You Will Learn:
•How to design a space shooter game
•How to build a parallax scrolling background
•How to build player and enemy actors
•How to add game control behaviors
It’s time to use the knowledge you’ve gathered in the previous chapters and put it all to use building a fully functional game. Unlike the first game, you will build this entire project from scratch–the only elements provided for you are the images you’ll need. In this chapter, you will make an arcade style space shooter game. You’ll start by creating the basic design elements needed for the game and from there, you’ll build all of the scenery and gameplay actors. You will include a game control actor that will dictate the enemy’s frequency and finally, you will add a GUI actor to display the game's score for the player.
Note–Project Files: In case you get stuck, the starter project file and a finished version of the space shooter game can be found in the assets for Chapter 11 folder.
Game Concept
The first step in designing a game is to figure out what its concept is. For this space shooter, you will create an arcade style video game that could have been found in any video arcade during the 1980’s. In this game, you will control a space ship that is flying over an alien planet. This space ship will battle alien ships that fly toward it from the right hand side of the screen. The player will score points by shooting and blasting the alien ships out of the sky.
Game Rules
The rules that will direct the space shooter game are:
•The player ship will start on the left side of the screen.
•Two kinds of enemies will fly toward the player at different speeds from the right side of the screen.
•The game is over when the player is destroyed.
•The player is able to shoot the enemies.
•Certain enemies are able to shoot at the player.
•The player is not able to leave the scene and will only be able to fly about halfway across the screen to the right.
Game Requirements
This game will require several graphic elements that have been provided for you in the starter file. In addition, you will be creating all of the behaviors needed to make the game playable. The requirements for the space shooter are:
•This game will be built to play in the Gamesalad Arcade.
Elements needed for the game include:
•3 actors to create a parallax scrolling background.
•1 actor for the player's spaceship.
•2 enemy actors.
•Bullets for the player and the enemies.
•A game controller actor.
•A GUI score display.
Note–Parallax Scrolling: Parallax scrolling is a technique that is often used in video games that grew out of its use in traditional cell-based animation. This technique adds a feeling of depth to a game by scrolling background images at different speeds.
The Alien Planet
You’ll begin creating the game by setting up the environment the action will take place in. This setting will be created using only three actors, but the way these actors are combined will give the game a lot of depth and life.
Before you begin creating the alien planet, make sure you have opened the starter file provided for this hour.
Figure 11.1: The Scene Attributes Tab with Wrap X active.
1Since the background of this game will scroll, the first thing to do is navigate to the Initial Scene and turn on Wrap X in the Scene tab (see Figure 11.1).
2Return to the Game tab and find the image named “background-sky” in the Images tab of the Library Palette. Drag this image to the Actors tab in the Inspector Palette to create a new actor.
3Double-Click the new background-sky actor and navigate to the Physics options. Now disable the Movable option (by unchecking it).
4Return to the Stage and drag the background-sky actor onto the Stage. Double-Click the actor on the Stage and change its Positions to (240,160)–this will center the actor on the Stage.
5Next, Drag the image named “background-2” from the Library Palette to the Inspector Palette to create another actor.
6Now, place this new actor onto the Stage and change its Positions to (240,93).
7To create the final actor for the alien planet, create an actor from the image named “background-1.”
8Place this actor on the Stage and change its Positions to (240,68). Your scene should now look exactly like Figure 11.2.

Figure 11.2: The completed alien background.
Note–Movable: It is a good idea to always turn off the movable option if you are sure an actor will never move during a game. This lets Gamesalad know it can ignore the actor during some calculations and this can help reduce performance issues in some games.
Animation
The background is now built, but it seems rather plain. It would be a lot more impressive if it were moving, adding some depth and realism to the game. The next step is to animate the layers of the background to make it come to life!
Note–Behavior Settings: For the rest of this book, if a specific setting in a behavior is not mentioned, it should be left at its default value. For example, the move type: should remain as additive in the move behavior you created in step 2.
1Double-Click the background-1 actor in the Library Palette. Make sure you are editing the Prototype Actor from the Library Palette and NOT the Instance Actor on the Stage.
2Next, add a Move Behavior to this actor and set it up like this: Direction: 180 » Speed 75 » Relative to: scene
3Return to the Scene Editor and Double-Click the background-2 actor in the Inspector Palette.
4Add a Move Behavior to this actor as well and set it up like so: Direction: 180 » Speed: 50 » Relative to: scene
Now, Preview the scene and you’ll see the background scroll from the right to the left. The parallax effect is accomplished by setting the move speed of the foreground actor faster than the background actor. The darker color of the background actor also adds to the depth effect of the parallax scrolling.
The Player
In this section, you’ll add the player's ship to the world and build its basic set of controls.
1To create the player's alter ego, Drag the image named “hero-ship” from the Library Palette into the Inspector Palette to create an actor.
2Place this new actor on the far left side of the Stage.
If you were to preview the game now, the hero ship will actually appear to be already flying since the background scrolls continually. However, to give the player control over the ship, you’ll need to add some keyboard controls to the hero-ship actor.
1Double-Click the hero-ship actor to open its Actor Editor and add an empty Rule to its list of behaviors.
2Create a condition in this rule that reads: Actor receives event » key » up Keyboard » is » down
3Then nest a Move Behavior in the rule and set its values as: Direction: 90 » Speed: 150 » Relative to: scene
4Rename this Rule “Move Up” (see Figure 11.3).
5Make a copy of this Rule and name it “Move Down.”
6Change the Condition of the Rule to read: Actor receives event » key » down Keyboard » is » down
7Change the Direction value in the Move Behavior to 270.
8Copy the Move Down Rule and change its name to Move Right.
9In this Move Right Rule, change the key press of the condition to Right and the Direction of the Move Behavior to 0.
10Finally, make a copy of the Move Right Rule and change the name to Move Left. Update the key press of the condition to be Left and the Direction of the Move Behavior to be 180.

Figure 11.3: The completed ‘move up’ rule in the ‘hero-ship’ actor.
Now Preview the game and you will have complete control over the players space ship. Using the arrow keys on they keyboard, you can freely move the ship up, down, left, and right. However, as you fly around, you might notice a few things that should be considered as errors. The spaceship can completely move off the screen at the top and bottom, it will wrap around to the right and left sides (since Wrap X is active in the Scene Settings), it can move too far to the right, and the ship also passes over (is on top of) both of the images used for the background landscape. Let's fix these “errors.”
To correct the layering of the actors so the ship appears to fly between the layers of the background, navigate to the scenes Layers tab in the Inspector Palette. Click the arrow next to the Background Layer to expose the list of actors used on that layer (see Figure 11.4). Reorder the layers by dragging the hero-ship between background-1 and background-2 and release it.

Figure 11.4: The ‘hero-ship’ actor has been placed between the two background actors in the Layers tab.
Preview the scene again. Now the player's ship will pass between the foreground and background layers of the planet.
Next, Double-Click the hero-ship actor and you’ll learn how to limit the player movement on-screen by adding a second condition to each of the move rules that were created in the previous steps.
1In the Move Up Rule, Click the Plus (+) button to add a second condition. Create this condition to read: Attribute » self.Position.Y » less than or equal to (≤) » 300
2In the Move Down Rule, add a second condition that reads: Attribute » self.Position.Y » greater than or equal to (≥) » 75
3In the Move Right Rule, create a second condition that reads: Attribute » self.Position.X » less than or equal to (≤) » 150
4In the Move Left Rule, add a second condition that reads: Attribute » self.Position.X » greater than or equal to (≥) » 40
Note–Attribute Browser: Remember, you’ll need to use the Attribute Browser to access the Actor Attributes (see Figure 11.5).

Figure 11.5: Using the Attribute Browser to create a second Condition in the Move Left Rule.
Preview the scene and you’ll see the ship now has freedom of motion, but only within a set of limited X- and Y-coordinates. All this movement is great, but since this game is being created as an arcade space shooter, you’ll need to add the ability for the player to shoot next.
Before you can add the actual behaviors to the hero-ship actor to allow shooting, you’ll need to create the actor that will be shot from the ship. Create this new actor by Dragging the image named “shot” (it looks like a yellow dot) into the Inspector Palette. Open the shot actor editor. Add a Move Behavior and change the Relative to: option to scene.
Next, return to the Actor Editor for the hero-ship and:
1Add a new Rule and create a condition that reads: Actor received event » key » space Keyboard » is » down
2Nest a Spawn Actor Behavior in this rule and choose these options: Actor: shot » Layer Order: in back of actor » Position x: 36 (see Figure 11.6)
3Rename this Rule “Shoot.”

Figure 11.6: The Spawn Actor Behavior.
Note–Position Offsets: Remember that the origin point of every actor is its center. When one actor spawns another, it spawns the new actor from its own center point by default. You can use the Position Offsets (x,y) to change the location from which the new actor is spawned. For example, by using an X Position of 36, you told the shot to spawn from the front of the hero-ship actor instead of its center point.
Preview the scene and test the shot by pressing the space bar–the shot should shoot out of the front of the ship and fly across the screen to the right. But since Wrap X is active, the bullet wraps from the right side of the screen and travels back to the left. This can be fixed by adding another rule to the shot actor. Create this rule like so:
1Open the shot Actor Editor and add a Rule to its behavior list.
2Establish a condition that reads: Attribute » self.Position.X » greater than or equal to (≥) » 470
3Nest a Destroy Behavior in this rule and name the rule “Destroy the shot.”
Now, when you shoot a bullet, they will not wrap around the edge of the screen because Gamesalad destroys them once their X Position is greater than or equal to 470.
Tip–Independent Actor Behaviors: The player's shot is a good example of how behaviors act independently of each actor. Through a combination of including the move behavior in the shot actor and then spawning the shot actor with the shoot rule in the hero-ship, the shot actor will be dynamically added to the scene. Once spawned, its own behaviors will take control of it and move it across the screen.
Aliens
Alien 1
In any good space shooter, you need a few aliens to use for target practice. Follow the steps below to add two aliens to the game.
Tip–Plan Your Behaviors: As your games become more complex, you should take a moment before adding behaviors to each actor and plan the action that each actor will need to perform. The aliens in this game will be set up to appear on the right side of the screen. They will fly to the left and disappear if they reach the left edge of the screen. The aliens will also need to be destroyed if they are hit by the player's shot or if they collide with the player's ship.
1Create a new actor using the image named “alien-1” and Double-Click to open its editor.
2To make the ship fade in when it appears on-screen, add an Interpolate Behavior and set it up to read: Interpolate Attribute: self.Color.Alpha » to: 1» Duration: 0.1
3Next, change the value of the alien-1 actors Alpha Attribute from 1 to 0. This is located under the Color Attributes in the actor Attributes Editor.
Note–Invisibility: When an actor's alpha value is changed to 0, the preview image of the actor will disappear. Don’t worry, the image is not gone, it has just been made invisible.
4To make the actor move across the screen once it has appeared, add a Move Behavior to the list and set it up to read: Direction: 180 » Speed: 100 » Relative to: scene
5Now add a Rule that will destroy the enemy when it is hit by the player's shot. Set this rule's condition to read: Actor receives event » overlaps or collides » with » actor of type » shot
6Nest a Destroy Behavior in this rule and name this Rule “Shot by player.”
7Copy this Rule and rename it “Hit the player” and update this rule's condition to read: Actor receives event » overlaps or collides » with » actor of type » hero-ship
8Finally, add a new rule and name it “Phase Out” with a condition that reads: Attribute » self.Postiion.X » less than or equal to (≤) » 40
9Nest an Interpolate Behavior in this rule and change its default values to read: Interpolate Attribute: self.Color.Alpha » Duration: 0.1
10Nest a Timer Behavior below the Interpolate Behavior and set it up to read: After 0.1 seconds » Run to Completion should be checked
11Nest a Destroy Behavior in the Timer Behavior.
Tip–Bug Hunting: As rules get more complex, it becomes easier to make a mistake or create a bug in the behaviors. When playtesting this game, if things don’t work as expected, remember there is a completed version included with the files for this book. If need be, you can troubleshoot the project by using that version to compare the behaviors you create to a set of working behaviors.
Note–Phasing Out: The phase out rule uses an interpolate behavior in conjunction with a timer behavior. Take a close look and you’ll see that the duration of the interpolate matches the time in the timer behavior. This will cause the image of the actor to fade out during a time span of .1 seconds. Once those .1 seconds pass, the timer will trigger and delete the actual actor from the scene.
Alien 2
Now that you have spent all that time making the first alien, it would be a real pain to have to repeat the whole process for the second alien. You won’t have to do that though! All you have to do is make a copy of the first alien actor (in the actors tab of the inspector palette) and rename it “alien-2.” Open this new “alien-2” actor and Drag the image named “alien-2” into the preview image. Since the preview image is already invisible, you won’t see a change, but when this actor shows up on stage, it will have the new image in place.
The only other change you’ll need to make to alien-2 is to make it move faster than alien-1. To do this, open the Move Behavior of alien-2 and update the Speed setting to 150. Everything else can remain the same as alien-1.
Most of the work on the aliens is complete now, but they still won’t appear on-screen. In order to get them to show up throughout the game, you’ll need to set up and use a game controller.
The Game Controller
It is common to create a separate actor to act as a game controller; however, it’s also possible to use any existing actor in the game as the control actor. As long as the control actor is ALWAYS on-screen, it can be any actor you choose. In this game, you will use the actor named “background-2” as the controller. The main reason to choose this actor is because, like the hero-ship, the aliens should fly between the layers of the background images. By using background-2 as the controller, the aliens' ships can be spawned between the two background layers easily.
1Open the Actor Editor for background-2 and add a Timer Behavior. Name this behavior “Timer: Spawn Alien Ship 1.”
2Set this Timer up to read: Every random(1,3) » with Run to Completion checked
Don’t type in the word “random.” Instead, Click the Expression Editor (e) button next to the seconds field. Choose the Random Function from the Insert Function menu (see Figure 11.7) and replace the words “min,max” with “1,3.” Click the green check mark to close the Expression Editor.
Note–Functions: Functions are special mathematical formulas that can be accessed when using the Expression Editor. In a later chapter, the expression editor will be looked at in more detail.
3Nest a Spawn Actor Behavior in this Timer and set its values to: Actor: alien-1 » Layer Order: in front of actor » Position x: 445 » Position y: random(65,250) » Relative to: scene (See Figure 11.8)
4Next, make a copy of this Timer Behavior and rename it “Timer: Spawn Alien Ship 2.”
5Finally, make the updates below and the controller will be complete.
•In the Timer Behavior: Every: random(2,6)
•In the Spawn Actor Behavior: Actor: alien-2
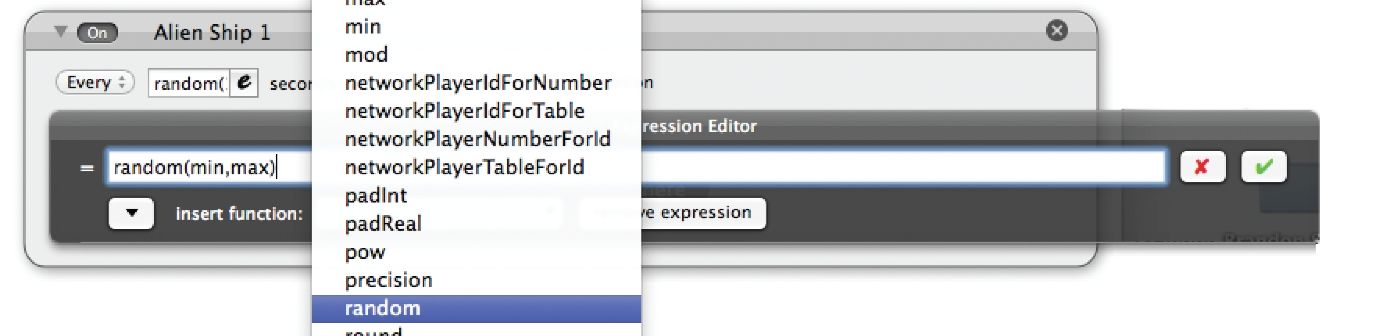
Figure 11.7: Choosing the Random Function in the Expression Editor.
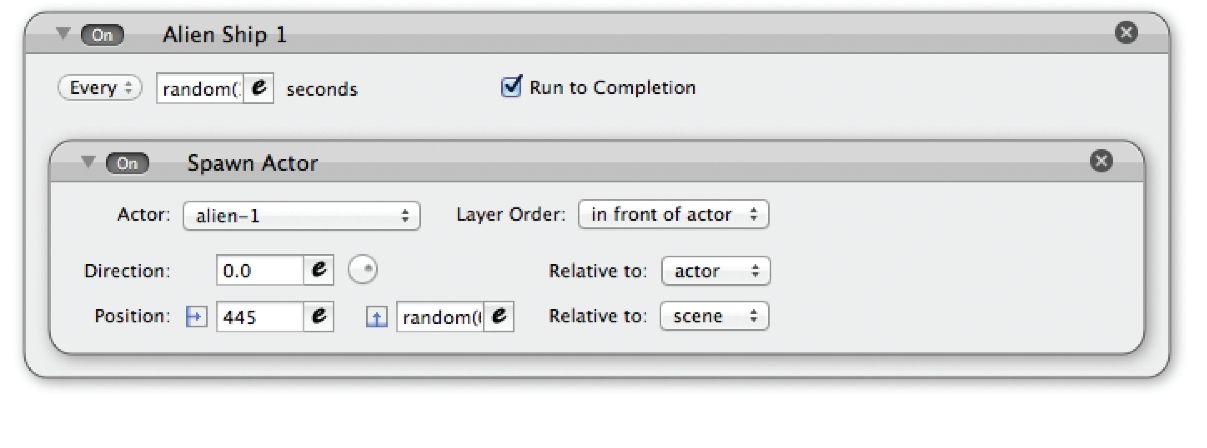
Figure 11.8: The completed rule used to spawn Alien Ship 1.
Preview the game and you’ll see it’s now looking pretty good. In addition to the background and player actors, the enemies now spawn and fly at the player and the player is able to blast the enemies out of the sky! As you play, you’ll likely see a few things that could be fixed, added, or made better. For example:
1The player's shot should disappear when it destroys an enemy.
2When the player collides with an enemy, they should both be destroyed.
3When the player shoots an enemy, the player should get some points.
4The points scored should be displayed on-screen.
5The enemies should be allowed to shoot back at the player.
Game Extras
All of the items outlined above are pretty easy to add; let's start at the top and destroy the player's shot when it hits an enemy. Since there are two aliens, the bullet will need to be removed from the scene when it collides with either enemy. The best way to deal with collisions that can occur with two or more actors is to create a tag set. A tag set is comprised of actors that are “grouped” together using an identifier Gamesalad calls a “tag.”
1Navigate to the Home Screen. From there, Click on the Actors Tab and Click the Plus (+) button in the lower left corner of the screen to add a new tag. Name this tag “Aliens” (see Figure 11.9).
2After creating the Aliens Tag, Click on the “All” tag at the top of the list and Drag the two alien actors onto the Aliens Tag title. When the title highlights, release the actors and they will be included in the tag set.
3Next, navigate to the Actor Editor for the shot actor and add a Rule to the behaviors list. Create a condition for the rule that reads: Actor receives event » overlaps or collides » with » actor with tag » Aliens
4Finally, nest a Destroy Behavior in this rule.
5To make the next step super quick and easy, Copy the rule you just created.
6Next, you will set up the hero-ship to be destroyed if the player collides with an alien. Open the Actor Editor of the hero-ship and Paste the rule you copied from the shot actor into the Behavior list. This rule is already set up to destroy the actor when it collides with either of the alien ships, so you don’t have to make any edits to it.

Figure 11.9: The actors alien-1 and alien-2 added to the Aliens Tag.
The first step in creating a score system for the game is to add a custom game level attribute that will be used to keep track of the score.
1Navigate to the Attributes Tab of the Inspector Palette.
2Click the Plus (+) button in the lower left corner of the palette.
3Choose integer as the attribute type and name the attribute “score.”
4Leave the default value as 0.
The next step is to actually add scorekeeping to the game.
1Open the Actor Editor of alien-1 and open the rule named “Shot by player.”
2Nest a Change Attribute Behavior above the Destroy Behavior in this rule and set it up to read: Change Attribute: game.score » To: game.score+10 (see Figure 11.10).
3Copy this Change Attribute Behavior and Paste it into the “Shot by player” rule of the alien-2 actor. Make sure it is pasted above the Destroy Behavior.

Figure 11.10: The updated ‘shot by player’ rule with scorekeeping added.
The score will now be calculated while the game is being played, but it is not being shown to the player yet. That is easy to fix:
1Add a new empty actor to the Actors Tab and open its Actor Editor. This actor will not have an image; it will act as a Graphical User Interface (GUI) object and display the score on-screen.
2Open the new actor's Attributes Editor and change the Red, Green, and Blue settings under Color to 0 and Alpha to 0.5. Turn Moveable Off under the Physics settings as well.
3Add a Display Text Behavior and open the Expression Editor by Clicking the (e) button. In the Expression Editor, choose game.score as the Text value.
4Set the rest of the Display Text Behaviors options to read: Align: Center » Font: Helvetica Neue » Size:14 (See Figure 11.11)
5Finally, name this actor “display-score” and place it on the stage. Double-Click the actor to open its Editor and update these attributes: Positions (240,305) » Sizes (480,30)
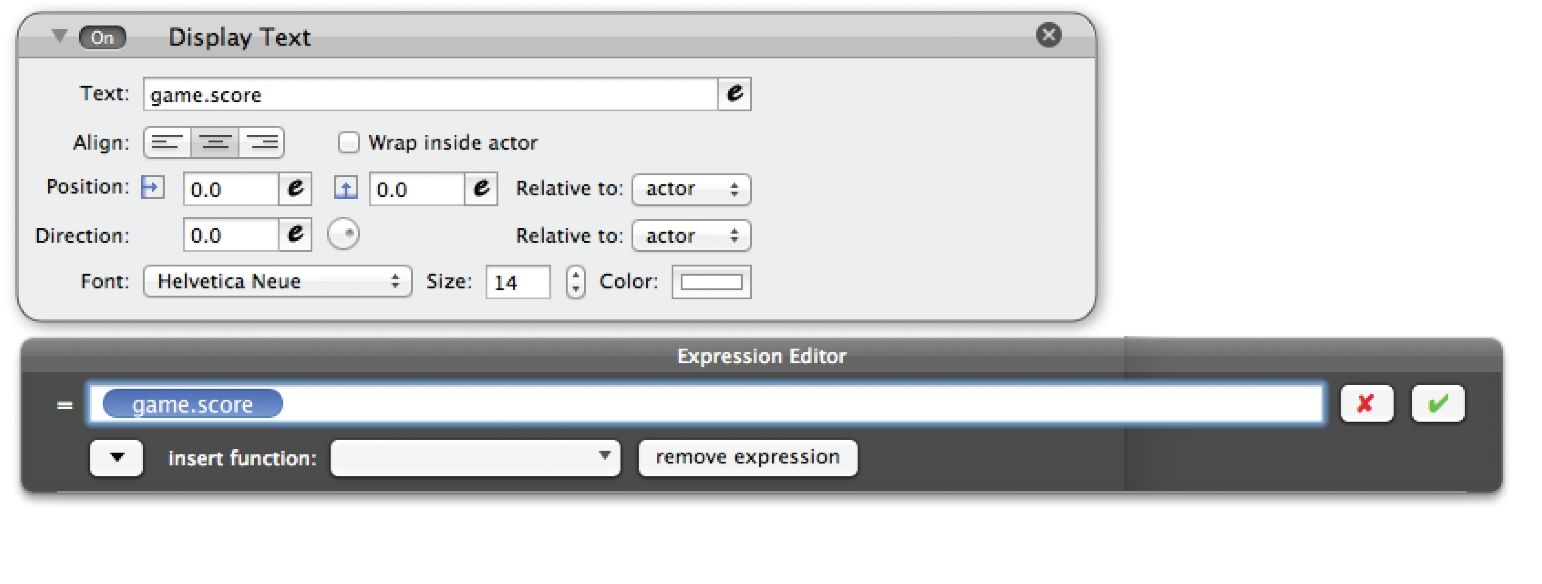
Figure 11.11: The completed Display Text Behavior for the on-screen GUI.
Preview the game and you’ll see the score is being properly kept and displayed across the top of the stage.
Finally, to be fair, we should give one of the alien ships the ability to shoot at the player.
1First create a new actor using the image named ‘shot-alien’.
2Before adding any behaviors to the actor, navigate to the Actors Tab from the Home screen. Once there, Drag the newly added shot-alien actor into the Tag named Aliens. Once added to the tag group, the shot-alien actor will automatically destroy the players ship when they collide.
3Open the Actor Editor for the shot-alien actor.
4Add a Move Behavior to the Behaviors list and set it up to read: Direction: 180 » Relative to: scene
5Add a Rule to the list and create two conditions that read:
Actor receives event » overlaps or collides » with » actor of type » hero-ship
Actor receives event » overlaps or collides » with » actor of type » shot
6In this Rule make sure you set up the top menu to read: When Any conditions are valid:
7Nest a Destroy Behavior in the Rule. This rule will destory the aliens shot if it collides with the player or the players shot.
8Create another empty Rule and create its condition to read: Attribute » self.Position.X » less than or equal to (≤) 10
9Nest a Destroy Behavior in this Rule. This will destroy the alien shot if it reaches the left side of the screen.
Now that all of the behaviors to control and destroy the alien shot have been completed, the final step is to allow one of the aliens to actually shoot the shot.
1Open the editor for the alien-1 actor and add a Timer Behavior to the list of Behaviors.
2Set the Timer Behavior up to read: Every random(1,3) seconds » Check Run to Completion
3Nest a Spawn Actor Behavior in the Timer and set it up to read: Actor: shot-alien » Layer Order: in back of actor » Position x: -32
Preview the game now and the first alien actor should periodically shoot at the player.
Improving the Battle
Even though this space shooter is now a complete game, it certainly could be made even better. It’s always worth asking yourself “how could I make this game better and what could I add or change?” Don’t be afraid to return to elements you have already added and try new and different things–just keep a back up copy of your past work in case you don’t like what you’ve done and want to return to a previous version.
Summary
In this chapter, you created an arcade style space shooter game. You started by designing the game and planning out the game's rules and requirements. Then you created the actors and added a parallax scrolling background. You then added the player's on-screen alter ego and provided enemies for the player to blast. Finally, you added scoring and built a GUI so the player can keep track of the game's score.