
Chapter 15: Camera Control and Graphical User Interfaces
In This Chapter You Will Learn:
•What the camera attributes control
•How to create a scrolling scene
•Graphical User Interface (GUI) basics
•How to create a GUI Layer
•How to create some common GUI elements
In this chapter, you will learn about Gamesalad's camera system and how to create an Graphical User Interface (GUI) to offer players important information about the game. You will begin by learning about the various camera settings and experiment with creating a scrolling scene where the camera automatically follows an actor. Next, you learn how to create a special GUI layer and use this layer to create the game's Graphical User Interface. Finally, you will learn about and create some common GUI elements.
The Camera
Every game created in Gamesalad can have only one active camera; this camera is the player's view of the game world. While a scene can be any size, a size much larger than a device's screen size, the camera size indicates the area of the scene that will be displayed on-screen (see Figure 15.1).
Figure 15.1: The Camera Attributes and Guidelines.
The camera has several attributes that can be manipulated during game play. The camera's attributes are:
•Origin X,Y: This is the starting position of the camera in a scene. The default starting location for the camera is (0,0).
•Size (width, height): These values set the width and height of the camera, indicating how much of a scene will be visible on-screen. The camera size is indicated by the outer white guideline shown on the stage.
•Tracking Area (width, height): This set of values determines the area within the camera view that will “snap to” or follow an actor that has a Control Camera Behavior applied to it. The camera tracking area is indicated by the inner white guideline shown on the stage.
•Rotation: The rotation of the camera.
By manipulating the camera's attributes, you are able to create things like camera panning, zooming, and rotating.
Tip–Panning: Panning is a term that is often used in photography and videography. Panning means to move a camera to the right or left. What the camera “sees” through its lens appears to move in the opposite direction. For example, panning the camera to the right results in the images in the camera's view to move toward the left.
––––––––––––––––––––––––––––––––––––––––––
Exercise 19: Camera Panning
Camera panning is often used in games. For example, in the popular game “Angry Birds,” the camera pans to reveal the pig's fortress before the game begins. In this exercise, you will create a similar effect. Open the file named “Camera Pan” provided in the assets folder for Chapter 15. This starter project is created for the Gamesalad Arcade platform, which is 480x320 pixels. Note that the scene size is much larger; however, it has been set to 2048x640 pixels.
1Begin by Double-Clicking the landscape actor that is already placed on the stage.
2Unlock the actor to make it an instance actor. This step is needed to gain access to the Camera's Attributes that are located in the Scene Attributes.
3Add a Rule and create a condition that reads: Actor receives event » mouse button » is » down
4Nest an Interpolate Behavior in the Rule and set it up to read: Interpolate Attribute: scene.Camera.Origin.X » to » 1,568 » Duration » 3 (see Figure 15.2).
5Open the Otherwise section of the Rule and add a copy of the Interpolate Behavior. Change the value of 1,568 back to 0.
––––––––––––––––––––––––––––––––––––––––––

Figure 15.2: The completed pan Rule.
Preview the scene and hold the mouse button down. Keep the button pressed until the movement stops. You’ll see the background appears to move toward the left; however, what is actually happening is the camera is panning toward the right. When you release the mouse button, the camera will pan back to its original position.
Camera Tracking
The camera tracking area works in conjunction with the Control Camera Behavior. When a moving actor, with a control camera behavior applied to it, reaches the edge of the camera tracking area, the camera will automatically being to follow the actor.
There are two ways to edit the camera's tracking area. The width and height of the camera tracking area can be directly edited in the Scene Attributes Tab or the interactive tracking editor can be used. (see Figure 15.3).
Figure 15.3: The Stage has been put into Camera Editor Mode.
Clicking the camera icon at the top left of the stage will reveal a yellow area on the stage and four handles; these handles are used to increase or decrease the size of the tracking area. Also when in camera editor mode, the camera origin can be changed by clicking anywhere within the white guidelines and dragging the camera zone to a new location on the stage.
––––––––––––––––––––––––––––––––––––––––––
Exercise 20: Camera Tracking
In this exercise, you will create a camera that tracks and actor as it moves around a large scene.
Start by opening the file named “Camera Scroll” from the asset folder of the files provided for Chapter 15. This file starts with a large scene (2048x640) already created.
Preview the scene and you’ll see that the arrow keys on the keyboard can be used to freely move the space ship around the scene. However, once the ship reaches the edge of the scene, the ship can move out of the camera's view.
1From the Stage Editor, Double-Click the hero-ship Actor to open its Actor Editor; you’ll see there is a group of behaviors already included that control the Actor's movements.
2Add a Control Camera Behavior to the list of behaviors. There are no options for this behavior; it just lets Gamesalad know that this is the actor the camera should automatically track.
Preview the scene. As the ship approaches the edge of the scene, the camera will follow it as it moves. However, the ship has to get very close to the scene's edge before the camera follows it. For this type of game, it would be more typical for the camera to follow the ship as soon as it starts to move. That change can quickly be made by adjusting the camera's tracking area.
3Return to the scene and Click the camera editor icon.
4Adjust both the horizontal and vertical handles of the camera tracking area so they are directly at the center of the stage (see Figure 15.4)
5Save this project. You will use it again in the next section.
––––––––––––––––––––––––––––––––––––––––––

Figure 15.4: The Camera Tracking Zone adjusted to be closed on the center of the live area.
Preview the scene and the camera will now begin to follow the ship actor as soon as it beings to move.
Note–Control Camera: There can be only one active Control Camera Behavior in a scene at one time.
Tip–Scene Scrolling: A scene is only able to scroll in any given direction while there is more of the scene to display. If the scene runs out of information to display, the camera scrolling will automatically stop.
Graphical User Interface
A graphical user interface (GUI) is a special layer of your game that displays important information during game play and can also accept player input. GUI controls are built using actors and Gamesalad's standard behaviors.
Some common items that might be displayed in a GUI include:
•The game score
•A player's health
•An item in the player's possession
•Time left in the game
•Messages to the player
•Settings controls (i.e. sound volume)
•Buttons (i.e. pause button)
A GUI should be built on its own special layer in the layers tab (see Figure 15.5). By creating a separate layer for the GUI, you are able to easily identify its elements and keep the GUI stationary on-screen if the rest of your game scrolls.
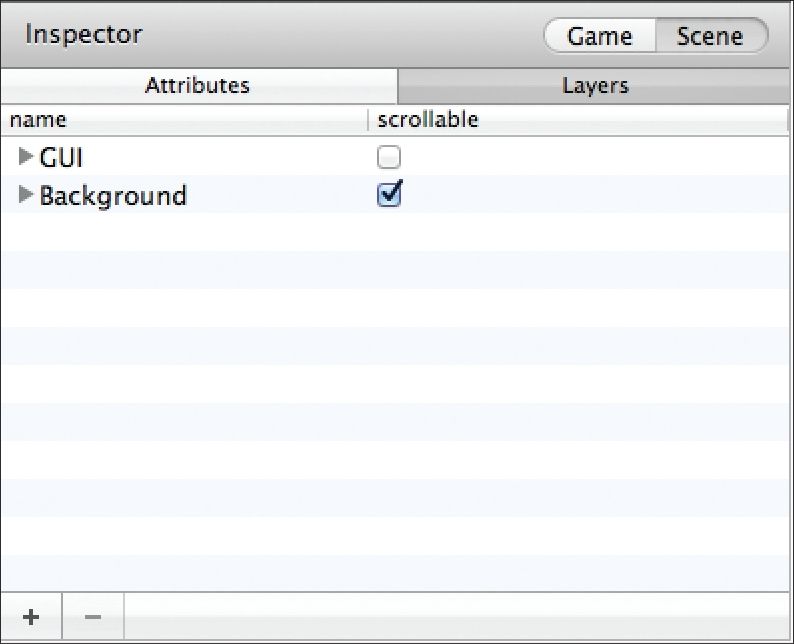
Figure 15.5: A special GUI layer has been created in the Scene Layers Palette.
GUI Elements
In the following section, you will learn to build some common GUI elements using Gamesalad's behaviors.
GUI Messages and Labels
To display a text message to the player, you will use a Display Text Behavior.
Note–GUI Exercises: All of the GUI exercises will use the scrolling camera project as a starting point. If you didn’t save the project, return to the previous section and create and save the project.
––––––––––––––––––––––––––––––––––––––––––
Exercise 21: Text Label
In this exercise, you’ll add a text label to the previous scrolling camera project.
1Open the “Camera Scroll” project created in the pervious section and add a new actor to the project.
2Name this actor “TextLabel.” Open the actor editor and change its Alpha setting to 0.
3Add a Display Text Behavior and change the default text to read “Text Label.”
4Return to the scene and Drag this actor to the top/middle area of the scene. When you release it on the stage, it will be invisible since you set the alpha value to 0.
5Click the actor and it will highlight. Change its size and placement to look something like Figure 15.6.

Figure 15.6: The TextLabel actor has been added to the Stage.
Preview the scene and it will display the words “Text Label” at the top/center of the screen. However, this will not work as a successful GUI just yet. Move the ship around the screen and you’ll see the text scrolls away once the camera begins to follow the ship.
To make this an actual GUI, you’ll need to create a special GUI layer and stop that layer from scrolling.
1Return to the Scene Editor and navigate to the Layers Tab.
2Add a new layer and name it “GUI.” Drag this layer above the Background layer.
3Expose the contents of the background layer by Clicking on the arrow next to its name and find the actor named “TextLabel.”
4Drag only this actor into the new GUI layer and uncheck the “scrollable” box associated with the GUI layer (see Figure 15.7).
5Save this project for use in the next exercise.
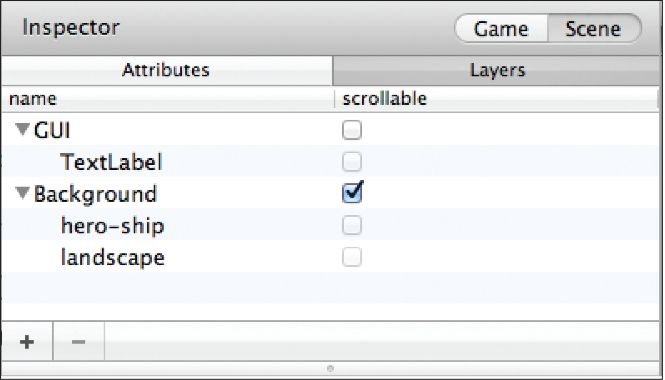
Figure 15.7: The TextLabel actor placed on a non-scrolling GUI layer.
––––––––––––––––––––––––––––––––––––––––––
Preview the scene and the TextLabel will remain stationary as the rest of the screen scrolls. You have just made your first non-scrolling GUI!
Tip–The Camera Live Area and Your GUI: When building a GUI on a non-scrolling layer, take special care to build it within the default camera live area (see Figure 15.8), which is indicated by the white outline of the stage. Once a layer is made non-scrollable, only the elements that are placed in this area will display on-screen.

Figure 15.8: Non-scrolling GUI’s MUST be created withing the camera’s live area.
Text Display Box
You can easily create a box to display the text label by changing the Color settings of the actor.
1Open the TextLabel actor editor. Choose a dark blue color from the color picker and change the Alpha Value to .25.
When you Preview the scene, the text will now be displayed in a colored box. If the text displayed does not fit within box, the text size and placement can be edited from within the display text behavior.
From a display text behavior you can adjust the alignment of the text (flush left, centered, flush right), the position x and y offset of the text, and the font, size and color of the text (see Figure 15.9).
GUI Buttons
There are many uses for buttons in a game; at the very least, you’ll likely need a “play” and “pause” button. Buttons are created using a combination of Rules and Behaviors.

Figure 15.9: The various settings available from a Display Text Behaivor.
––––––––––––––––––––––––––––––––––––––––––
Exercise 22: Pause Button
In this exercise, you’ll create a button to pause the game.
1Starting with the project from the previous exercise, navigate to the Scenes Editor and create
a new scene named “Pause.”
2Go to the Initial Scene and Delete the TextLabel actor from the stage.
3From the assets folder for Chapter 15, import the image named “Pause.png” to the project.
4Create a new Actor using this image and open its Editor.
5Add a Rule to this Actor and create a condition that reads: Actor receives event » touch » is » released
6Nest a Pause Game Behavior in this rule and choose “Pause” from the Go to Scene Menu. If you happen to be a pro-user, you will also have the option to display an advertisement. You can ignore this option.
7Place the Pause Button on the Stage and make sure it is on the GUI layer in the Layers Palette.
––––––––––––––––––––––––––––––––––––––––––
Preview the scene and move the space ship around. While you are moving the ship, Press the Pause Button and the game will pause. Once paused, the game will seem to be “locked up,” but remember, a game (or any computer program) can’t do anything it isn’t programmed to do. You have not told the game how to return to action yet. To “un-lock” the game you can either click the back button located in the upper left corner of the screen or click the re-play button located directly under the preview button.
Tip–The Pause Behavior: Gamesalad's pause behavior pauses the current running scene and displays a new scene on top of it. To display additional information, like the words “Game Paused,” add any additional content to the pause scene and it will be displayed on-screen while the game is paused.
Button States
Part of good GUI design is to offer the player feedback on their actions. One way of doing this is to give buttons “states” of appearance so they look different depending on the actions of the player. A button's state is often referred to as Normal (the standard appearance of a button), Hover (the appearance of a button when it is being touched by a pointer or finger), and Active (the appearance of a button while it
is active).
––––––––––––––––––––––––––––––––––––––––––
Exercise 23: Hover State
In this exercise, you’ll create a Hover State for the pause button:
8Return to the Stage and open the pause button's Editor.
9Add another Rule to the button and set its condition up to read: Actor receives event » touch » is » inside
10Nest a Change Attribute Behavior in the Rule and set it up to read: Change Attribute: » self.Color.Alpha » To: » .25
11Place a copy of this Change Attribute Behavior in the Otherwise section of the Rule and update it to read: Change Attribute: » self.Color.Alpha » To: » 1
12Save this project. You will use it again in another exercise.
––––––––––––––––––––––––––––––––––––––––––
Preview the scene and press and hold the mouse button OUTSIDE of the pause button. As you move the mouse pointer in and out of the pause button area, it will highlight as it changes states. Remember, if you accidently click the pause button, the game will seem to “lock-up”.
Display Meters
A display meter is an on-screen representation of how much of something the player or another character has in a game. Meters are often used to display a player's health, amount of ammunition available, or the amount of time left in the game. Meters usually display as a solid colored line or a series of images. In the exercises that follow, you’ll learn how to create both types.
––––––––––––––––––––––––––––––––––––––––––
Exercise 24: Image Display Meter
In this exercise, you will create a life meter that displays a heart image for each life the player has remaining.
Open the project from the previous exercise.
Open the TextLabel Actor Editor from the previous exercise and update it to read: Text: Health: » Align: flush left » Size: 20 » Color: Black
Change the Alpha value of this actor to 0.
Place this actor in the upper left hand corner of the stage.
Create a new Game Level Integer Attribute named “lives” and set its starting value to 3.
Import the image named “Heart.png” to this project and use it to create a new actor. The image is located in the asset files for Chapter 15 folder.
Place a copy of the Heart Actor on stage near the TextLabel actor.
Open the Heart Actor Editor and add a Replicate Behavior to its list of behaviors. Set up this behavior to read:Copies: game.lives » Spacing: 35 (see Figure 15.10)
––––––––––––––––––––––––––––––––––––––––––
Preview the scene and you will see something like Figure 15.11. The scene now displays the word “Health” followed by a series of three hearts. If you’re not happy with the exact placement of the actors in the scene, return to the editor and adjust their locations. While this display is nice, it doesn’t offer much feedback to the player since there is no interactivity. In the next section, you will update this so the number of hearts decreases when the player loses a life.

Figure 15.11: The GUI-heart health meter.
To take a life away from the player, you will set up the player to act like a button―when you click it, the player will lose a life. Of course this would never happen in an actual game. This action is just for demonstration purposes to give you a quick way to take a life away from the player.
1Open the hero-ship actor's editor and add a Rule. Create a condition that reads: Actor receives event » touch » is » pressed
2Nest a Change Attribute Behavior in the rule and set it up like so: Change Attribute: game.lives » to » game.lives-1
Preview the game. Now, when you click the hero-ship, the life count will reduce by one. The number of hearts displayed in the GUI reduces by one as well.
In addition to the image display meter, many games use a solid bar to represent how much of something
is remaining in the game. The process for building that sort of GUI meter is very similar to the image display meter.
––––––––––––––––––––––––––––––––––––––––––
Exercise 25: Bar Display Meter
In this exercise, you will create a solid bar display meter.
3Starting with the project you finished in the last exercise, update the value of the Game Level Attribute “lives” to 100.
4Delete the Heart actor from the stage.
5Create a new empty Actor named “HealthBar” and open its Editor.
6Update the Color of this actor to green, or any other color you like.
7Change this actor's Width to 1 and Height to 20.
8Add a Replicate Behavior to this actor and set it up to read:Copies: game.lives » Spacing: 1
9Add this Actor to the Stage, on the right hand side of the TextLabel actor.
––––––––––––––––––––––––––––––––––––––––––
When you Preview the scene, you will see a long green bar extending across the top of the screen (see Figure 15.12). Clicking on the player's ship will reduce the lives value. As you click the ship, the bar will shrink.
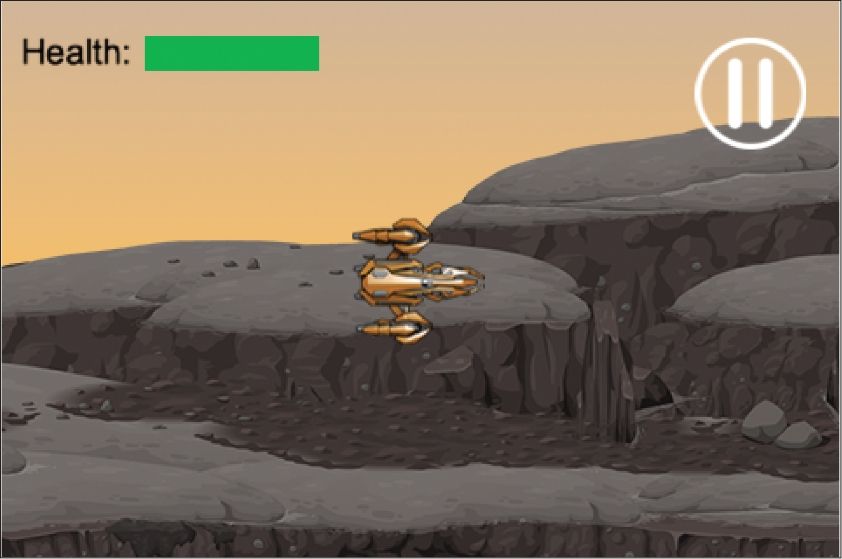
Figure 15.12: The GUI-bar health meter.
Tip–Creating the Bar: The “bar” in the pervious
exercise is created by repeating a one pixel wide line over and over, one hundred times. When the player loses a life, one pixel of the line is removed, causing the bar to decrease in length.
Summary
In this chapter, you learned about the camera's controls and settings. You learned how to use the Control Camera Behavior to create a camera that will follow an actor as the actor moves throughout the scene. Next, you learned how to create a non-scrolling GUI layer. Finally, you learned how to create some common GUI elements and experimented with creating many of them yourself.