Chapter 19: Game Polish
In This Chapter You Will Learn:
•How to polish a game
•How to playtest a game
•How to polish game audio
•How to polish a game's GUI
•How to create a consistent graphic style
In this chapter, you will learn all about what it means to polish a video game. You’ll learn how to playtest the project and learn what to watch for during the testing phase. Next, you will learn what can be done to polish the sound effects and soundtrack of the game. Afterwards, you will learn how to polish a game's GUI so it feels natural to the player. Finally, you will learn how to make sure the game follows a consistent graphic style.
Game Polish
Game polish is a very subjective term that will likely be defined somewhat differently by just about anybody you talk to in the video game industry. What most definitions of polish have in common is that polish is the part of a game's development that usually takes place toward the end of the project.
Polishing a game is all about fixing any small issues that arise during playtesting, adding small features, performing code and behavior optimizations, cleaning up graphic elements, and making sure the art style is consistent. Polish can vary by discipline. For a sound designer, it may be resampling audio and recompressing it; however, for an artist, it may be adding a bit more detail to a character or animation. If you are a sole indie developer or part of a very small team, you’ll likely be doing most of the polishing yourself.
It’s important to allow enough time in the game's development for a specific “polish phase.” Polish has been referred to as the last 10-15% of your project that can be the most difficult to “get through.” This last 10% of a project can often feel like it takes as long to complete as the first 90% of the project.
Playtesting
As I mentioned early in the book, you should be playtesting throughout the entire game development process. As the end of development approaches and you begin to anticipate the final release of all your hard work and time, don’t lose sight of playtesting. Part of the polish phase should certainly include returning to the list of bugs or improvements that you had intended to make during development. Each bug and improvement should be thoroughly tested, making sure they have been corrected or added as planned. It’s very easy to lose sight of a small detail while trying to track down and fix multiple bugs or features. So keep a list and try to keep the process organized.
Don’t rely on only the development team's experience while playtesting. The more input that can be gathered on the game the better. If possible, enlist friends and family during the testing phase and even consider using Apples TestFlight service to help with the process if you are developing for iOS.
It may not be practical to ship a game with no bugs at all, but that should be the goal of the testing phase. Once the game is released to the masses, players will likely try to do things with your games, characters, and puzzles that you never imagined―certainly some previously unknown bugs will crop up. But anything that is found before the game is released should be corrected.
Game Audio
For many indie developers, it seems like audio is often an afterthought that is sometimes “thrown in” at the end of development. Most developers don’t do this on purpose; they are just so busy working on the rest of the project that audio sometimes suffers. It is critical to remember that audio contributes a lot to the gaming experience. The right audio can totally change a game's mood and feel while poor audio, or no audio at all, can really bring an otherwise good game down.
There are a lot of opportunities to use audio in a game. Certainly there are the obvious uses for sounds and music; a soundtrack, button clicks, jumping sounds, gunshots, etc. But there are also a lot of less obvious uses for audio that are sometimes overlooked. Nearly every object that the player interacts with has the opportunity to bring more life to the game through audio. For example, when a gun fires, there will be the main shot sound, but also consider adding the sound of bullet shells hitting the ground or the sound of the gun reloading to add another layer to the audio experience. If the game world is a forest, consider adding ambient sounds of crickets chirping or birds singing to add a feeling of more life in the forest. If the game is a horror game, the sounds of distant screams or roaring monsters could go a long way toward intensifying the player's fear level.
Note–Ambient Sound: Ambient sound is another more technical term for background noise. Background noise is any sound other than the primary audio source.
Audio is an important part of the video game experience and should be given the attention it deserves.
The Graphical User Interface (GUI)
There is a whole section in this book dedicated to creating a Graphical User Interface (GUI), but it is important enough to mention again. Even if you and your testers are satisfied with your game's GUI, don’t be afraid to view it one last time with a very critical eye. A GUI is typically on-screen during every level of a game. Even as the backgrounds and settings change, the GUI may not. For this reason, you should be positive the game's GUI is as clean, simplified, and optimized as possible.
A good GUI should only include information that is immediately relevant to the player and anything that is not critical to the game's action can be either removed or moved to another screen. Each game type will have its own critical elements that must be displayed at all times, but some examples are: a player's life, on-screen controls, ammunition count, and a level map. If you decide to rearrange your game's GUI and move some elements to another screen, a good candidate for that is often the pause screen. However, if there is a lot of extra information that needs to be displayed, you’ll likely want to create a special screen to display it all.
A GUI can often benefit from some additional animation or effects as well. The areas of information could move into place when the level first loads, buttons could animate with different states (normal, hover, and active), and life meters could change color as the player's health increases and decreases. The options really are endless.
Graphic Style
Every game has a certain graphic style―the style of artwork used for the game graphics. Certainly this style should be chosen at the beginning of the project and not the end. But there are often so many assets that need to be created that they are created at different times, by different people. It is critical to review all the graphic elements used in a game during the polish phase and make sure they are all fit the same graphic style.
Most successful games don’t mix art styles, but instead have one continuous style throughout all of the game's screens; splash screens, game play screens, credits screens, etc. This same art style usually extends to the game's website and marketing materials as well. There is no single art style that every game should use. Instead, there is an almost endless list of art styles to choose from, including:
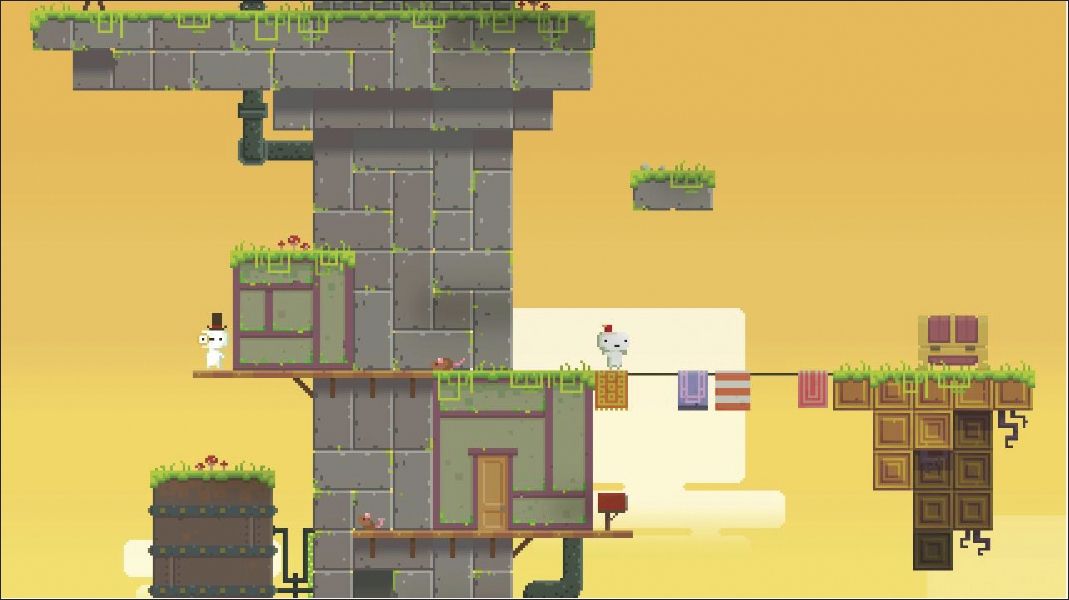
Pixel Art Style
Figure 19.1: Pixel art graphics from the popular indie game Fez.
Cartoon Art Style

Figure 19.2: Cartoon art graphics from the Angry Birds series of games. Note that the characters, backgrounds and GUI are all created in the same cartoon style to maintain a consistent graphic look.
Sketch Art Style

Figure 19.3: Sketch art graphics from the game SketchFighter 4000 Alpha.
Pre-rendered 3D Art Style

Figure 19.4: Pre-rendered 3D art graphics from the Donky Kong Country series of games.
The art style chosen for a game should be something that enhances the game's feel and mood, but most importantly, it should be consistently used throughout the entire game. If you play any of the games used as examples above, you will see that even though the art style of each game is very different, they have each used their chosen style consistently. If you choose to create your game play screens and characters in a pixel art style, you shouldn’t create your menus and splash screens as pre-rendered 3D art. Make sure every element in your game is created in a consistent art style for the entire project.
Over Polish
It’s possible to “over polish” a game. In every project there is a certain point of diminishing returns (the point at which changes you make will have very little effect on the overall quality of the game). While it can be hard to tell when you have reached that point, always try to weigh the effect of the change you are about to make or feature you are about to add and decide if it will be worth the time and effort when the game is complete. Certainly fixing a game-breaking bug is important and the time should be taken to correct it, but endlessly tweaking a special effect may not be worth it if that is the only bit of polish that is stopping the game from being released. It is a judgment call, but one you should be aware of while you are polishing your projects.
There are a lot of ways games can be polished. Every game has some common elements, but there will likely be some specific to each project as well. The subjects discussed in this chapter are common among just about any game project. But keep in mind this is not an exhaustive list. There will likely be some elements specific to your own games that should be tweaked and polished before publishing that are not mentioned here.
Summary
In the last chapter, you learned all about game polish and how to make sure a game is the best it can be. You learned about playtesting games and how to polish their audio and graphical user interfaces. Finally, you learned the importance of having a consistent art style.