
Chapter 21: Mobile Development
In This Chapter You Will Learn
•How to configure your development environment for mobile development
•How to test games on a mobile device
•How to save and load data on the device
•How to set up accelerometer-based controls
•How to detect and track multiple touch events at once
Since the launch of the Apple App Store in 2008, games have been one of the most downloaded categories of apps for iOS devices. The same holds true for the Android App Stores. With Gamesalad, it’s easy to develop games for use on just about any mobile device available today. In this chapter, you’ll learn how to configure your development environment for mobile publishing. Next, you will learn how to test games on a mobile device. Afterwards, you will learn how to save and load data to/from the mobile device. Finally, you will learn how to create controls for games on a mobile device using the accelerometer and multi-touch input.
Note–Gamesalad Free vs. Paid: As a user of the free version of Gamesalad, you are able to publish to the Apple App Store. This chapter's lesson will focus specifically on publishing for Apples iOS devices. If you are using the paid version of Gamesalad, you will also be able to publish to Android, Amazon, Kindle, and Tizen devices. Many of the subjects covered in this chapter apply to non-Apple devices as well.
Configuring Your Environment
Before you are able to publish and distribute games to mobile devices, you’ll need to set up your development environment. The first step in that process is signing up with each app store that you want to distribute games through. In order to sell, or give away, your games on the Apple App Store, you’ll need to sign up with Apple to become a Certified Apple Developer.
Note–The Cost of Developing: At the time of this writing, the cost of signing up to be a Certified Apple Developer is $99 (USD) per year. If you plan to sell your games through their app store, Apple will take 30% and pay you the remaining 70% of the game's income. Of course, if you give your games away for free, there is no income to split with Apple.
After signing up to be a Certified Apple Developer, you’ll also need to:
1Install Xcode and Application Loader on your Macintosh. Both are free and available from Apple.
2Set up a development certificate.
3Create a distribution profile.
4Set up your device for testing.
5Test your game either in Gamesalad's viewer or as an ad-hoc build.
6Submit the game(s) to the Apple App Store.
While the specifics of each of those steps are beyond the scope of this book, don’t worry; there are lots of resources available online from Gamesalad, Apple and other sources to help ease the process. The first time you go through the process of testing and publishing to any mobile platform, it may seem overwhelming; however, as you get more practice, the process will become second nature.
Gamesalad offers an online “cookbook” that outlines each step needed to publish to the Apple App Store. This is located at the URL below:
https://help.gamesalad.com/hc/en-us/sections/200442116-3-Apple-Publishing
Apple's online developer site can be found at this URL:
Mobile Playtesting
It’s already been discussed that you should always playtest games before you release them; this certainly applies to the mobile platforms as well. Once a game is ready to be tested on a mobile device, there are two options: The Gamesalad Viewer can be used or the game can be built as a full ad-hoc build and tested live on the device. In this chapter, you will learn how to use the Gamesalad Viewer to quickly test games on an Apple iDevice (iPod, iPhone, iPad).
Note–Testing Requirements: In order to test on a mobile device, you will, of course need to have a device to test on. If you don’t currently have access to a device, you should still read through this chapter so you understand the process. Even without a mobile device, you can still create games for iDevices―you just won’t personally be able to test your games on a device before publishing.
The Gamesalad Viewer is an app that is installed on the mobile device and is used to quickly test games as they are being developed. The viewer can be downloaded from Gamesalad's website at:
http://gamesalad.com/download/latest/ios-viewer
The viewer application will need to be installed on each device that games will be tested on. To install the Gamesalad Viewer, follow the instructions provided by Gamesalad at the URL below:
Once the viewer has been installed on your device and the device is turned on and on the same Wi-Fi network as the computer you are running Gamesalad Creator on, there will be a new icon displayed next the Preview button at the top of the window. (see Figure 21.1).
Figure 21.1: The “Preview on Device” menu has been added to the Gamesalad Creator window.
This new “Preview on device” button acts as a pull-down menu. With the viewer installed on an iPad, iPhone, and iPod, you’ll be able to choose which device you’d like to preview the game on.
Tip–Viewer vs. Ad-hoc: The Gamesalad Viewer is great for a quick test while developing, but you should always test your games using a full ad-hoc build as well before you publish any games through the App Store. The viewer is an emulator that runs on the device; because it is emulation, sometimes things will not work the same as doing a full ad-hoc build. An ad-hoc build takes more time, but it produces a 100% native application.
Note–Certified Apple Developer: To install the Gamesalad Viewer (or any custom software) on an iDevice, you need to be a Certified Apple Developer. If you have not signed up with Apple, do so now or you will not be able to complete the exercise below.
––––––––––––––––––––––––––––––––––––––––––
Exercise 34: The Gamesalad Viewer
If you have a device to test on, follow these steps to create and test your first app using the Gamesalad Viewer.
1Make sure you have downloaded and installed Gamesalad Viewer App on your mobile device.
2Create a new portrait project whose platform type matches your mobile device. For example, if you plan on testing on an iPad, create a project using the iPad portrait platform.
3Navigate to the Stage and create an empty Actor named “Square.”
4Place a copy of the Actor at the center of the stage.
5Open and Run the Gamesalad Viewer on your device.
6Once the Preview on Device Button appears in Creator, choose your device from the Drop-Down menu.
7After a moment, the screen in Creator will change to the “remote preview screen” (see Figure 21.2) and the project will be displayed on your mobile device.
8Save this project for later use in this chapter.
––––––––––––––––––––––––––––––––––––––––––
This project is not “playable.” There is no interaction, but you should see the square actor positioned in the center of your devices screen.

Figure 21.2: The “Remote Preview Screen” is displayed while your project is running in the Gamesalad Viewer App.
Note–The Remote Preview Screen: This screen displays lots of useful data about your project while it is playing on your device. It will track the projects performance, measured in frames per second, and display a lot of useful memory usage statistics.
Saving and Loading Data
There will be many times when you need to save and load data in the games you have created. You may simply want to save a high score or you may create a complex RPG game that needs to save player stats, weapons, and location information. Gamesalad offers two different ways to save and load data.
Save and Load Behaviors
The Save and Load Behaviors are used to save and load one attribute value at a time. When using the save behavior, you’ll need to indicate what attribute to save and you need to assign a specific save location as a key value (see Figure 21.3).

Figure 21.3: The Save Behavior.
•Attribute: Use the Attribute Browser to choose which Attribute should be saved.
•Key: A key is a specific string of characters that is assigned to each individual save location. This key is used to identify the save file and is used to reload the data later using the Load Behavior. A key can be any string of characters you like.
To use the Load Behavior (see Figure 21.4), you will need to supply the same two pieces of information in reverse order. Data will be loaded from the Key location provided and will be placed into the Attribute indicated. Data loaded into an Attribute will replace the previous value that the Attribute held.

Figure 21.4: The Load Behavior.
While the save and load behaviors work great for small amounts of data, if there is a lot of information to keep track of, Tables are a more efficient option for saving and loading data.
Save Table
Using tables to save data takes a bit of pre-planning, but if there are large amounts of data to save, it’s worth taking the time up front to plan for it.
Imagine for a moment that you are creating an RPG game and for your player character, you’ll need to keep track of the following values: health, strength, armor, endurance, speed, and luck. You can, of course, create them as individual Attributes and save and load them one by one. However, it would be more efficient to plan ahead and create a table named “player stats” that contains all six values―you could then load them from the table as needed and save that table whenever any of the values change. To save a table during game play, trigger the Save Table Behavior (see Figure 21.5).

Figure 21.5: The Save Table Behavior.
Once triggered, the table indicated in the pull-down menu will be saved to the device. There is no need to reload table data. Once a table is saved, it is immediately available in the game to be read from or saved.
The save table behavior completely overwrites all of the original data in the table with any data that has been updated. Be careful not to accidently overwrite data you don’t intend to.
Tip–Table Best Practice: It’s common to create two tables for every set of data used in a game. For example, when creating the “player stats” table discussed above, create a second table called “player stats defaults.” That way, if the “player stats” table ever needs to be reverted to its default values, the data from the “player stats defaults” table can be copied into the “player stats” table using a copy table behavior.
Accelerometer Control
Most mobile devices have an accelerometer built into them. An accelerometer measures the force of acceleration through movement or gravity. On a mobile device, the accelerometer is usually used to determine which way the screen is being held (portrait or landscape) and to measure the tilt of the device.
An accelerometer is able to detect changes on the X, Y, and Z-axis (see Figure 21.6).

Figure 21.6: The accelerometers X, Y and Z axis.
The default axis for the accelerometer is when the device is located in the upright, portrait position as indicated in the figure above. If the device is rotated to the landscape position, the accelerometer data will need to be converted to the correct axis.
––––––––––––––––––––––––––––––––––––––––––
Exercise 35: Using the accelerometer
In this exercise, you’ll add two behaviors to the square from the previous exercise to make it move using the accelerometer.
1Open the previous exercise and open the Actor Editor for the square actor. If you didn’t create the previous exercise for a portrait orientation, recreate it as a portrait project.
2Add a Rule to the Actor and make its condition read: Attribute » game.Accelerometer.X » is greater than (>) » 0.1
3Nest a Move Behavior in the rule and leave it set at its default values.
4Copy the Rule and update the condition to read: Attribute » game.Accelerometer.X » is less than (>) » -0.1
5Update the Move Behavior of this rule to read: Direction: 180
6Use the Gamesalad Viewer to test this on your device and you’ll see that when you tilt right and left, the square moves in the appropriate direction.
7Rotate the device to a landscape orientation and you’ll see, as mentioned above, that you no longer get the expected results because the axis has shifted.
8Save this exercise for use in the next section.
––––––––––––––––––––––––––––––––––––––––––
Note–Accelerometer Attributes: The accelerometers X, Y, and Z Attributes are located in the devices section of the attribute browser (see Figure 21.7).

Figure 21.7: The accelerometer settings withing the devices section of the attribute browser.
Multi-Touch Control
Most mobile devices are primarily controlled by touch; through the capacitive screen, the device is able to detect multiple touches and the location of each touch. Gamesalad is able to detect up to eleven touches at one time. Keep in mind that even though Gamesalad is able to detect up to eleven touches, that does not mean every mobile device is able to detect that many touches. Different mobile devices from different manufactures are able to detect different numbers of touch events. In addition to detecting the number of touches, the specific X and Y location of each touch is tracked by Gamesalad as well.
The exact attribute names of each touch attribute can be found in the devices tab of the inspector palette (see Figure 21.8).
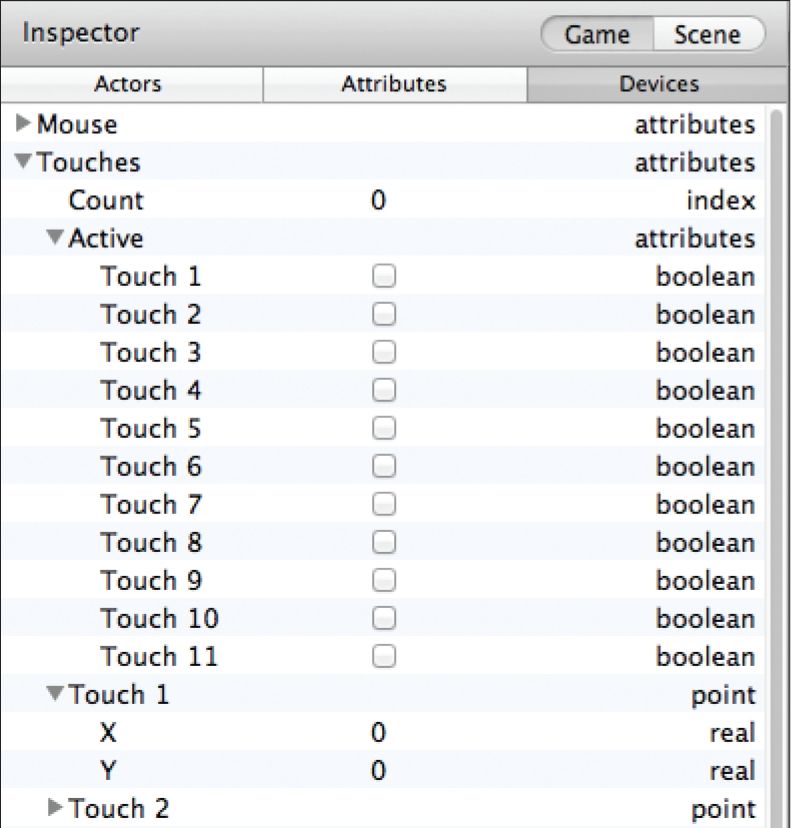
Figure 21.8: The Touches Attributes located in the Inspector Palette.
•Count: This is an integer number indicating the total number of touches currently on the screen.
•Active: This is a boolean value indicating the true or false state of each touch.
•Touch–X/Y: This is a real number indicating the X and Y coordinates of the touch.
By using these values, some very interesting controls and interactions can be created for games.
––––––––––––––––––––––––––––––––––––––––––
Exercise 36: Counting on Your Fingers
In this exercise, you will track and display the amount of touches on the device's screen.
1Open the file from the previous exercise and open the Actor Editor for the square Actor.
2Turn off or Delete the two Rules that were added during the previous exercise.
3Add a Display Text Behavior to the list and update its color to Black.
4Open the Expression Editor for the Text field and make it read: game.Touches.Count (see Figure 21.9)
5Preview the project on your device using the Gamesalad Viewer and for each finger touched to the screen. The number displayed will increase by 1.
––––––––––––––––––––––––––––––––––––––––––

Figure 21.9: Adding Touches.Count to a Display Text Behavior.
Summary
In this chapter, you discovered how to set up your development environment with mobile devices in mind and learned how to playtest games on your own device. You then learned how to save and load data to and from the device. Afterwards, you learned how to read the accelerometer and how to use it to control objects on-screen. Finally, you learned about multi-touch capacitive screens and how to track multiple touches at one time.