There are as many essentials to learn about food as there are different kinds of it. How do you choose it? How do you know if it’s ripe? How do you cook it? How do you serve it?
And how do you get ketchup out of the bottle?
On the following pages: a sampling of the finest info bits.
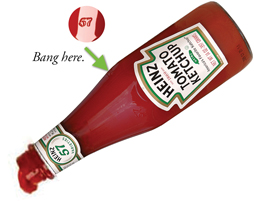
The ancient Incan ritual for extracting ketchup
According to tribal lore (as well as the Heinz Web site), there’s a special significance to the number 57 that’s molded into the glass Heinz ketchup bottle: You can bang that exact spot with the heel of your palm a few times to get the ketchup flowing.
(Why, with more than 5,500 products, does Heinz still use 57 as its marketing number? Because founder Henry Heinz used to advertise his “57 varieties” back in 1896. Even though, back then, the company was already selling 60 different products. Mr. Heinz thought 57 was catchier.)
The scientific method for extracting ketchup
Not all ketchup comes from Heinz, and not all ketchup comes in tall glass bottles. So how are you supposed to get the ketchup out of other containers? Especially when there’s only a little bit left at the bottom?
Use centrifugal force. Hold the bottle at the bottom. Make sure the lid is on securely. Swing your arm in a big circle a couple of times. You’ll discover that (a) the ketchup is forced to the top of the bottle, ready for dispensing, and (b) the other people at the barbecue look at you funny.
Special note for those with rotator-cuff injuries: If you find it difficult or painful to swing the ketchup bottle over your head—well, do you want that condiment or don’t you, wimp?

No, just kidding. There’s an alternate centrifugal-force method that can also help you: Holding the bottle upside-down over your burger, swirl your hand around in little circles. Try to make a very tiny, very slow tomato tornado against the sides of the bottle. After a moment, the ketchuppy lava will flow.
Many a fast-food restaurant or cafeteria offers small white paper cups, which you’re supposed to fill with ketchup or mustard from the dispensers before heading to your table.
Upon closer inspection, you’ll discover two facts about these cups:
• They’re made of white paper, folded up accordion style for added structural strength.
• They don’t hold very much.
Those are, in fact, two related facts. Because if you tug on the paper cup’s rim, unfolding the pleats, you wind up making the cup bigger, so it holds more.

Anyone at your table who intends to help themselves to your fries will be appreciative.
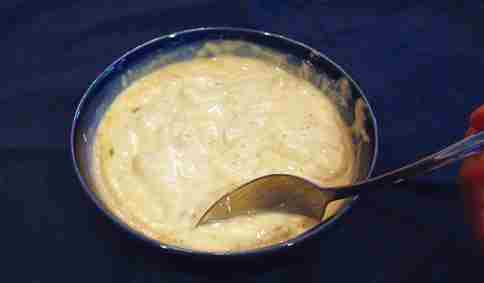
A life-changing tip for people who buy natural peanut butter
Brand-name regular peanut butter—Jif, Peter Pan, Skippy, and so on—has a lot more in it than peanuts. You’re also getting sugar, oil, mono- and diglycerides, and so on.
Natural peanut butter is nothing but peanuts and maybe salt. Some people consider it tastier and healthier. Some people also consider it a real pain to use, because when you open the jar, there’s a pool of peanut oil sitting on top of the butter. It’s your job to stir the oil back into the peanut sludge before eating, which is tricky and messy.
But not if you store the jar upside down! In that case, the oil rises to the bottom of the jar. You’ll be able to stir it much more easily and efficiently—without any oil mess at all.
Leave the butter out
Cold, hard butter from the fridge is really hard to spread on bread. You wind up tearing the bread and depositing the butter unevenly. Life’s rough, right?
Anyway, the solution is ridiculously easy: Leave your butter out of the fridge. Leave it on the counter, where it’s easy to grab—and soft—whenever you have to spread it onto something.
You’re probably thinking, “No way! It’s a dairy product! It’ll spoil!”
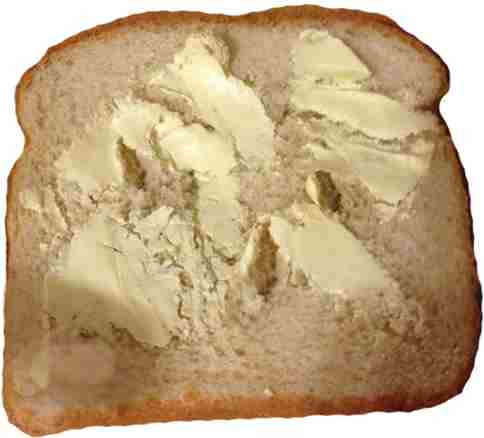
Actually not. Bacteria need moisture to flourish—and butter is made almost completely of fat. It began life as cream; furthermore, that cream’s been pasteurized, killing all sick-making bacteria. Finally, the salt in most butter makes it even more unlikely for bacteria to gain a foothold.
Bottom line: You won’t get sick from butter you’ve left out for a few weeks.
You may, however, discover that it eventually tastes funny if it’s exposed to light and oxygen. Therefore, keep it in a covered, opaque butter dish.
This simple change will bring tremendous happiness to your life.
On the other hand, you’ll find yourself using more butter this way.
So, you know—even more happiness.
You rinse mushrooms in water, of course.
If you’re a longtime cook, that simple statement might be causing your palms to sweat and pupils to dilate. For dec–ades, conventional wisdom has told us that mushrooms are like sponges—that if you put them in water, they’ll soak up moisture and won’t cook properly.
“Use a damp paper towel or a soft mushroom brush to wipe each mushroom, one at a time,” says the Better Homes & Gardens Web site to this day. “Do not soak the mushrooms. Because they absorb water like little sponges, mushrooms won’t brown nicely when cooked if they are full of water.”
But it’s not true.
The New York Times, The Guardian, TV’s Alton Brown, and many individual chefs have all done comparison tests, rinsing half the mushrooms and hand-rubbing the other half (with a “soft mushroom brush,” no doubt). After cooking, the mushrooms look and taste identical.
So rinse away, cooks of the world. You’ll be able to get dinner on that much sooner.
The Great Garlic Husk Trick
Garlic, as you probably know, comes prepackaged by Nature with a convenient wrapper: its skin, its husk. Convenient, that is, until you want to remove it.
Why not let Nature remove it for you, too?
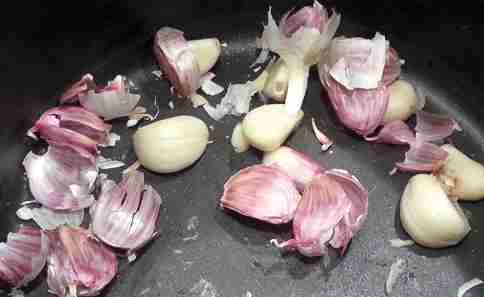
Put the garlic in a hard, enclosed container—a pot with a lid, for example, or two metal bowls placed mouth to mouth. Shake hard, for maybe 15 seconds.
When you stop, you’ll find that the garlic is now naked and shivering, its wrapper in shreds nearby.
Flatten your meat
Experienced family food providers divide their ground beef into individual ziplock bags before freezing it. These individual meat packs will be much easier to thaw and prepare when the time comes. (The same principle applies to tomato sauce, cookie dough, stew, and so on.)
Really experienced family food providers flatten the meat before freezing it. Flatter packages are faster to freeze, easier to stack, and faster to thaw.
The better way to peel a banana
Most people attempt to open a banana’s peel using the stem as a pull tab. Sometimes that works. But often, especially if the banana is a little green, that process winds up mushing the banana top into baby food. You also wind up having to pick away the stringy bits.
You’ll avoid both problems if you open the banana from the other end.
(Most people think of a banana’s opposite end as its “bottom.” But in fact, bananas grow in bunches upward from the stem—so technically, the “bottom” is the top. There. Now you won’t embarrass yourself at a Chiquita company picnic.)
Pinch the black crusty end point, splitting it. Now you can tug the peels away.

This method is better than the stem-opening tradition in three ways:
• You avoid mushing or bruising the first bite.
• No stringy parts! (They peel away with the peel.)
• The stem acts as a handy handling handle when you’ve eaten your way to the bottom.
(On the Internet, you can read that this is how monkeys eat bananas—aren’t they smart? But in fact, monkeys open their bananas from the bottom, from the top, or from the side—whichever seems easiest at the time. Apparently, they don’t get on the Internet much.)
Chopping an onion: The Basics
As everybody knows, cutting an onion releases a sulfuric chemical called syn-propanethial-S-oxide. It rises to your face as a gas, and then next thing you know, your eyes are watering—your body’s desperate attempt to flush the acid out. That’s why you cry when you cut an onion.
On the Internet, there’s a “how to avoid onion crying” tip for every man, woman, and child: chewing bread while you cut, chewing gum, keeping a spoon in your mouth, breathing only through your nose, and so on.
But the science says that these are the ones that work:
• Use a sharp knife. The sharper the knife, the fewer onion cells you break open, and the less gas you release.
• Chill the onion first. Thirty minutes in the fridge, or 10 minutes in the freezer. Less syn-propanethial-S-oxide will evaporate.
• Blow the gases away. Turn on your stove’s exhaust fan, set up a portable fan, or even blow gently at the onion as you cut it.
• Cut under a thin stream of water on a cutting board. The water keeps the gases from rising to your face.
• Cut as closely (and as safely) as you can to a candle. Somehow the flame interferes with the sulfur gas molecules reaching your face.
The most effective method of all: Wear swim goggles. That practice, however, guarantees quizzical looks from the kitchen passersby.
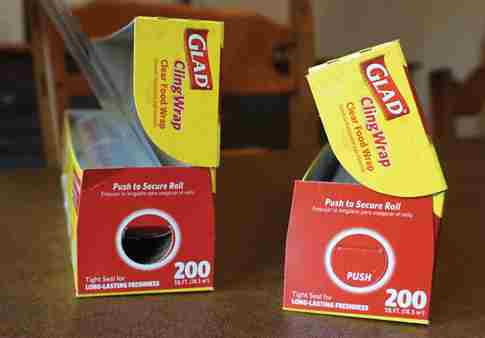
The axle you didn’t know your plastic wrap had
There’s a secret feature lurking on the ends of your plastic wrap’s cardboard box: little triangular cardboard tabs. You’re supposed to pop them inward.
You’ve now made, in effect, an axle that holds the roll of plastic wrap in place as you unroll it!
Where to find cooler food in your bowl
What do you do when the food in your bowl—soup, chili, oatmeal, mac and cheese—is still too hot from cooking? Most people have only one tactic: blowing on each mouthful.
There is, however, another technique at your disposal: Take small bites from around the edges of the bowl. The food there is always a few degrees cooler than what’s in the center. The bowl is shallower there, and the bowl itself has cooled the hot stuff down where it touches.
The ultimate guide to knowing about an egg
You want to know the problem with eggs? They have shells. You can’t see inside them. How do you know if an egg is rotten? Or hard-boiled? The wise lifers on Twitter know:
• Twirl the egg on your countertop. If it spins, it’s hard-boiled. If not, it’s raw. (The contents of the uncooked egg are runny, so they slosh around, resisting the spin. The cooked egg’s center of gravity, on the other hand, doesn’t change.) —Barb Hagerman
• Put a questionable egg into a bowl of water. If it sinks, it’s OK to eat, even if it’s past the due date written on the carton. If it’s rotten, it floats, thanks to the gas that has accumulated inside. (Iffy ones touch the bottom, standing on end.) —Jay Lyerly
The ultimate guide to cooking with eggs
You want to know the great thing about eggs? They have shells. That’s built-in protection.
There’s a trick, however, to getting the eggy stuff out of the shelly stuff:
• Instead of cracking an egg on the edge of the pan, bowl, or counter, crack it on a flat surface. That way, the shell cracks without the yoke spilling out or shell fragments falling into your breakfast-to-be. —Stephen Campbell
• Once you’ve boiled an egg, you have to get the shell off of it. Here’s the easiest way.
• First, crack the shell around the equator (middle ring) of the egg. Roll it around on the counter to make the cracks even finer.
• Next, peel away the cracked shells from the equator, leaving a bare strip around the middle. At this point, you can pop the top and bottom halves of the shell off.
(By the way: The shell is even easier to peel if you’ve put the egg in cold water for a few minutes after cooking, so that the shell and membrane separate a bit.) —Leon Wong
How to remember how to set the utensils
When you’re setting the table, you probably know that you’re supposed to put the knife, fork, and spoon on both sides of the plate. But if this isn’t the sort of thing you do every day, how are you supposed to remember where they go? Which ones go on the left side and which on the right?

• The order of silverware is easy to remember: It’s alphabetical! Fork, Knife, Spoon.
• The side of the plate is easy to remember, too: The word fork has the same number of letters as left. The words knife and spoon each have the same number of letters as right.
Right? —Robert Rubin
The right way to pour from a box of liquid
When you pour liquid from a can,” your mom probably told you, “use the can opener to make holes on both sides of the lid. That way, the air can come in one hole, while the liquid pours out the other.”
Well, guess what? The same principle applies when you’re pouring from one of those rectangular, waxed-cardboard boxes of liquid: broth, soup, almond milk, chai tea, and so on.

You’ll be able to pour much more steadily, with more control and better speed, if you poke an airhole into the top of the carton, on the side opposite that of the pouring spout.
How to quench a spicy mouth on fire
When you take a bite that’s much spicier than you expected, it’s no fun. It’s pain. Your mouth is on fire, and you want to put it out now.
Unfortunately, most people’s instinct is to gulp water. That’s how you put out a real fire, right?
With spice, though, that’s the worst thing you can do. The burning sensation in spicy food is caused by an oil from the hot peppers called capsaicin (cap-SAY-sin).
Oil and water don’t mix. So if you drink water (or beer), you just wash that burning chemical into new places in your mouth. It’s the same reason you can’t put out a chemical fire with a fire hose—you’re just pushing the chemicals around.
What does put out a capsaicin fire in your mouth? Fat, oil, alcohol, and “soak up” foods. For example:
• Dairy products. Whole milk. Yogurt. Butter. Sour cream. Ice cream. The milk proteins and fat bind with capsaicin oil and wash it away.
• Oily products. Peanut butter and olive oil are the oily ingredients you’re most likely to have handy in a restaurant. Here again, the oil binds with the capsaicin and gets it off your taste buds.
• Alcohol. Yes, alcohol can also dissolve capsaicin. But we’re talking high alcohol content (like vodka), not something that’s mostly water (like beer).
• Sponge foods. Starches like white rice and bread can soak up the capsaicin oil, leaving less of it on your flesh to burn you.
Then, for best results, don’t take another bite of whatever got you into trouble.
How to stop apples from turning brown
Once you expose an apple’s insides to the air, they begin oxidizing—an enzyme in the juice reacts with the oxygen in the air and turns the white part brown. It doesn’t affect the taste much, but it’s a visual turnoff, especially for discerning consumers under 12 years old.
Scientists are, in fact, working on developing new apple breeds that don’t contain the culprit chemical and won’t turn brown. Until they succeed, you have two options:
• Keep the air away from the cut parts. If you’ve cut an entire apple into slices, store it back in its original form, held together by a rubber band. Without exposure to the air, the apple flesh won’t oxidize.
• Use the old lemon-juice trick. Citric acid is an antioxidant; it stops the browning in its tracks. Lemon juice, lime juice, orange juice, and pineapple juice all contain citric acid in abundance.
You can just pour or sprinkle the juice onto the cut apples—pineapple juice is usually a taste hit with the younger set. Or you can soak the slices in a bowl of anti-browning potion (a cup of water with a tablespoon of lemon or lime juice in it).
If you’re hard-core, you can also buy a bottled citric-acid powder called Fruit-Fresh that’s precisely for this problem.
All of these tricks work equally well with other fruit that oxidizes, like bananas, pears, peaches, and avocados.
The universal kitchen timer
If you have a kitchen timer, great. If you have a timer app on your smartphone, great.
But if you have neither, go to Google.com. In the search box, type in “Set timer for 5 min” (or whatever timing you need). When you click Start, you get a countdown. (If you click the  icon, the timer fills your entire screen, for visibility from across the room—or across town.)

When the timer reaches zero, your computer/phone/tablet thing plays a sound (unless you’ve clicked the  icon to mute it).
Great for board games and family arguments, too!
Opening a jar: The Basics
If you can’t seem to unscrew a super tight jar lid bare-handed, use one of these tricks. They work every time:
• Put a fat rubber band around the rim of the lid. Now you’ve got the grip of Superman, and the force of your turning is magnified greatly.
• Wedge a spoon under the edge of the lid. Use it like a lever to pull the metal out slightly. As in the previous trick, the idea is to break the vacuum seal. Once the seal pops, the lid unscrews easily!

• Confidently rap the lid’s edge against the floor. If you do it hard enough, you’ll make a nearly imperceptible dent in the metal, which lets in air, which breaks the vacuum seal, which makes the lid unscrew easily.
How to stop the pot from boiling over
You know all those goofy “life hacks” that people send around on the Internet? Well, one of them is worth learning—it’s quick, easy, and it really works.
A pot of water doesn’t boil over if you lay a wooden spoon across the top of the pot.

Why does it work? Two reasons. First, the dry wood itself pops the tiny bubbles of the foam.
Second, the spoon is a lot cooler than the steam inside the bubbles. When the bubble hits the wood, the steam condenses back into water, and the bubble bursts.
That’s why you can’t use a metal spoon; it heats up rapidly and loses the temperature differential.
You also shouldn’t use a plastic spoon. When it melts into the pot, it makes your food taste funny.
The painfully simple trick for scooping out hard ice cream
Ready?
Run your spoon under hot water first. That’s it.
You’ll find that the spoon cuts through the hard ice cream as though its … soft ice cream.
If you’re eating hard ice cream, you may prefer to keep a mug of hot water next to you, so you can dip your spoon into it after each delicious, melty mouthful.

The quick way to clean a blender
After you’ve used your blender to whip up some delicious smoothies, pancake batter, hummus, pesto, salsa, guacamole, salad dressing, or tapenade, you’re left with the less delicious task of cleaning that blender.
Well, if spinning deadly blades made the mess, they can clean it up, too.
Fill the blender halfway with water … add a drop of dish soap … and run it.
Then rinse with hot water. Presto: clean blender.
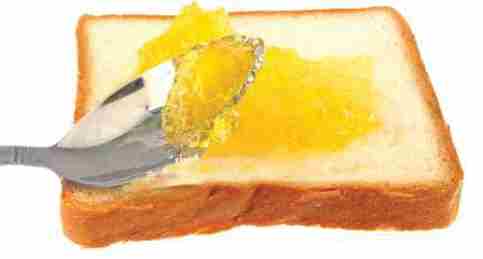
The Great Jelly-Spreading Lie
The world wants you to believe that a knife is the best implement for spreading jelly, butter, and cream cheese onto bread. It’s not.
The spoon is a better choice. Specifically, the back of it.
First, its larger surface area distributes the spreading pressure, so it’s less likely to tear the bread. Second, when you need to scoop into the container for more jelly or cream cheese—well, it’s a spoon.
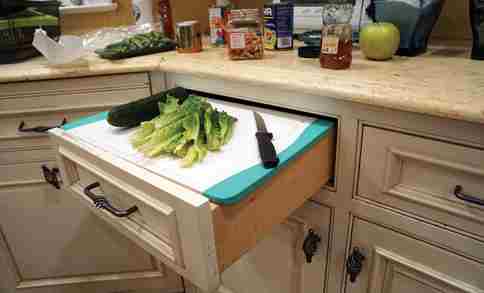
Every now and then, you’ll encounter a situation when you’ll wish you had more counter space. Thanksgiving for 20 people, for example. Or an apartment in New York.
That’s the beauty of drawers and cutting boards. Pull out a drawer, lay a cutting board across it, and boom: instant counter space.
You can probably figure out how to reverse the procedure on your own.
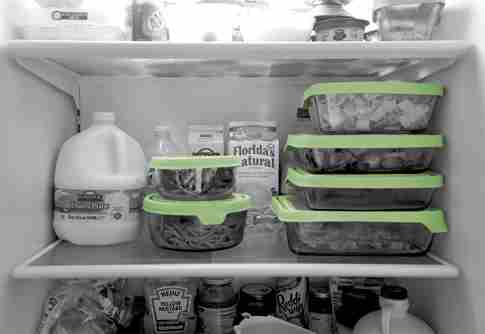
Lazy Susan in the fridge
In moments of intense boredom, you may realize how goofy it is that a refrigerator—the box in your house that you open the most frequently—is opaque and solid on three sides. That quirk explains the Fridge Shelf Shuffle: the time-consuming, energy-wasting moments of foraging that you must occasionally undertake when you’re trying to find what you want.
A lazy Susan—one of those rotating platters—is the simple solution. Why aren’t they built into refrigerators in the first place?

Rescue bread from the brink of death
From the moment it comes out of the baker’s oven, bread begins losing moisture. If a loaf of your bread is entering the kingdom of staleness, you can get at least another good day out of it with this bread-zombie trick:
Put the loaf under running water. Seriously. Get the crust really wet.
Set the bread into your oven, right on the rack, and heat at 300 degrees for 6 to 12 minutes, depending on the size of the loaf and how wet it is.
Amazingly, the steam makes the inside soft and moist, and the oven makes the crust firm and crackly. You’re ready to sandwichify.
Rescue greens from the brink of death
Greens—lettuce, kale, cabbage, chard, what have you—wilt over time. They turn dark and slimy. No news there.

But it’s not because they’re rotting; it’s because they’re dehydrating.
You can reanimate them by soaking them in lukewarm water for half an hour or so. Then rinse them with cold water, and marvel at their restored crispness and attractiveness.
Can of soda: straw holder
This is an old Internet classic, but it’s handy:
Use the pop-top of a can of soda to stop the straw from popping up out of the drink.

How to light a bunch of candles with a single match
Simple: Use a stick of uncooked spaghetti. It works like a very long match and burns with an even, long-lasting flame. It gives you plenty of time to move from candle to candle, lighting them all with that one noodle.
The spaghetti-match trick is also worth remembering when you have to light a pilot burner way inside some grill, fireplace, oven, or stove, or you’re trying to light a candle whose wick is way down at the bottom of a container. It’s like a footlong match.

How to store cucumbers so they don’t get gross
If you don’t refrigerate a cucumber, it will get soft and disgusting within 48 hours.
If you just put the cucumber into the fridge naked (the cuke, not you), it will get soft and wrinkly, and lose its crispness and flavor.
If you put the cucumber into a plastic bag in the fridge, it will get slimy in a few days (the cucumber, not the bag).
The secret: Wrap the cucumber in a paper towel and put that into a plastic bag in the fridge. The cucumber will look, feel, and taste perfect even after a week.
Incredibly, the paper towel trick works even on the cut end of a cucumber. That end won’t get slimy or soft, either, if it’s pressed against a paper towel. It’s a miracle of modern science.
(The paper towel trick also works on cut lettuce. You can even lay one across the top of one of those clear-plastic containers of grocery-store, ready-to-eat salad mixes to keep it from getting slimy.)
Restore crystallized honey
First of all, crystals forming in your bottle of honey doesn’t mean it’s gone bad; it’s not like a battery or something. Crystallization is normal—so normal that honey crystallizes in the beehive if the weather gets chilly.
The crystals represent the separation of the two kinds of sugar that make up honey: glucose and fructose. The speed of crystallization depends on the container (glass bottles = slower crystallizing), the temperature of the cabinet (cooler temperatures speed up crystals), and whether the honey has been filtered (which reduces the likelihood of crystallization).
In any case, putting it all back together again is as simple as heating the honey. You can do that either in the microwave (try 15 seconds for the first round) or by putting the honey bottle into hot water for a few minutes.
Once the honey cools, though, it will recrystallize. And after several cycles of heating/cooling, the honey will start to lose its flavor and scent. So the best technique is to heat only as much as you need—or to learn to like crystallized honey.
Yes, some people prefer their honey crystallized; it tastes good, and it doesn’t drip. Worldwide, in fact, more people buy factory-crystallized honey (in forms called creamed, spun, whipped, or churned) than runny honey.
Buy these containers and praise the gods of science
In general, this book tiptoes very carefully to avoid telling you what to buy. It’s a book of wisdom, not endorsements.
But these, you should buy. Your life will change profoundly.
They’re glass bowls with airtight lids; you get various sizes in a set. You can microwave in these bowls, serve in them, freeze in them—and, above all, store the leftovers in them. In other words, after a meal, you have one bowl to wash instead of three or four.
The leftovers thing is the best. You don’t have to use any landfill-clogging plastic wrap, since the lids are airtight—and you can see what’s in these bowls as they sit on your fridge shelf. They stack beautifully in there, too.
There are many brands: Anchor, Pyrex, Snaplock, Kinetic, Rubbermaid. All of them can go from freezer to oven to table to dishwasher in one dish.
Every cook should be issued a set of these bowls.