From classical times at the eastern end of the Mediterranean, the Dardanelles, which lead through the Sea of Marmara to the Bosporus to what, at that time, was the Turkish capital Constantinople, have been the crossroads between Asia and Europe. Invading armies and ideas have crossed this narrow stretch of water, determining the fate of nations from ancient times. The area has always had great strategic importance, as it controls the only entrance into the Black Sea. From the time when the fabled city of Troy was built on its southern shore over three millennia ago, to Allied attempts to force the straits in the First World War, the Dardanelles have been constantly fought over.
In August 1914 the two German cruisers Goeben and Breslau, eluding the pursuit of Admiral Troubridge’s squadron, found sanctuary in the Dardanelles, where the Turkish Government allowed them free, unchallenged passage through the Sea of Marmara to Constantinople.
At this stage of the war Turkey was uncommitted and neutral and, under the existing international agreements concerning the passage of war vessels between the Black Sea and the Mediterranean, they should have refused them entry. Instead, the Turkish Government, in the shape of two soldiers of fortune Enver Pasha and Talaat Bey, had decided to throw in their lot with the German Empire and arranged the purchase of the two cruisers.
Germany had for some years been establishing a relationship with the Ottoman Empire, supplying military advisors and weapons, as they saw the Turks as a possible future ally against Russian expansion. Turkey had for years been considered the sick man of Europe and was to all intents and purposes bankrupt, so the purchase was worth no more than the paper it was written on.
Following the capture by the Royal Navy of a Turkish torpedo boat in September in Turkish waters, the Turkish Government closed the Dardanelles to all foreign shipping on 1 October 1914, in contravention of international agreements. This was followed by a violent anti-British campaign in the press engendered by British actions and for the earlier seizure by the British Government of two battleships being built in Britain for the Ottoman Empire.
In response to these provocative actions, a part of the British Mediterranean fleet under the command of Admiral Sackville Carden was concentrated at the island of Tendos at the mouth of the Strait on 27 October.
From the Turkish point of view, the acquisition of the German ships was a timely addition to their navy – replacements for those seized in British yards, the Rashadiea of 23,000 tons and the Sultan Osman I, a huge 27,000-ton warship mounting fourteen 12in guns, at that time the most powerful battleship in the world.
As part of the sale agreement of the German ships, the German crews under their commander Rear Admiral Wilhelm Souchon were in effect transferred to the Turkish Navy, which suited German plans relative to compromising Russian naval strength in the Black Sea.
The German crews adopted the fez headgear but were otherwise in all but name a German squadron based in the Black Sea.
Britain and France immediately imposed a blockade on the Dardanelles to ensure that the two cruisers did not emerge again into the Mediterranean and were for the time being satisfied that two dangerous German warships were isolated in the Black Sea out of harm’s way.
The possession of the two ships, renamed Yavuz Sultan Selim and Midilli, completely changed the situation in the Black Sea, where the Russian fleet based at Sevastopol had no ships that could match the two ex-German cruisers in gun power.
On 28 October the Ottoman fleet led by the Yavuz Sultan Selim raided the Russian harbours of Sevastopol and Odessa, where despite some small success sinking two small gunboats, the Russian Black Sea fleet was still left intact. Russia declared war on the Ottoman Empire on 2 November 1914, with Great Britain following suit on 6 November.
On 3 November the fleet at Tendos weighed anchor and sailed to the mouth of the Dardanelles where the battle-cruisers Indefatigable and Indomitable, together with the French battleships Verité and Suffren, laid down a 10-minute fire on the outer forts, with two objectives in view: first to demonstrate British naval power and secondly to determine the range and arcs of fire of the Turkish guns.
Lacking any form of air reconnaissance during the operation, the British fleet commander Admiral Carden was unaware of the severity of the damage that short bombardment had inflicted on the forts. Although one lucky shot hit a magazine in the Sedd el Bahr fortress, causing great damage, this was not to be repeated in later attacks, due to the flat trajectories of the naval gunfire, where the short range militated against plunging shellfire that would have better suited the purpose.
This premature attack only alerted the Turks to British intention and allowed them to strengthen what were already formidable coastal defences on the Gallipoli peninsula.
As far back as 1906 the British General staff had discussed the possibility of forcing the Straits by a combined military and naval operation in the event of war with Turkey, but had come to the conclusion that such an adventure would be extremely costly both in ships and difficult for the Army to gain a foothold due to the extensive fortifications, and should be avoided as a policy, and so it was later to prove.
However, one Cabinet member, Winston Churchill, at that time still First Lord of the Admiralty as early as September 1914, proposed to Prime Minister Herbert Asquith the setting up of a second front to break the stalemate that had already begun to develop with the start of static trench warfare on the Western Front. He also saw such a demonstration as a way of diverting the Turks from attacking Egypt and seizing the all-important Suez Canal. The canal was the gateway to India and vitally important for trade and bringing Empire troops from India, Australia and New Zealand to the battlefields of France and the Middle East.
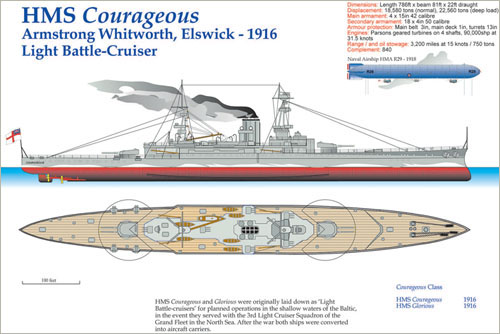
Initially, plans to open two new fronts were proposed for consideration, with Admiral Fisher devising a scheme for a naval attack to land troops on the German coastline in the Frisian Islands, and even had the special light draught battle-cruisers HMS Courageous, HMS Glorious, HMS Furious and other vessels laid down for the purpose.
This scheme was considered by the War Council to be too risky and wisely was taken no further. However, Winston Churchill’s plan to launch a purely naval attack on the Dardanelles was accepted with the intention of forcing the Strait and entering the Black Sea, where it was naively expected that the appearance of a combined British and French fleet off Constantinople would persuade the Turks to surrender.
Churchill and Admiral Fisher disagreed about the form such an action should take, with Fisher putting forward his contention that a purely naval attack would fail and would have to be supported by a military action with the landing of troops on the Gallipoli peninsula and advancing on Constantinople.
In January 1915 Churchill requested the commander of the Royal Navy’s Mediterranean Fleet, Vice-Admiral S. Carden, to produce a plan for forcing the Strait, employing battleships, submarines and minesweepers. On 13 January the Government War Council approved the plan. A fleet was put together comprising two modern pre-dreadnought battleships HMS Lord Nelson and HMS Agamemnon, armed with 12in and 9.2in guns, and ten pre-dreadnought battleships, HMS Ocean, HMS Albion, HMS Vengeance, HMS Majestic, HMS Prince George, HMS Canopus, HMS Irresistible and HMS Cornwallis, all with four 12in guns, together with HMS Swiftsure and HMS Triumph with four 10in guns apiece.
Also included were the new super-dreadnought Queen Elizabeth with eight 15in guns, the battle-cruiser Inflexible, minesweepers and other small craft, together with a French squadron of four pre-dreadnoughts (Suffren, Charlemagne, St Louis and Gaulois, all armed with 12in guns) and a Russian cruiser.
On 19 February Admiral Carden led ten battleships into action against the outer forts. The Cornwallis and Vengeance opened fire at 12,000yd on the Orkanie fort, with the remaining ships firing from 8,000yd. However, it soon became evident that the ships needed to be anchored as the gunners were experiencing great difficulty in spotting the fall of shot on the flat, featureless landscape, where only a direct hit on a gun position or a magazine could knock it out.
After 8 hours of bombardment in which only 140 shells had been fired and with little to show for their efforts and with the forts left largely undamaged the fleet withdrew.
The next day a further bombardment took place that had better results, as other ships had been stationed on the flanks of the battleships to accurately record fall of shot.
Among the ships was the new Queen Elizabeth, whose 15in guns with only eighteen rounds quickly destroyed two large guns at Cape Helles, while the older Irresistible firing thirty-five 12in rounds destroyed the fort at Orkanie.
In the afternoon, the battleships moved closer inshore, bringing their secondary armament into play, silencing all the outer forts. Landing-parties of marines were put ashore at Kum Kale and Orkanie, spending two days ashore placing demolition charges in the forts and destroying fifty guns. At the same time the minesweepers were able to clear several of the layers of minefields the Turks had laid in the entrance to the Strait.
The inner defences proved harder to deal with where the Straits widen out above Seddulbahir, the range being too great for accurate firing. For the first time the Allied warships became targets for the mobile batteries, which included 6in howitzers, positioned on either shoreline.
Between 2 and 8 March, three more bombardments took place that proved ineffective. The Queen Elizabeth, firing indirectly over the Gallipoli peninsula at 14,000yd range, was hit seventeen times by the mobile artillery and only managed to fire at a rate of one round per hour due to spotting problems, while throughout the conflict no guns were put out of action in the forts.
The Queen Elizabeth came under fire from an unexpected source when, while firing on Fort Chemenlik on the Asiatic shore, the Turks brought up the old pre-dreadnought Hayreddin Barbarossa, the ex-German Kurfurst Friedrich Wilhelm built in 1894. A great advantage of the old ship was that her 11in guns had an elevation of 25° and her first three rounds landed near the British ship, causing her to move out to sea an additional 1,000yd, as it was assumed due to the plunging trajectory that the shells had come from onshore howitzers.
The Queen Elizabeth identified and destroyed the spotting position, but soon found herself under plunging shell fire, with the Hayreddin Barbarossa hitting the battleship with three shells on her armoured belt below the waterline.
As the deck armour of ships of the period was not designed to withstand plunging fire, it was possible that the old Turkish battleship could seriously damage or even sink a modern dreadnought fresh from the shipyard. The Admiralty belatedly decided that the Queen Elizabeth was too valuable to be risked in such a dangerous situation and, additionally, they were reluctant to use too many of the 15in shells until the stocks had been built up. They insisted that she be recalled to serve with the Grand Fleet, but not before she was employed in a final attempt to break through to the Narrows.
On the night of 13 March the cruiser Amethyst led six minesweepers into the Strait in an attempt to clear the mines, when four of the trawlers were hit by shell fire and the Amethyst was also damaged.
Unbeknown to the Allies, earlier on the night of 8 March the Turkish minelayer Nusret had laid mines in Eren Koy Bay on the Asian shore. The Turks had observed that the Allied ships made a turn to starboard as they withdrew from the wide bay, and accordingly sowed a line of twenty-five mines parallel to the southern shore at intervals of 100yd and a depth of 15ft.
Admiral Carden planned a massive sweep using all eighteen battleships that was to silence the guns that protected the five lines of minefields stretched across the bay. The attack was to be accompanied by thirty mine sweepers that in reality were fishing trawlers manned by civilian crews tasked to clear the minefields once and for all.
Unfortunately, before the operation could begin Admiral Carden suffered a nervous breakdown – his place was taken by his second in command, Vice-Admiral de Robeck.
In brilliant sunshine on 18 March and perfect visibility the fleet stood in towards the Narrows, with the ships arranged in five lines as shown:
| Line A | Queen Elizabeth – Agamemnon – Lord Nelson – Inflexible(D) |
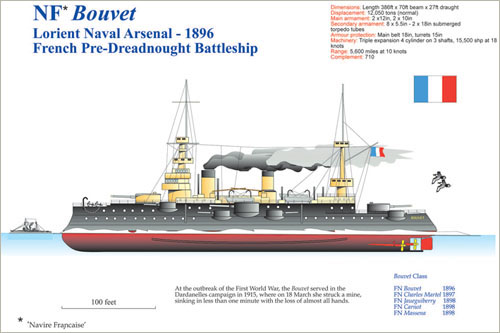
| Line B (French) | Gaulois(D) – Charlemagne – Bouvet(S) – Suffren(D) |
| Line B (British) | Vengeance – Irresistible(S) – Albion – Ocean(S) |
| Line C | Majestic – Prince George – Swiftsure – Triumph |
| Reserve line | Canopus – Cornwallis |
| Key: (D) Damaged (S) Sunk |
The Queen Elizabeth was the first to open fire, followed by the others in the first line and the second French line from Eren Koy Bay at 11.00 a.m.
After 2 hours of heavy naval gunfire the Turkish batteries were still largely intact. Although their fire had been reduced, it was still accurate, with the Gaulois, Suffren, Agamemnon and Inflexible all taking damaging hits.
At 1:25 p.m., with most of the Ottoman batteries now silenced, Vice-Admiral de Robeck decided to withdraw the French line and bring up the British Line C, plus the Swiftsure and Triumph.
Around 1:50 p.m., as the French ships led by the Suffren began to swing round in a wide turn to starboard towards Kum Kale heading for the open sea, the second ship in the line, the Bouvet, struck one of the mines laid by the Nusret ten days before. Her companions watched horrified as an enormous explosion followed, and within a matter of 30 seconds, with the ship still going ahead, she capsized and sank, taking 600 of her crew to the bottom.
Despite this setback, the fleet continued the bombardment until 2 hours later when the Inflexible also struck a mine in the same area as she was withdrawing, but although she took on many tons of water, her captain nursed her back to Tendos where she was beached while temporary repairs were effected.
A further disaster occurred when the Irresistible was also mined and began to drift towards the shore under heavy fire from the coastal batteries.
Vice-Admiral de Robeck ordered Ocean to take her in tow, but her captain considered the water too shallow, and after standing off the derelict ship was herself mined, jamming her steering gear and both ships drifted off up the Straits under heavy fire as efforts were made to rescue the crews.
In the face of these losses, de Robeck ordered the fleet to withdraw, while after dark Commodore Keyes took a destroyer into the Strait to look for the two battleships, but after searching for several hours concluded that both the Irresistible and Ocean had sunk.
The battle of 18 March 1915 was a great victory for the Ottoman Empire and demonstrated the folly of attempting a naval action in enclosed waters against fixed defences without military support onshore. For the loss of 118 Turkish casualties they had sunk three battleships, severely damaged a battle-cruiser by mine and inflicted over 800 casualties on the combined fleet.
The catastrophic losses of three Allied capital ships in a single afternoon – while a shock to the commander Admiral de Robeck, as he saw himself responsible for the most serious loss suffered by the Royal Navy since Trafalgar – had been anticipated by Churchill, who regarded such losses as a necessary sacrifice to achieve the breakthrough. Indeed, he regarded the old battleships as expendable gun platforms that could easily be replaced and even described them as useless for any other purpose.
This, quite apart from Churchill’s apparent lack of concern for the lives of the crews of these ships, could also be considered a harsh opinion of the fighting capabilities of these older pre-dreadnoughts, which were placed in a situation, under the guns of shore based batteries at close range, and sailing into areas of intensively sown minefields, which any warship would be lucky to survive. It says more about the poor strategic and tactical decision making of those planning such campaigns.
Although outdated by the introduction of the dreadnought and their increasingly demonstrated vulnerability to mine and torpedo, where eleven British pre-dreadnoughts were lost during the war as opposed to only two dreadnoughts, they were still powerful ships in their own right and, properly employed in conditions that suited their vulnerability, they gave useful service throughout the war on convoy duty, as guard ships, harbour protection and on coastal bombardment work.
With the launching of the Majestic, designed by Sir William White in 1895, battleship design achieved a uniformity of layout that was to persist until the launch of the Dreadnought in 1906, with two funnels arranged side by side and two 12in guns mounted in barbettes at either end of a central armoured citadel, displacing 14,000 tons and capable of 17.5 knots. These nine ships were the oldest pre-dreadnoughts employed in the war.
From 1900 to 1904 a further twenty battleships were laid down that were generally similar in layout and armament, but with their two funnels set behind each other fore and aft. The Albion was typical of this class of ship. Laid down in 1899 at the Thames Ironworks at Blackwall and commissioned in 1901, she was of 12,950 tons’ displacement, 430ft in length with a beam of 75ft. Her triple expansion four cylinder engines produced 13,500hp on two shafts giving a speed of 18 knots and sufficient coal stowage for a range of 5,600 miles at 10 knots.
Her main armament was four 12in 35 calibre Mk IX guns, which at an elevation of 15°, had a range of 15,000yd, firing a 850lb armour-piercing shell at a muzzle velocity of 2,400fp. Secondary armament consisted of twelve 6in Mk VII 45 calibre guns, firing a 100lb shell with a range of 14,000yd and four 18in submerged torpedo tubes. With a complement of 810, these ships served in all theatres, with eight ships of the King Edward VII class forming the 3rd Battle Squadron of the Grand Fleet at the outbreak of war in 1914 until replaced by modern dreadnoughts.
Also under the command of the Commander-in-Chief was the Channel Fleet, or Second Fleet, comprising the 5th and 6th Battle Squadrons of fourteen pre-dreadnought battleships and the reserve fleet – the 7th and 8th Battle Squadrons containing twelve of the oldest ships.
Two other ships present at the Dardanelles were the Agamemnon and her sister ship Lord Nelson, which had been designed by Sir Philip Watts, who had succeeded Sir William White as Chief Constructor to the Royal Navy in 1902. While excellent ships, as they were completed after the launch of the Dreadnought, they had the misfortune to be obsolete before they were built. Watts believed that, with the development of the torpedo boat and the increased range of engagement, a more heavily armed type of battleship was required, and these two ships could be seen as proto-dreadnoughts. They were of 16,500 tons and represented the last expression of the pre-dreadnought design.
Like the preceding ships, the main armament comprised four 12in Mark IX 50 calibre guns, but in these ships the 6in secondary batteries were replaced with ten 9.2in Mark XI 50 calibre guns mounted in four two-gun turrets on the beam at each end of the citadel and two single-gun turrets amidships. They also carried five 18in submerged torpedo tubes and were the first to carry a single distinctive tripod mast on her mainmast.
Armour protection consisted of a 12in belt tapering to 4in at either end or 12in on the turret, and 1in deck armour. With a length of 443ft and a beam of 79ft, the four-cylinder triple expansion engines, the last to be used in British battleships, were of 17,000hp that imparted a speed of 18.5 knots. With a crew of 780, these two ships were fine sea boats and very manoeuvrable, having a small tactical diameter.
Agamemnon had the distinction of shooting down a Zeppelin in Salonika in 1915 and after the war was used as a radio-controlled target.
At this distance in time, it seems incredible that the combined military minds of Great Britain and France, with the example of what was already taking place on the battlefields of Flanders, should propose to attempt to force the straits solely by warships, without a supporting land assault by troops. It was naively expected that once the combined British and French fleet arrived off the Golden Horn that the Ottomans would tamely surrender.
Perhaps it is as well that they never succeeded at the first attempt, as the thought of the assembled might of two Allied nations trapped, as indeed they would have been within 24 hours in the Black Sea, would have handed a huge propaganda victory to the Central Powers.
As it was, the British Secretary of State for War appointed General Sir Ian Hamilton to command the combined Mediterranean Expeditionary Force to undertake the landings on the Gallipoli peninsula.
This force comprised, along with British troops of the 29th Division, Australian and New Zealand infantry stationed in Egypt where they were training prior to being sent to the Western Front. Also present were the Royal Naval Division and the French Oriental Expeditionary Force that included four battalions of Senegalese colonial troops. Unfortunately, due to the delay between the cessation of the naval attacks and the start of the land campaign, a period of over four weeks, this allowed the Ottoman forces sufficient time to defend the peninsula in depth and to replace the guns that had been destroyed in the forts during the naval bombardment.
The Turkish forces were under the joint command of Mustafa Kemal and the German military advisor to the Ottoman Empire Otto Liman von Sanders, both of whom were extremely experienced and capable soldiers.
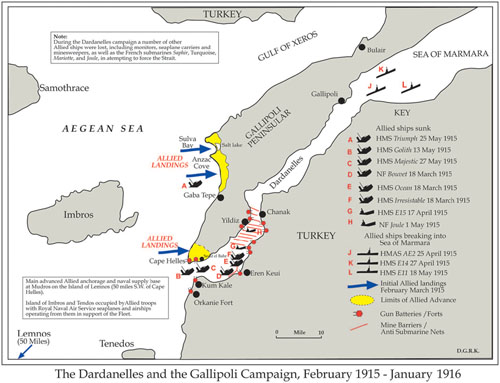
The land invasion commenced on 25 April 1915, with the British 29th Division landing at Cape Helles at the tip of the Gallipoli peninsula. The Anzacs were put ashore at Gaba Tepe, or Anzac Cove as it became known, on the Aegean coastline, where they planned to advance across the peninsula. Meanwhile, the French made a diversionary landing at Kum Kale on the Asian shoreline before re-embarking to reinforce the British sector at Hellas.
These initial landings met little resistance and, had they been quickly followed up with a determined advance, much of the peninsula could have been secured, allowing British warships to enter the Strait in greater safety.
As it was, this was not to be the case as by the following day Turkish troop reinforcements swept down the peninsula to halt any further advances by the Allies. The force of Allied battleships based at Mudros on the island of Lemnos 50 miles to the south-west provided covering fire for the landing of troops, pouring an accurate fire into the Turkish trenches. Accuracy was achieved by the troops onshore correcting the fall of shot, and on occasion spotting was carried out from aeroplanes carrying wireless sets launched from the seaplane carrier HMS Ark Royal, a converted collier of 7,450 tons that carried ten seaplanes in her hold.
At Cape Hellas on V beach, the Royal Munster Fusiliers and the Hampshire Regiment were landed under heavy fire from the collier SS River Clyde with appalling losses.
From then on, for the next eight months, the battle for control of the Gallipoli peninsula raged, with a constant round of attack and counter attack which left the Allied forces confined to the narrow beach areas they had first seized. Despite enormous losses, they were unable to make a breakthrough.
On the night of 12–13 May, a Turkish torpedo boat Muavenet-i Milliye steamed unseen slowly down the Strait into Morto Bay off Cape Helles and fired two torpedoes at HMS Goliath, striking her amidships under the funnels.
Following a tremendous explosion, the Goliath began to settle when a third torpedo struck her under the aft gun turret and she rolled over on her beam ends, rapidly sinking and taking 570 of her crew of 700 to the bottom. The Turkish torpedo boat, although fired on, managed to escape in the confusion.
On land, a constant war of attrition was fought under appalling conditions, with the opposing entrenchments often within a few score yards of each other. The searing summer heat, combined with non-existent sanitation and the uncollected corpses putrefying in the sun, were the cause of dysentery and other diseases that were to flourish in the summer, while interminable rain and frostbite made the winter months miserable. By August, and following the failure of the Allied offensive, the land campaign had ground to a halt and the question of evacuation was raised in Paris and London on 11 October 1915, which was strongly rejected by Sir Ian Hamilton who, like many of those responsible, was fearful of the damage to British prestige that a withdrawal would evoke.
The War Council, however, voted in favour of evacuation and dismissed General Hamilton, replacing him with General Sir Charles Monro, who oversaw the withdrawal. The evacuation of the army can be considered the sole success of the campaign, with the last troops departing the beaches on 20 December 1915.
The evacuation in winter rain and snow was expected to incur heavy casualties, but thanks to a steady reduction of the ranks, with large numbers of troops being taken off in the preceding days and the use of self-firing rifles that gave the impression that the Allied trenches were still manned, fourteen divisions of infantry and artillery were successfully spirited off the bloody beaches for the cost of only two wounded.
During the ill-starred campaign, 44,000 British and French troops had been killed, together with 10,000 Anzacs, while the Ottoman forces lost 86,000 dead. Of those responsible for the planning of the operation Lord Kitchener’s reputation only suffered to a small degree as he was such a popular figure, while Churchill was demoted from First Lord of the Admiralty to a minor post until he resigned at the end of the year to command an infantry regiment on the Western Front.
The losses in capital ships incurred during the first 2 months of the campaign were the British battleships Ocean and Irresistible, the French battleship Bouvet on 18 March, followed in May by the British ships Goliath, Triumph and Majestic. These seemingly unacceptable losses were considered on the contrary by Churchill and the War Cabinet to be perfectly acceptable, as Churchill’s view was that they were old and useless and fit for nothing else.
None of this could conceal the truth that Great Britain had suffered the greatest loss of capital ships since Nelson’s day.
In September, in response to the failure of the land campaign, Admiral de Robeck put forward another plan for a further naval assault on the narrows to clear the minefields with better equipped minesweepers. The plan was supported by Churchill, but strongly opposed by Fisher, as he feared that more of the ships of the Grand Fleet would be frittered away on what was patently a lost cause.
Admiral Sir Roger Keyes, still a great supporter of aggressive naval action as a way to secure the Straits and capture Constantinople, presented more detailed plans to the War Council in conjunction with Admiral de Robeck to sweep the mines and enter the Sea of Marmara, while Lord Kitchener proposed a landing on the isthmus of Buldair with 40,000 infantry, capturing the entire peninsula that would allow Allied ships into the Sea of Marmara unchallenged.
With the entry of Bulgaria into the war on the side of the Central Powers in October 1914, the Ottoman Empire now had a direct supply line to their German allies and the defences on the peninsular were rapidly strengthened still further, making the chances of success in the land campaign an even more remote possibility.
If the Allies were unable to force the Strait with surface ships, the submarine, in theory, offered a better chance of success. Even before the campaign had started, the old British submarine B11 had worked her way past five consecutive minefields to torpedo the old Turkish battleship Mesudiye that dated from 1874 in Sari Sighlar Bay, where it was moored as a floating battery.
The sinking was rightly seen as a major success for the Royal Navy and her captain Lieutenant Commander N. Holbrook was awarded the first naval Victoria Cross of the war.
This early success by submarine combined with the initial seemingly successful bombardment of the outer forts on 3 November was key to encouraging the adoption of the original plan to force the Strait by naval forces alone.
The French submarine Saphir was the next Allied submarine to work her way through the ten mine barriers that stretched across the narrows, where she ran aground at Nagara Point after coming under fire from shore batteries and was scuttled by her crew, with fourteen dead and thirteen taken prisoners of war.
On the next British attempt on 17 April the E15 was caught in unsuspected underwater currents and she ran aground in Sari Siglar Bay under the guns of the Dardanos battery, where she came under heavy fire that resulted in the death of her captain Lieutenant-Commander Theodore Brodie.
The Turks made strenuous efforts to capture the boat, but were frustrated in this when the remaining crew exploded a torpedo that wrecked the interior of the submarine before surrendering.
The Australian submarine AE2 was the first to succeed in passing through the Strait on the night of 24–25 April 1915 under the command of Lieutenant Commander Henry Stoker.
The AE2 attacked the Turkish light cruiser Plykisrvket, badly damaging her, but due to defective torpedoes failed to sink her other targets. The AE2’s luck finally ran out in Artaki Bay on 29 April when she was shelled by a Turkish torpedo boat and sank, with the crew abandoning her as she settled, where they, too, became prisoners of war.
Undeterred by the fate of the earlier attempts, on 27 April 1915, Lieutenant Commander Edward Boyle broke through into the Sea of Marmara in his boat E14, where, in a three-week campaign, he and his crew sank a gunboat and a minelayer and several thousand tons of assorted small steamers. Although the tonnage sunk was small, the effect on Turkish morale of having an enemy submarine at large in the Sea of Marmara was a powerful propaganda coup for the Allies.
On the return to Murdos of the E14, Lieutenant Commander Boyle was awarded the Victoria Cross. Under Boyle the E14 made two further incursions into the Sea of Marmara where he sank further ships and, more importantly, disrupted coast-wise traffic for weeks at a time.
Perhaps the most successful British submarine commander in the Great War was Lieutenant Commander Martin Nasmith. His boat, the E11, was the standard type employed during the First World War.
Some sixty E class boats were built. With a surface displacement of 660 tons and armed with five torpedo tubes and a 12pdr gun, and with a range of 3,000 nautical miles carrying a crew of thirty, they proved to be Britain’s most handy and effective submarines.
The E11 had already seen service in the Baltic at the beginning of the war and had taken part in the Cuxhaven raid on Christmas Day 1914. The E11 passed through the Strait and entered the Sea of Marmara on the night of 18 May 1914. On surfacing, Nasmith captured a trading schooner, which he lashed to the submarine’s conning tower as a decoy to allow the submarine to approach other Turkish ships unseen. However, after several days without attracting any targets, he set the boat adrift. On 23 May he sank a gunboat and a minelayer, while on the 24th near the port of Tekirdag E11 attacked and sank an ammunition ship after the crew had taken to the boats.
Going closer inshore, Nasmith sank a troop transport and forced a second aground by gunfire. He was so close to shore that he was attacked by a Turkish cavalry squadron, to which he replied with his deck gun.
The day of 25 May brought the E11 into the waters off Constantinople, with the intention of seeking out the two ex-German warships Goeben and Breslau. Brazenly surfacing off the Golden Horn 1 hour after midday, Nasmith found instead a troop transport, the Stamboul, which he attacked within sight of the Turkish capital, hitting her with a torpedo but failing to sink her, as the damaged ship was beached, after which the E11 came under sustained fire from shore-based artillery, causing Nasmith to submerge and escape back into the Sea of Marmara.
However, the very appearance of a British submarine, the first enemy warship in over one hundred years to attack Constantinople, was a tremendous blow to Turkish morale, causing great panic within all sections of the city.
The E11 returned into the Bosphorus again on 27 May, sinking in total eleven ships before heading back through the Dardanelles to re-arm and refit on 5 June, where on the way he torpedoed another troop transport, before joining the fleet at Murdos. On arrival, Nasmith learnt that for his actions he had been awarded the Victoria Cross, the third naval recipient of the honour in the campaign.
As a new British landing was under way at Suvla Bay, on 8 August as the E11 again prepared to enter the Strait, she sighted the Turkish battleship Hayreddin Barbarossa, which she sank with a salvo of two torpedoes, then again appearing before Constantinople and repeating her earlier success by sinking still more ships.
The E11 made three sallies into the Sea of Marmara and the Black Sea, where she sank a total of twenty-seven steam vessels and over fifty-eight smaller sailing ships, while in a cloak and dagger operation the E11 first officer Lieutenant Guy D’Oyly-Hughes was put ashore to blow up a bridge and culvert on part of the Constantinople railway line, earning him the Distinguished Service Order.
In other operations on 1 May the French submarine Joule attempted to enter the Strait, but struck a mine with the loss of all on board. A second French effort on 27 July by the Mariotte also failed when she became entangled in anti-submarine nets and was forced to surface, where it was shelled by shore batteries, forcing her commander to scuttle his boat before accepting captivity to prevent it falling into Ottoman hands.
The French submarine Turquoise managed to enter the Sea of Marmara on 30 October, but unfortunately ran aground and was captured intact before her captain could scuttle her. Along with the crew, who were taken prisoner, documents were discovered with details of British plans and of a proposed rendezvous with a British submarine, the E20, on 6 November; a rendezvous which was instead kept by a German U-boat, the U14, which torpedoed and sank the unsuspecting British boat.
The Allied submarine offensive was the most successful aspect of the entire Gallipoli campaign, and indeed the only success. Over the period April 1914 to January 1915, nine British submarines sank two battleships, one destroyer, two minelayers, five gunboats, nine troop transports, thirty-five steam ships and 180 other craft, for the loss of eight Allied submarines.