The Gamble master bedroom game table with more visual weight. David B. Gamble House, 1908-09. Courtesy of the Gamble House.
Chapter 7
The Waterfall Leg
The Greenes (most likely Charles) maintained complete control over even the smallest of details in a design. Even a minor component such as the waterfall leg had a purpose beyond its first impression. Nothing was superfluous. Everything had a reason and was fine-tuned to its specific situation. Their artistic vision for a design was complete, with virtually no loose ends. In other words, every detail in a piece of furniture worked in complete harmony to support the design as a whole. Every element had its own measured contribution to the common good. There were no freeloaders! This did not happen with a few select designs; it permeated almost everything they did.
The Greenes employed an infinite number of design elements, such as the waterfall detail, in their work. Sometimes the ideas were original and other times they were borrowed. But they did not simply copy and paste a borrowed idea. They not only infused it with G&G DNA, but each specific use was given careful consideration. Context was central to even the smallest of details.
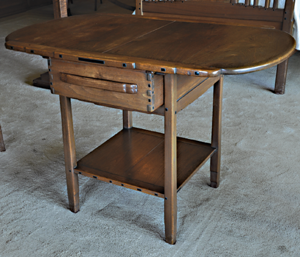
From my viewpoint, there are many classic end-of-leg design features that either amplify or diminish the overall weight of a piece. Tapering the two inside faces at the bottom of a leg, as is seen in the waterfall detail, is a classic trick used to contain and transfer the visual weight of a design to the point of contact with the floor (point of gravity). The Greenes used this device in at least a couple of incarnations, but with the Gamble house master bedroom it reached its full assimilation into the family of Greene & Greene. Here the detail was genetically re-engineered and given a new life. Instead of a simple straight taper line, the Greenes added a couple of gentle uneven soft steps. It was not just simply re-engineered and then replicated—it was adapted for each specific situation.
The Gamble master bedroom game table with more visual weight. David B. Gamble House, 1908-09. Courtesy of the Gamble House.
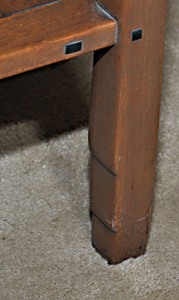
The game table’s waterfall detail with the longer first step. David B. Gamble House, 1908-09. Courtesy of the Gamble House.
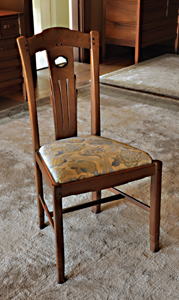
The side chair from the Gamble House (1908) master bedroom had less visual weight than the game table. David B. Gamble House, 1908-09. Courtesy of the Gamble House.
I love to work out analogies in my head to explain designs. These ideas are entirely my own musings and I do not want to suggest that I have by some means “channeled” the mind of Charles Greene. I wish I could!
One of my favorite analogies involves the treatment of visual weight and strength. These two facets of design—weight and strength—are symbiotic and play parallel functions within my analogy. When weight is increased, additional strength is needed for support. When strength is amplified, the apparent weight of the design increases. Strength and weight can also be seen as, masculine equals heavy and strong while feminine is analogous to lighter and more delicate. For the purpose of simplification, though, I generally only use the term “visual weight.”
In my last book, I described another bottom of the leg treatment, the “Blacker leg indent.” In that case, I asked my readers to imagine the visual weight of the piece pushing down on and residing in the very bottom portion of the leg, past the indent. In the case of the waterfall detail, although it’s still visual weight at play, the scenario works out a bit differently. Instead of containing the weight of the piece, the waterfall serves to transfer and dissipate the visual weight to the floor.
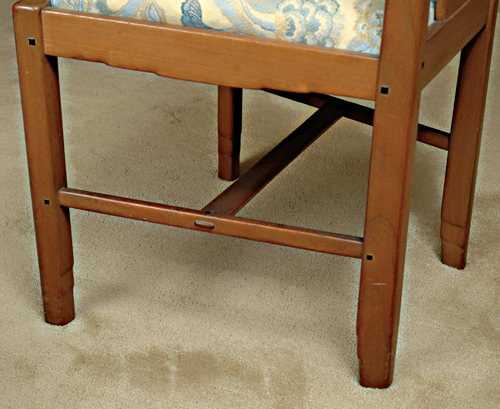
The side chair had a shorter first step than the game table. David B. Gamble House, 1908-09. Courtesy of the Gamble House.
Charles nuanced the detail to suit each particular use. It is not known what determining factors guided Charles Greene. It may or may not have been something parallel to my analogy. It may have been simply based on the overall length of the leg. We will never know. Nonetheless, I believe my visual weight theory serves to illustrate, at least in my mind, how the detail relates back to the overall design. I would encourage my readers to take the time to follow my analogy though. It may not work for you, but in going through the exercise you may gain an understanding that will aid in developing your own analogies.
There are two constants in the waterfall’s equation: the overall length and the lengths of each individual step. No matter what else is going on with the design, these things remain the same. The two individual steps were not equal in length though. One was unquestionably longer than the other. In the designs with more visual weight, such as the game table, the first step was the longest, and in those with less visual weight, such as the side chair, the steps were reversed. Please follow along as the analogy plays out. Picture for a moment if you will, the visual weight of the piece pushing down upon the lower legs. There is a given space in which to make all the weight transfer happen. But secondary to that, imagine that initially this weight transfer must be reduced to a manageable load before it engages the second and final step. The designs with more weight in play will require more space (length) initially to reduce the weight to that point of manageability. With this set of rules in place the more “weighty” designs will have the longer step first. And for the “less weighty” pieces the reverse is true.
Another piece in the room, the night table, features a reverse tapered leg with a “pointy” end at the bottom of the waterfall detail. I have no doubt there was a reason for the variations on this piece. Again, the real reason can only be answered by the Greenes (Charles). For this we would need a time machine, and for the present I find myself without one. So until then, we can only continue to speculate and form analogies and theories.
Laying Out the Templates
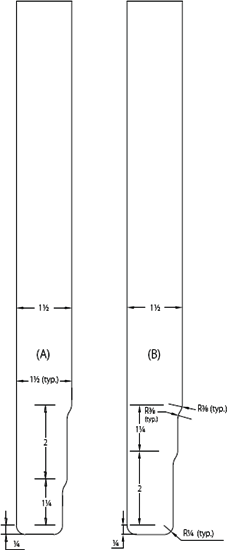
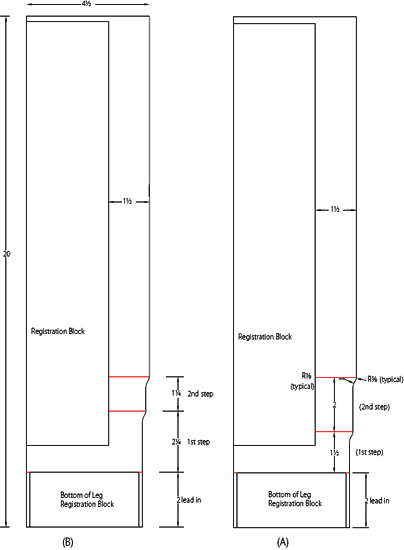
The waterfall detail is fairly simple to make. We will go through the process of making both versions: one with the short step on the bottom, labeled “(A)”, and one with the long step on the bottom, labeled “(B)”.
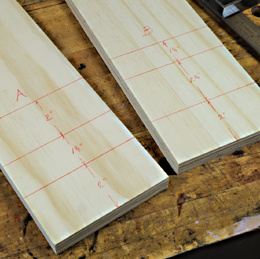
To start with, cut two pieces of ¾" good quality plywood to exactly 4½" wide by about 20" long. The 20" length will accommodate a 17" long leg and allows for a two-inch lead-in at the beginning of the template and a one-inch run-out at the end. If your leg is longer than 17", adjust the overall length accordingly. If you only plan on making one of the waterfall configurations, you will only need to cut out one piece of template stock.
A. Waterfall Leg Detail
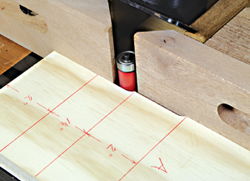
1. Lead-in and starting points for each step.

2. First offset the fence by 1⁄8".
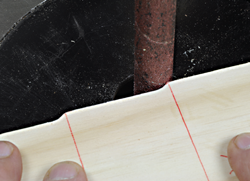
3. Run both pieces of template stock past the bit, up to the third line.
4. Re-adjust the infeed side to ¼" back from the outfeed side.
5. Run the stock again, this time stopping at the second line.
Referring to drawing B (page 79), draw the three lines that represent the lead-in and starting points for each step.
Note that the dimension for the first, lower, step also includes the ¼" round-over portion at the bottom of the leg.
Next, set the router table up with a ¾" (3⁄8" radius) straight bit. Offset the fence so the out-feed side is tangent with the bit and the in-feed side is set back from the out-feed side by exactly 1⁄8", then run both pieces of template stock past the bit, up to the third line. Now re-adjust the in-feed side so it is ¼" back from the out-feed side. Run the stock again, this time stopping at the second line. The stopping points of the two cuts have formed the needed 3⁄8" inside radius of both steps.
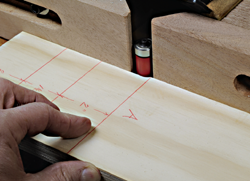
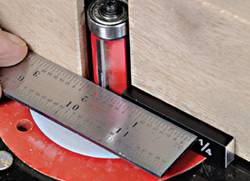
Next, draw the mating outside radius. Using any object with a 3⁄8" radius (Berol RapidDesign R-75 shown), connect tangentially the inside radius with the intersecting straight line. With a spindle sander, carefully eat away the material up to the pencil line. The lines are small and just for general reference. Be careful not to remove too much material—usually just a light touch is sufficient.

6. Draw the mating outside radius.
7. Sand up to the pencil line.
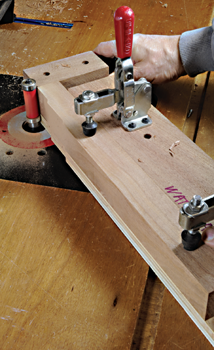
8. Flush the block to the back of the template.
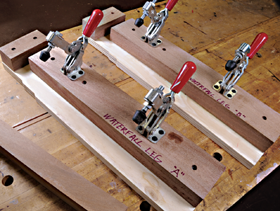
9. The finished routing templates.
Attaching the Registration Blocks to the Template
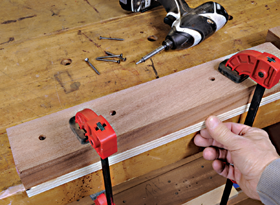
Before attaching the registration blocks, orient the template so that when facing up, the “steps” are on your right. This positions the jig to cut “downhill” rather than into the grain and reduces considerably the chances of blowout. Next, fasten a block to the “lead in” side of the first line (refer to drawing B). This block registers the bottom of the leg.
Now fasten a block that is about 1 ½" thick x exactly 3" wide x about 16" long to the template. Flushing the block to the back of the template should situate the block exactly 1 ½" back from the face edge of the template. The set back is critical, so adjust the block’s placement if necessary. Finish off by mounting two toggle clamps to the templates.
B. Waterfall Routing Templates
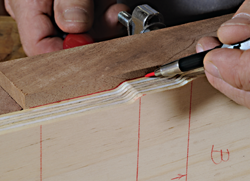
10. Register the leg stock in the template and trace the waterfall steps.
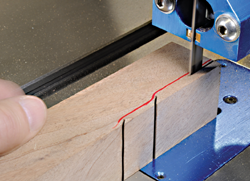
11. Band saw some of the excess material away.
12. Place the stock in the template and route the profile.
Machining the Leg
Machine the leg stock to 19⁄16" x 19⁄16" x (your needed length). The finished legs will be 1½" x 1½", but they are blanked out oversize to allow for a full profile cut, which ensures a smooth transition from the straight line to the routed steps. Now, set up the router table with a top bearing ¾" (3⁄8 radius) flush trim bit. Register the leg stock in the template and trace the waterfall steps, then, staying away from the line, bandsaw some of the excess material away. Clamp the stock back in the template and route the profile starting from the left (top of the leg) and ending the cut on the right (bottom of the leg). Rotate the stock 90 degrees counterclockwise and repeat the process to complete the routing.
Sanding and Shaping
A few key points to keep in mind before we start on the final round-over shaping and sanding. These concepts can be applied, with very few exceptions, to most any Greene & Greene shaping and softening applications. A round-over should present a seamless transition from the flat surface to the radiused edge. Viewing the round over from different light angles will highlight any discrepancies in the smooth transition. Progressing through the grits on the flat surfaces will slightly diminish the round-overs, making minor sanding/shaping corrections necessary. Be cautious however, to not sand/shape too aggressively. The final touches are best done with a very light touch, while paying close attention to how the sanding is affecting the shape.
13. Shape the perimeter of the bottom end of the leg.
14. Clean up the chatter left over from routing the steps.
15. Soften the round-over between the individual steps.
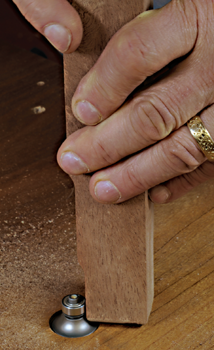
To begin the round-over process, set up a router table with a zero-clearance ¼" radius round over bit. Use this setup to shape the perimeter of the bottom end of the leg. Next, round-over all four edges down the length of the leg with a 1⁄8" radius bit. The back corner where the waterfall steps meet cannot be done with the router and will be sanded to shape later.
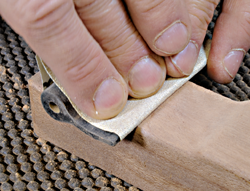
Starting with 120-grit sandpaper wrapped around a flexible sanding pad, clean up the chatter left over from routing the profile. Make sure to sand right up to and including the inside radius of the step. Continue on with the sanding pad, using a backward drawing motion to evenly sand and soften the outside radius of the step-down. Progress though the grits up to 220.
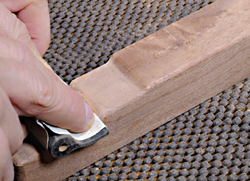
16. Sand and shape the ¼" round over at the bottom of the leg.

17. Draw down the corners of the round-over.
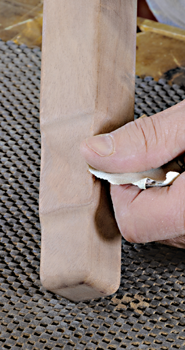
18. Shape an 1⁄8" radius on the sharp edge where the steps meet on the backside.
Sand the four long faces of the leg and their adjoining 1⁄8" radiuses. Error on the side of slightly enlarging the round-over rather than leaving it diminished. Now, starting with 120-grit sandpaper backed up by your thumb, use a flapping motion to sand and shape the ¼" round over at the bottom of the leg. Use the same flapping motion to draw down the corners of the round-over.
Again, starting with 120-grit, finish off the waterfall detail by shaping about a 1⁄8" radius on the sharp edge where the steps meet on the backside.
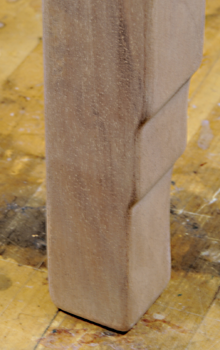
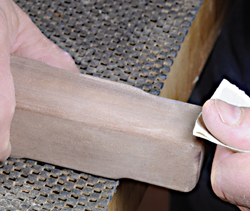
19. The waterfall leg detail in the “B” configuration.
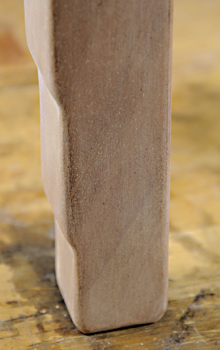
20. The waterfall leg detail in the “A” configuration.
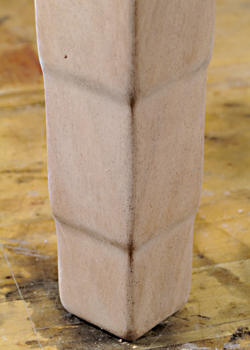
21. The detail changes character when seen from the backside.
The waterfall detail is deceptively simple. With just a bit of “tweaking,” the Greene’s adapted it to complement changes from one design to the next. Use it and adapt it, but give careful consideration to its specific use. As with any design element, context is all-important.