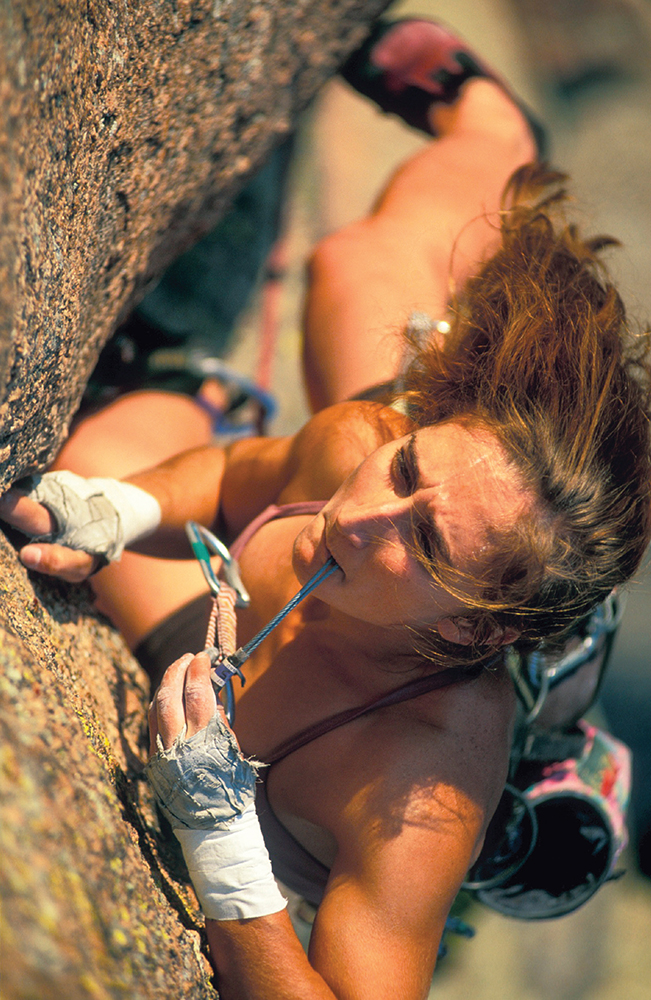
Silvia Luebben in the moment on Max Factor (5.11c), Vedauwoo, Wyoming

Silvia Luebben in the moment on Max Factor (5.11c), Vedauwoo, Wyoming
One of the bastions of traditional climbing, the Shawangunks in New York, was discovered for rock climbing by Fritz Wiessner in the 1930s. He soon opened a number of routes up to 5.7, a respectable difficulty given the era and the primitive gear. Modern Times is one of the classics, opened in the 1960s. It follows the typical horizontally banded quartz conglomerate, busting through big roofs on big holds.
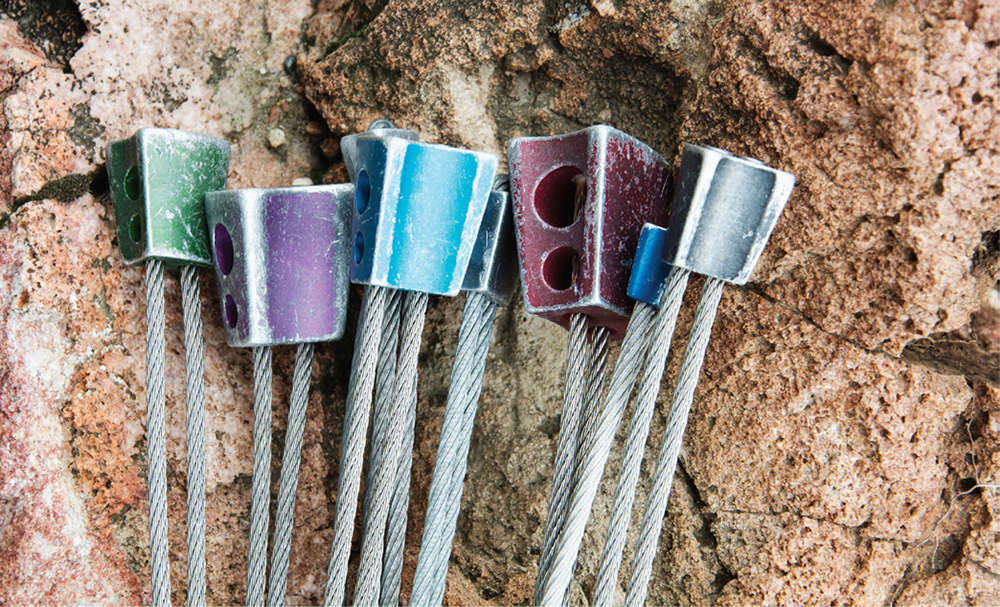
A well-used set of chocks always has some stories to tell.
You definitely want a good selection of cams on Modern Times; they work best when the horizontal cracks are parallel and when you need to set the gear quickly. But you’ll also carry wired nuts and possibly some Tricams or hexes. These provide bomber placements in spots where the cracks waver, where the horizontal cracks are lipped, and where regular cams don’t fit well or at all. They also work at the belay, so you can save the precious cams for the lead.
This chapter covers all the types of protection other than cams, including
![]() wired nuts,
wired nuts,
![]() micronuts,
micronuts,
![]() hexes,
hexes,
![]() Tricams,
Tricams,
![]() slider nuts,
slider nuts,
![]() Big Bros.
Big Bros.
For each type of anchor, we’ll discuss
![]() pros and cons,
pros and cons,
![]() how to set and remove the anchor,
how to set and remove the anchor,
![]() how to evaluate the placement.
how to evaluate the placement.
Technically, Tricams, slider nuts, and Big Bros are cams because of the way they transfer a downward pulling force into a horizontal force against the crack walls, but they are included here so that spring-loaded camming units can have their own chapter. Most of the chocks might also be considered passive protection, because they have no moving parts. Cams and slider nuts fall into the active protection category because the spring actively holds the protection in place. Big Bros have moving parts and a spring, and they are held in the crack by pressure from the locking collar, so they are also active protection.
EVOLUTION OF CLIMBING CHOCKS
Pitons were the predominant climbing anchors for many years. Each piton placement chipped some rock away, though, and in time, the popular routes became pitifully scarred. Years later, you can still find these piton scars on the old classic routes. In fact, the scars create the finger jams and pockets on many modern free climbs.
British climbers began the movement toward “clean climbing” that required no hammer and did not scar the rock. They started by tying slings around chockstones for protection. As early as 1926, some clever Brits stuffed their pockets with stones to jam in the cracks and tie off for protection. Eventually, they scavenged machine nuts along the railroad tracks, filed out the threads, and slung the holes with cord. Soon enough, they were drilling holes in the larger nuts to save weight. Armed with racks of machine nuts, they tackled increasingly difficult climbs. In the early 1960s, they began making nuts specifically for climbing. They experimented with many exotic shapes: truncated cones, pyramids, knurled cylinders, and T- and H-shaped bars. Ultimately, the wedge and hexagonal shapes emerged as the most practical due to their good stability and high strength-to-weight ratio.

A selection of early chocks
Most climbers resisted clean climbing—at first. They trusted their pitons, and they weren’t going to trust a chunk of metal slotted in a crack. Pitons probably would have held their ground, except that slotting nuts is much easier than banging pitons. Once climbers realized this, they dumped their heavy hammers and iron for light nuts and hex-shaped chocks made of aircraft aluminum.
The most versatile nut, the Tricam, was invented by Greg Lowe in 1973 and came to market in 1981. Tricams are unique because they can jam in a constriction like a wedge or cam in a parallel crack. Tricams have a cult of followers who always carry a few small Tricams. They swear by Tricams, while others swear at them. Tricams work great in many situations, but the larger sizes never caught on because they lack the stability of spring-loaded cams. There’s nothing worse than having your protection fall out well below your feet.
The first commercially successful cams, called Friends, appeared in 1978. As cams took over, larger chocks (bigger than fingersize) took the back seat. A climber might carry large chocks, but only to supplement a set or two of cams. Wired nuts have held their ground, though. They remain the warhorse for protecting thin cracks.
Climbers experimented with sliding nuts, double wedges sliding against one another to lock in a crack (similar to the way a doorstop works) as early as 1946. Finally, in 1983 they became available when Doug Phillips introduced Sliders. The design was improved when Steve Byrne invented ball nuts, which have a ball that rotates in a groove to accommodate mildly flaring cracks.
Craig Luebben designed Big Bro expandable tube chocks, with help from Chuck Grossman and mechanical engineering professor Jaime Cardenas-Garcia, in 1984. The name comes from George Orwell’s book 1984 and the line “Big Brother is watching you.” Big Bros came to market in 1987, extending protection into the realm of off-widths and squeeze chimneys—anything from 8 to 30.5 centimeters (3.2 to 12 inches).
WIRED NUTS
Wired nuts are indispensable on many traditional climbs. They work wonders jamming in the constrictions of small, irregular cracks. Because they are small and light, you can carry a bunch of them. They’re cheap, too, at least compared to cams. Losing some wired nuts to bail off a route won’t leave you crying.
Wired nuts come in many sizes, ranging from 3.8 to 50 millimeters (0.15 to 2 inches). They work great in the small to medium sizes, but hexagonal chocks or Tricams may be a better choice for passive protection for cracks wider than 25 millimeters (1 inch).
SETTING NUTS
When seeking a spot in the crack to set a nut, look for the following:
![]() Solid rock surrounding the nut. Fractured, rotten, friable, or soft rock may shatter under load.
Solid rock surrounding the nut. Fractured, rotten, friable, or soft rock may shatter under load.
![]() Constrictions that jam the nut against a downward pull and ideally against an outward tug too.
Constrictions that jam the nut against a downward pull and ideally against an outward tug too.
![]() A good fit. Choose the right size of nut to best fit the crack. If the nut doesn’t fit well, try the next size. If you’re setting a curved nut, orient the concave face to the right or left so it best fits the crack, striving for maximum surface contact between the nut and the rock.
A good fit. Choose the right size of nut to best fit the crack. If the nut doesn’t fit well, try the next size. If you’re setting a curved nut, orient the concave face to the right or left so it best fits the crack, striving for maximum surface contact between the nut and the rock.
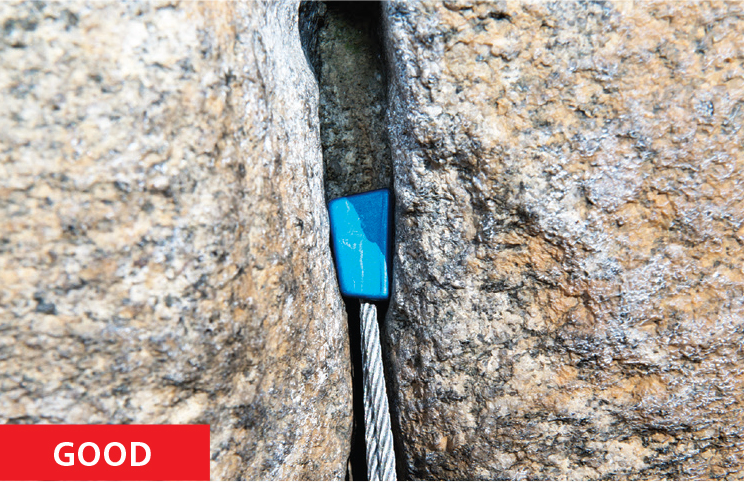
A bomber nut placement resists an outward pull, has good surface contact with the rock on both sides, and would require significant rock or metal deformation to move under a downward pull.

In softer rock, try to place nuts with more rock between the nut and potential failure. Here, in limestone, the nut is placed deeper in the crack than might be necessary in granite.

This nut would be stronger with more surface contact.

This nut has poor contact on the left side. If just a little rock breaks, it’s outta there!
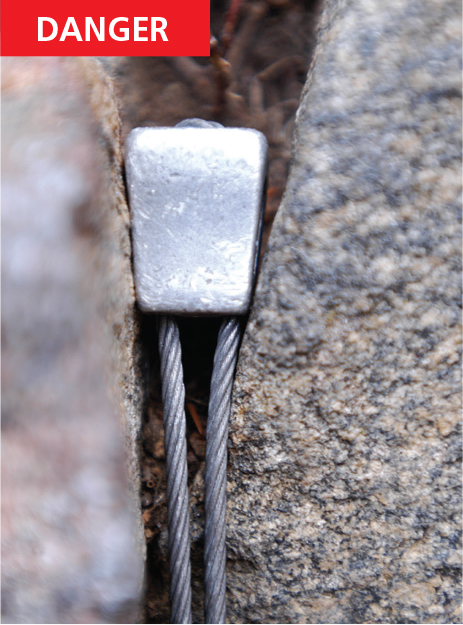
This endwise nut is strong in a downward pull but could be easily knocked loose or fall out. If this is the best you can find, clip it with a long sling to minimize the rope action from knocking it out and climb past carefully without pulling outward on it.
Think Rock DOG:
![]() The Rock must be solid.
The Rock must be solid.
![]() The crack should have constrictions to oppose a Downward pull and ideally an Outward pull.
The crack should have constrictions to oppose a Downward pull and ideally an Outward pull.
![]() The nut should have a Good fit in the crack.
The nut should have a Good fit in the crack.
If the nut fits well, you can usually just place it gently in the crack. Your partners will appreciate it. Sometimes a light tug helps set the nut. The amount of force you can exert by tugging will not even come close to the force of a fall, so don’t consider pulling on a nut to be a test. Occasionally, it’s wise to set the nut with a sharp tug (or a few) to keep it from lifting out due to climber movement. If the placement can be easily lifted out by an outward pull and you can’t find a better spot, or if it’s the last good piece for a while and you absolutely need the nut to stay in place, then go ahead and yank it. Save this bullying technique for crucial times, though; your partners will hate cleaning a pitch full of yanked, stuck nuts.
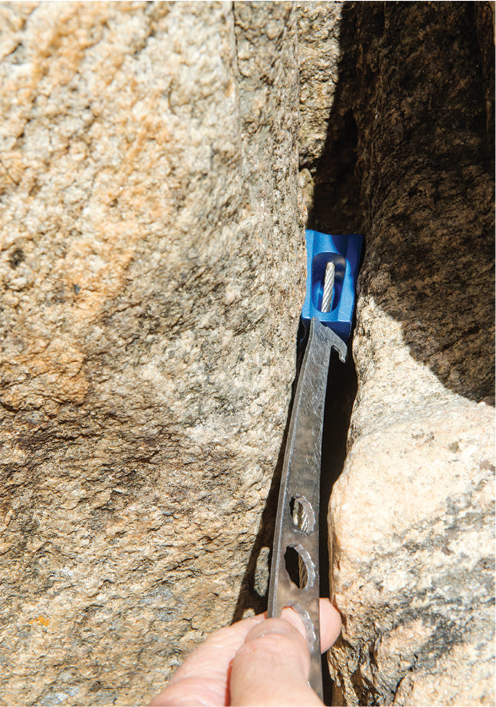
Cleaning chocks:
You can push, prod, poke, or pull with a nut tool to liberate stubborn nuts. Some climbers rig the nut tool with a keeper cord to prevent dropping it, but others find the cord easily tangles with other gear and the benefit of the cord isn’t worth the hassle.
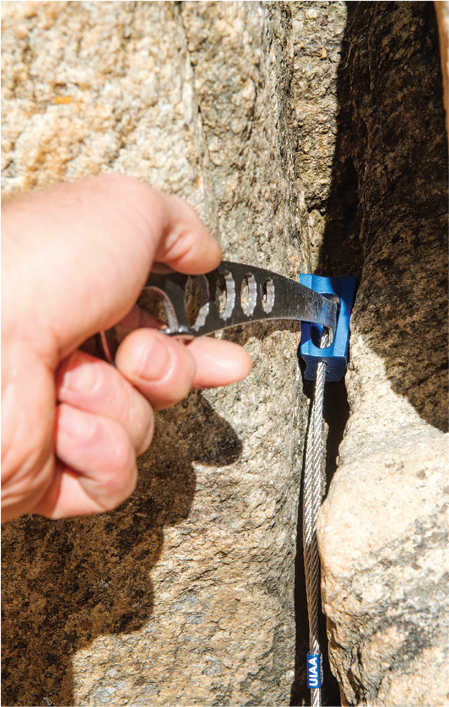
When the nut has a hole in the side, try inserting the nut tool in the hole and lever the nut to loosen it.

If the nut refuses to budge, hold the working end of the nut tool against the stuck nut and smack the other end with a large chock, rock, or carabiner, but be careful not to drop anything on climbers below.
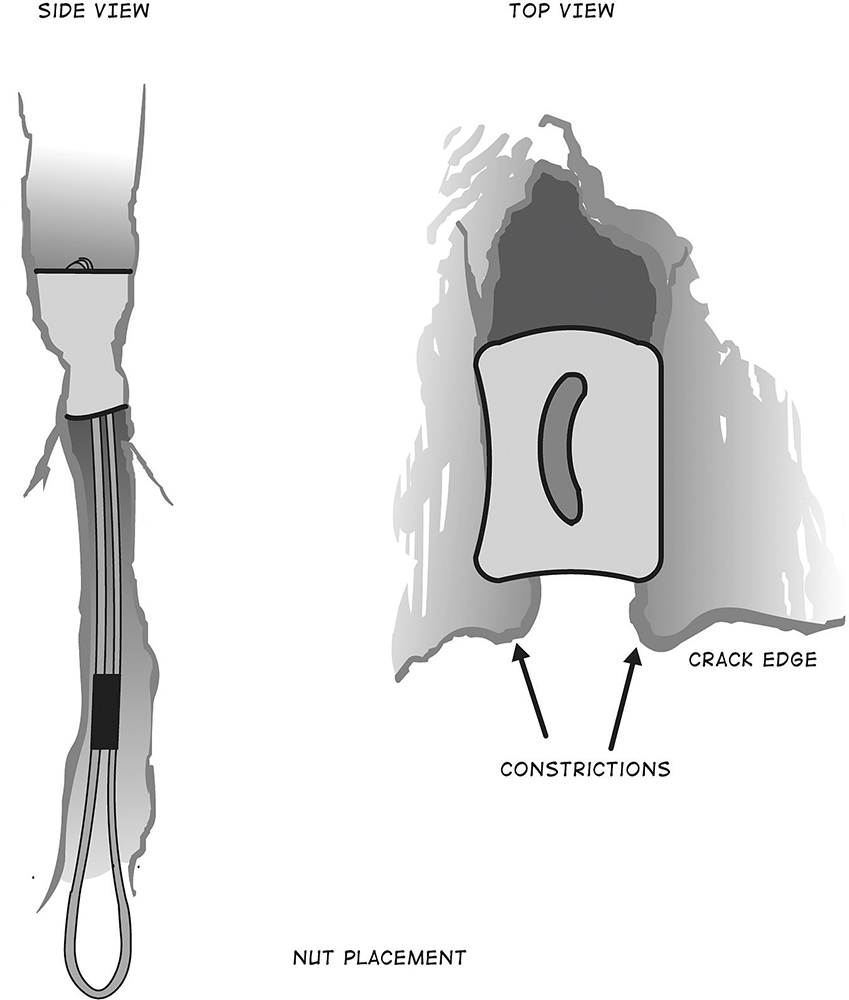
If you can find downward and outward constrictions and fit them with the right size nut, you’ll have a secure placement.
CLEANING NUTS
To remove a nut, imagine the path it took going into the crack. Usually it’s obvious, but sometimes the nut was wriggled through some intricate maze that must be retraced to free the piece. Hold the cables and try to wriggle the nut loose, then work it out through the opening. If it won’t budge, you might try whipping the cable upward with the carabiner to loosen it; overusing this practice, though, will bend and eventually fray a nut’s cables, and it also might get the nut more stuck.
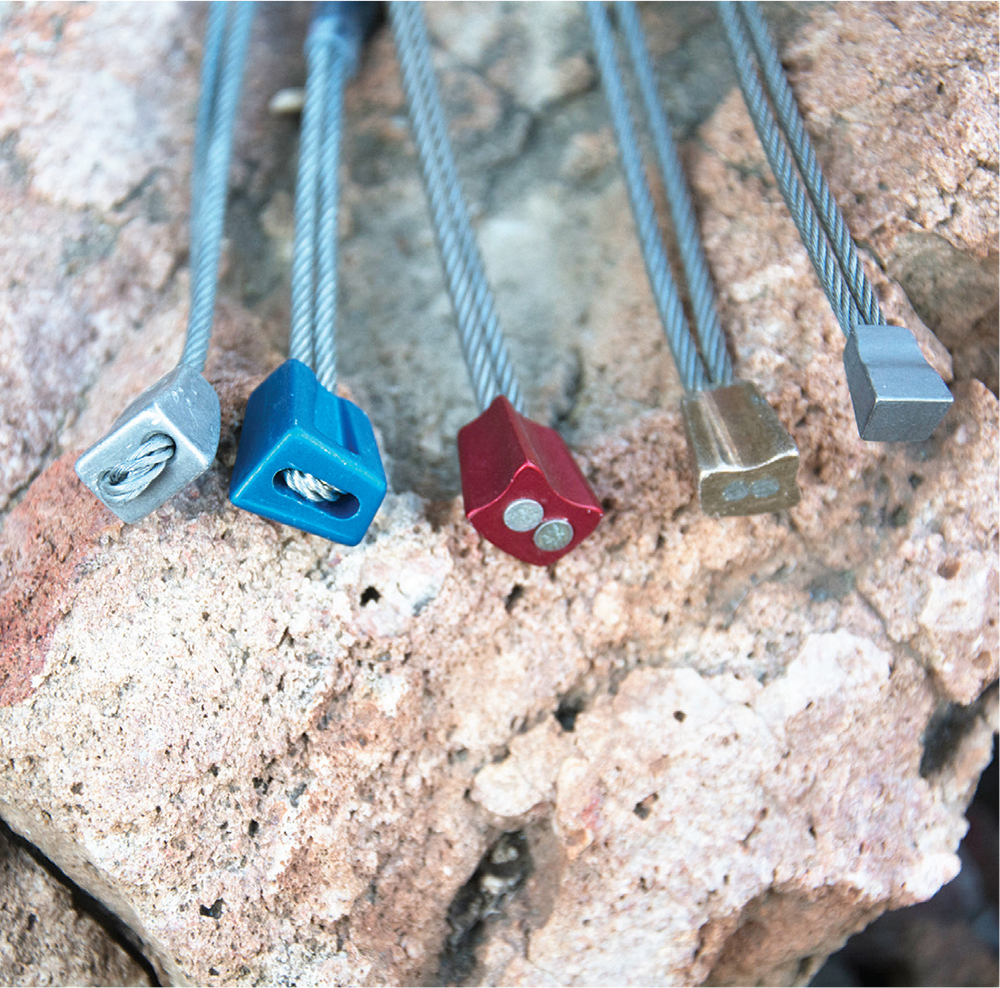
Most climbers prefer the nuts they practice with the most. Tapered nuts fit better in flares, where parallel-sided nuts will often be insecure. Experienced climbers use both. Brass nuts tend to bite the rock better, but steel nuts are more durable and less prone to deformation under extreme loads.
Sometimes a nut gets really stuck, especially if the leader fell or hung or set it with a yank. If the nut won’t budge, break out the nut tool.
SHAPE AND FIT
A good fit maximizes the surface-contact area between the nut and the rock, decreasing the pressure on the rock and adding strength and stability to the placement. Nuts are available in different shapes to help you find the best fit for a given crack. Curved nuts have a concave face on one side and a convex face on the other; they fit securely in many tapering placements and are the favorites of many climbers. Straight-sided nuts have no curve, but they fit many cracks well, and they get stuck less than curved nuts. Offset nuts fit flared cracks and piton scars, making them especially useful for aid climbing and for protection in areas with flaring cracks and piton scars.
Climbers often place mediocre protection that could be much better with just a minor adjustment—sometimes moving the piece only a few millimeters vastly improves the placement. Use special care to find the best fit.
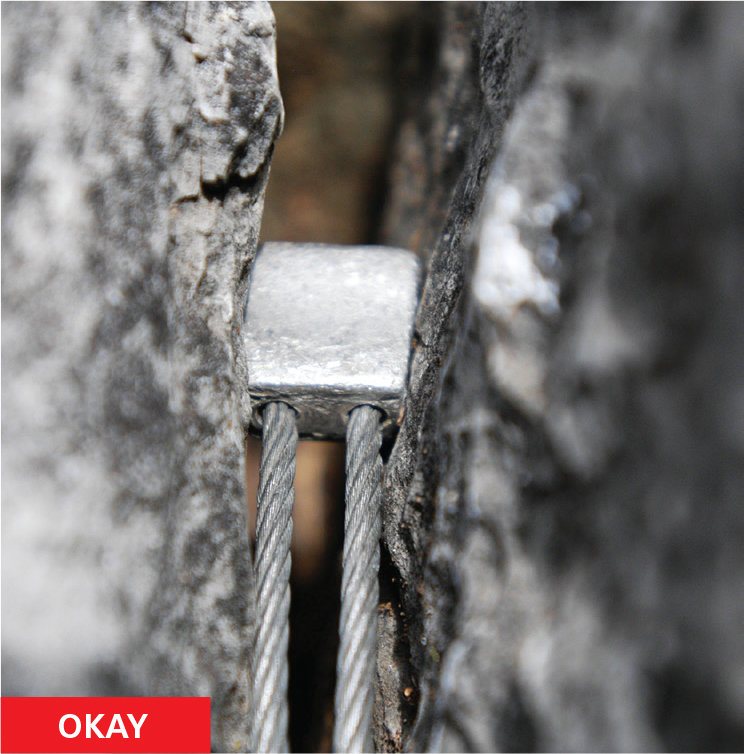
In a pinch, you can set a nut endwise to fit a bigger crack, but it’s weaker. In solid rock, sideways placements are often bomber because the wide surfaces against the rock result in more surface contact.
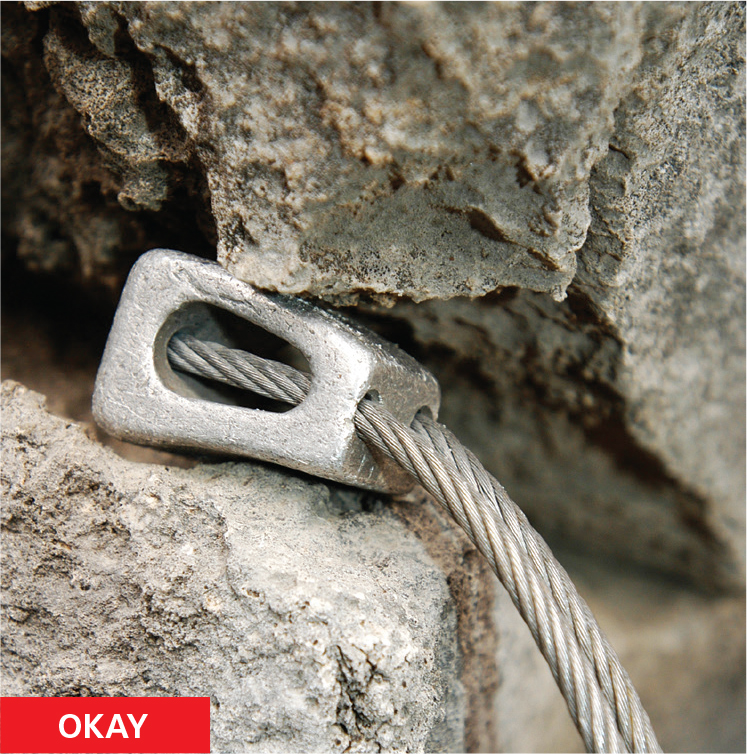
In a horizontal crack, try to find an opening in the back of the crack that allows you to slide the nut toward a constriction on the edge of the crack. Such a placement can be bomber. The piece shown is good, provided it does not get pulled to the left.

The crack has no constriction to resist an outward pull, so the rope may wriggle the nut out, or the nut might pop out in a fall. Even worse, it has very poor surface contact with the rock. If the rock breaks a little, the nut will fail.
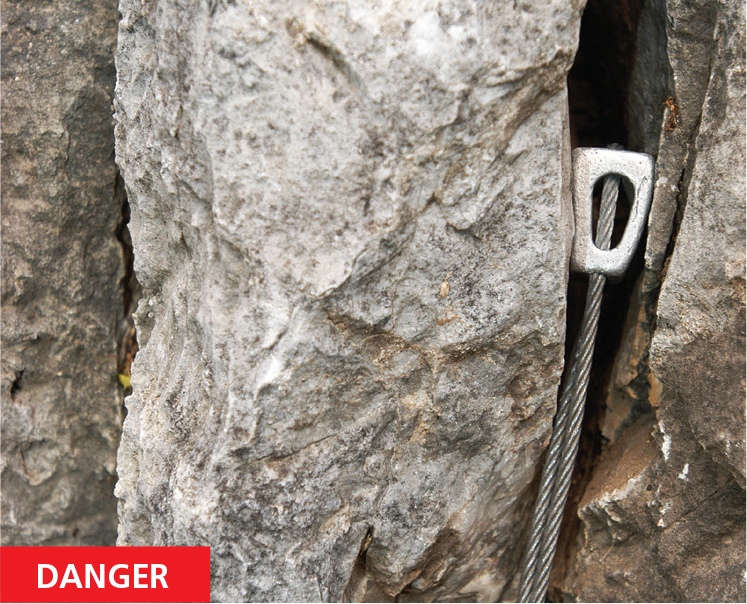
This nut could pull the fractured block on the left side loose. Be careful what you set your anchors behind. The nut also relies on a thin, fractured layer on the right side.
MICRONUTS
Micronuts fit the tiniest cracks, but they have limited strength—the nuts, wires, and contact area with the rock are small. The smallest micronuts are intended for aid placements only, or perhaps to oppose a larger nut and hold it in place. In a good placement in solid rock, larger micronuts can be strong enough to catch most falls.
Traditional micronuts are made of brass, with a stainless-steel cable silver-soldered to the nut. The soldering avoids a sharp bend in the cable and fills the holes drilled for inserting the cable, which maximizes the strength of the small nut. Some micronuts are made of copper-infused steel, which provides strength and grip with the rock surface.
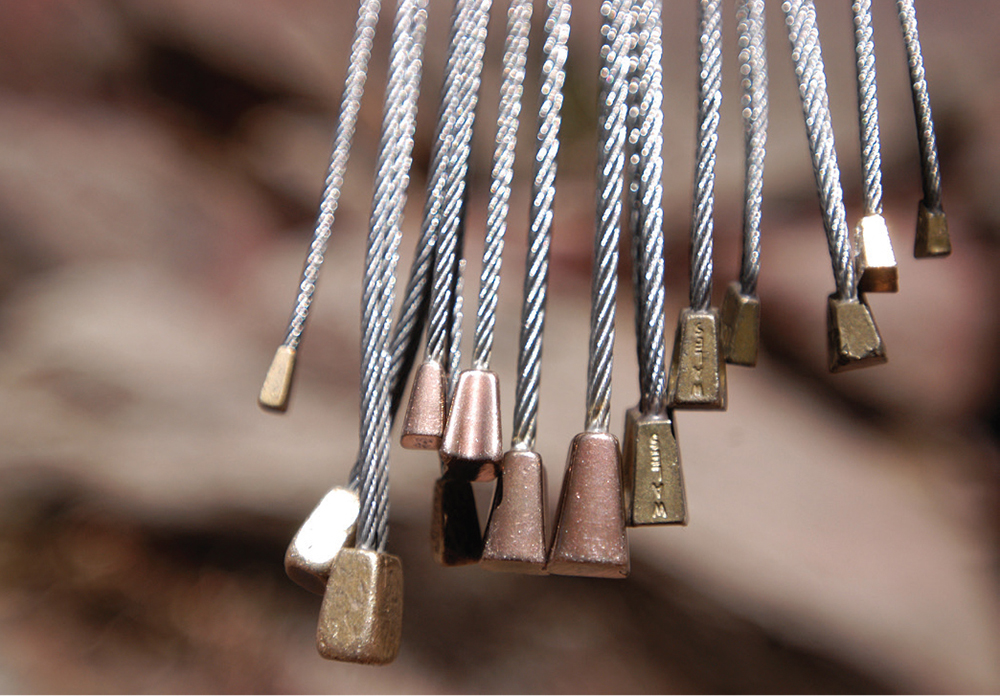
Micronuts are used for tiny cracks. Pay attention to the kN ratings on micronuts—the middle and larger sizes are surprisingly strong, while the smaller ones can break in a short fall.

This micronut is too close to the edge of the crack, and it’s barely touching on the left side.
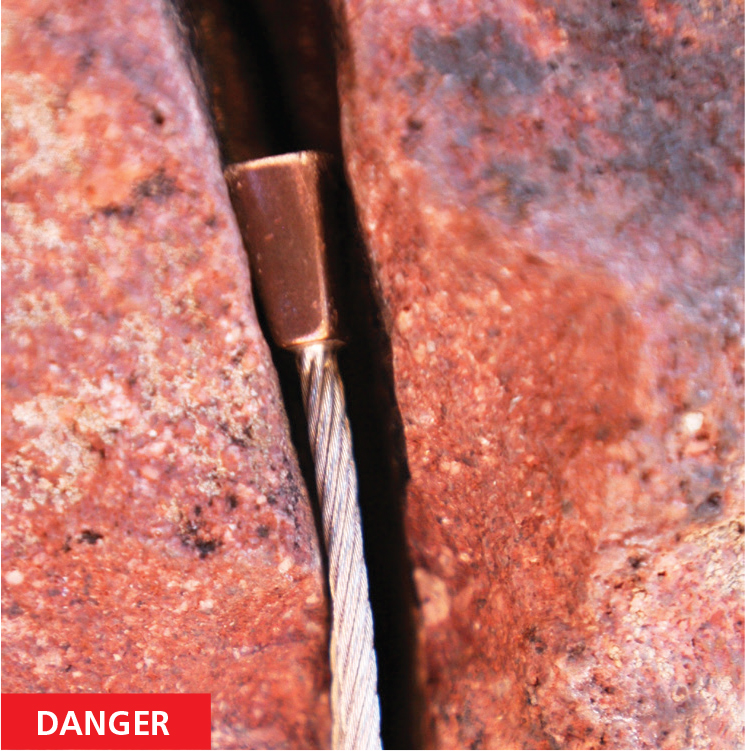
This micronut has poor surface contact on the right side. A slight outward tug in a fall or a little rope wriggle will free it from the crack.
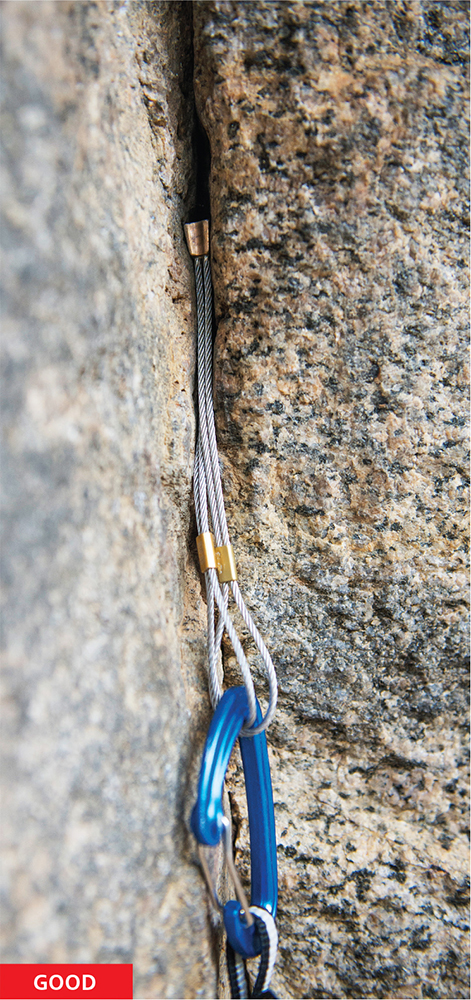
Here, a nest of two micronuts was placed to maximize the strength and compensate for potential uncertainty due to not being able to see into the small crack to determine the details of the placement. When in doubt, more micronuts are usually better.

This micronut is one of the larger sizes, so the tested strength is plenty to hold a fall; it has good surface contact on both sides, and the brass material will help prevent it from dislodging due to rope drag or climber movement. In thin, shallow cracks, consider micronuts with sideways orientations.
HEXAGONAL CHOCKS
Chocks based on a modified hexagonal shape work like normal nuts, only they’re designed to fit bigger cracks. The four or five sizes ranging from 2.5 to 6.5 centimeters (1 to 2.5 inches) seem the most practical, though you can buy smaller and larger models. Hexagonal chocks come slung with webbing or cable. The webbing is lighter and stronger, while the cable-slung hexes allow you to reach high placements and are less prone to tangling on the rack.
When placing a hex-shaped chock, find a downward constriction to jam the chock and an outward constriction to hold it in place. Strive for maximum surface contact between the rock and the chock. Hexagonal chocks can cam somewhat in a crack, due to the sling (or cable) position causing a rotation of the chock, but no spring exists to hold the chock in place, so they work best when jammed in a constriction. Because of the asymmetric shape, you can fit two crack sizes with a sideways placement, and a third size with an endwise placement.

This hex placement looks good at first glance because the crack is tapered nicely; but upon closer inspection, it is not stable because it’s set too close to the crack edge, is not rotated to get a snug fit on the planar sides of the piece, and will fall out of the crack with even the slightest outward pull.
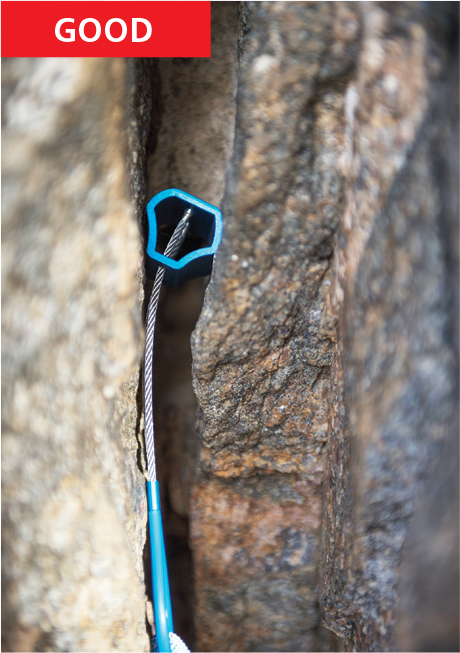
A bomber hex placement. Hexes are significantly lighter than camming units of the same size.
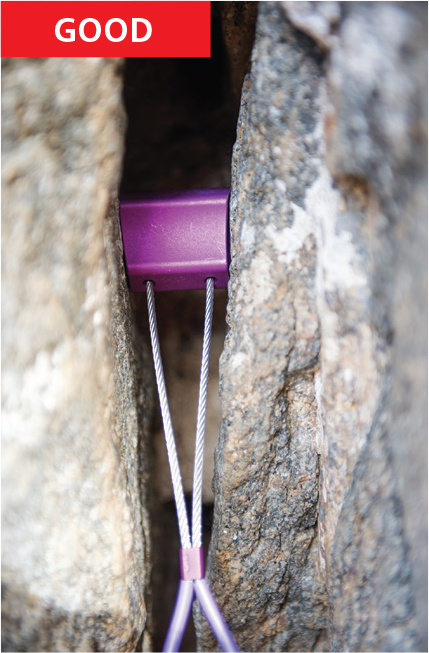
A hex set endwise fits a wider crack.
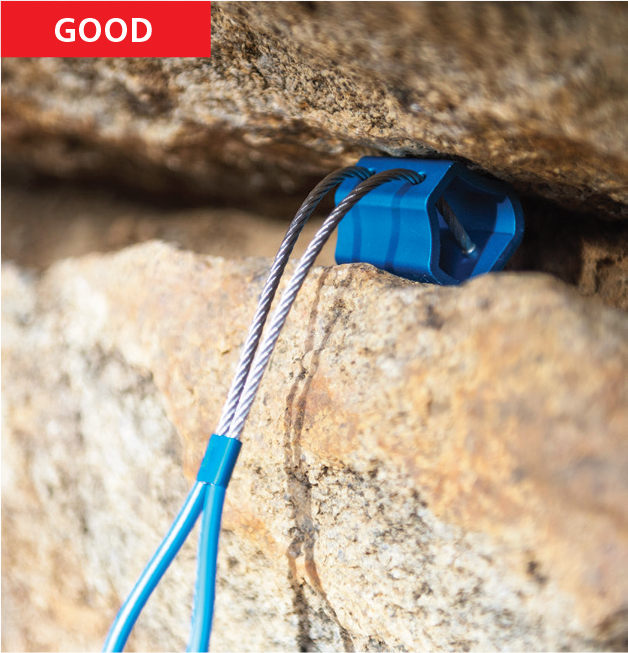
This hex was slipped through an opening into a constriction at the lip of this horizontal crack and not only wedges but also cams to hold it in position. It will hold multidirectional pulls.
TRICAMS
Climbers love or hate Tricams, often based on where they climb. Tricams are extremely versatile, with two placement modes: you can wedge a Tricam in a tapering crack just like a nut, or cam it in a parallel crack. Their compact shape allows them to fit in pockets or pods where nothing else can.
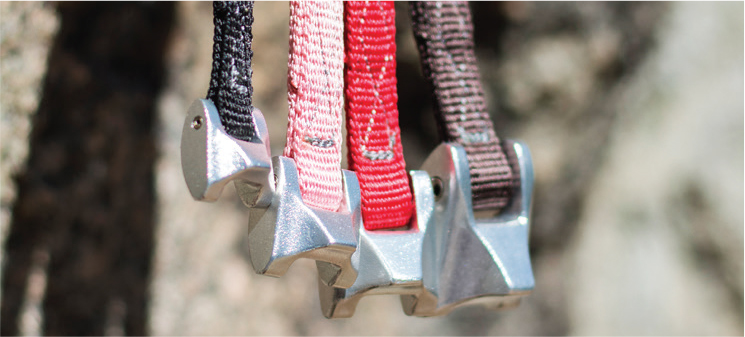
Tricams used to be made in eleven sizes, but due to climbers preferring the smaller ones, modern Tricams are made only in the smaller sizes.

A.When camming a Tricam, lay the sling inside the rails. New Tricams have stiffer webbing to facilitate ease of placement and removal.
B.Set the fulcrum (or point) in a divot, microcrack, or small edge inside the crack or pocket for stability. Tug the Tricam to set it and be careful not to wriggle it loose with the rope.
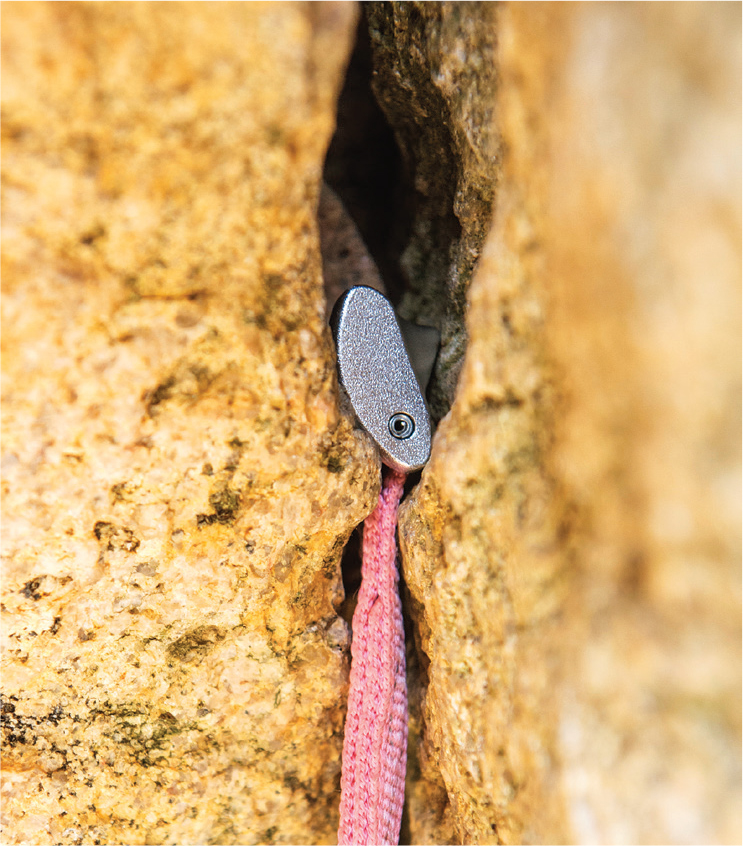
When wedging a Tricam in its more passive orientation, find a fit that gives solid surface contact between the Tricam and the rock with a good constriction to hold the Tricam in place.

The new Tricams are also tapered in their sideways orientations, adding versatility to what was already arguably the most versatile protection.

Tricams work very well in pockets, where cams or nuts do not.
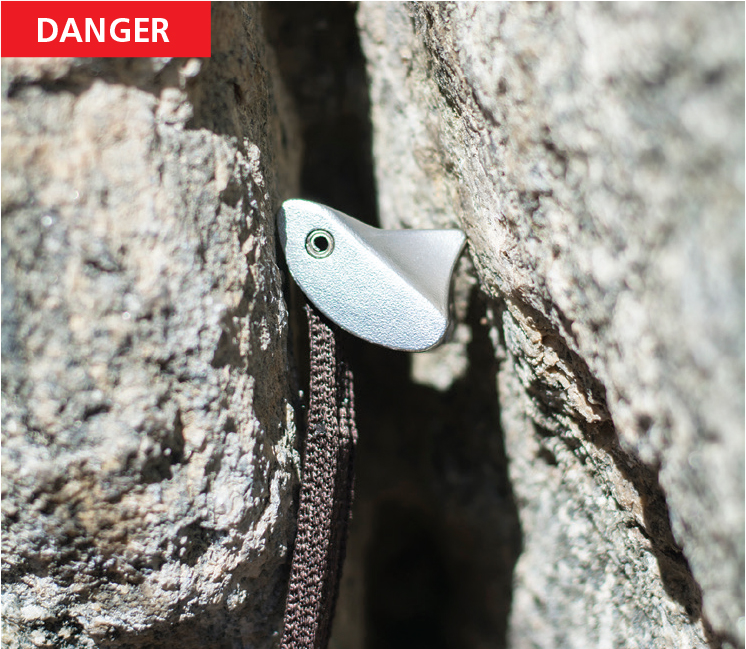
This Tricam is unstable because the fulcrum has no rock feature to hold it in place and the crack flares downward.
SLIDING NUTS
Sliding nuts fit parallel cracks from 3 to 16 millimeters (0.12 to 0.63 inch). The semispherical “ball” wedges against the “ramp” like a door on a doorstop. This creates a large outward force that generates friction to oppose a pull. The ball can rotate to adjust for a small amount of flare in the crack. A small camming unit is usually easier to assess than a sliding nut, but the sliding nut will fit smaller cracks.
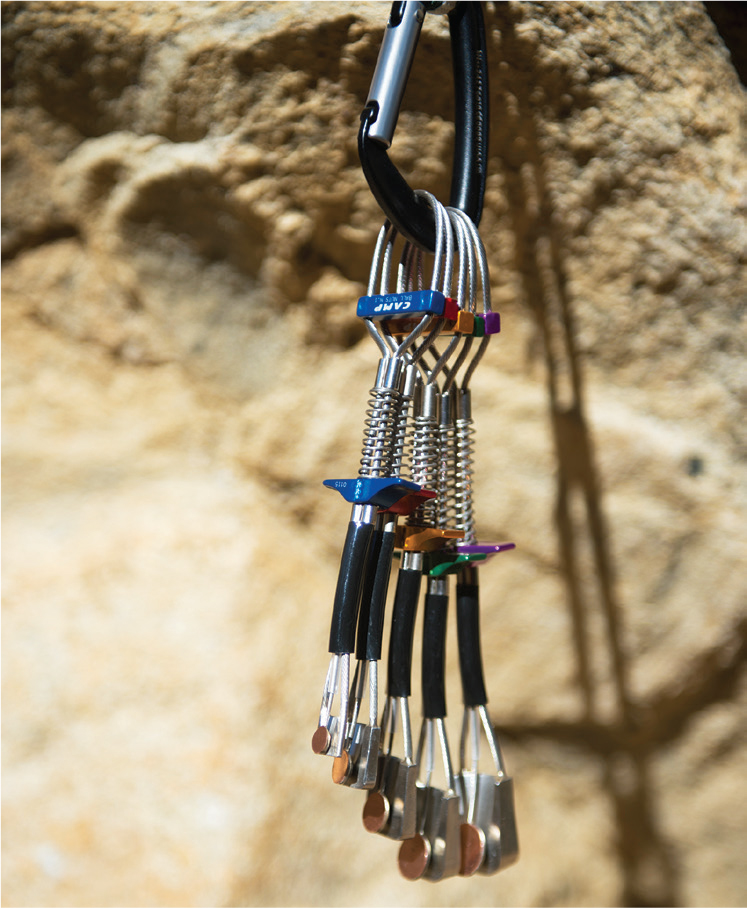
Sliding nuts, also called ball nuts, work in tiny parallel cracks where no other protection will work. Like all cams, these are most secure when there is a passive element holding them in the crack, such as a slight constriction, edge, or bump just under the placement.

To set a ball nut, retract the trigger and insert the piece in a crack, just above a minor constriction if possible. Release the trigger so that the ball jams against the ramp. It should be 50 percent or less expanded and have good surface contact with the rock. Tug the ball nut to test it and set it.

This placement looks reasonably good. The piece was extended with a quickdraw (not shown) so the rope wouldn’t wriggle the ball nut free.
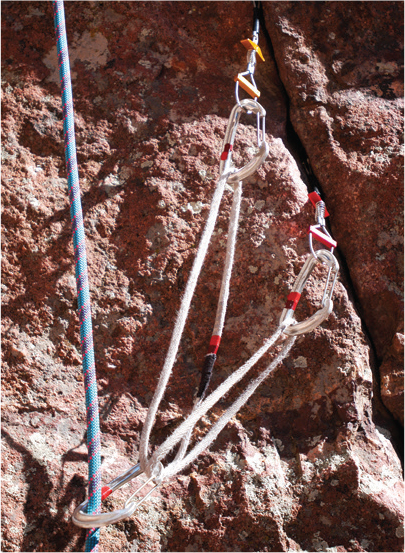
If you set a ball nut in a less than perfect placement, consider setting two and equalizing them.
EXPANDABLE TUBES
Big Bro expandable tubes cover cracks from 7 to 47 centimeters (2.75 to 18.5 inches). A Big Bro is much lighter and more compact than a giant cam and more stable when set in a good placement. You can’t slide the Big Bro up the crack like a cam, though. A giant cam is easier to set than a Big Bro and works better in flared cracks.
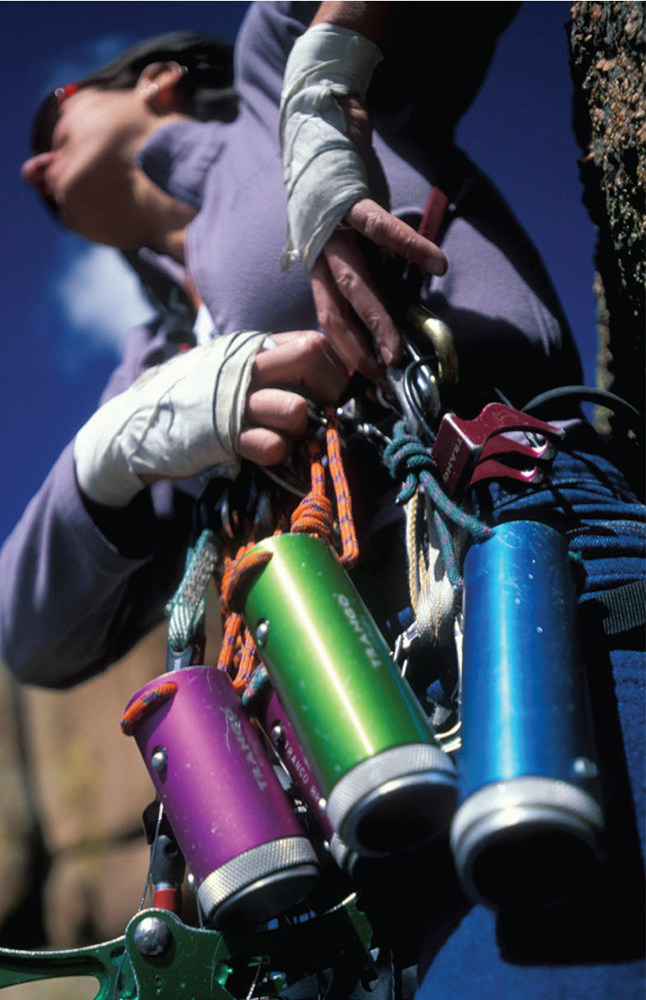
Four sizes of Big Bro expandable tubes protect parallel cracks, from fist cracks to small chimneys. Big Bros are lighter and more compact than giant camming units but harder to place.

Big Bros provide anchors in cracks bigger than the largest cam as demonstrated by Big Bro inventor Craig Luebben on the Texas Finger Crack (5.11), Escalante Canyon, Colorado.
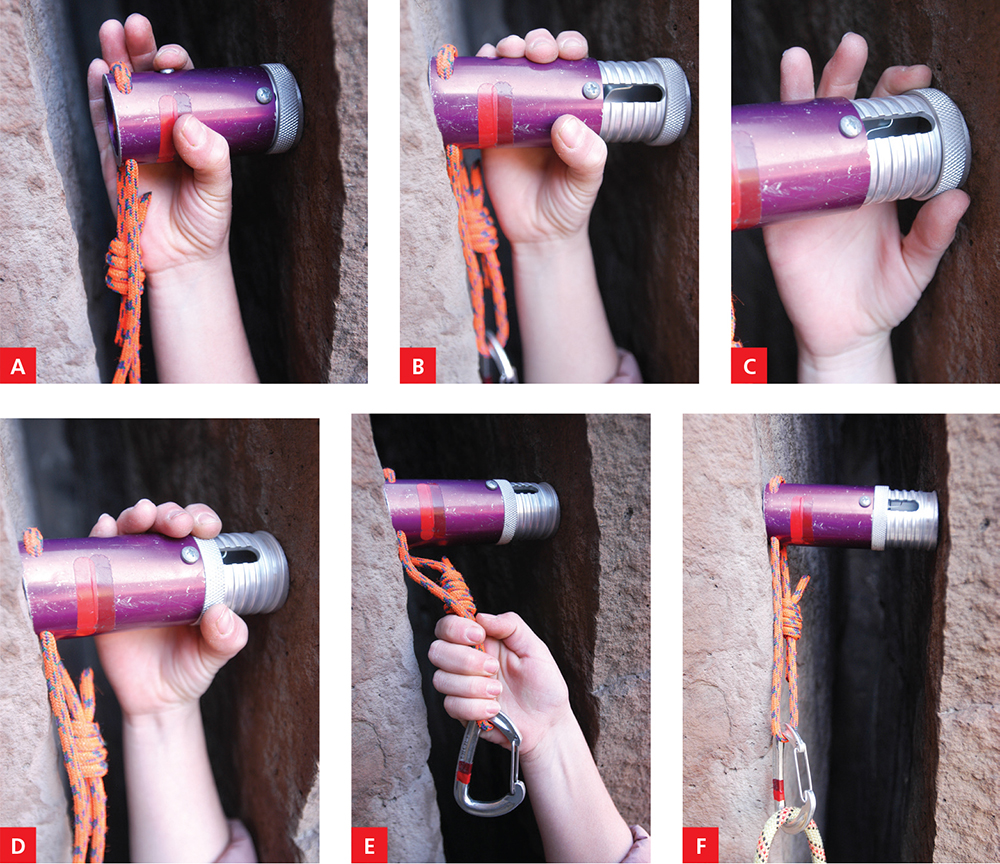
To place a Big Bro:
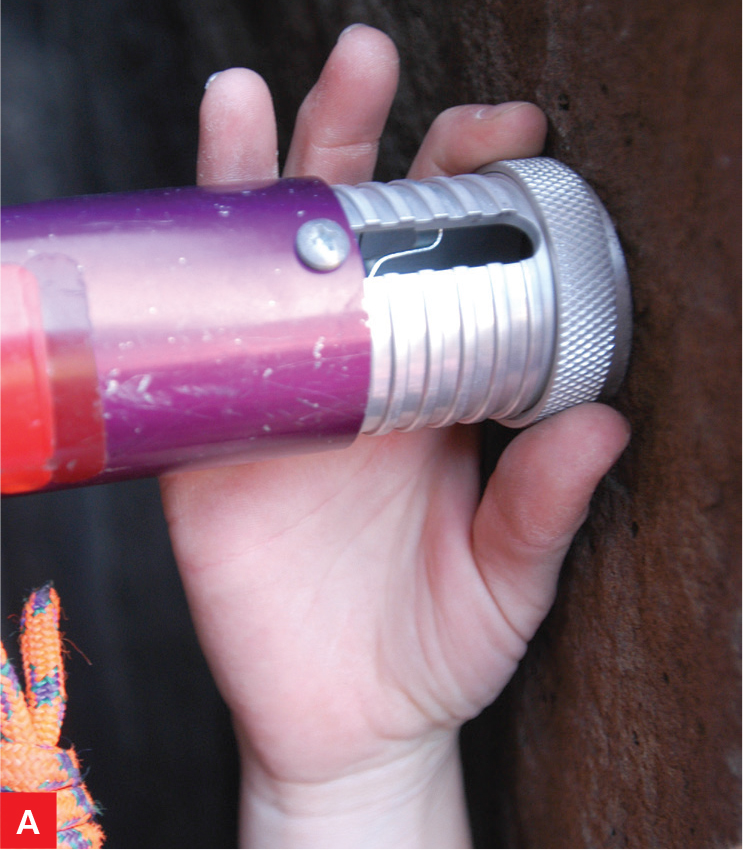
A.Find a parallel spot in the crack and push the inner tube (the side with the collar) against the wall.
B.Push the trigger button so that the tube expands to fit the crack. Don’t “dry fire” a Big Bro by pushing the button and letting the inner tube slam against the stop or the rock—instead, let the tube expand slowly.
C.With the spring holding the tube in place, spin the locking collar. It helps to make sure the locking collar is loose and not jammed tight before starting a lead so that it is easy to spin during placement.
D.Crank the collar down tight against the outer tube.
E.Tug sharply on the sling to test the stability and lock the tube in place. Retighten the collar.
F.Clip the rope into the sling with a carabiner.
To remove a Big Bro:
A.Spin the collar to the end of the tube.

B.Collapse the unit until the trigger pops up.

If the crack flares, find the most parallel placement possible. Set the cord end so it fully contacts the rock, and let the other side touch in one point, like a Tricam. Use a long sling so the rope doesn’t disturb the placement and be careful not to knock it loose as you climb past.
SIZE AND STRENGTH OF CHOCKS
All brands and models of chocks come in a set of complementary sizes, from small to large, and are numbered according to size. This creates a selection for fitting various cracks: if a piece is too small, try the next size up.
It’s wise to not trust the tiniest nuts much; even if the nut doesn’t break, the rock might. A small nut might slow you down, though, or stop a short fall, especially if you’re high up on the pitch so the impact force is low. To increase the odds of nuts holding, consider equalizing two small nuts.
Only nuts thicker than 8–14 millimeters (5/16–½ inch), depending on the brand, rate a full strength of 10 or 12 kN (2,250 to 2,700 pounds), which is sufficient to hold most climbing falls. In these medium and larger sizes, rock quality and placement stability become the important factors for ensuring placement security. One brand of hexagonal chocks rates below full strength in the smallest two sizes (rated 6 kN/1,350 pounds), but most brands rate from 10 to 14 kN (2,250 to 3,150 pounds) throughout the size range.
Sliding nuts are not as strong, ranging from 4.5 to 8 kN (1,000 to 1,800 pounds), depending on the size. Because of their limited strength and fickle nature, use these devices with care. Expandable tubes rate a burly 15 kN (3,375 pounds) across their size range.