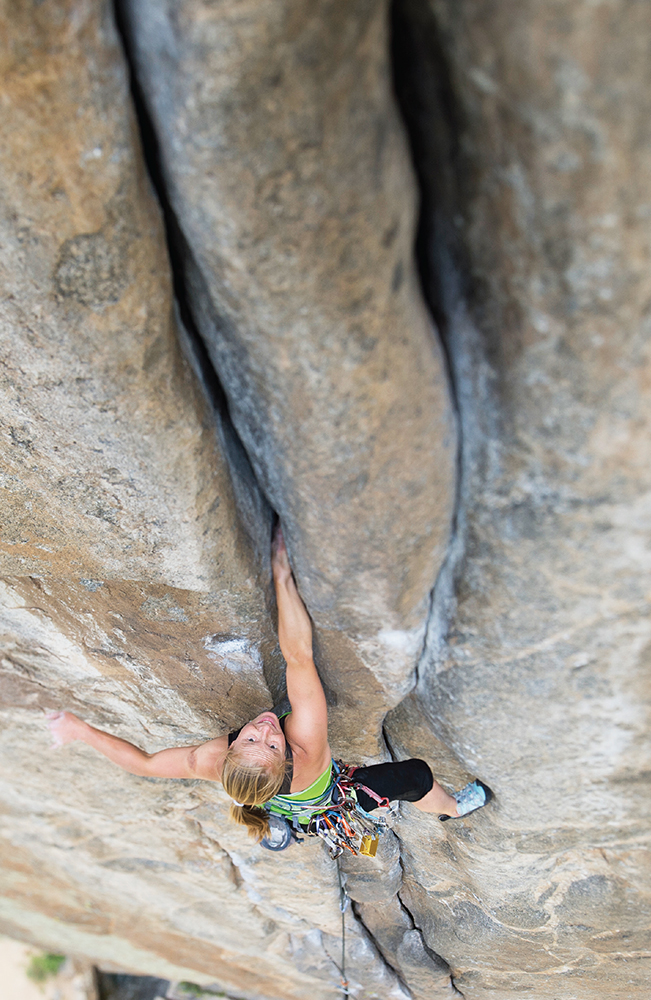
Kristen Felix on Country Club Crack (5.11), Colorado
Kristen Felix on Country Club Crack (5.11), Colorado
Trad climbing can provide a lot of fun and adventure in wild, airy places. Whether you’re monkeying out roofs in the Gunks, racing up Half Dome in a day, taking a voyage into the murky depths of the Black Canyon, climbing dreamy granite spires in the Bugaboos, or even just enjoying a few pleasant pitches after work at any of the other hundreds of distinctive traditional climbing areas, one thing remains common: to lead trad routes safely you need good knowledge, judgment, and skills for protecting the climb. Every climb poses some risk to the leader; the goal is to manage that risk to an acceptable level while enjoying the climbing.
This chapter discusses the rack you should carry on a traditional route and how to strategically protect a climb, balancing safety with efficiency.
The chapter also covers
![]() setting the first piece in a pitch,
setting the first piece in a pitch,
![]() protecting a pitch,
protecting a pitch,
![]() using quickdraws and slings to minimize rope drag,
using quickdraws and slings to minimize rope drag,
![]() using half ropes to reduce rope drag,
using half ropes to reduce rope drag,
![]() the duties of a leader.
the duties of a leader.
Red River Gorge, Kentucky, is famous for its relentlessly overhanging sandstone sport routes, but it also has some superb trad cragging. Say you’re at “the Red,” gearing up to climb the classic crack B3 (5.11b). From the ground, you can see that it’s going to be mostly a finger and hand crack, but the crack appears to get smaller up high. Because it’s only a one-pitch route, you cut the rack down to shave weight. A selection of wired nuts, micronuts, a couple of hexes, some tiny cams, and a double set of finger- to hand-size cams will be more than sufficient.
The climbing goes smoothly, jamming the perfect crack in stellar rock. You set most of the pro from decent stances to save mental and physical energy for the crux. The climbing is pretty straight up, so you clip the cams and hexes directly, and you clip the nuts with a quickdraw. You set the nuts and hexes whenever the crack allows, keeping the precious cams for when the placements get strenuous.
The crack becomes less pro-friendly at the crux. By looking ahead, you anticipate the difficulty, so you set two good pieces where the crack is still good, and you take a rest. Then you go for it—the pitch is sheer, with nothing to hit if you fall. You could try to wriggle in little nuts to reduce the runout, but that would take a lot of energy and actually increase the chance of falling, and the pro wouldn’t be good anyway. Better just to climb through. With the last cam well below your feet, you toss the rare trad dyno to slap the horizontal break. Once on this ledge, you get some reprieve before launching into the intricate final moves. You set one piece immediately to end the runout below and another as high as you can to keep yourself off the ledge in a fall, squeak through the awkward stemming moves, and clip the fixed tree anchor.
Traditional racks:
A big rack can be distributed between the gear sling and the harness.

For steeper rock, racking on the harness is usually better because the gear you need doesn’t swing so far out of reach behind you.

On moderate multipitch climbs and off-widths, a shoulder sling is usually best because it is easy to push out of the way and is fast for passing the rack to the other climber when swapping leads.
Strategy is key for leading a trad route like B3 safely. It’s important to protect the route efficiently so that you have enough strength for both climbing and placing the protection. It’s far easier to climb dangerously, and you might even get away with it for a while, but in the long run, it’s far better to put in the effort and discipline to climb every pitch as safely and efficiently as you can. Practicing this kind of strategy every time you climb makes it easier to make good decisions when the climbing is difficult and the protection, tricky. This is particularly true for climbers just breaking in to more difficult terrain. Far too often, aspiring 5.10 or 5.11 trad leaders end up taking dangerous or even injurious falls after finding themselves too pumped to manage the protection and trying to climb their way to safety without placing enough gear.
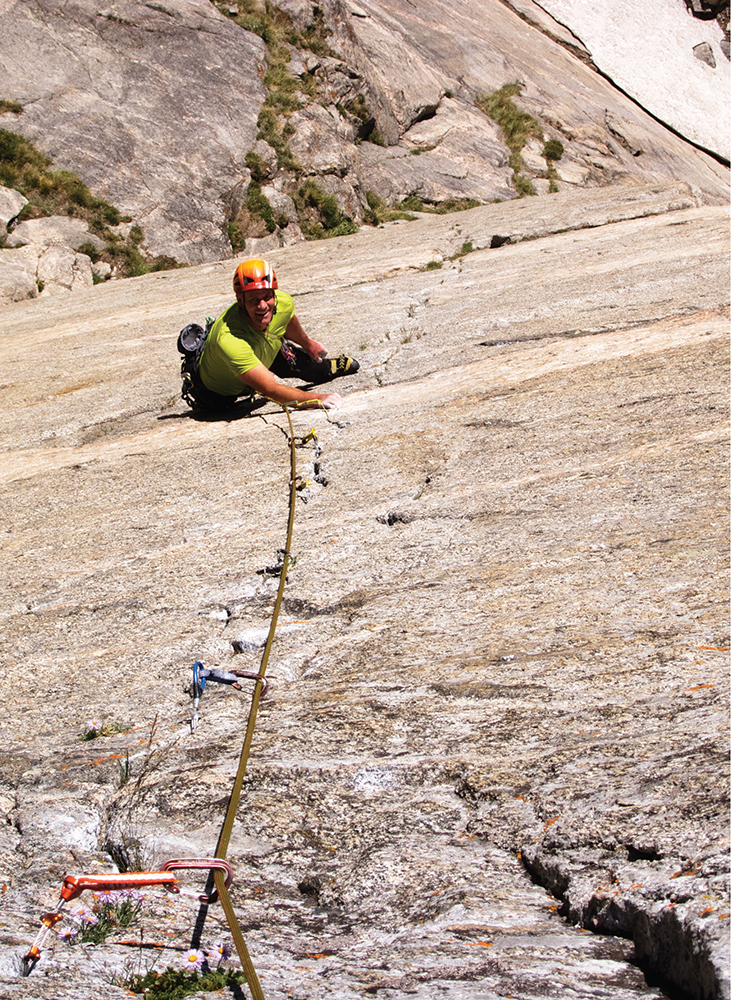
Marc Gay is all smiles on Sinners on Sunday (5.12), Mt. Evans, Colorado.
TRAD CLIMBING GEAR SELECTION
On traditional climbs, the leader needs quite a selection of gear for setting protection and building belay anchors. What you bring depends on the style and preferences of the climbing team and the requirements of the route. The rack described below is a good starting point for many multipitch traditional routes. It covers a range of crack sizes and provides plenty of slings, quickdraws, and carabiners for extending protection and setting belays. A typical trad climbing rack may include the following:
![]() one or two sets of wired nuts
one or two sets of wired nuts
![]() two or three hexes
two or three hexes
![]() one or two sets of cams ranging from 1–7.6 centimeters (⅜–3 inches)
one or two sets of cams ranging from 1–7.6 centimeters (⅜–3 inches)
![]() seven to ten quickdraws
seven to ten quickdraws
![]() five to eight shoulder-length slings
five to eight shoulder-length slings
![]() one or two double-length slings
one or two double-length slings
![]() six to eight extra carabiners
six to eight extra carabiners
![]() two to four locking carabiners
two to four locking carabiners
![]() one or two cordelettes
one or two cordelettes
![]() one gear sling (some climbers prefer to rack on the harness)
one gear sling (some climbers prefer to rack on the harness)
![]() one nut tool
one nut tool
This basic rack can get you safely up many routes, and when a guidebook suggests a “standard rack” this is usually what it means. You might beef up the rack if the route has long pitches and include some bigger gear if the climb has wide cracks. If you anticipate short pitches or abundant fixed anchors, pare the rack down to save weight—it’s much easier to climb with a light rack.
Seek information about recommended gear from a guidebook, internet forums, other climbers, and by scoping the route from the ground. Take all this information with a grain of salt—guidebooks can be wrong, internet beta is notoriously inaccurate, other climbers can give well-intentioned but faulty information, and even the view from the ground can be misleading. Bring a little extra gear if you have doubts about your information; remember that cracks often look smaller than their true size when viewed from the ground and constantly assess your retreat options in case things don’t work as planned.
PROTECTING THE CLIMB
Protecting a climb is part science, part art. You have a lot of creativity open to you, but you have to get a few basic things right. Having gear that’s in good condition and well organized by size on the rack will make the job easier.
The leader manages a fine line, using judgment to assess and mitigate risk while climbing with confidence and efficiency. Some climbers overdo the analysis and protection, and it holds them back. Too many complicated systems or too much hesitation and doubt will climb a team right into the afternoon thunderstorm. To climb harder trad routes, you need to be quick and confident with your protection.
FIRST PROTECTION
Once you get a few feet above the ground (or if the landing is rough and the climbing hard, maybe even while standing on the ground), it’s time to start setting protection. The first protection in a pitch can receive a strong outward pull, depending on the position of the belayer. If this first piece pops out, the outward pull goes to the next piece higher—and it’s possible to zipper out several pieces this way. To avoid this, the first piece should be able to hold a downward pull to protect the climber, and an outward pull to protect the pieces above. A good cam, two pieces opposed, or another multidirectional placement that can withstand an outward pull is a smart first piece.
On a multipitch route, the leader should set good protection as soon as possible above the belay. The first piece (or two) of protection is one of the most crucial pieces—it protects the belay anchors from a hard impact and it makes the catch easier for the belayer. If the climbing is hard, many experienced climbers will put a couple of pieces right next to each other just above the belay to ensure that a hard fall onto the belay anchor will not happen. As noted in chapter 1, recent studies show that a factor-2 fall is likely to injure the belayer or hit them with so much force that they lose control of the rope.
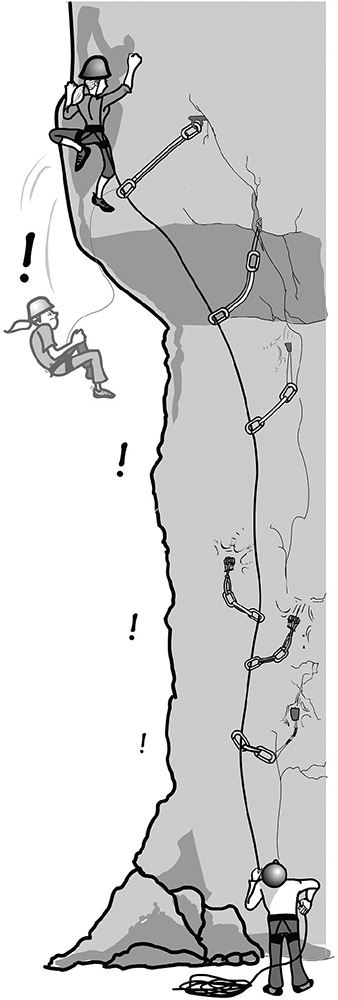
If the first piece fails the outward pull, the other pieces may, too, and they could “zipper” on up the rope.

While it’s wise to clip protection early in the pitch to avoid a factor-2 fall onto the anchors, the jury is still out on whether it’s smart to clip your belay anchors as the first piece of protection. While it should make the catch easier for the belayer, it also increases forces on the anchors by 60–70 percent because of the pulley effect. If the anchors aren’t stellar, you might not want to clip in to them for lead protection. If the placements are truly bomber, it is probably a good idea to clip the top one as lead protection.

You can clip the top piece in the belay. The individual placements must be bomber for this to be safe—but you want bomber pieces in your belay anchors anyway!
Depending on the arrangement of the anchor and your belayer, you can clip either the top shelf for the first protection or a higher placement in the belay. Sometimes, especially when it’s easy climbing above a good belay ledge, it’s better to climb up a little way to set the first protection. When the climbing is hard or runout off the belay, it can be safer to place the first piece above the belay while leading and still on belay from the previous pitch. Clip the piece and then climb back down to the belay. This is particularly useful on bolted climbs, where the second can be belayed through the first bolt of the next pitch and then get a handy top rope for the first few moves of the next lead. Like many things in climbing, it’s entirely up to you and your partner to make the call.

Ahhh . . . that’s better. Things get safer for the team once the leader sets solid protection above the belay. This reduces the fall factor, the impact force, and the pull on the belayer; and it protects the belay anchors from a high impact. The leader has to keep setting protection at reasonable intervals to continue reducing the fall factor and the potential force.
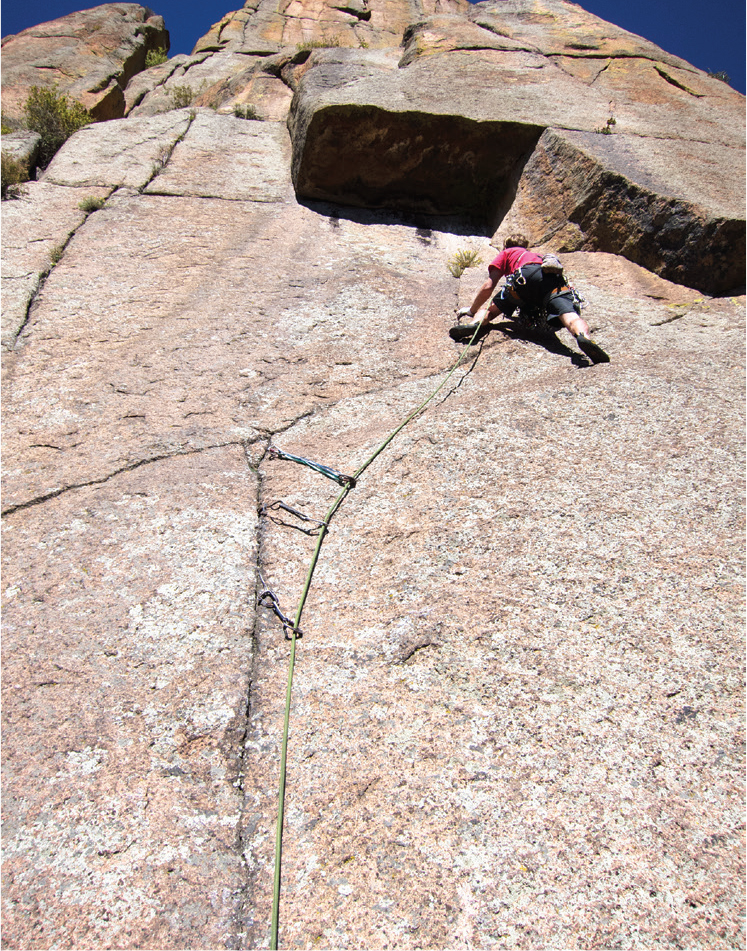
PROTECTING THE PITCH
The leader sets protection as the pitch unfolds. At the beginning of the pitch, set gear frequently to protect against a ground fall. On easy terrain, it can be tempting to run it out off the belay, but no matter the grade, do everything possible to place good protection frequently near the belay and save your boldness for another time. As you get higher up the pitch, you can space the protection more and get your runout on, provided that there are no ledges to hit. Whenever you pass a ledge, place protection close together again for a few pieces to keep you off the ledge if you fall.
When you get to a point with a crux looming just above, place a couple of good pieces if possible. When the climbing is hard, more protection keeps you safer and helps keep your head relaxed. It’s smart to always have at least two bomber pieces between you and a bad fall. If the protection isn’t great, place more. Aside from safety, placing a couple of bomber pieces at the beginning of a hard section can make the difference between really going for it and slumping onto a piece of protection because you “didn’t trust you gear.”
If the rock is solid and the climbing is easy, you can get by with less protection, but you don’t want to run it out too far. After falling 45 feet, a 150-pound climber will be doing nearly 40 miles per hour and carrying about 10 kN (or over 2,000 pounds) of potential force. The rope stretch and belayer give will reduce the final impact force, but making huge runouts is not heroic; it makes the entire team vulnerable to a broken hold or slip. Your partner counts on you to make good decisions and lead the pitch safely, not get hasty, fall, and create an epic. Climbers who regularly push the limits of their ability and protection are rolling the dice. This may seem alarmist, but leader falls are all-too-common causes of accidents in rock climbing according to Accidents in North American Mountaineering.
Set plenty of protection on traverses, especially before and after the cruxes—gear before the crux protects the leader, gear after the crux protects the second. If you’ve just climbed up a ways and are beginning a traverse, set a directional anchor to keep the rope above the second climber through the vertical section. You can also set protection to show your partner where to go or to keep the rope away from bad rock, sharp edges, or rope-eating cracks. The potential forces of a pendulum fall are almost the same as a free fall. In a laboratory, a 150-pound weight dropped from a point level with but 30 feet to the side of the anchor point will be going close to 30 miles per hour at the bottom of the pendulum. The actual physics of a climbing fall’s speed will vary, depending on rope stretch, climber friction against the rock, angle of the rock, and rope out between climber and belayer, but the point is that hitting a flake or rock wall at the bottom of a 30-foot pendulum is not so different from hitting the ground from 30 feet up and would likely result in injury. If the climber is at a 45-degree angle to their protection, or pendulum point, the speed of fall will be about half that of the fall described above, but still enough to cause injury. As the distance from the protection point increases at any given angle, so does the potential speed of fall. At times it will be safest for the second climber to climb past the protection, which can protect them from the swing, then reach back and clean it from better holds.

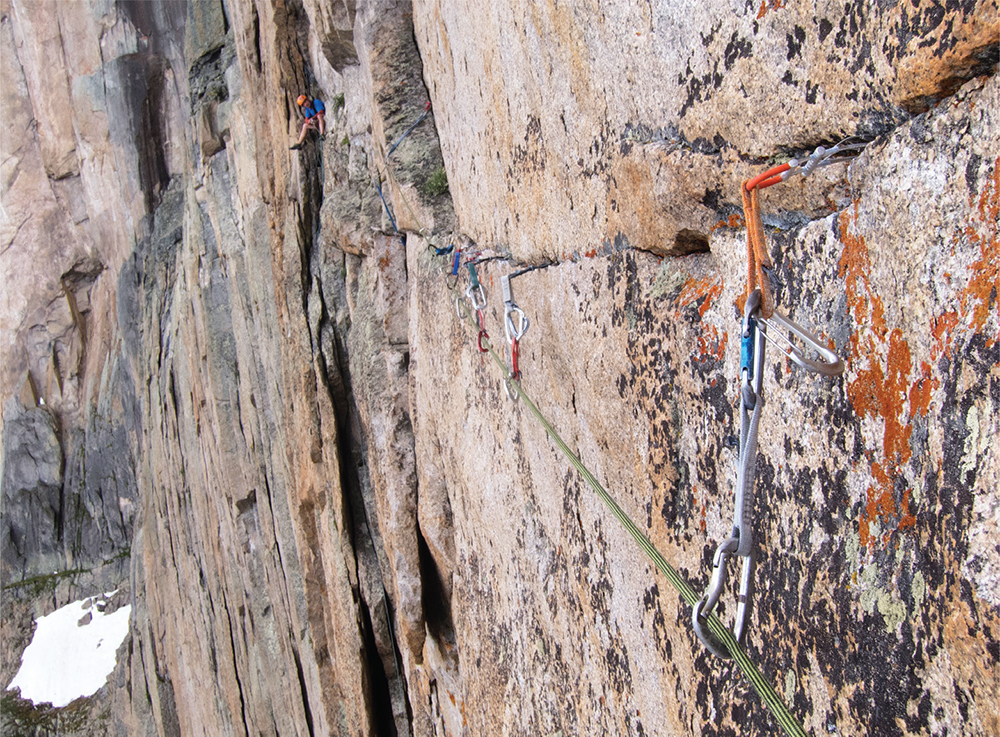
Steph Davis cruising Quarter of a Man (5.12), Indian Creek, Utah. Protecting this pitch involves using a good strategy for being both safe and efficient.

Finger cracks often deliver some of the most solid gear and most enjoyable gymnastics in the world of climbing.
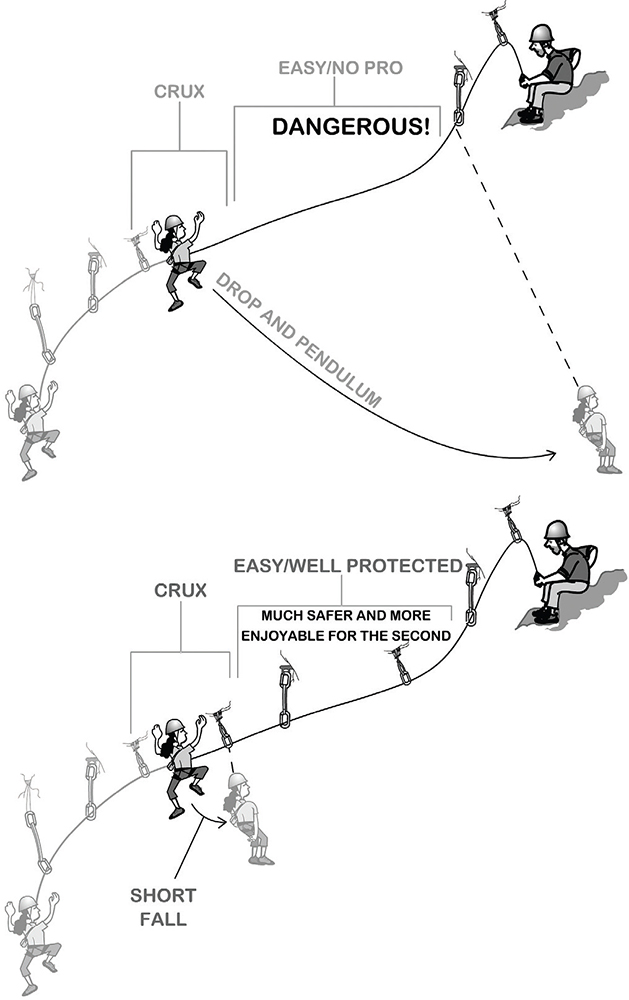
Set plenty of protection on traverses, especially after the cruxes, or else the second climber can take a big pendulum fall.
When you find yourself following a pitch like this, you’ll appreciate a leader who placed protection not only for himself but also for you.
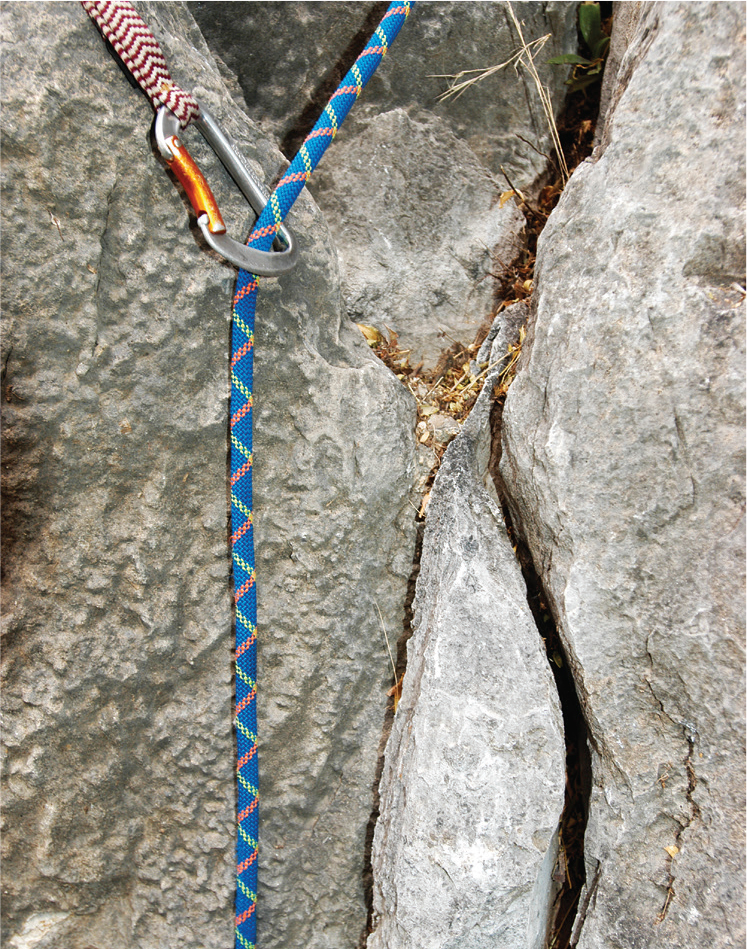
A clever leader will use protection to keep a rope from running into a tight crack, especially at the lip of a roof. Pro can be set to pull the rope away from the crack, as shown here, or it can be set inside the crack to keep the rope out. A nut, chock, or Big Bro—whichever fits the crack—works well for this.
ADVANCED TIP—EXTENDABLE QUICKDRAWS
Extendable quickdraws are handy on alpine and traditional rock routes. When the route runs straight up, you can leave the quickdraw shortened to minimize the length of a fall. When more extension is needed to keep the rope running clean, simply extend the sling.

A.Clip two carabiners in to a shoulder-length sling and pull them apart onto opposite sides of the sling.
B.Pass one of the carabiners through the interior of the other.
C.Pull the carabiner down until it is even with the two new loops in the sling and clip them.
D.Now you have an extendable quickdraw.
E.You can quickly get full extension by unclipping any two strands . . .
F.. . . and pulling the sling apart.
DUTIES OF THE LEADER
![]() Research the route’s ascent and descent information, gear requirements, and current conditions.
Research the route’s ascent and descent information, gear requirements, and current conditions.
![]() Come prepared with the right gear and a good mental state.
Come prepared with the right gear and a good mental state.
![]() Double-check knots, buckles, and belay setups before taking off on lead.
Double-check knots, buckles, and belay setups before taking off on lead.
![]() Set good protection right above the belay.
Set good protection right above the belay.
![]() Climb efficiently and in control.
Climb efficiently and in control.
![]() Set solid protection early and often in the pitch.
Set solid protection early and often in the pitch.
![]() Stay aware of the ever-changing consequences of a fall, depending on ledges and the ground, and protect accordingly.
Stay aware of the ever-changing consequences of a fall, depending on ledges and the ground, and protect accordingly.
![]() Exploit obvious protection opportunities, and ferret out obscure ones when necessary.
Exploit obvious protection opportunities, and ferret out obscure ones when necessary.
![]() Stay on route.
Stay on route.
![]() Protect traverses for the second as well as the leader and communicate with the second on how to clean the traverse safely.
Protect traverses for the second as well as the leader and communicate with the second on how to clean the traverse safely.
![]() Use appropriate extension to keep the rope running straight, but don’t overextend the protection.
Use appropriate extension to keep the rope running straight, but don’t overextend the protection.
![]() Avoid placing protection where it creates rope drag.
Avoid placing protection where it creates rope drag.
![]() Try to keep the rope away from bad rock, sharp edges, and rope-eating cracks.
Try to keep the rope away from bad rock, sharp edges, and rope-eating cracks.
![]() If the protection is sketchy or nonexistent, climb in absolute control or find a safe way to bail off the route.
If the protection is sketchy or nonexistent, climb in absolute control or find a safe way to bail off the route.
![]() Find a good belay station at the end of each pitch.
Find a good belay station at the end of each pitch.
![]() Watch the weather and execute contingency plans if the weather goes sour or if the climbing is too hard or dangerous.
Watch the weather and execute contingency plans if the weather goes sour or if the climbing is too hard or dangerous.
Extension
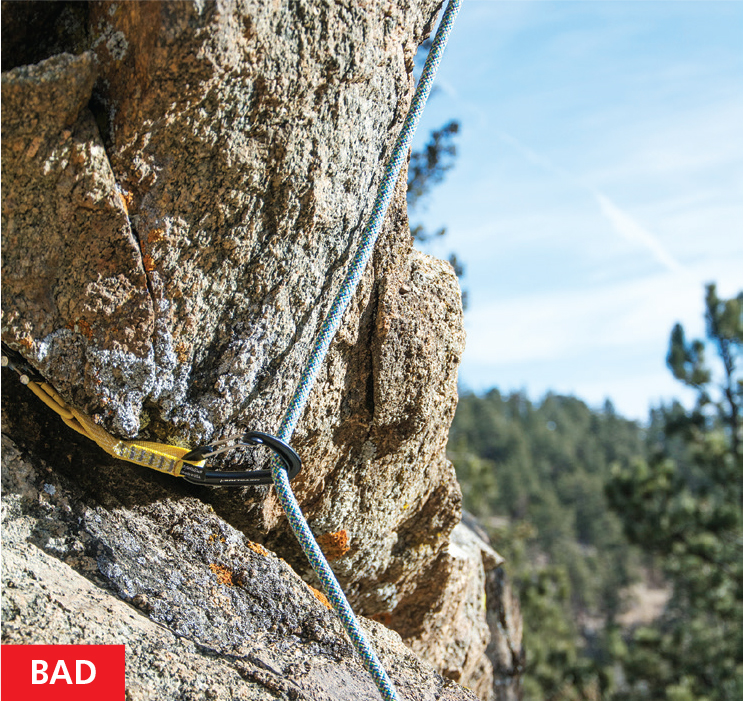
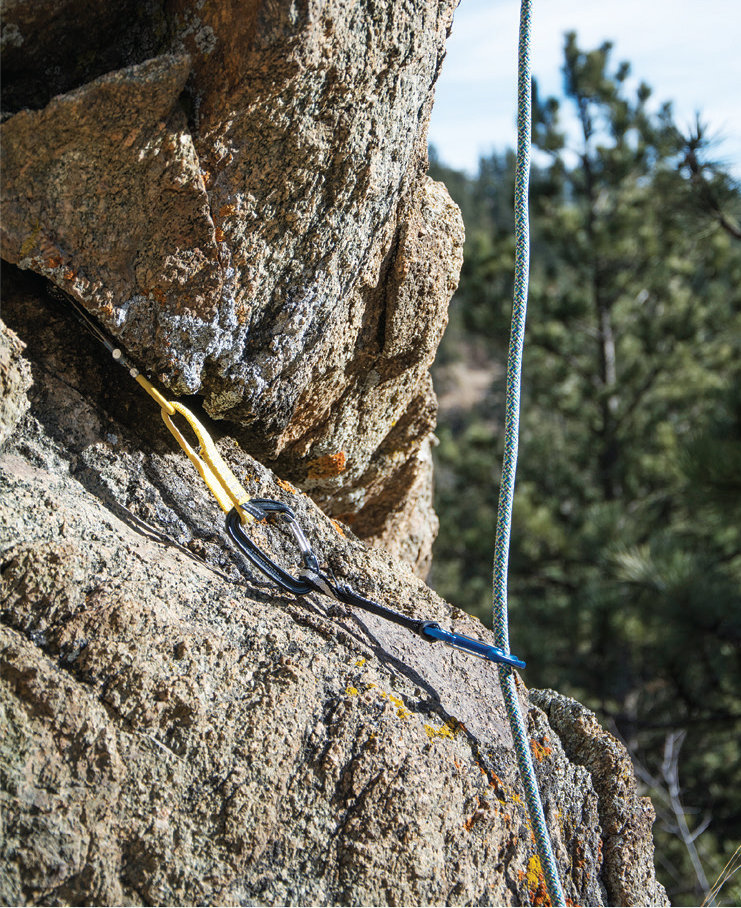
On a straight-up pitch, it’s usually okay to clip the rope directly in to the slings of cams or to clip wired nuts with a quickdraw. If the pitch traverses or climbs over a roof or jogs right or left, however, it’s good to extend the protection to keep the rope running straight. Try to get just the right length of extension—too much extension will increase the length of a fall more than necessary.
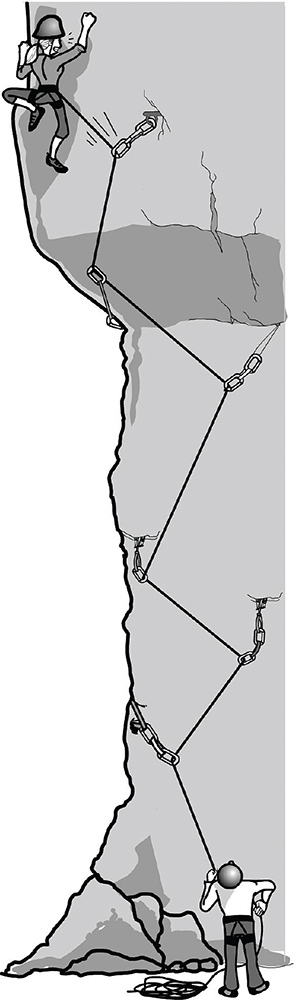
Poor extension. The protection is not extended enough, so the rope makes many bends back and forth. This creates huge rope drag and also puts a sideways pulling force on the pieces, which could pull them out in a fall.

Good extension. The rope runs clean by adding appropriate extension to the protection pieces.
On straight-up cracks, it’s best to clip a cam directly if it’s not buried deep in the crack. This also minimizes the length of a potential fall. Here, the leader ensures minimal rope drag with a combination of clipping short while the crack was going straight up, then with long slings just before the climb traversed right.
Here, even this slight bend in the rope will cause horrific rope drag for the leader as they climb above.

On this sharp turn right, it’s good to sling the protection extra long to prevent the rope from bending too sharply. Two shoulder slings enchained are necessary to avoid rope drag here.
In this case, just a single quickdraw extension is enough to keep the rope running straight.
ADVANCED TIP—HALF ROPES
On wandering routes, half ropes work great for clipping selective pieces—one rope on the right and the other on the left—to keep the ropes running clean. If two ropes are needed to descend anyway, the half-rope system can be the way to go. If the team must haul gear, though, a single rope and haul line work better.

By clipping one rope to the left and one to the right, it’s possible to keep the ropes running straight without extending the protection much. Half-rope technique also gives you a backup if one rope severs, but it can be more cumbersome dealing with two ropes, and cases of rope cutting are exceedingly rare. Most climbing is done using single-rope technique.
EXERCISE—TRAD PROTECTION
Beginning Trad Leader: The safest way to start trad leading is to do a few mock leads, with a top rope and a guide or very experienced trad climber to clean and evaluate your protection. The assignment: perform four mock leads to see if you’re ready to move on to the real deal. The first couple of leads should be easy, so you can relax while you set the gear. The next two leads should be progressively harder to give you a feel of what it’s like to place gear under pressure. If the climber or guide who evaluates your gear gives the green light, it’s time to do some real leads. For your first climbs, choose routes with ample protection opportunities that are easy for you to climb and slowly progress to harder climbs.
Intermediate Trad Leader: Improve your protection-setting skills: go to the base of an area that has plenty of cracks and set as much protection as you can in ten or fifteen minutes and have your partner evaluate the placements. Set all the types of gear that you have on your rack; don’t fall into the “cams only” mind-set. Repeat the exercise in different spots until you can quickly set a variety of good protection. Then, when climbing, challenge yourself to pick the right piece the first time rather than always taking several attempts to match the cam or chock with the crack size.
Advanced Trad Leader: On a short pitch that is entirely visible from the ground, try selecting the exact rack you will need before you leave the ground. Carry some extra gear on the back of your harness in case you get it wrong. This will help you to anticipate gear needs, which improves protection strategy, confidence in making do with what you have, and reduces the need to carry tons of extra equipment on longer pitches.