
A.Make a figure eight in the rope 2 or 3 feet from the end.
Climbers use knots for many purposes. This section focuses on knots used by climbers to construct anchor systems and attach themselves to the anchors. Other climbing knots are not included—see Rock Climbing: Mastering Basic Skills and Knots for Climbers, both by Craig Luebben, or Clyde Soles’s The Outdoor Knots Book for more climbing knots. Animated, step-by-step guides, such as www.animatedknots.com, can be found online and are excellent resources for reminders and basic instruction on how to tie most knots.
When reading the knot descriptions, the free end is the end of the rope, while the standing end refers to the side with most of the length of the rope. A bight is a loop of rope that does not cross itself, while a coil is a loop that does cross itself. When tying knots, keep them tidy and free of extra twists so that they maintain full strength and are easy to visually check.
Some knots weaken the rope more than others because they bend it in a tighter radius. This creates shear stress in the rope (loading across the rope fibers rather than along their length) and can severely stress the rope on the outside edge of the bend. The figure eight is a strong knot for tying in to rope because it does not bend the rope sharply. Many climbing books include a chart to show the relative strength of various climbing knots. These numbers are only roughly accurate, and they change with the material and diameter of the cord.
KNOTS FOR TYING IN TO THE HARNESS
The tie-in knot is the one we trust our lives to every time we go climbing. It is not redundant, has not benefited from technological improvements to reduce human error, and even if you tie it correctly a thousand times in a row, that one time you do it wrong will probably kill you. Tie your knot without distraction, check your partner’s knot, and have them check yours. Every time.
FIGURE-EIGHT TIE-IN
This is the standard knot for tying the rope to your harness because it’s strong, secure, and easy to visually check.
A properly tied, well-dressed, and tightly cinched figure-eight knot does not require a backup knot unless the rope is especially stiff. Nonetheless, it’s not a bad idea to add a backup to your tie-in knot.
A.Make a figure eight in the rope 2 or 3 feet from the end.
B.Pass the end of the rope through the tie-in points on your harness, which usually include the leg loops and waist belt.
C.Retrace the eight with the end of the rope, starting from where the rope emerges from the harness.
D.Continue retracing the knot so that the second strand lies parallel to the first.
E.Keep the knot tidy, or “well dressed.” Avoid extra twists and make the tie-in loop small so that the knot sits close to your harness. Cinch all four rope strands tight to secure the knot.
GRAPEVINE BACKUP
A properly tied figure-eight knot does not need backup, however, many climbers tie a backup knot that protects the primary knot from untying. Some use a simple overhand, but the overhand often unties itself within a single pitch of climbing. Use a grapevine or extra pass to back up your figure-eight knot.
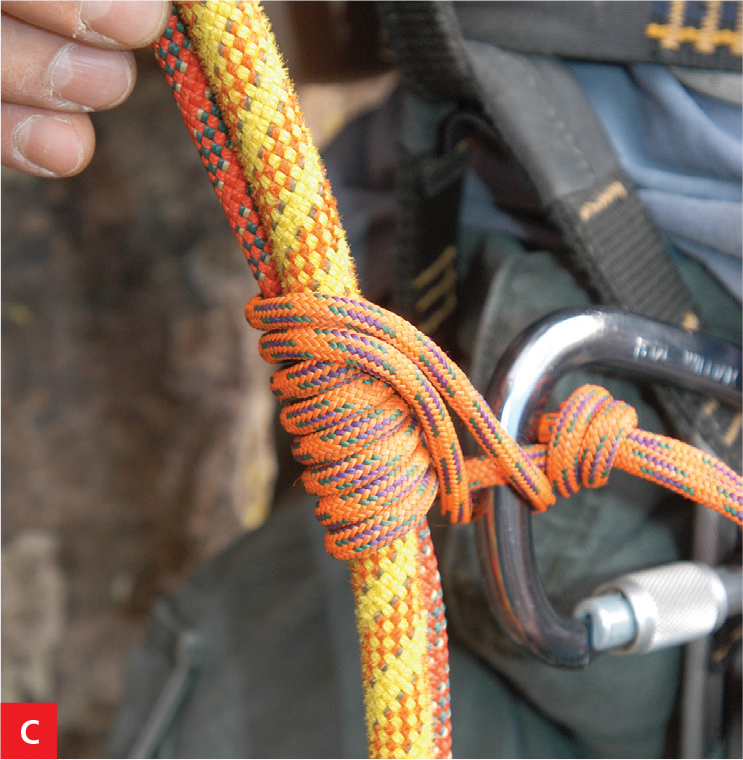
A.Tie a grapevine knot to back up the figure eight. Coil the rope once around its standing end, then cross over the first coil and make a second coil.

B.Pass the rope end through the inside of these coils and cinch the grapevine tight. Leave a 2- or 3-inch (5- or 8-centimeter) tail in the end of the rope.
EXTRA PASS BACKUP
The extra pass is simple: pass the rope end one more time through the figure-eight knot to secure it.

C.Tie a figure-eight knot, then pass the rope end one more time through the figure eight.
D.This secures the figure eight.
KNOTS FOR TYING IN TO ANCHORS
Always use a locking carabiner for tying in to anchors. Lacking a locking carabiner, you can substitute two carabiners with gates opposed (facing opposite directions).
CLOVE HITCH
The clove hitch allows you to adjust the length of your tie-in to the anchors without untying or unclipping the knot. To extend or shorten your tie-in, simply feed rope through the clove hitch. Once you unclip the clove hitch, it’s gone—no knot to untie. Always cinch the clove hitch tight by pulling on both rope strands, otherwise it can loosen and possibly unclip itself from the carabiner.
Forming the two loops and clipping them in to the carabiner is the fastest way to tie the clove hitch. When belaying a lead climber, tie the clove hitch with the load strand next to the spine of the carabiner for maximum strength. The carabiner can lose up to 30 percent of its strength (depending on the carabiner shape and rope diameter) if the load strand sits near the carabiner gate. This is not a problem if the carabiner holds only body weight, but it could be dangerous if the attached belayer catches a leader fall.

A.Twist two coils into the rope so that it looks like a two-coil spring.
B.Slide the top coil below the bottom coil. Do not twist or rotate the coils.
C.Clip both coils into a locking carabiner and lock the gate. If you’ll be belaying a lead climber, be sure that the load strand of your rope sits next to the spine of the carabiner.
OVERHAND
The overhand knot is useful for creating a loop. Because it puts a sharper bend in the rope, it’s not quite as strong as a figure-eight knot, and it’s harder to untie after being heavily loaded.

A.Take a bight of rope and make a coil in both strands of the bight.
B.Pass the bight through the coil.
C.Cinch the overhand tight.
FIGURE EIGHT ON A BIGHT
Tie a figure eight in the middle of the rope to make a strong loop for clipping yourself in to anchors. The figure eight on a bight works in many situations where you need a secure loop to clip. It is easy to untie even after loading.

A.Take a bight of rope and form a figure eight with the two strands of the bight.
B.Pull the bight through itself, cinch the figure eight tight, and clip it.
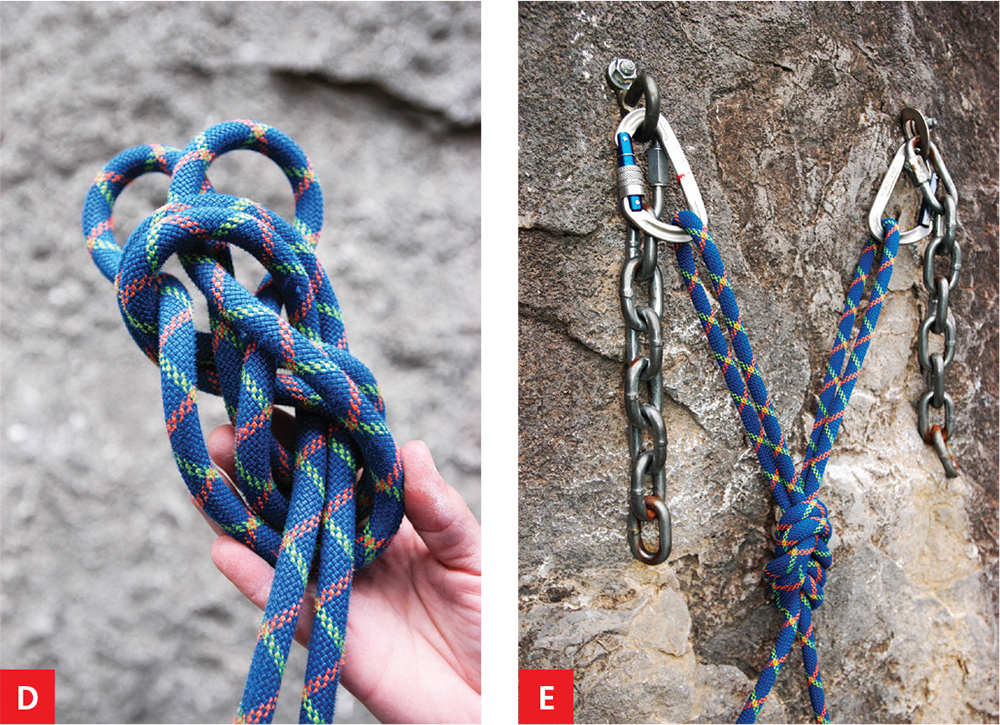
DOUBLE-LOOP FIGURE EIGHT
The double-loop figure eight creates two secure loops that can be clipped to two different anchors. It is not truly redundant, because if one loop severs, the other loop may slip through the knot, causing anchor failure. However, the rope is rarely redundant anyway. Make sure the rope does not contact any sharp edges.
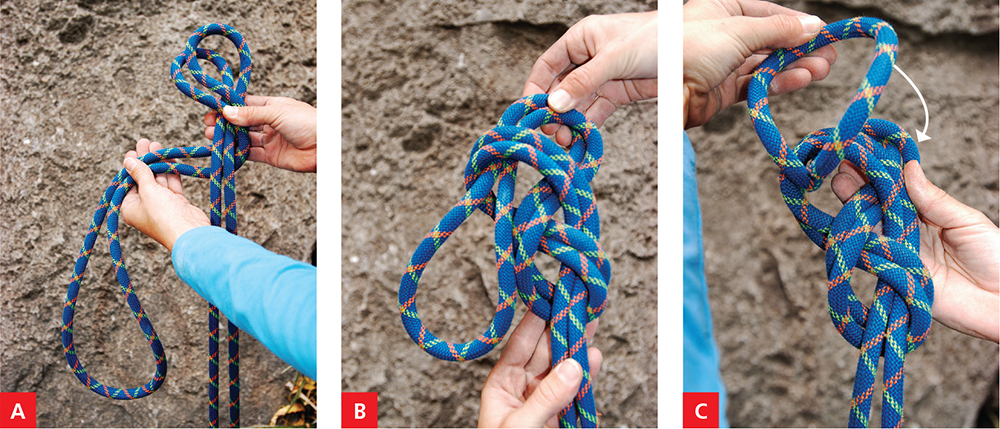
A.Begin tying a figure eight on a bight, with a longer than normal loop.
B.Rather than passing the initial bight through the eight to finish the knot, pass a bight from each strand through the figure eight.
C.Take the initial bight and flop it over the entire knot.
D.Pull the resulting bights through the figure eight to cinch the knot tight.
E.Adjust the loop lengths by pulling the rope through the figure eight. This lengthens one loop and shortens the other.
KNOTS FOR TYING A ROPE AROUND A TREE OR BOULDER
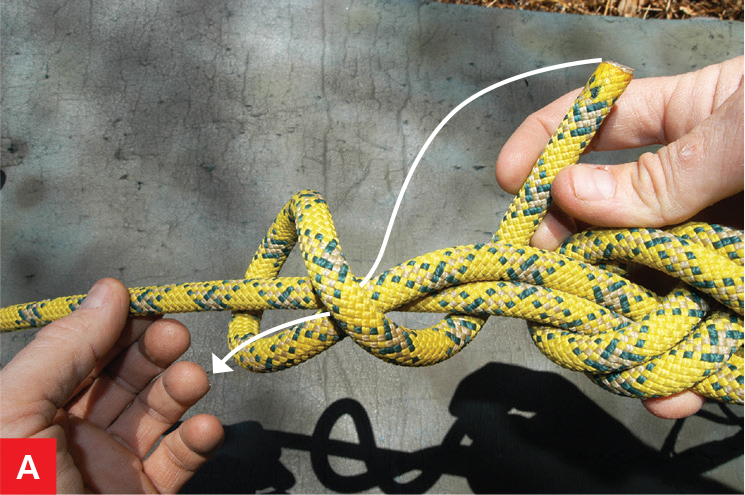
DOUBLE BOWLINE
The double bowline is great for tying a rope around a tree, boulder, or other natural anchor. Many sport climbers also use a double bowline for tying in because it’s a snap to untie, even after multiple falls. A loosely tied double bowline can untie itself if the knot is wiggled, especially if the rope is stiff—always back up the double bowline with a grapevine or other secure backup knot and cinch both knots tight.

A.Pass the rope around a tree or other anchor, then twist two coils in the standing end of the rope.
B.Bring the free end of the rope up through the coils, down around the standing end of the rope, and back down through the coils. The rope’s free end should come into the middle of the double bowline.
C.Cinch the double bowline tight.
D.Finish the bowline with a grapevine backup.
KNOTS FOR JOINING WEBBING OR CORD
While sewn webbing has reduced the need for tying knots in slings, it is still essential to know how to tie the ends of cord or webbing.
WATER KNOT
Water knots tie pieces of webbing into loops. The water knot unties over time as it gets loaded and unloaded—check that the tails are at least 7 or 8 centimeters (3 inches) long every time you climb. Some climbers tape the tails to prevent them from creeping. If you do this, leave the ends of the webbing in view so you can see them.

A.Tie an overhand knot in one end of a sling and match the other end of the webbing to the first end.
B.Retrace the original overhand knot.
C.Cinch the knot tight. The tails should be at least 8 centimeters (3 inches) long.
FLAT OVERHAND
Many guides use the flat overhand for tying a cordelette into a loop because it’s quick to tie and untie. The flat overhand is more secure than it appears, provided that you cinch it super tight and leave the tails at least 30 centimeters (12 inches) long.


A.Take both ends together and tie an overhand knot.
B.Cinch the knot tight, leaving a tail at least 30 centimeters (12 inches) long.
C.If the ropes are icy or dramatically different diameters or types (such as one dynamic and one static), adding a secondknot, as shown, will increase the strength and security of the knot.
D.This rope is now ready for rappelling.
DOUBLE FISHERMAN’S
The double fisherman’s knot joins cord into a loop, for example, to close a cordelette or sling a chock.


A.Coil one free end of the cord around the other.
B.Cross the cord over itself and make a second coil.
C.Pass the end through the inside of the coils.
D.Repeat the first step, this time coiling the second rope around the first, but in the opposite direction so that the finished knots are parallel to each other.
E.Cinch the knots tight. When the knot is finished, the coils should be clean and parallel as shown.
HITCHES
A hitch is a knot that requires the application of force in order to retain its structure. Hitches are among the most versatile of climbing techniques, and the following hitches are mandatory techniques for any climber to know.
GIRTH HITCH
The girth hitch has many uses. With it, you can
![]() fasten a sling or daisy chain to your harness for clipping in to anchors (always tie in to anchors with the climbing rope if you will be belaying),
fasten a sling or daisy chain to your harness for clipping in to anchors (always tie in to anchors with the climbing rope if you will be belaying),
![]() fasten a sling around a tree to make an anchor,
fasten a sling around a tree to make an anchor,
![]() attach two slings together to make them longer,
attach two slings together to make them longer,
![]() connect a sling to a carabiner without opening the carabiner’s gate (perhaps because it’s your only attachment to the anchor).
connect a sling to a carabiner without opening the carabiner’s gate (perhaps because it’s your only attachment to the anchor).
Don’t girth-hitch the cable on a nut or chock or any other small-diameter object, because the sling may be cut by it under load.
In a recent incident, a thin Spectra/Dyneema sling that was girth-hitched to another sling broke under little more than body weight. The sling may have been compromised, but climbers may wish to avoid girth-hitching slings of different diameters together. If shock loading is anticipated, use a carabiner attachment instead of a girth hitch.


A.Pass the webbing sling through your belay loop or around any object you want to fasten it to, and pull one end of the webbing through itself to create the hitch.
B.This fastens the webbing to the belay loop. Consider adding a second piece of webbing for redundancy.
PRUSIK
The prusik is a friction hitch, and if you’re going to learn to use only one friction hitch, the prusik is it. It’s easy to remember, and it grips well.
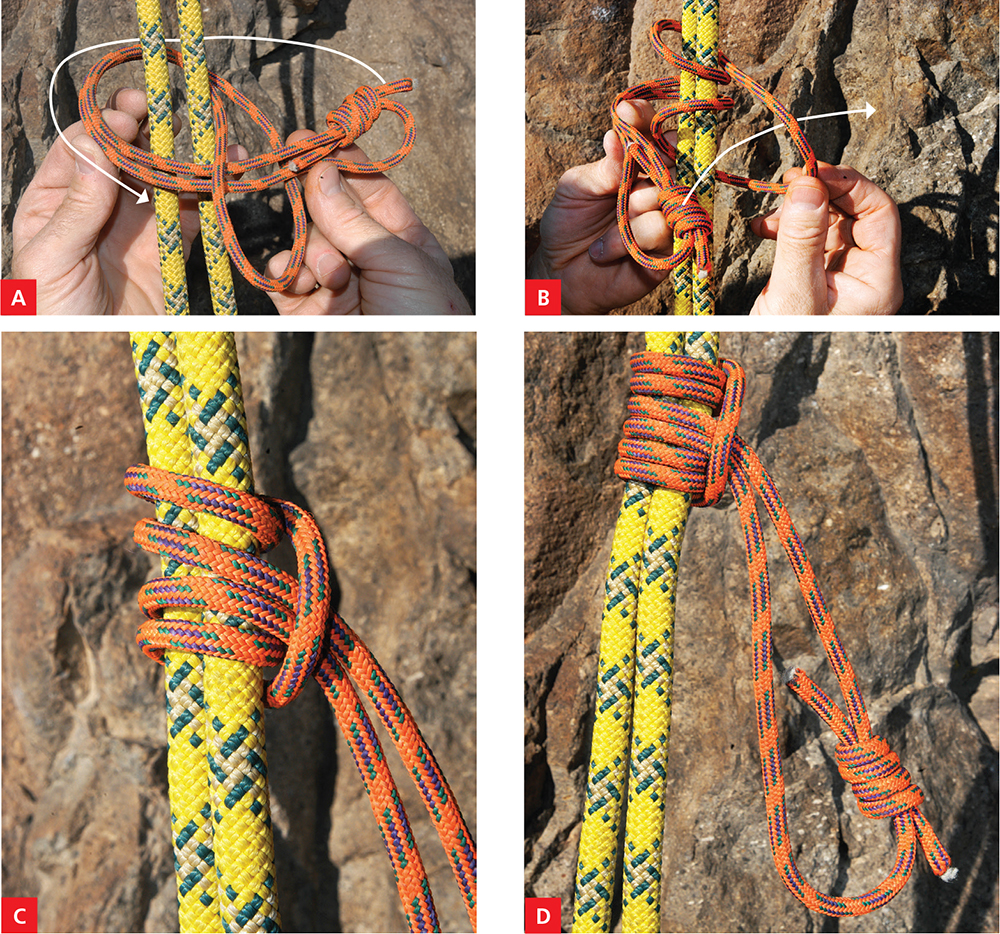
A.Take a thin-diameter cord (5–7 millimeters in diameter) tied into a loop, wrap it once around both strands of the rappel rope, and pass it through itself as if you’re making a girth hitch.
B.Wrap the cord once again around the rope and through itself.
C.Now you have a 2-wrap prusik.
D.Repeat the procedure to create a 3-wrap prusik for more friction. Keep the wraps neat and parallel.
AUTOBLOCK
The autoblock adds convenience and safety by backing up your brake hand when rappelling. If you accidentally let go of the rope, the autoblock “grabs” the rope and halts your descent. The autoblock prevents overheating your brake hand on a long, steep rappel, because your hand rests on the autoblock, not the sliding ropes.
The autoblock is usually set on the harness leg loop so that it cannot touch the belay/rappel device. If the autoblock tails are too long, or if the rappel device sits too low, the cord can touch the device. In this case, it may not lock, or worse, it could jam in your rappel device, stranding you until you unweight it. If you can’t get the required separation between your autoblock and rappel device, extend the rappel device farther from your harness by girth-hitching two short slings in to your belay loop and attaching the rappel device to them.

A.Clip a nylon sling or a loop of cord to your leg loop with a locking carabiner. Wrap the sling or cord around the rope. To shorten the resulting knot, you can also girth-hitch one end of the sling or cord to your leg loop, then clip the other with a carabiner.

B.Wrap it four times until you have a 5- to 7.5-centimeter (2- to 3-inch) tail on each end.
C.Wrap the cord too tight, and you’ll have a slow, jerky rappel; not tight enough, and the autoblock won’t grab when you need it. Practice with the autoblock to get the length right. The rappel device goes on the rope above the autoblock.