Chapter 5:
Equipment, Helpful Tips, and Conversions
I’ve always heard how baking is such a precise science, but I’ve found that baking with real, whole foods can be a rather inexact science, as the sizes, shapes, and moisture content of the whole foods vary. In the beginning, I used measuring cups, but find it easier to use a kitchen scale now (and anything that makes life in my kitchen easier is good with me!). One of the benefits of this type of baking is that most of the ingredients we use don’t require additional oils or liquids, because the whole foods already contain them.
Whole foods contain different amounts of moisture, oils, fiber, starches, and sugars. Once you get used to working with them, it’s easy to judge whether you need a little more or little less of a particular ingredient. Usually, simply adding an extra egg to loosen a thick batter or adding a tablespoon more of coconut flour to thicken a batter that’s too wet, is all that’s needed.
You may also notice that most of the recipes call for fairly consistent ingredients, such as almond and coconut flour. For varied tastes and nutrients, many recipes can be substituted with other nuts. Almonds and coconut have become very popular choices for those going grain-free, not just because they’re high in protein and fiber, but also because of their mild taste and visual appeal, which gives the most traditional taste and texture of baked goods. Also, when you’re first switching over or learning to use different ingredients, I think it’s best to keep it as simple as possible.
Real Food Kitchen Equipment
The right equipment can make a huge difference when baking, and below I’ve listed for you the items I use most frequently. A well-stocked kitchen already has many of these kitchen tools. You’ll want to invest in a nice, high-powered, sturdy food processor and blender for smooth batter results in minutes. I use the Cuisinart 14-cup food processor and the Vitamix blender. They’ve been worth every penny.
•Blender
•Food processor
•Kitchen scale
•Coffee grinder or Magic Bullet
•Spiralizer for veggie noodles
•Oven thermometer and timer
•Cutting board
•Electric handheld mixer
•Muffin pans
•Doughnut pans
•6- and 8-inch cake pans
•7-inch springform pan
•Pastry cutter
•Pie pans
•Baking sheets
•Cooling racks
•Microplane zester
•Measuring cups and spoons
•Mixing bowls
•Spatulas, knives, whisks, and wooden spoons
•Colander/sifter
•Silicone baking sheets
•Parchment and waxed paper
•Slow cooker and pressures cooker are great additions
•Lastly, you need an oven (haha) and you need to know how it bakes, as not all are created equal.
Having the items I’ve listed on hand will make it simple for you to bake the recipes in this book. Most of the equipment is easy to find and fairly inexpensive.
Helpful Tips
Over the years of experimenting in my kitchen with whole foods I’ve learned a few tricks. I admit, it’s also made me a bit crazy I think (well, I have to blame it on something!). It might be more accurate to say that my choice to employ occasional deceptive cooking practices has taken its toll on my mental health. Keeping secrets, especially from those you love, can mess you up, so you may be happy to know that writing this book has helped to lift a huge weight off me. Now my whole family will know there may be a tomato in their cupcake or a zucchini in their pancake. I hope this mental decline doesn’t happen to you, so if you feel the need to be honest, go right ahead. It’s likely no one will believe you anyway. I also figured I’d save you from having to learn all the tricks the hard way and share a few with you, so now you’ll have more time to eat your delicious creations.
Below I’ve listed some general, overall tips as well as some food-specific tips:
•I once dropped a whole egg, shell and all, into my food processor as it was blending. For this reason, I always crack my eggs into a small bowl first and then add them to the batter.
•My recipes were only tested with real eggs from my chickens, which are on the large/extra-large size. Small eggs will affect the recipe, so don’t be afraid to add an extra egg if you think you need one. I sometimes list the volume of eggs (ie: 1 cup) for this reason.
•As long as the foods are clean and organic, I often don’t bother peeling them (unless I don’t want the green zucchini skin to discolor the white cupcake). The recipe will designate if the food should be peeled; otherwise, it’s really your choice. However, an unpeeled potato may mean a thick batter that would benefit from an extra egg. And always taste the peel for any bitterness before deciding to use it.
•Many of the recipes can be made either in a blender or a food processor. To use a blender, add the eggs, fruit/veggie, nuts (if not using nut flour), and other wet ingredients and blend. Mix the dry ingredients in a bowl then pour the wet into the dry.
•If you want to use your food processor instead of the blender, add the dry ingredients before the eggs or any other ingredients that contain a lot of moisture. Stop it a time or two and stir and scrape down the sides as needed.
•You may substitute blanched, slivered almonds for another nut if you prefer. To de-skin raw almonds, submerge one minute in boiling water, cool, and pinch out of their skins.
•To substitute other nuts for almond flour, add them to the blender with the wet ingredients. About 1¼ cups nuts = 1½ cups almond flour.
•The almond flour I use is finely ground from blanched almonds from one of the brands on my Resources page. If you use another flour that is more coarsely ground, results will differ. You can grind it more fine in your food processor if need be. Do not use nut meal (which contains the skins).
•I use the “dip and sweep” method of measuring flour which means I dip the measuring cup in and level it off with a butter knife, instead of pouring the flour into the cup, which would yield a slightly different measurement.
•If needed, sift sweet potato, coconut flour, and baking powder/soda to remove any lumps.
•While most of these recipes use raw fruits and veggies, I keep baked sweet potatoes and boiled red skin potatoes on hand in my refrigerator for various uses as well. For the sweet potatoes, just place them whole and un-punctured on a cookie sheet and bake them at 325°F for about an hour. Simmer red skin potatoes with their skins on, in water until soft.
•I generally use unsalted butter.
•Grind psyllium husks (don’t use the whole seed as results will be affected), and chia seeds to a fine powder in a coffee grinder/Magic Bullet.
•While grinding erythritol will powder it, it still may re-crystalize and have a crunch in some frostings or other low-moisture recipes. If you follow the directions for my frostings, they’ll be nice and creamy without a crunch.
•You can substitute for baking powder by mixing 2:1 cream of tartar and baking soda.
•Do not switch baking soda for the baking powder in a recipe where color is important (such as the Red Velvet or Lavender cupcakes)
Bread and Pizza Tips
•Make sure to adequately grease the bottom of the pans for easy removal. I usually use coconut oil, ghee, or palm oil. You can also buy coconut oil cooking spray now.
•The crust may look dark, but it’s necessary to ensure that the inside is cooked. Cover with parchment paper or aluminum foil, if desired, to keep it from over-browning.
•For a softer crust, store the bread in a plastic bag so the moisture content can redistribute.
•Don’t worry about over-working the dough; there’s no gluten to develop.
•If the dough has been sitting out for a while and/or the outside seems dry, spritz it with water before baking.
•Baking pizzas on a stone and/or the bottom rack helps crisp up the crust.
•Liberally grease the pan with olive oil or use a silicone baking sheet instead of parchment paper.
Crusts, Crackers, and Wraps Tips
•Make sure to roll the cracker dough nice and thin and as even as possible.
•Use a silicone baking pad rather than parchment paper because the moisture in the dough or batter can cause the parchment to wrinkle and give you wrinkly crackers and wraps.
•Crackers and wraps can burn quickly, so keep a low oven temperature and a close eye on them.
•After baking, make sure to leave the crackers to dehydrate more in a warm oven to crisp up.
•Always use a crust protector for crust edges.
• For quiches and pies such as pumpkin I find grain-free crusts best fully pre-baked rather than par-baked.
Sweets Tips
Every day it seems a new sweetener comes on the market. Pick a few you like and trust without hidden “natural” ingredients. If you choose a erythritol/monk fruit blend, it will likely be a little sweeter than just plain erythritol. My recipes were tested with pure monk fruit (Lakanto or Pure Monk brands) or liquid stevia (Sweet Leaf or Trader Joe’s brands). The liquid needs to be added to the wet ingredients in the blender; however the powder can be added to either the dry or the wet.
•If you don’t have paper cupcake liners, coat the cups with coconut oil and dust with coconut flour. I don’t suggest silicone baking cups for the cupcakes.
•Most batters should be the consistency of thick pancake batter. Batter consistency will also depend on whether you use the skin or not; the skin will usually make a thicker, stiffer batter.
•If the batter seems too thick, add another egg and blend once more.
•If the batter seems too thin, add an additional tablespoon of coconut flour.
•If you desire more sweetness a few more drops of monk fruit or stevia works great.
•If a recipe calls for a potato/sweet potato, it is usually used raw. It can usually be substituted with a raw summer squash (like a yellow or green zucchini) or even another fruit/veggie, plus an additional tablespoon of coconut flour and a tablespoon of coconut oil.
•Use the toothpick method to check for doneness. Stick the toothpick into the bread or cake, and if it comes out clean, it has finished baking.
•A pinch of guar gum added to frostings increases freezing ability and makes it fluffier.
•If you’re counting carbs, ⅔ cup sweet/potato per cupcake recipe = less than 1 tablespoon per cupcake.
•Grain-free pie crusts made without added starch easily absorb moisture, so brushing with an egg and gelatin/agar wash and pre-baking them is essential.
•Using a kitchen scale is quicker and easier than evenly chopping and using a measuring cup.
•Baking powder that has cream of tartar as an ingredient helps maintain the color of the vegetable in the baked good. Adding ½ a teaspoon of cream of tartar to a cake batter helps also, but don’t use baking soda as it will affect the color.
•Frost cakes soon after cooling, or wrap in plastic to keep from getting a dry exterior. They all freeze well.
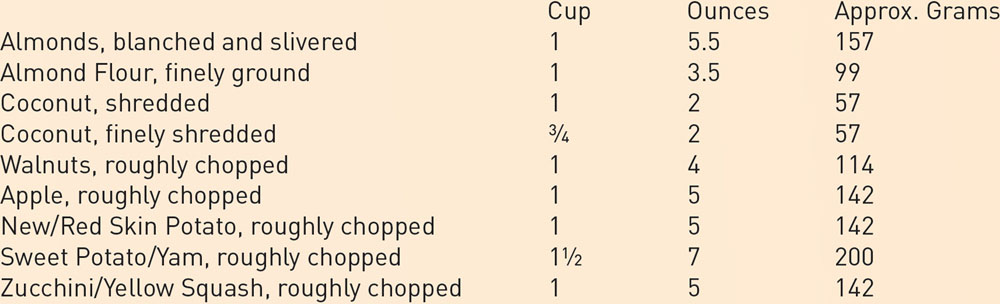
Conversions & Equivalents
Oven Temperature Equivalent
| 100°F = 38°C | 200°F = 95°C |
| 250°F = 120°C | 300°F = 150°C |
| 350°F = 180°C | 400°F = 205°C |
Equivalents to 1 Cup of Table Sugar
1 cup erythritol/monk fruit blend
1⅓ cup erythritol or IMO sweetener
2 cups date sugar plus extra liquid (depending on recipe)
1–2 teaspoons 100% pure monk fruit—varies with manufacturer and product.
1–2 teaspoons stevia powder or liquid—varies with manufacturer and product.
¾cup date syrup, maple syrup, or honey, plus 2 teaspoons coconut flour or about 20% less liquid
1 cup xylitol
Almonds
1¼ cups blanched, slivered almonds = 1½ cups flour
Note: The more fiber, fat, and protein in a meal, the slower the digestion and absorption of sugars and carbs, therefore a slower blood sugar elevation.