Chapter 11
‘I CAN’T LOSE HALF MY MOUNTED TROOPS’
February to May 1918
After the fall of Jerusalem, General Allenby’s next objective was to occupy the western side of the Jordan Valley from the Dead Sea to Wadi el Auja. General Chetwode’s XX Corps was given the task, while the Anzac Mounted Division advanced from Bethlehem on the right flank heading for Jericho. The advance was via narrow valleys and mountain tracks, ‘a gaunt place of fierce heat, strong winds, and blinding dust-storms, giving sustenance to neither man nor beast’.1 The main enemy defences were astride the Jericho road, a ‘track very rough and hilly’ as Jim Greatorex described it.2
General Cox’s 1st Brigade and the New Zealand Mounted Rifles Brigade concentrated at El Muntar some 10 kilometres from the Dead Sea. On 20 February 1918, the New Zealanders overran Turkish defences among the hills, thus opening the way for Lieutenant Charles Parbury’s troop from the 1st Light Horse to move down the Wadi Kumran to the Dead Sea Plain. The rest of Cox’s brigade followed and forced the Turks back from the Jericho road. Edwin Brown observed that ‘Bridges blown away in several places caused a little delay.’ At 8 p.m. the 1st Brigade was ordered to make a night march, ‘passing down some very steep hills and gullies . . . and very windy till at last we come out on the flat side of the Dead Sea’.3 Frank Hurley accompanied the brigade: ‘At times the horses slid, more than walked down the steep rocky faces, and the only guide was the dim outline of the horseman ahead or the trail of sparks from the horseshoes.’4
The squalid town of Jericho was entered by the 3rd Light Horse on the morning of 21 February. ‘A dirty little hole containing only one building of any size . . . the Jordan Hotel,’ Maurie Evans wrote.5 ‘We captured only some 40 prisoners,’ Frank Hurley added, ‘wretched specimens of beings, unshaven, unkempt and hungry.’6 Chetwode’s infantry now moved forward to drive the Turks across the Jordan River. ‘Their camps we could see at the foot of hills over the Jordan,’ Edwin Brown wrote.7 On the western side of the Jordan there were some imposing sights, such as the spectacularly sited Greek Orthodox Monastery of St George, hewn out of the cliffs of Wadi Kelt a few kilometres above Jericho. Nearby was the white Monastery of the Temptation, on Temptation Hill. Evans wrote that this was ‘where JC was tempted by the devil and fasted 40 days etc’.8

The Jerusalem to Jericho road winds its way through great waves of limestone at Talat ed Dumm. ‘A bare barren place,’ Granville Ryrie wrote. ‘A sort of white chalky ground covered with stones, no grass or trees of any sort.’ Walter Smyth collection.

Map 7: Es Salt and Amman

Jericho locals. Reg Dixon collection.

The Monastery of the Temptation hewn out of the cliffs of the Mount of Temptation above Wadi Kelt. Reg Dixon collection.
On the night of 28 February, a Martinsyde aeroplane was transported to the western shore of the Dead Sea. The plane, which was nicknamed Mimi, was stripped of its wings and tail and fitted with floats, then launched before dawn to attack a fleet of enemy boats on the eastern shore. The hydroplane skimmed across the water until the rudder-yoke broke and it drifted ashore. The pilot then had the floats removed and converted to makeshift canoes, each to carry four men, but the men were unable to row close enough to the enemy boats to complete the mission.9

Rushing a canteen in the Jordan Valley. Ralph Kellett collection.

Mimi, the Martinsyde hydroplane on the Dead Sea. Wilfred Baker collection.

Amman, 50 kilometres north-east of Jericho, was an important rail centre, with a rail tunnel and viaduct for the Hejaz railway nearby. Wanting to maintain the initiative, General Allenby ordered an operation against Amman to destroy the rail infrastructure and draw Turkish forces away from the coastal plain and the southern region. Major General John Shea would command a force based around his 60th Division, but floods delayed the crossing of the Jordan and the enemy rushed in reinforcements to hold the east bank.
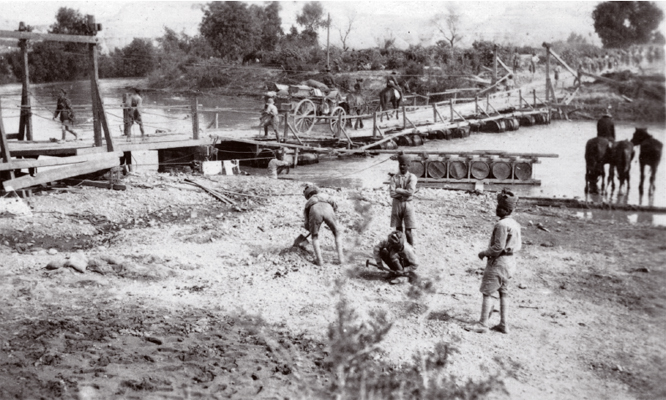
A cart crosses the Jordan River on a barrel pontoon bridge. Six empty drums have been lashed into a wooden frame to create each pontoon. Reg Dixon collection.
By mid-March, the Anzac Mounted Division and the Imperial Camel Corps brigade had concentrated at Talat ed Dumm. The infantry of the 60th Division finally crossed the Jordan at Hajla on the night of 21 March, via a pontoon bridge constructed by the Australian engineers of the 1st Field Squadron. One of the engineers, Fred Bell, had swum downstream under heavy fire to position the stay cables of the bridge.
The New Zealanders crossed the Jordan and headed north up the east bank to clear the Ghoraniye crossing point, while other troops landed east of the Jordan estuary on the Dead Sea shore. In response, the Turks pulled back to the foothills around Shunet Nimrin, blocking the main road to Es Salt. The 6th Light Horse was the first Australian regiment to cross the Jordan, and the rest of Ryrie’s 2nd Brigade followed. ‘It is only a few yards wide and a couple of feet deep, bridged by a pontoon, and the banks, and even the stream itself was dense with foliage and made a pretty sight,’ Jeff Holmes wrote.10 The track that Ryrie’s men followed to the east was barely suitable for led horses. Ryrie ‘had to turn all limbers and carts back & it was soon evident that it was an almost impassable goat track’.11 Rain made progress even more difficult, particularly for any camels. ‘We climbed a hill, and slid down precipices and it beats me to this day how some of us never got killed,’ Jeff Holmes wrote. ‘We travelled awful slow, standing for hours in the cold rain.’12

A line of light horsemen bound for Es Salt. John Gorrell collection.
Cox took his 1st Brigade north but the supposed road really was ‘a mere goat track’. Moving in single file, it took Lieutenant Colonel George Bell’s 3rd Light Horse three hours to cover the first 5 kilometres. ‘At one stage it was as much as we could do to get the pack horses along the narrow ledge,’ Major James Clerke wrote. ‘The ammunition panniers on the inside were scraping the rocky wall, while those on the off side hung over a precipice, from which was a sheer drop of hundreds of feet. Fortunately, the Turks did not expect us.’13
No opposition was encountered until mid-afternoon, by which time Bell’s regiment had crossed the formidable range.14 It may have been rough but, as Jim Greatorex wrote, the wildflowers gave the country the appearance of ‘a veritable garden of Eden in places’.15 Late on the afternoon of 25 March, Bell’s 3rd Light Horse reached Es Salt, an old mountain town of 15,000 inhabitants west of Amman. Bell sent 80 of his dismounted light horsemen around the Turk lines at night, and when daylight broke they opened fire with Hotchkiss guns on three Turkish machine-gun crews. As a result, some 1000 defenders fled in panic and Es Salt was secured.16 The light horsemen were particularly welcomed by some 4000 Christian residents of the town. ‘The inhabitants seemed very pleased to see us, firing off rifles in the air and running amok generally,’ Greatorex wrote.17 British infantry arrived soon thereafter to occupy the town, while the light horsemen moved out to cover the approaches.

A Turkish machine-gunner dead at his gun. ‘Out of time,’ Godfrey Burgess wrote as the caption. Godfrey Burgess collection.
Meanwhile, Ryrie’s brigade and Chaytor’s New Zealanders headed for Amman. Arthur Mills led the 4th Battalion of cameleers across the hills. ‘The track got slipperier, wetter and steeper,’ he wrote. ‘Lost quite a lot of camels, broken legs dislocated joints etc.’18 Major Arch Bolingbroke led the 5th Light Horse in the absence of Colonel Cameron, and the regiment captured enemy motor lorries along the Es Salt to Amman road. But although the New Zealanders and cameleers were able to cut the railway line south of Amman, the 5th Light Horse could not do the same north of the town. The Turks held a strong position at Amman, with good observation for their artillery from the other side of Wadi Amman, alongside which the railway line ran. ‘Very heavy machine gun fire,’ George Hunt wrote of the enemy response. With ‘no artillery to shift them from dominating position’, Amman would not fall easily.19
When the 2nd Brigade, the New Zealand brigade and the cameleers advanced on 27 March, the Turkish fire was devastating. The attacks continued the next day and the casualties mounted. Granville Ryrie’s brigade attacked dismounted and his cousin, Major Harold Ryrie of the 6th Light Horse, was badly wounded; within two years he would die of those wounds. Of the 58 men in Major Ryrie’s squadron, 40 were killed, wounded or missing. Trooper Bert Scurrah was one of the wounded, shot through the spine and right foot, ‘dangerously ill’ as his service record put it.20 ‘It was a poor lot who lined the ridge just in front of our lines last night,’ Joe Burgess wrote. Such dismounted infantry attacks were a long way from the glories of the mounted charges. ‘Jacko is obstinate,’ Burgess added.21 The 7th Light Horse also suffered heavily—by the end of the day only 50 men were in the firing line. Arthur Mills’s cameleers took part in an assault that night alongside the New Zealanders. ‘At 0200 my boys fixed bayonets and charged the Jacko lines,’ he wrote. ‘We with NZ cleared enemy out of his sangar possies . . . our boys did wonders they are all heroes.’22 But the attackers were up against Turkish reinforcements that had arrived by rail from the north, and Amman remained in Turkish hands. General Shea ordered a withdrawal.
Cacolets were used to bring some of the wounded men from Amman back to Es Salt. Of these swaying platforms slung either side of a camel, the official historian wrote that ‘It would be scarcely possible to devise a more acute torture for a man with mutilated limbs than this hideous form of ambulance-transport.’23 ‘The damnedest thing ever invented,’ was how Arthur Mills described them.24 As an alternative, eleven wounded men were strapped face down on the backs of horses on a bed of greatcoats and got out that way. ‘We put them on a horse back to front,’ Mills wrote, ‘put the man’s feet in a water bucket hung from the horse’s neck, laid the man’s belly on the saddle and tied the man’s hands together under the horse’s flank.’25 ‘That night was the worst I had ever put in,’ Granville Ryrie wrote. ‘The cold was simply awful, we rode all night & got to Es Salt.’26
There were a number of Circassian villages in this area. Many Circassians, who had been displaced from the northern Caucasus region by Russian forces in the 1860s and been resettled by the Turks, had strong sympathies towards the Turkish forces. ‘The Circassians are openly hostile to our people,’ Arthur Mills wrote. Emboldened Circassian villagers at Ain es Sir fired on the New Zealand rearguard, killing four or five.27 In response, 36 Circassians were driven from their houses and killed. As the official historian observed, ‘The retreat was not again molested.’28
The Turks also increased pressure on Es Salt. The 3rd Light Horse fought hard to hold it, but although Colonel Bell thought it a mistake, the town was evacuated on 1 April. ‘We imshied to near Es Salt today and we were glad,’ Joe Burgess wrote that day.29 The Christians trudged back with the Allied forces in the wet and cold. Some of the light horsemen carried women and children up on their saddles. ‘There were 3 or 4000 of all sorts and sizes and ages trying to carry all their worldly possessions and walk the 20 odd miles to the Jordan,’ Granville Ryrie wrote.30 ‘It’s crook to see the poor old folk struggling back,’ Joe Burgess observed.31 ‘We did our best for the travelling myriads,’ Ted Woods wrote. ‘Our first two passengers were baby girls . . . we finished up with more civvies than soldiers on the transport.32 ‘Many of the boys had kiddies on their camels,’ Arthur Mills noted.33

Refugees from Es Salt gather following the arduous trek to the Jordan Valley. ‘All along we passed the poor unfortunate refugees trekking, walking, dragging themselves along,’ Arthur Mills wrote. ‘Men, boys, girls, women, old men, babies.’ John Gorrell collection.
Though a stretch of the Hejaz railway had been destroyed during the operation, the Amman tunnel and viaduct remained intact; the operation had been a failure, with 1200 officers and men as casualties.34 Jeff Holmes summed it up for most: ‘It was by far the worst time I spent in my life.’35 Granville Ryrie concurred: ‘I never had anything like as rough a time since the day I was born.’36
Utilising the natural hills and swamps, the light horsemen had added trenches, wire and cleared firing positions to form a strong defence around the three Jordan River bridgeheads, which now came under considerable Turkish pressure. ‘Johnny has any amount of guns here now and nearly every morning wakes us up with his early morning drum fire,’ John MacNamara wrote.37 On 11 April, the Turks made a pre-dawn attack down the Wadi Nimrin against the Ghoraniye and Musallabeh bridgeheads. ‘In the half light (0400) each burst could be seen like a small stroke of lightning,’ Arthur Mills wrote. ‘The echo booms and rolls along the rocky wadi.’38 ‘All through the day the artillery kept going,’ Edwin Brown noted. ‘About a thousand Turk troops had come down from the hills.’39
At Ghoraniye, the 2nd Light Horse defenders allowed the attackers to get within 100 metres of their positions before opening fire with their Vickers and Hotchkiss guns. Most of the attackers fell under this fire, and the few that reached the wire got no further. Colonel Cameron’s 5th Light Horse also took a toll, as did the supporting artillery. General Cox wrote that the artillery dropped ‘a perfect hail of shrapnel on the thick scrub’, under the cover of which the enemy troops advanced.40 The Turks withdrew that night.
At the Musallabeh bridgehead, Colonel George Langley’s 1st Australian Camel Battalion was using stone sangars in lieu of trenches due to the rocky terrain. The Turkish assault troops worked their way up the wadis while artillery fire kept the defenders’ heads down, but the cameleers held them off. The bridgeheads remained secure.

A German despatch rider makes room for a native cart on the road from Amman to Es Salt. Royal New South Wales Lancers Memorial Museum collection.
To support the Arab army operating to the south, General Allenby now decided to make a second attack on Es Salt and Amman. General Chauvel would command the force, which was based around his two mounted divisions with two infantry brigades, two Indian cavalry regiments and considerable artillery resources in support. Chauvel had been ordered by Allenby to make ‘bold and rapid marches’. Under pressure to release up to 23 of his infantry battalions to France following the German spring offensive, Allenby wanted to gain the Amman–Es Salt area with a view to pushing on to Deraa and beyond before he lost most of his infantry.41
Chauvel moved the Australian Mounted Division across the Jordan on the evening of 29 April, covering the Londoners of the 60th Division in dust as the infantrymen prepared to attack the Turks at Shunet Nimrin. Sydney Barron later wrote, ‘We moved off just after dusk, leaving our fires burning to deceive the enemy.’42 Barron was with Grant’s 4th Brigade as it advanced across the Jordan plain, attracting artillery fire once day dawned. ‘Just on daylight Jacko discovered us and started to shell us from the opposite side,’ Barron wrote.43 Arthur Mills watched ‘the mounted men working up the flat under the enemy big gun fire. Wave after wave in extended order galloping and trotting along as though on parade.’44
Continuing at the gallop, Grant’s brigade suffered 23 casualties during the charge across the plain, six of them fatal. Wilson’s 3rd Brigade followed Grant’s and headed for Es Salt. ‘Turks had the wind up. Star shells everywhere and heavy artillery opened at random,’ Robert Fell wrote. ‘We were white with dust after our night ride.’45 ‘We had climbed four thousand feet in the ten miles from the river,’ Ron Kemp wrote of the subsequent move to Es Salt.46 ‘Words cannot describe that climb up, it seems a nightmare,’ Stan Parkes added.47

Dawn in the Jordan Valley at Jisr ed Damieh on 30 April 1918. ‘Just before battle,’ Joe Bradshaw wrote as the caption. Joseph Bradshaw collection.
There was no opposition until 3 kilometres west of Es Salt, where the Turks held hill positions, but these were soon taken by the dismounted troopers of the 9th and 10th Light Horse, before Lieutenant Charles Foulkes-Taylor of the 10th led the first troops into the town. They surprised a Turkish transport column trying to evacuate, forcing the carts off the track down into the wadi and taking 200 prisoners plus considerable material, including 28 new German machine guns.
Back down in the Jordan Valley on the night of 30 April, a force of some 4000 Turks crossed the Jordan River at Jisr ed Damieh and attacked Grant’s 4th Brigade, threatening to cut the supply lines of the force at Amman and Es Salt. ‘They looked like ants crawling along the white banks of the Jordan,’ Bill Smyth wrote.48 Grant was forced to pull his brigade back to defend the track to Es Salt, abandoning nine guns as he went. ‘Breech blocks and sights removed, guns abandoned,’ Henry Gullett wrote. ‘A wild galloping chaos, every man for himself.’49 Chauvel ordered up reinforcements.
Meanwhile, Ryrie’s 2nd Brigade and a brigade of mounted yeomanry had also reached Es Salt. But the Turkish breakthrough at Jisr ed Damieh compelled Chauvel to concentrate on opening the Es Salt road at Shunet Nimrin rather than pushing on towards Amman. Shunet Nimrin had proved impregnable from the valley side, so the yeomanry, supported by part of Ryrie’s brigade, were directed to attack the stronghold from the rear. Infantry from Shea’s 60th Division also moved up to support the operation, and for five days in stifling heat the Londoners battered at the defences without success. ‘The road wound through a gorge between hills which rose tier upon tier in rear, making a most effective position for observation and gun fire,’ James Clerke wrote.50

The road through Wadi Nimrin. John Gorrell collection.
Meanwhile, Wilson’s brigade adopted defensive positions around Es Salt. The 10th Light Horse was attacked on the night of 2 May but cut down hundreds with minimal loss. It was now three days since the crossing of the Jordan, but supplies were plentiful in Es Salt and there was good grazing country around the town. The 5th Light Horse, with the 8th and 10th alongside, now came under attack but drove the Turks back, capturing 319 prisoners. Some 200 more attackers were left dead in front of the Australian positions. Robert Fell was in the thick of the fighting with the 10th: ‘Fighting very close. I do some bombing, crawled out in front and settled a machine gun and crew.’51
But with Shunet Nimrin still in Turkish hands, Chauvel, after conferring with Allenby, ordered a withdrawal late on the afternoon of 3 May. ‘I can’t lose half my mounted troops,’ Allenby conceded.52 ‘We withdrew at night and got out through the pass,’ Granville Ryrie wrote. ‘It took some doing to get 5000 horses & men out in single file, if you allow 3 yds per horse it makes a column 8 miles long or more.’53 Once again, the wounded suffered greatly during the retreat. Of two badly wounded men who were left behind at Es Salt, one later died but the other, Corporal William Simms, was found alive in a hospital at Aleppo five months later. Arthur Mills watched the light horsemen return. ‘They came as fast as their tired animals could carry them,’ he wrote. ‘We could see them scurrying down the mountain track and across the flat.’54 Back down in the Jordan Valley, Grant’s men took a hammering but, with timely reinforcements, they kept the Turks at bay.
As with the first Es Salt ‘raid’, this second operation, despite the extraordinary dash of Grant’s and Wilson’s brigades, had ended in apparent failure. When General Allenby motored down to the valley to see Chauvel after the action, Chauvel expressed his regret at the operation’s failure. ‘Failure be damned. It has been a great success!’ Allenby replied and said he would explain later.55 He did so in a letter to a friend in London: ‘Nothing much doing here, for the moment, but my big raids beyond the Jordan have drawn Turks against me, and have eased pressure on the Arabs further south.’56 The two operations would prove crucial to the outcome of the war in the Middle East. As Allenby observed, they had the effect of forcing the Turkish command to direct more attention to the Amman area, and Allenby would subsequently exploit this in dramatic fashion.
In this war there were many ways to die, such as at Port Said on 10 January 1918. ‘Explosion on ship laden with Benzene, soon on fire,’ Alf Sly wrote. ‘One poor unfortunate caught up in port hole—terrible death.’57 Norm Garden also watched. ‘The flames were mountains high and the smoke black as ink,’ he wrote. ‘Her stern was blown away.’58

A ship ablaze at Port Said. John Gorrell collection.

A line of light horsemen descends the distant hills to cross a pontoon bridge over the River Jordan. Ralph Kellett collection.