
FACILITIES
Car park and charges: Yes; charges apply
Cafe: Yes
Toilets: Yes
Showers: Yes
Bike wash: Yes
Nearest bike shop: On site
Bike hire: Yes
Accommodation: B&Bs, Hotels, camping and self-catering accommodation in and around the Tweed Valley area.
Other trails on site: Green, Black, Orange freeride park and skills area, permissive paths and forest roads.
Ordnance Survey map: Explorer 337.
ENJOYMENT FOR SKILL LEVEL
Beginner: 9/10
Intermediate: 10/10
Advanced: 9/10
Getting there: From Edinburgh take the A703 to Peebles, turn left at the roundabout in Peebles and head east on the A72 towards Galashiels. You will see Glentress Forest on your left.
Grid ref: NT 28522 39867
Sat nav: EH45 8NB
More info: www.forestry.gov.uk
www.7stanesmountainbiking.com
TRAIL 1: RED
On-site grade: Red
Clive’s grade: Red
Distance: 18km
Technicality: 8/10
Ascent: 585m
ENJOYMENT FOR SKILL LEVEL
Beginner: 5/10
Intermediate: 7/10
Advanced: 8/10

From the newly built Peel Centre follow the trail signs past the shop and cafe and on to the forest road. You will climb on the forest road for a few metres. Take care on this section as this is the main access road to the upper Buzzard’s Nest car park and you may encounter vehicles.
You will bear right onto a quieter forest track and continue to climb slightly before taking a left into the first section of single track. This section of trail is shared with the Green and Blue routes. Within this opening section of single track you have a few option lines clearly signed.
Join a section of forest road near Squirrels car park, continue to climb before taking a left turn and into another single-track climb. This section winds its way up the hillside through large pines and there are a few little ramps that require some effort as you climb higher and higher above the Tweed Valley.
This section of trail is quite long and there are a couple of crossing points for the return Blue trail. Visibility is good but do keep an eye out to your left up the hillside for descending riders. In the upper part of this section before the next forest road crossing you have the option of a few low-level skinny log rides. This area of hillside is a great place to practise some skills before heading on to the main trails.
After you cross the forest road the gradient levels out and you climb through some younger pines. Once again you have a few skinny long ride options but there is nothing too challenging within this section. When you leave the small pines behind, you come out into the open and the trail takes in a few more switchbacks. Once again you are presented with some option lines of various grades. This single-track trail runs up above the main forest road and will link you to the Buzzard’s Nest car park. As this is the main car park for the jump and skills areas, it can get quite busy here so take care when crossing the car park!
Continue straight on and around the metal gate, climbing upwards on a forest road. The skills areas will be to your right as you climb up. Take a right turn and pass the top of the jump park/skills area.
The Red route continues along forest road (you will see the Blue trail cross from left to right). A few hundred metres past the skills area you drop into a nice section of single track to your right. Throughout this section you encounter some tight switchbacks, small jumps, stream crossings, and some slightly steeper rougher sections.
The downhill section is short-lived and you’re soon into another single-track line traversing its way up the hillside through a series of switchbacks. This then joins an old forest road, giving you a chance to grab a breath and enjoy the view down the valley before climbing up to your left on single track.
Once again you encounter tight switchbacks. These ones are steeper and require a bit more effort than the last section. The trail levels out and you traverse to a forest road taking a tight left and climbing upwards. This can catch you out if you’ve not preselected the correct gear.
The forest road climbs up and you have a wonderful view back down the valley to your left as you traverse around the hillside. You will see the last climb just down below you. After several hundred metres the trail turns off to the right and climbs up a steep hillside on single track. Once again you will encounter tight switchbacks and some steeper gradients.
At the top of the single-track climb you come out into the open and will join a forest road taking a right turn climbing up towards Spooky Woods. Near the top of this section just after you come into the treeline the gradient starts to steepen up. This only lasts for approximately 150m before you turn right into a single track.
The next section is named Spooky Woods, which comprises of tabletop jumps, double jumps, rock drops, flowing berm corners, and a bomb hole thrown in for good measure. This section of trail is a firm favourite among visitors to the forest and is built in a more modern trail-centre style compared to the rest of the descent. At the end of Spooky Woods, cross a forest road, rejoin the old Red route and descend downhill on a trail that is much narrower and rougher.
The single track eventually joins an old forest road and levels out. Continue on the forest road and blend to a wider, more established forest road. Climb up for a few metres. The trail leaves the forest road and drops down to your left. This is a relatively uneventful section, however there is a tight left-hand switchback in the lower part of this trail that is quite loose so don’t let your guard down.
There are two sections of single track before the final descent. These are split by a short section of forest road. Take care when climbing on the forest road as there may be vehicles heading both up and down.
You will turn off left into the final descent, which comprises of fast-flowing single track, tight rough corners and drops. The initial part of the section is quite smooth and fast. After a short rise the trail narrows down and becomes quite rough in places.
After an open section you switch tight right into the trees. Here there is a split-line option, keep left for the Red trail or turn right for the Black option. At the bottom of the descent you will run along next to a fence and a pinch gap slows you down before joining the forest road, head back down to the Peel Centre and car parks.
TRAIL 2: BLUE
On-site grade: Blue
Clive’s grade: Blue
Distance: 13km
Technicality: 3/10
Ascent: 325m
ENJOYMENT FOR SKILL LEVEL
Beginner: 8.5/10
Intermediate: 9/10
Advanced: 3/10
The Blue trail heads out up the same route as the previous Red trail. When you arrive at the top in the Buzzard’s Nest car park the signs become slightly vague. The Blue trail drops down a small gully from the top right-hand corner of the car park; you need to go straight ahead across the car park and turn right. Here you should see the gully and the trail straight ahead of you, take care as the Blue trail crosses from left to right on its return leg.
Following the outbound loop descend slightly before you climb up. This section is shared with the Red and the next stage linking up to the forest road could be considered quite tough for a Blue-graded trail. At the time of writing there was a diversion and unfortunately we could not ride the upper loop. The diversion took a left turn of the forest road on the Blue return: this is a fast descent linking into a single-track climb,
When you get to the top of the short climb, descend slightly on a forest road before turning right into Blue Velvet. This is a lovely flowing piece of single track with an easy rolling surface.
After crossing the forest road through a pinch fence, join into Berm Baby Berm, a smooth fast trail with movement and basic features that snakes down the hillside back towards Buzzard’s Nest car park.
At the end of this section you cross over the Blue outbound trail and head straight on past the car park to your right and into more flowing trail dropping back down to the main forest road.
After you cross the forest road you are in the final sections of downhill and you will have option lines to take rock drops, whoops and jumps. You will cross the outbound climb partway down so keep an eye out down to your right for riders below you. A series of switchbacks drops you onto a forest road. A slight descent heads back towards the Peel Centre. One final section of trail links to another forest road and you’re homeward bound.
ALSO WORTH RIDING
ARRAN
Cross-country trails, Castle Blue 10km, Blue 10km, Red 18km and 35km Black trail
Camping, hotels and B&Bs in the area
Location: From the west coast of Scotland there are two ferries that go to Arran: Ardrossan to Brodick and Claonaig to Lochranza. For the Ardrossan to Brodick crossing take the M77 from Glasgow to Kilmarnock (or A71 from M74 junction 8), then take the A71 towards Irving where you need to pick up the A78 coast road and head north to Saltcoats. You will see signs to the harbour from here.
Grid ref: NR 96164 36042
Sat nav: Arran
Info: www.arranbikeclub.com
CARRON VALLEY
Cross country trail, Red-grade loop with Orange freeride line
Camping, hotels and B&Bs in the area
Location: From the main A872 in Denny pick up the B818 sign posted to Fintry. After approximately 6km on the B818 you will pass through Carron Bridge, the car park is on your left 2km beyond the village.
Grid ref: NS 76038 83763
Sat nav: Carron Bridge, Falkirk FK6
Info: www.forestry.gov.uk
LEARNIE RED ROCK TRAIL
Cross-country trails, Green, Blue and Black-grade trails with jump spots
Camping, hotels and B&Bs in the area
Location: Head North on the A9 to the Tore roundabout with the A832. From the roundabout leave the A9 and head towards Cromarty on the A832, pass through Rosemarkie and after approximately 5km you will see the car park on your right.
Grid ref: NH 736614
Sat nav: Rosemarkie
Info: www.forestry.gov.uk

The new bike shop and cafe at Glentress
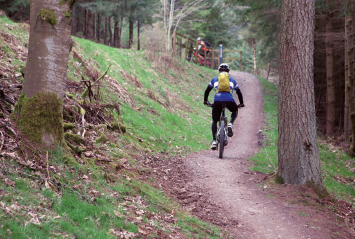
All trails share the first climb

Skinny log rides in the opening climb give you a chance to hone your skills

The Tweed valley, classic Scottish scenery