Chapter 7. Using a Database: Putting Python’s DB-API To Use
Storing data in a relational database system is handy.
In this chapter, you’ll learn how to write code which interacts with the popular MySQL database technology, using a generic database API called DB-API . The DB-API (which comes as standard with every Python install) allows you to write code which is easily transferred from one database product to the next... assuming your database talks SQL. Although we’ll be using MySQL, there’s nothing stopping you from using your DB-API code with your favorite relational database, whatever it may be. Let’s see what’s involved in using a relational database with Python. There’s not a lot of new Python in this chapter, but using Python to talk to databases is a big deal , so it’s well worth learning.
Database-Enabling Your Webapp
The plan for this chapter is to get to the point where you can amend your webapp to store its log data in a database, as opposed to a text file as was the case in the last chapter. The hope is that in doing so, you can then provide answers to the questions posed in the last chapter: How many requests have been responded to? What’s the most common list of letters? Which IP addresses are the requests coming from? Which browser is being used the most?
To get there, however, we need to decide on a database system to use. There are lots of choices here, and it would be easy to take a dozen pages or so to present a bunch of alternative database technologies while exploring the pluses and minuses of each. But, we’re not going to do that. Instead, we’re going to stick with a popular choice and use MySQL as our database technology.
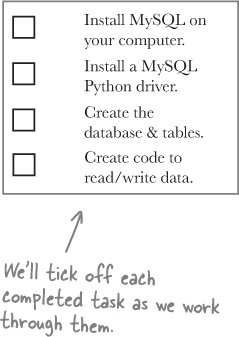
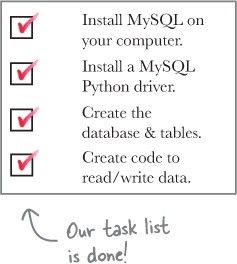
Having selected MySQL, here are the four tasks we’ll work through over the next dozen pages:
- Install the MySQL server
- Install a MySQL database driver for Python
- Create our webapp’s database and tables
- Create code to work with our webapp’s database and tables
With these four tasks complete, we’ll be in a position to amend the vsearch4web. py
code to log to MySQL as opposed to a text file. We’ll then use SQL to ask and -with luck - answer our questions.
Task 1: Install The MySQL Server
If you already have MySQL installed on your computer, feel free to move onto Task 2.
How you go about installing MySQL depends on the operating system you’re using. Thankfully, the folks behind MySQL (and its close-cousin, MariaDB) do a great job of making the installation process straightforward.
If you’re running
Linux
, you should have no trouble finding mysql-server
(or mariadb-server
) in your software repositories. Use your software installation utility (apt
, aptitude
, rpm
, yum
, or whatever) to install MySQL as you would any other package.
If you’re running
Mac OS X
, we recommend installing
Homebrew
(find out about Homebrew here:
http://brew.sh/
), then using it to install MariaDB, as - in our experience - this combination works well.
For all other systems (including all the various Windows versions), we recommend you install the Community Edition of the MySQL server, available from:
Or, if you want to go with MariaDB, check out:
Be sure to read the installation documentation associated with whichever version of the server your download and install.
Don’t worry if this is new to you.
We don’t expect you to be a MySQL whiz-kid while working through this material. We’ll provide you with everything you need in order to get each of our examples to work (even if you’ve never used MySQL before).
If you want to take some time to learn more, we recommended Lynn Beighley’s excellent Head First SQL as a wonderful primer.
Introducing Python’s DB-API
With the database server installed, let’s park it for a bit, while we add support for working with MySQL into Python.
Out-of-the-box, the Python interpreter comes with some support for working with databases, but nothing specific to MySQL. What’s provided is a standard database API (application programmer interface) for working with SQL-based databases, known as DB-API . What’s missing is the driver to connect the DBAPI up to the actual database technology you’re using.
The convention is that programmers use the DB-API when interacting with any underlying database using Python, no matter what that database technology happens to be. They do that because the driver shields programmers from having to understand the nitty-gritty details of interacting with the database’s actual API, as the DB-API provides an abstract layer between the two. The idea is that, by programming to the DB-API, you can replace the underlying database technology as needed without having to throw away any existing code.
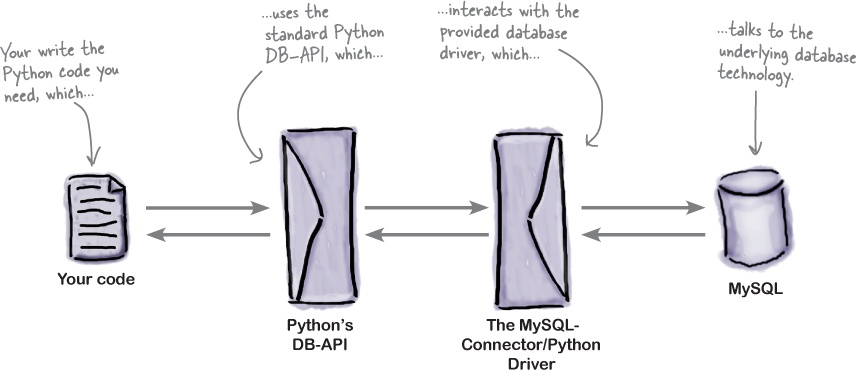
We’ll have more to say about the DB-API later in this chapter. Here’s a visualization of what happens when you use Python’s DB-API:
Geek Bits
Python’s DB-API is defined in PEP 0247. That said, don’t feel the need to run off and read this PEP, as it’s primarily designed to be used as a specification by database driver implementers (as opposed to being a how-to tutorial).
Some programmers look at this diagram and conclude that using Python’s DB-API must be hugely inefficient. After all, there are two layers of technology between your code and the underlying database system. However, using the DB-API allows you to swap out the underlying database as needed, avoiding any database “lock-in” which occurs when you code directly to a database. When you also consider that no two SQL dialects are the same, using DB-API helps by providing a higher level of abstraction.
Task 2: Install A MySQL Database Driver For Python
Anyone is free to write a database driver (and many people do), but it is typical for each database manufacturer to provide an
official driver
for each of the programming languages they support.
Oracle
, the owner of the MySQL technologies, provides the
MySQL-Connector/Python
driver, and that’s what we propose to use in this chapter. There’s just one problem...
MySQL-Connector/Python
can’t be installed with pip
.
Does that mean we’re out of luck when it comes to using
MySQL-Connector/Python
with Python? No, far from it. The fact that a third-party module doesn’t use the pip
machinery is rarely a show-stopper. All we need to do is install the module “by hand” -it’s a small amount of extra work (over using pip
), but not much.
Let’s install the MySQL-Connector/Python driver by hand (bearing in mind there are other drivers available, such as PyMySQL . That said, we prefer MySQL-Connector/Python as it’s the officially support driver provided by the makers of MySQL).
Begin by visiting the
MySQL-Connector/Python
download page:
https://dev.mysql.com/downloads/connector/python/
. Landing on this webpage will likely preselect your operating system from the
Select Platform
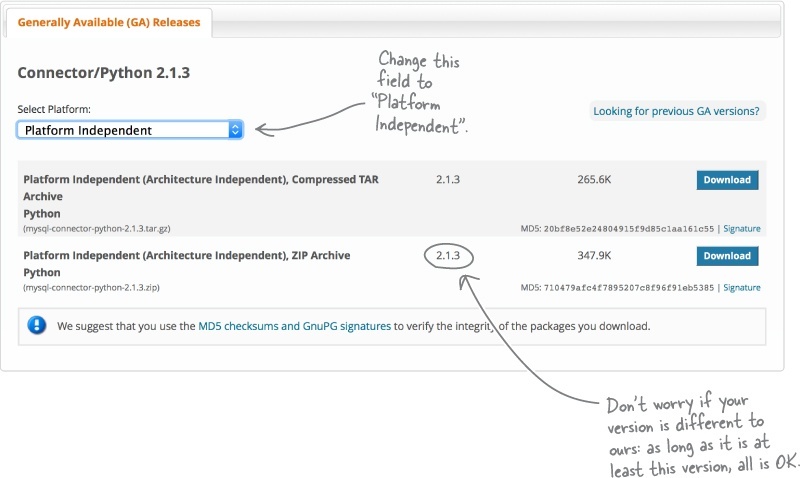
drop-down menu. Ignore this, and adjust the selection drop-down to read
Platform Independent
, as shown here:
Then, go ahead and click either of the Download buttons (typically, Windows users should download the ZIP file, whereas Linux and Mac OS X users can download the GZ file). Save the downloaded file to your computer, then double-click on the file to expand it within your download location.
Install MySQL-Connector/Python
With the driver downloaded and expanded on your computer, open a terminal window in the newly created folder (if you’re on Windows , open the terminal window with Run as Administrator ).
On our computer, the created folder is called mysql-connector-python-2.1.3
and was expanded in our Downloads
folder. To install the driver into
Windows
, issue this command from within the mysql-connector-python-2.1.3
folder:
|
Install MySQL on your computer. |
|
|
Install a MySQL Python driver. |
|
|
Create the database & tables. |
|
|
Create code to read/write data. |
py -3 setup.py install
On Linux or Mac OS X , use this command instead:
sudo -H python3 setup.py install
No matter which operating system you’re using, issuing either of the above commands results in a collection of messages appearing on screen, which should look similar to these:
When you install a module with pip
, it runs though this same process, but hides these messages from you. What you’re seeing here is the status messages which indicate that the installation is proceeding smoothly. If something goes wrong, the resulting error message should provide enough information to resolve the problem. If all goes well with the installation, the appearance of these messages is confirmation that
MySQL-Connector/Python
is ready to be used.
Task 3: Create Our Webapp’s Database & Tables
You now have the MySQL database server and the MySQL-Connector/Python driver installed on your computer. It’s time for Task 3, which involves creating the database and the tables required by our webapp.
To do this, you’re going to interact with the MySQL server using its command-line tool, which is a small utility that you start from your terminal window. This tool is known as the MySQL
console
. Here’s the command to start the console, logging in as the MySQL database administrator (which uses the root
user-id):
mysql -u root -p
If you set an administrator password when you installed MySQL server, type in that password after pressing the Enter key. Alternatively, if you have no password, just press the Enter key twice. Either way, you’ll be taken to the console prompt , which looks like this (on the left) when using MySQL, or like this (on the right) when using MariaDB:
mysql> MariaDB [None]>
Any commands you type at the console prompt are delivered to the MySQL server for execution. Let’s start by creating a database for our webapp. Remember: we want to use the database to store logging data, so the database’s name should reflect this purpose. Let’s call our database vsearchlogDB
. Here’s the console command which creates our database:
The console responds with a (rather cryptic) status message: Query OK, 1 row affected (0.00 sec)
. This is the console’s way of letting you know that everything is golden.
Let’s create a database user-id and password specifically for our webapp to use when interacting with MySQL as opposed to using the root
user-id all the time (which is regarded as bad practice). This next command creates a new MySQL user called vsearch
, uses “vsearchpasswd” as the new user’s password, and gives the vsearch
user full rights to the vsearchlogDB
database:
A similar “Query OK” status message should appear, which confirms the creation of this user. Let’s now log out of the console using this command:
mysql>
quit
You’ll see a friendly “Bye” message from the console, before being returned to your operating system.
Decide On A Structure For Your Log Data
Now that you’ve created a database to use with your webapp, you can create any number of tables within that database (as required by your application). For our purposes, a single table will suffice here, as all we need to store is the data relating to each logged web request.
Recall how we stored this data in a text file in the previous chapter, with each line in the vsearch.log
file conforming to a specific format:
At the very least, the table you create needs five fields: for the phrase, letters, IP address, browser string, and results values. But, let’s also include two other fields: a unique ID for each logged request, as well as a timestamp which records when the request was logged. As these two latter fields are so common, MySQL provides an easy way to add these data to each logged request, as shown at the bottom of this page.
You can specify the structure of the table you want to create within the console. Before doing so, however, let’s log in as our newly created vsearch
user using this command (and supplying the correct password after pressing the
Enter
key):
Here’s the SQL statement we used to create the required table (called log
). Note that the ->
symbol is not part of the SQL statement, as it’s added automatically by the console to indicate that it expects more input from you (when your SQL runs to multiple lines). The statement ends (and executes) when you type the terminating semi-colon character, and then press the
Enter
key:
Confirm Your Table Is Ready For Data
With the table created, we’re done with Task 3.
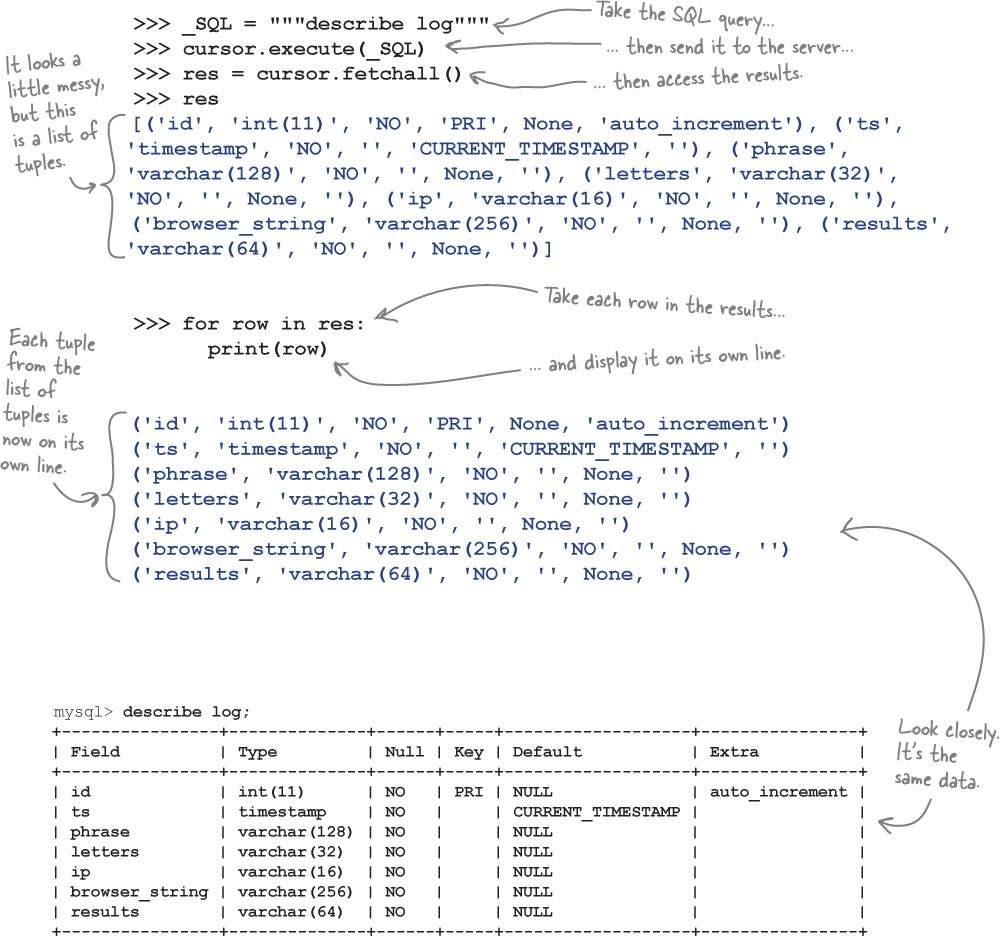
Let’s confirm at the console that the table has indeed been created with the structure we require. While still logged into the console as user vsearch
, issue the describe log
command at the prompt:
mysql>
describe log;


+----------------+--------------+------+-----+-------------------+----------------+


| Field          | Type         | Null | Key | Default           | Extra          |


+----------------+--------------+------+-----+-------------------+----------------+


| id             | int(11)      | NO   | PRI | NULL              | auto_increment |


| ts             | timestamp    | NO   |     | CURRENT_TIMESTAMP |                |


| phrase         | varchar(128) | NO   |     | NULL              |                |


| letters        | varchar(32)  | NO   |     | NULL              |                |


| ip             | varchar(16)  | NO   |     | NULL              |                |


| browser_string | varchar(256) | NO   |     | NULL              |                |


| results        | varchar(64)  | NO   |     | NULL              |                |


+----------------+--------------+------+-----+-------------------+----------------+
And there it is: proof that the log
table exists and has a structure that fits with our web application’s logging needs. Type quit
to exit the console (as you are done with it for now).
Yes, that’s one possibility.
There’s nothing stopping you from
manually
typing a bunch of SQL INSERT
statements into the console to
manually
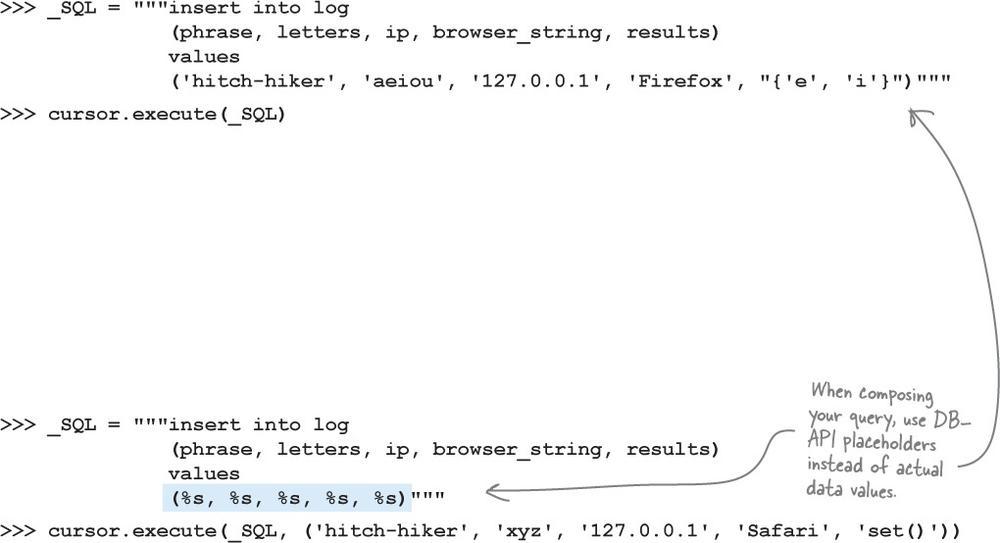
add data to your newly created table. But, remember: we want our webapp to add our web request data to the log
table
automatically
, and this applies to INSERT
statements, too.
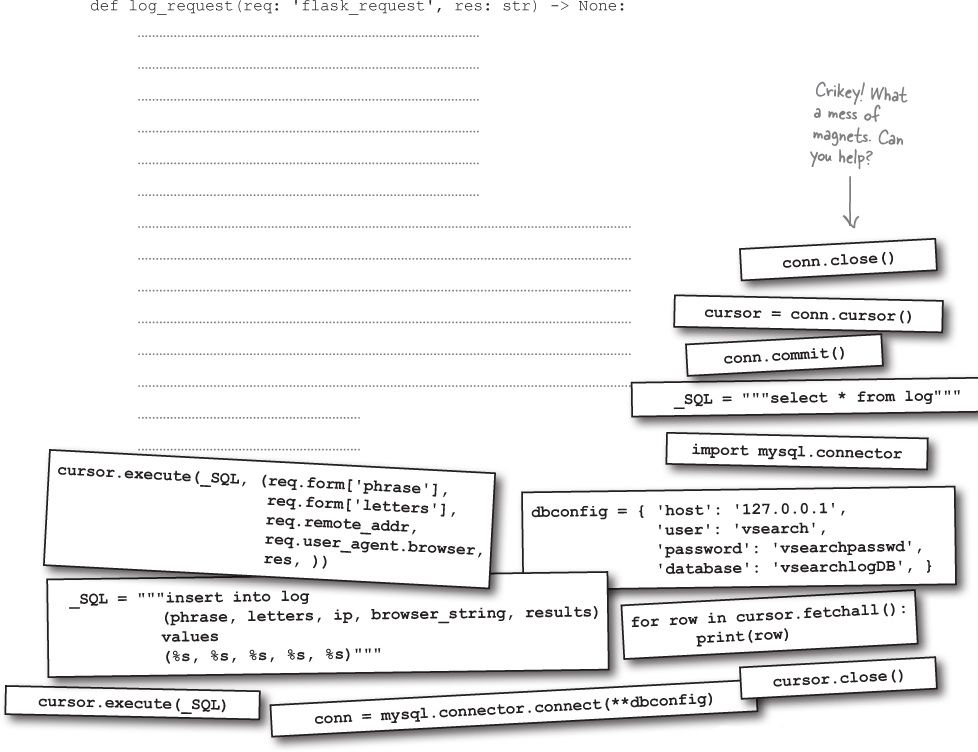
To do this, we need to write some Python code to interact with the log
table. And to do that, we need to learn more about Python’s DB-API.
Task 4: Create Code To Work With Our Webapp’s Database And Tables
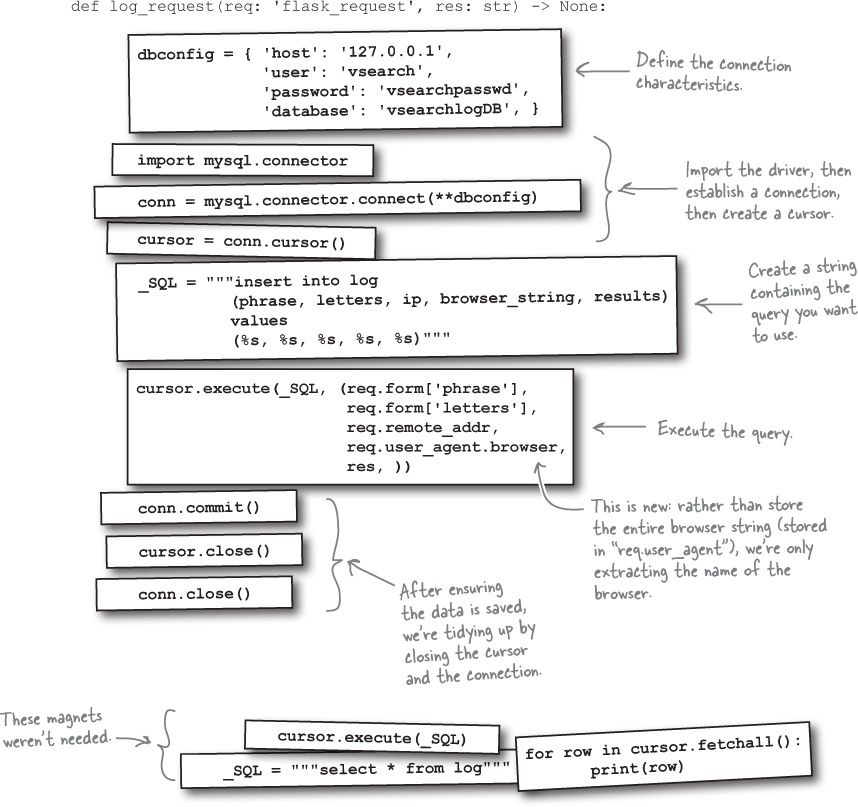
With the six
steps
of the DB-API
Up Close
completed, you now have the code needed to interact with the log
table, which means you’ve completed Task 4:
Create code to work with our webapp’s database and tables.
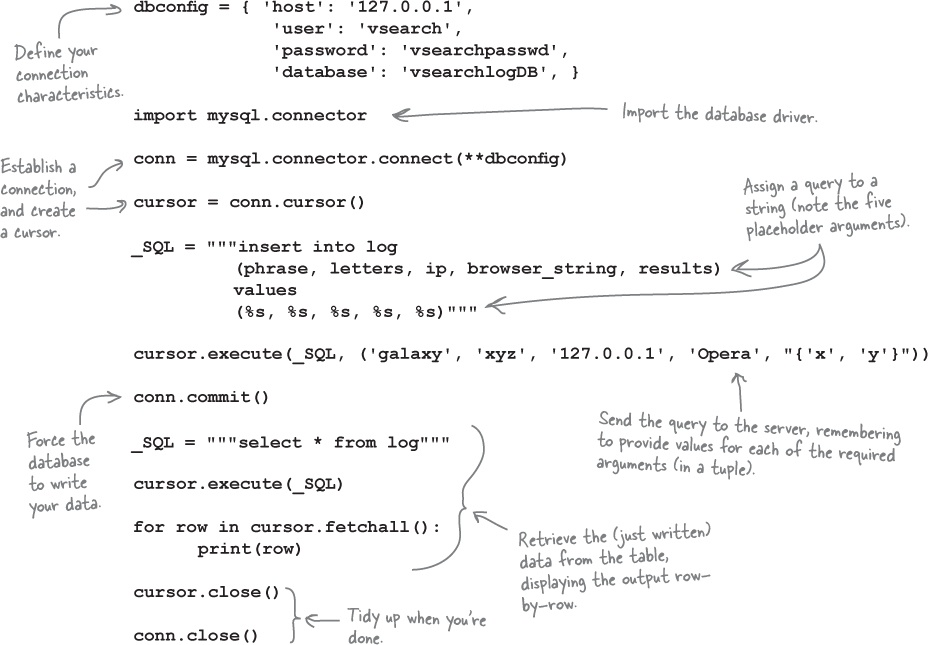
Let’s review the code you can use (in its entirety):
With each of the four tasks now complete, you’re ready to adjust your webapp to log the web request data to your MySQL database system as opposed to a text file (as is currently the case). Let’s start doing this now.
Storing Data Is Only Half The Battle
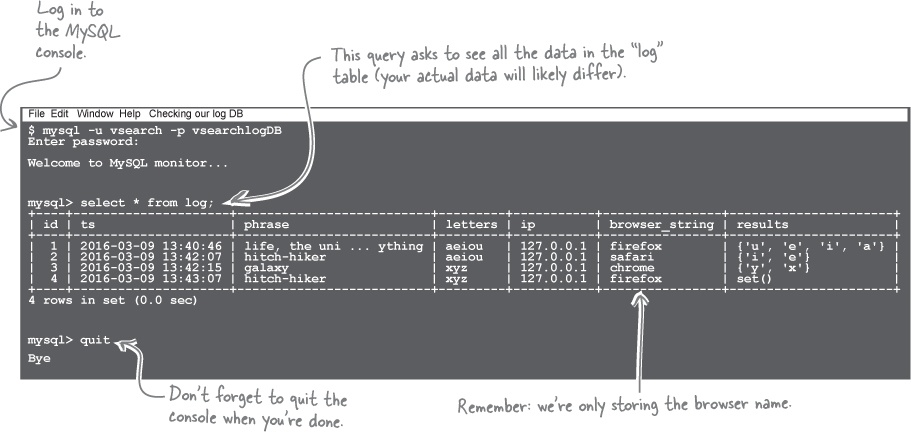
Having run though the
Test Drive
on the last page, you’ve now confirmed that your Python DB-API compliant code in log_request
does indeed store the details of each web request in your log
table.
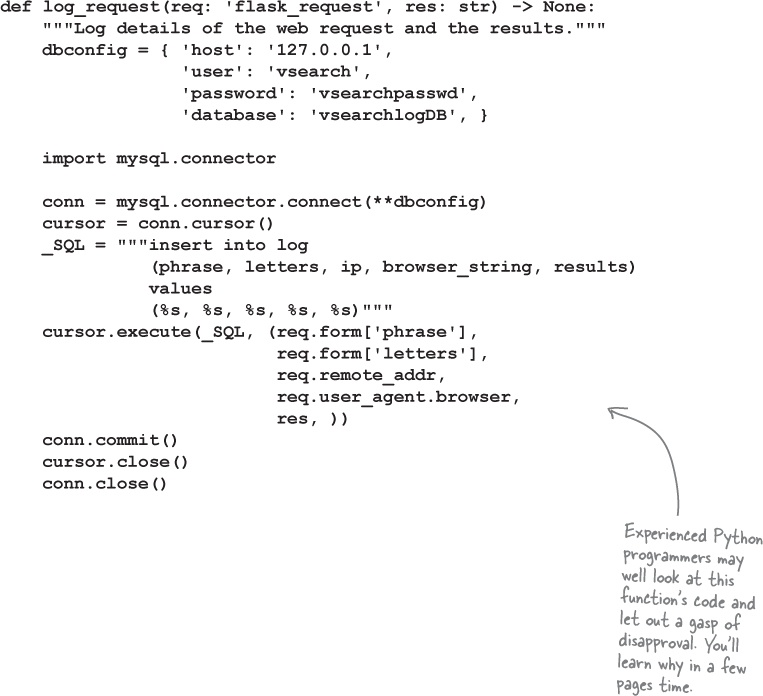
Take a look at the most-recent version of the log_request
function once more (which includes a docstring as it’s first line of code):
This new function is a big change
There’s a lot more code in the log_request
function now than when it operated on a simple text file, but, the extra code is needed to interact with MySQL (which you’re going to use to answer questions about your logged data at the end of this chapter), so this new, bigger, more complex version of log_request
appears justified.
However, recall that your webapp has another function, called view_the_log
, which retrieves the data from the vsearch.log
log file and displays it in a nicely-formatted web page. The view_the_log
function’s code now needs to be updated to retrieve it’s data from the log
table in the database, as opposed to the text file.
The question is: what’s the best way to do this?
How Best To Reuse Your Database Code?
You now have code which logs the details of each of your webapp’s requests to MySQL. It shouldn’t be too much work to do something similar in order to retrieve the data from the log
table for use in the view_the_log
function. The question is: what’s the best way to do this? We asked three programmers our question... and got three different answers.
In their own way, each of these suggestions is valid, if a little suspect (especially the first one). What may come as a surprise is that, in this case, a Python programmer would be unlikely to embrace any of these proposed solutions on their own .
Consider What You’re Trying To Reuse
Let’s take another look our database code in the log_request
function.
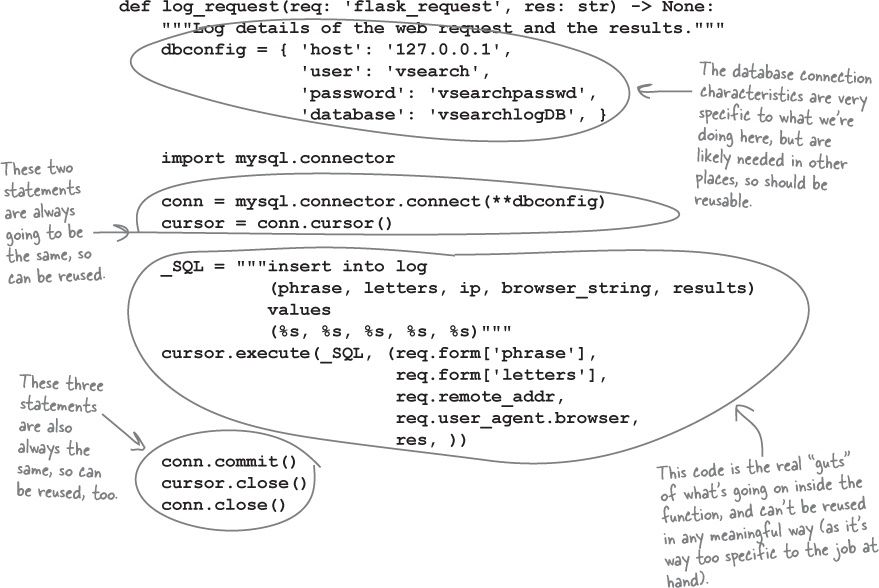
It’s should be clear there are parts of this function which can be reused when writing additional code which interacts with a database system. As such, we’ve annotated the function’s code to highlight the parts we think are reusable, as opposed to the parts that are specific to the central idea of what the log_request
function actually does:
Based on this simple analysis, the log_request
function has three groups of code statements:
- statements that can be easily reused (such as the creation of
connandcursor, as well as the calls tocommitandclose), - statements that are specific to the problem but still need to be reusable (such as the use of the
dbconfigdictionary), and - statements that cannot be reused (such as the assignment to
_SQLand the call tocursor.execute). Any further interactions with MySQL are very likely to require a different SQL query, as well as different arguments (if any).
What About That Import?
Nope, we didn’t forget.
The import mysql.connector
statement wasn’t forgotten when we considered reusing the log_request
function’s code.
This omission was deliberate on our part, as we wanted to call out this statement for special treatment. The problem isn’t that we don’t want to reuse that statement: the problem is that it shouldn’t appear in the function’s suite!
Be careful when positioning your import statements
We mentioned a few pages back that experienced Python programmers may well look at the log_request
function’s code and let out a gasp of disapproval. This is due to the inclusion of the import mysql.connector
line of code in the function’s suite. And this disapproval is in spite of the fact that our most-recent
Test Drive
clearly demonstrated that code works. So, what’s the problem?
The problem has to do with what happens when the interpreter encounters an import
statement in your code: the imported module is read in full, then executed by the interpreter. This behavior is fine when your import
statement occurs
outside of a function
, as the imported module is (typically) only read
once
, then executed
once
.
However, when an import
statement appears
within
a function, it is read
and
executed
every time the function is called
. This is regarded as an extremely wasteful practice (even though - as we’ve seen - the interpreter won’t stop you from putting an import
statement in a function). Our advice is simple: think carefully about where you position your import
statements, and don’t put any inside a function.
Consider What You’re Trying To Do
In addition to looking at the code in log_request
from a reuse perspective, it’s also possible to categorise the function’s code based on
when
it runs.
The “guts” of the function is the assignment to the _SQL
variable and the call to cursor. execute
. Those two statements most patently represent
what
the function is meant to
do
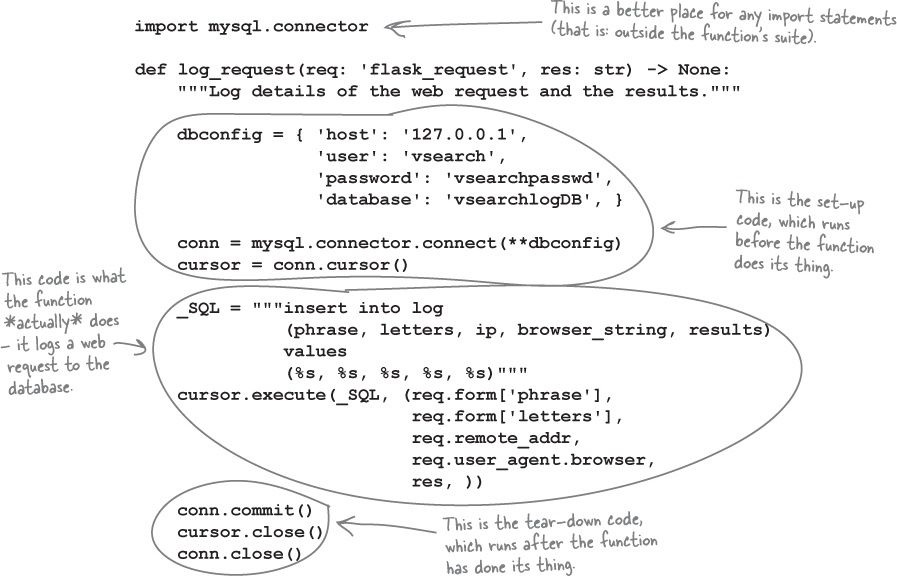
, which - to be honest - is the most important bit. The function’s initial statements define the connection characteristics (in dbconfig
), then create a connection and cursor. This
set-up
code always has to run
before
the guts of the function. The last three statements in the function (the single commit
and the two close
s) execute
after
the guts of the function. This is
tear-down
code which performs any required tidy-up.
With this
set-up, do, tear-down
pattern in mind, let’s look at the function once more. Note that we’ve repositioned the import
statement to execute outside of the log_request
function’s suite (so as to avoid any further disapproving gasps):
Wouldn’t it be neat if there was a way to reuse this set-up, do, tear-down pattern?
You’ve Seen This Pattern Before
Consider the pattern we just identified: set-up code to get ready, followed by code to do what needs to be done, and then tear-down code to tidy-up. It may not be immediately obvious but, in the previous chapter, you encountered code which conforms to this pattern. Here it is again:
Recall how the with
statement
manages the context
within which the code in its suite runs. When working with files (as in the code above), the with
statement arranges to open the named file and return a variable representing the file stream (in this example, that’s the tasks
variable; this is the
set-up
code. The suite associated with the with
statement is the
do
code - here that’s the for
loop, which does the actual work (a.k.a. “the important bit”). Finally, when you use with
to open a file, it comes with the promise that the open file will be closed when the with
’s suite terminates. This is the
tear-down
code.
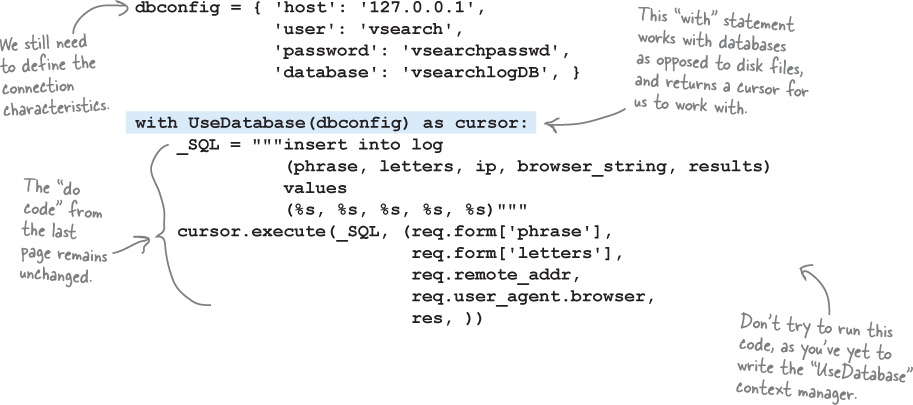
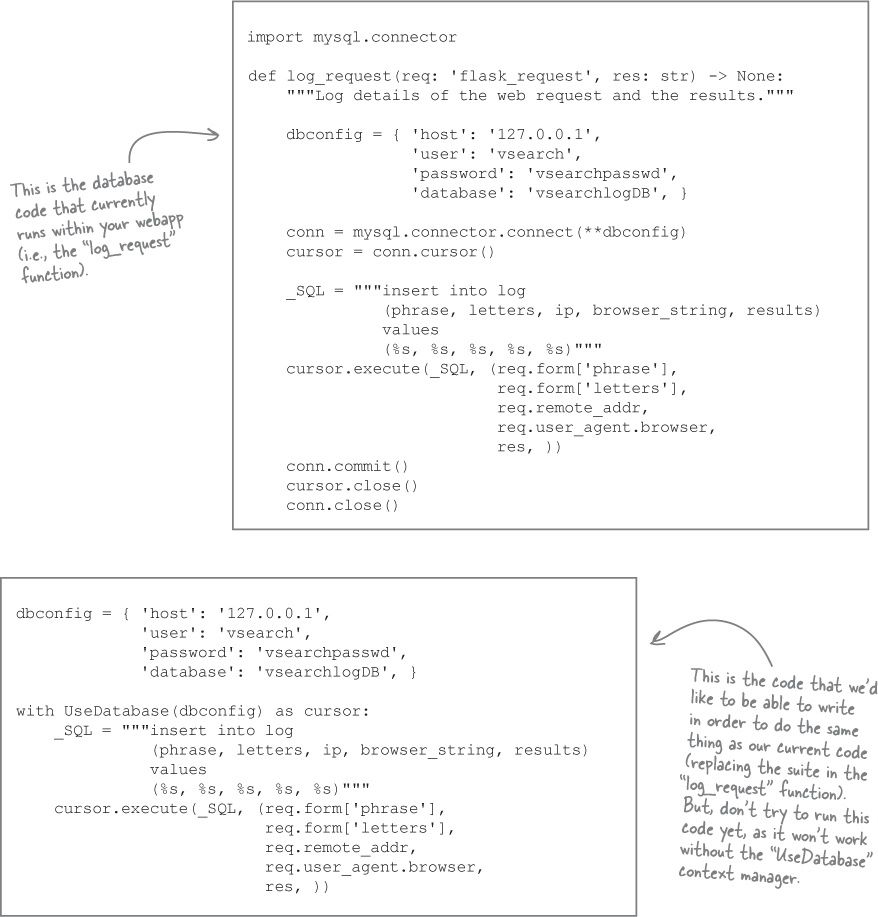
It would be neat if we could integrate our database programming code into the with
statement. Ideally, it would be great if we could write code like this, and have the with
statement take care of all the database set-up and tear-down details:
The
good news
is that Python provides the
context management protocol
which enables programmers to hook into the with
statement as needed. Which brings us to the
bad news
...
The Bad News Isn’t Really All That Bad
At the bottom of the last page, we stated that the
good news
is that Python provides a context management protocol which enables programmers to hook into the with
statement as and when required. If you learn how to do this, you can then create a context manager called UseDatabase
, which can be used as part of a with
statement to talk to your database.
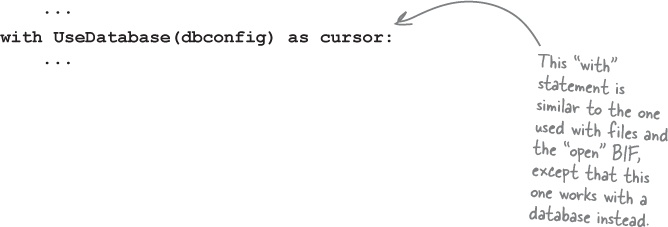
The idea is that the set-up and tear-down “boiler-plate” code that you’ve just written to save your webapp’s logging data to a database can be replaced by a single with
statement which looks like this:
The bad news is that creating a context manager is complicated by the fact that you need to know how to create a Python class in order to successfully hook into the protocol.
Consider that up until this point in this book, you’ve managed to write a lot of usable code without having to create a class, which is pretty good going, especially when you consider that some programming languages don’t let you do anything without first creating a class (we’re looking at you , Java).
However, it’s now time to bite the bullet (although, to be honest, creating a class in Python is nothing to be scared of).
As the ability to create a class is generally useful, let’s deviate from our current discussion about adding database code to our webapp, and dedicate the next (short) chapter to classes. We’ll be showing you just enough to enable you to create the UseDatabase
context manager. Once that’s done, in the chapter after that, we’ll return to our database code (and our webapp) and put our newly acquired class-writing abilities to work by writing the UseDatabase
context manager.

