
Chapter 7: Other Pruning Methods
You do not have to be a professional to create some of the many artistic shapes you may know through pruning. It takes work, and it also requires constant maintenance, but it can add a fun and creative dimension to your pruning and gardening.
Pollarding
Pollarding is a type of pruning also known as tree shaping that creates a manicured look. You can see pollarded trees in various big American cities, such as San Francisco where there is an outstanding collection of pollarded trees in front of the San Francisco Civic Center and lining the streets in certain European cities. Pollarding began in medieval Great Britain and Europe when people cut tree limbs for basket and furniture making, for livestock food, and for firewood. The next season, they again harvested the profusion of fresh growth that grew from where they cut the limbs and so on. After many years, the subject tree developed huge clubby growths known as pollard heads on the end of the limbs where they harvested the smaller limbs every year. Instead of cutting the tree to the ground every year, the limbs were established on a taller tree to keep the new growth out of the reach of wildlife and domestic animals. If you have ever seen a pollarded tree, you cannot easily forget it. You either consider it an interesting work of art or a travesty. Pollarding differs from topping a tree because pollarding involves an ongoing process that begins when the tree is young. Topping involves a one time, stressful act done on a mature tree that can increase the chance for disease and weather-related injuries.
Pollarding establishes a framework of six to eight lateral or scaffold limbs on a fast-growing tree, such as a sycamore or willow. It involves cutting off the top of a tree and cutting the branches back to the trunk so that in summer, a mass of shoots burst out of the head or heads. You determine the eventual height of the scaffold limbs, as pollarding is not an exact science. You can train the tree to grow the limbs in a spiral arrangement. Remove any side branches growing from the limbs. When you reach the desired number of scaffold limbs and the desired height of the tree, cut off the leader branch in the center of the tree. Every year or two during the dormant season, cut off all the growth that appeared the previous season, and shorten the limbs so they are 2 to 5 feet from the trunk. Because the beauty of a pollarded tree is in the interesting leafless and clubby scaffolding limbs, prune early in the dormant season so you can enjoy your creation. Good trees for pollarding include sycamores, willows, ashes, maples, and mulberries.
Coppicing
Coppicing could be considered the low-growing cousin of pollarding. It is simply the process of cutting down a fast-growing deciduous tree or large shrub to within 6 inches of the ground and allowing multiple stems to come up in place of the trunk. Once again, people did this to create multiple smaller limbs for weaving, livestock food, and fuel. The main difference between coppicing and pollarding is that coppicing is used for wildlife management. In forests where tall tree canopies shade out any growth on the forest floor, a tree can be cut at the base rather than completely removed. This allows sunlight to reach the forest floor, and the coppiced tree also provides tender growth for animals, such as deer and rabbit, to browse. Coppicing is an ongoing process that you must continue after starting on a large scale. If people coppice too many trees in a wooded area, eventually the forest will have many small limbs coming up everywhere that restrict wildlife movement. The stump left after tree coppicing is known as a “stool.” Both coppicing and pollarding can extend the lives of trees for hundreds of years.
Pleaching
Pleaching is a curious example of pruning and training a tree or shrub. When pleaching, a series of woody plants are planted close enough together that their limbs can touch or are at least planted close enough so the trees can be bent over and woven together. If a tree is braided through another tree, or pleached, eventually the trees will grow together. Trees can be pleached at a high level so they create a canopy or a two-dimensional wall of growth if carefully pruned. Young trees can be bent over a walkway or path and pleached so they form a green tunnel. There is really no limit to what can be done when it comes to pleaching. Although time consuming, it is a creative and fun activity. Choose the plants you are going to pleach carefully. You want to choose trees with flexible limbs not covered with a thick layer of bark early in life. Linden and sycamore are good choices for a large project, and yaupon holly and ficus trees are good choices for a smaller project. They grow fast, and you can see results in a few years rather than decades. Any sized yard or garden will do because pleaching is simply a matter of growing two or more trees together.
The history of pleaching
The Romans invented the art of pleaching trees, and Julius Caesar used them as a military obstacle. During this time, people also used pleaching to encourage new growth on trees, as well as prevent damage to new trees during flooding.
During medieval times, people performed pleaching horizontally — rather than vertically — because they used it as protection against annual flooding but not as a protector against damage to new trees. Rather, pleached trees created a connected, raised space about 8 feet above flood waters, and on this space, people constructed huts that protected them against the elements.
To build this space, they planted trees of the same species in a grid-like formation, similar to how orchards are planted. As the saplings grew, they pruned branches and trained them to grow toward a neighboring tree like a graft. As trees merged with other trees, they also combined their life systems of water, minerals, and sap. Once the grafted branches matured into large limbs, they had the strength to hold the weight of planks that they laid on top, as well as the huts they then built on the planks. Foliage from the outer trees sheltered the huts from the elements and may have even provided fruit to eat.
Also during medieval times, pleaching gained popularity for use in formal gardens. In fact, the word “pleach” derives from the old French word “plechier,” meaning to braid or intertwine. During the Middle Ages and through to the mid-18th century, many formal gardens, first in France and then later in England and other royal European gardens, contained walkways and pleached structures. Pleaching was, in fact, a status symbol because in order to maintain the design, the landowner had to employ many gardeners, which meant that he had the money to do so.
As time passed, farmers also used pleaching to make boundary hedges more secure. When pleaching hedges, the technique is called hedgelaying. Hedgelaying is discussed in further detail in Chapter 11.
How to pleach
One of the fun things about pleaching is that there are several ways you can set up your canvas: as a singular row where trees or hedges intertwine, as two rows facing each other to create an archway or a tunnel along a walkway, or as trees planted in a square or circle to create a pleached canopied ceiling or room.
Make sure you choose trees that have strong, yet flexible branches, such as apple, pear, fig, beech, hornbeam, olive, linden, willow, almond, sycamore, wisteria, lime, or dogwood. You must choose trees of the same species and of similar size and variety. Spacing will depend on what you want to pleach — that is, whether you want to form an archway, tunnel, or canopy — but make sure you space the saplings equally. This can range from 2 to 10 feet apart or more.
Next, stake the trees into the ground about 3 feet, with the top of the stakes reaching as high as the top growth. You will also need horizontal batons — such as canes, wires, or wooden posts — with cross pieces for tying in and training the side branches until they grow into each other. You will eventually remove this framework, but you need it initially for support and for directing growth into the shape you desire.
Start by tying in a side shoot — one shoot on the right and one shoot on the left — to each horizontal support. Choose shoots just below the side supports so they must arch up rather than bend down. Then, take the topmost shoot and bend it toward the tree you want it to intertwine with; tie this to the support of that tree you want to intertwine it with. The direction of the bend will vary depending on whether you want a row, tunnel, or canopy. Occasionally, head off or cut this main shoot to stimulate growth in the side shoots.
Although you will eventually want a smooth lower trunk reaching from the ground to your pleached branches, you should initially allow some of the lower branches to grow on each young tree — this helps thicken the trunk. But, make sure to pinch these temporary branches back to less than 1 foot long, and cut them off completely after a few years.
Once the branches from the trees grow so they reach each other, you can then weave them together or tie them together. If you tie them together, you must eventually remove this tie, or it will strangle the branches. Cut off any branches growing perpendicular to the plane of the pleached trees.
Once your trees have successfully filled the desired area, you must prune them annually from top to bottom. Also, remove any stems growing up from the ground area or along any of the branches. If some of the growth is too dense, make sure to thin it out to allow light to penetrate.
Eventually, you will need to remove your support frame. This will occur when your pleached trees are sturdy and the branches have naturally grafted or grown together. Once this happens, the support systems of the trees will merge their life processes of water, minerals, and sap.
You can also pleach hedges, commonly known in Europe as hedgelaying. Hedgelaying is similar to tree pleaching because each hedge is grafted to the hedge next to it to form a boundary.
First, you cut each stem or trunk along the hedge near the ground, leaving enough upper branches to allow sap flow to keep the hedge alive. When deciding how many upper branches to leave, use caution. You do not want the top to look bare. Next, place a row of vertical stakes in the ground to hold the hedge upright. Then, intertwine the branches of the hedge along the line of the hedge.
The next step involves weaving long, flexible lengths of hazel strands along the top of the hedge and between the stakes — to keep the hedge sturdy. Then, trim the hedge, and leave it until the next pruning season. At that time, you will cut any new growth that has occurred to promote thickening and to create an A-shaped cross section, wherein the branches are pruned so that the new top growth forms an A shape. This allows light to penetrate the center of the hedge to encourage new growth to create a thicker, denser hedge.
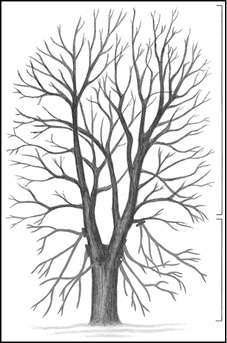
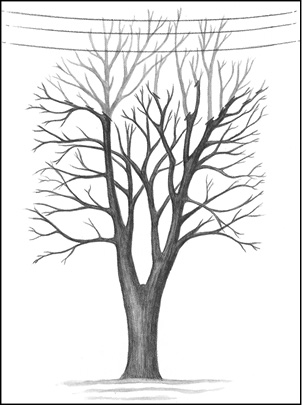
Crown Raising
Crown raising — also called crown lifting or raising the skirt — is cutting off the bottom limbs of a tree or large shrub. It is the opposite of crown reduction — when a tree has grown too large for its intended space. It also is different from crown thinning — when branches are pruned throughout the crown to allow light to penetrate and air to move throughout the crown or upper story or canopy of the tree. Certain trees, such as pine trees, go through a natural pruning process where the bottom limbs have so much shade they die and fall off. A pine tree may be 20 years old before it has enough limbs naturally removed to offer shade to a person sitting or standing under its branches.
Crown raising is done for a number of reasons. One of the most common reasons is to create space under a tree for people, vehicles, buildings, or other trees, shrubs, and plants. For example, in parks, crown raising can create space for people to park their vehicles, sit, or walk under trees.
Public safety reasons also prompt crown raising around buildings and roads. For example, when trees line a street or highway, people will remove lower branches so drivers can see the road in both good and bad weather. It can eliminate branches from obstructing not only the roads but also traffic lights and road signs. On roads and driveways, crown raising is necessary to allow for headroom of passing and parked cars, and when vehicles are parked, to allow for passengers to get in and out of their cars. Crown raising can allow for greater visual access, preventing traffic or pedestrian accidents. When trees grow too close to buildings or windows, crown raising can prevent branches from obstructing light into a room or building, or it can prevent safety issues like branches falling on the roof.
Crown raising is also used in forest management — lower branches are removed to increase the amount of timber produced and the quality of the wood. This happens by concentrating knots into a small interior core of trunk wood, providing early formation of clear, knot-free timber. Because frequency, size, and knot types determine the value of lumber, crown raising is one way to increase the cost and quality of timber.
Crown raising also gets rid of decayed wood or diseased parts of the tree that can weaken the health of a tree. Certain trees are susceptible to disease of the lower trunk, and crown raising can be used as a preventative measure against diseases. For example, pruned white pines can avoid a condition called white pine blister rust, which strikes lower branches of this species.
Crown raising can improve the look of a tree or allow access to pathways blocked from lower branches. If you desire to have a tree you can sit under, crown raising can provide the space. Crown raising can also allow light to penetrate trees, shrubs, or plants that grow below the tree or in the tree’s shade coverage. In this case, crown lifting is beneficial to the health of other trees and plants in the yard or garden.
How to “raise the skirt”
Crown raising is a simple procedure when the lower branches of the crown or canopy of the tree are removed. The trick is to not overdo it because it can cause stress, damage, or death to the tree.
You should only prune the lower branches to the point of providing enough clearance for people, vehicles, or other vegetation. When you complete crown raising, the remaining crown of the tree should be two-thirds of the height of the tree so the crown and tree as a whole remains balanced in height and appearance.
To achieve this, you need to remember that what you do on one side of the lower part of the tree should be done on the other. Make sure you cut an equal amount of branches from each side of the tree to preserve the proportion of the tree. Unless the job requires a higher clearance, only remove branches from the ground to the desired height of the lowest secondary branch.
To prevent these problems, do what nature does and take off a little at a time by following the same formula as you do for newly planted trees: Take off an area one-fifth of the tree’s height each year until you obtain the desired height. For a 60-foot tree, you can remove 12 feet of growth, which is plenty to create an enjoyable space. But, for a smaller tree only 20 feet high, take off only 4 feet, and wait until the next pruning season to remove another 4 feet. Only take off as much as needed when basal pruning so that you never prune off a total amount of limbs that equal a space greater than one-third of the tree’s height. When this happens, the top section of the tree becomes too heavy in relation to the rest of the tree, and the tree can snap in half in high winds.
The ration of live crown to total tree height should be at least two-thirds. Image courtesy of the USDA.
A few words of caution: Crown raising should not include the removal of large branches growing directly out of the tree’s trunk. Removing large branches opens up wounds in the tree that can lead to decay or insect infestation, jeopardizing the future health of the tree. In cases where you cannot avoid the removal of these branches — such as the tree’s heavy branches are the ones that need removal in order to create the space desired — you should remember the recovery time for the tree will be longer. To help preserve the health of the tree, you can also prune off one-third of the limb the first year, and the next year when you prune the tree, you can remove the remainder of the limb. This gives the tree the time to adjust for the loss. A rule of thumb is that if the diameter of a limb is greater than half the diameter of the tree, you should remove it in stages. Remove these heavy branches in three or four pieces to make the job easier and safer. It might be preferable to use a mechanical lift rather than a ladder.
Some useful tips to remember when crown raising include:
- Try not to go overboard when removing these branches because this could lead to the development of a top-heavy tree.
- When cutting back to the trunk, do not forget to use the three-step method of using an undercut first to prevent stripping of the trunk.
- Use caution and be conservative when selecting which branches to remove. Limit the size and number of branches as much as possible, and keep the removal well spaced.
- Keep in mind that crown lifting introduces light to the bottom part of the tree, which can encourage growth from dormant buds. To thwart this from happening, leave smaller branches on the lower part of the trunk. This will trunk taper, meaning the tree trunk will decrease in diameter with height, and it will also protect the tree from the being harmed by the sun. Keep these temporary branches about 4 to 6 inches apart along the stem. Make sure they are pruned annually and eventually removed.
- The most favorable time to perform crown lifting is during the late summer, when branches are at their fullest in foliage and can give you a better view of what needs removal.
- Also, you might want to consult an arborist before embarking on this project because the lower branches play an important role in how a tree sways in high winds and storms.
Drop-crotching
Drop-crotching — also referred to as crown reduction — is a way to selectively thin out a tree so the basic shape of the tree remains. Occasionally, because of poor pruning methods or storm damage, the crown needs redefining. For example, a fruit tree may become too top heavy because of previous pruning to encourage fruit growth. Also, drop-crotching can thin out a tree to increase light penetration and air movement throughout the crown of the tree. Shearing or topping the tree is not considered an acceptable way to reduce the crown area. On mature trees, you should consult a professional for reducing the crown area.
The process of drop-crotching removes branches from the crown of the tree because they are too long or too high. Each branch is cut back to a fork in the tree called a crotch. The forks are branches that have a live branch at least half the width of the branch being pruned, or they are the main stem. In this method of pruning, the branches are shortened over the entire main branch system of the tree. Every place where you see a branch grow out of a bigger limb is a crotch. They can be located anywhere in the tree, from the highest point to the lower canopy.
To prevent branch die back, cuts should be made at lateral branches that are at least one-third the diameter of the stem at their union. Image courtesy of the USDA.
When drop-crotching, you should keep a balanced shape so you should not thin or reduce more than 25 percent of the crown. Keep the cut as close to the parent branch as possible. Keep in mind that severe drop-crotching will stress the tree and lower its natural defense system because of the large wounds that result in the places where the branches have been pruned. Drop-crotching is preferable to stub cuts, where you do not prune up to the collar or trunk of the tree, because drop-crotch wounds are closer to the stem and heal more quickly. Within a few months, sprouts will grow in the places you cut so you must also prune these because these new growths will tend to be weakly attached and unsafe.
The proper way to prune is to make sure you position all cuts just above a substantial branch, and you make these cuts over the entire main branch system for balance. When thinning, remove branches off substantial or main branches. Do not cut the main branches themselves unless necessary, as in the case of branches touching power lines, roofs, sides, or windows of buildings. Choose those stems or branches that form a V-shape attachment to the substantial branch that is being thinned. Be sure to remove the whole length of the selected stem branches, and cut as close to the parent branch as possible.
Begin your cut on the underside of the branch you are pruning, well up from the V-crotch. For these cuts, use a pointed bow saw if the limb is thin or hard to reach, and use a D-shaped bow saw if the limb is thicker or heavier. Next, make your second cut on the top side of the branch, from the inside of the crotch but well up from the initial cut and the ridge of bark that joins the two branches. Be sure to cut all the way through the branch so only the stub remains. Next, shorten this stub by making your final cut just to one side of the branch bark ridge and parallel to it.
Leave branches that form a U-shape of attachment. Also avoid forming lion tails, which are tufts of foliage and branches at the end of branches caused by removing all inner lateral branches and foliage. If you leave the lion tails, you risk sun scalding on branches and the trunk, as well as epicormic sprouting, which are shoots growing on the mature section of the main stem, trunk, or branch. Lion tails can also result in weak branch structure and breakage. Always remove branches that rub against or cross other branches.
The best time of year to drop-crotch is during late fall or winter. During the dormant season, there is less sap loss, which means less stress to the tree. Also, fungi and insects also tend to be dormant during the late fall and winter, meaning the opportunity for infection or infestation is not as high. And because deciduous trees are leafless during this time, you can see the shape of the tree and the branches that need thinning better. You should always remove dead branches, no matter what time of the year.
You should thin as little as necessary rather than harm the tree by over thinning.
Creating a Standard for Trees and Bushes
When professional gardeners — those who make their living from taking care of trees and plants — talk about creating a standard, they are referring to training a bushy plant to have a clear, upright stem and a rounded cotton ball-shaped top, like those trees drawn in children’s picture books.
When certified arborists — professionals who have studied arboriculture, or the cultivation, management, and study of trees — talk about creating a standard with trees and bushes, they are talking about following the pruning rules set by the American National Standards Institute (ANSI). These include adhering to definite instructions on how to prune various trees and shrubs and what tools to use for each individual job, as well as how to take care of and clean pruning tools so that disease is not spread. This book mentions these same guidelines, and you can find them online at www.ansi.org.
Gardeners and arborists both love and hate standards, depending on personal preferences, but those who advocate creating standards usually do it for fun. You are pretty much creating a miniature lollipop-looking tree, and it is fairly easy to do.
How to create a standard
You can create a standard with a seedling, a rooted cutting, or an established bushy plant. Keep in mind, young plants are more flexible than established ones, and their rapid growth makes them easier to train to a standard form because you are not fighting against years of old growth. Also, with a young plant, there is less risk of damaging, stunting, or even killing the plant.
If you are using a seedling or rooted cutting, select a plant that has a strong center stem or branch. If you are using an established plant, choose one that has a larger central branch, and lop off all stems down to the soil level. You should note that pruning off all the lower branches can stress an older, established bush, which might make it a poor candidate for creating a standard. Leave plenty of branches and leaves on the top part of the center stem so the plant can produce enough energy to sustain itself and grow in a healthy way.
Next, place a stake in the soil, and tie the main center stem of your seedling, rooted cutting, or bushy plant to the stake every few inches. The stakes ensure the eventual trunk will grow straight, and upright growth consumes more of the plant’s energy so this should also help to suppress the growth of lower buds. Once the plant matures or reaches full height and the central stem is strong, you can remove the stake. A mature plant will be dense with fully-grown leaves. Removing the stake is your call, but you can tell if the main stem is ready by whether it appears strong and upright. If there are any shoots growing near the base of the plant, remove them. Most of these shoots will not grow back if they are cut off when the plant is still young.
In the second year of growth, some branches may begin to grow from the main stem, and you should pinch them back to weaken them. Do this every time the plant grows a few inches. Continue to prune off any branches growing below the bushy top growth of the rounded top. Also, occasionally clip the top growth. This will encourage more growth from the top of your center leader.
One area of concern if you live in a climate with harsh winters: Standard trees are less hardy in winter than if they had remained bushy shrubs because they are missing their side branches. If your standard plant is in a planter, you can easily bring it indoors when the weather is cold. But, if your standard tree is in the ground, be sure to insulate the stem with a burlap bag.
Choosing your standard
Two kinds of standard trees exist: ornamental standards and standards. Both are small, but ornamentals are dwarf sized — or smaller than usual — and are usually in pots.
Creating standards is increasingly popular because it is a fun way to enjoy the beauty of a tree without the space required for many traditional trees. This is especially true when creating ornamental or tree standards in large containers, although many standards do just as well when planted in the ground. Containers give you the freedom of bringing your standard indoors in cold weather, which is an advantage when dealing with plants, such as rosemary and citrus, which can die when the thermometer dips.
There are endless choices of plants that make great standards, but here are some favorites among gardeners:
Rosemary is a favorite choice as a dwarf-sized standard, often growing no more than 2 feet tall. The rosemary foliage is a semi-evergreen silver and green, which produces small blue flowers in summer. Rosemary leaves are decorative, and they also have a functional use: Rosemary is a popular herb used to season meat, sauces, and soup. Rosemary does best when grown in pots and moved indoors if you live in a climate with cold winters.
Dwarf orange trees are another great choice when growing an ornamental standard. If you live in a cold-winter climate, it is especially important to grow dwarf oranges in containers you can take indoors. Pinch off some of the fruit buds so the tree can keep its lollipop, rounded form. The tree will still bear fruit on the remaining buds.
Ornamental cherry trees can be grown in the ground and provide three separate interesting seasons: spring with its cherry blossoms, summer with its cherry fruit, and fall with its interesting colors of yellow, orange, and brown. But, these trees can reach a height of 10 to 15 feet so you should do some pruning each year to maintain the standard rounded form.
Camellias are a type of evergreen shrubs and small trees, originally native to Asia, that make another great choice for standard trees. Camellias have shiny leaves and showy, rose-like blooms that come in red, white, and pink. In both cherry and camellia plants, select a young plant with a strong center stem. Remove the lower foliage and any shoots along the stem. Stake the main stem, and once it reaches the height you desire, pinch off the tip growth. This will force the plant to branch out, creating the rounded top you desire. Camellias are hardy shrubs and do well both in the ground and in containers. They prefer partial shading and do well as an ornamental plant or along fences or walls.
Gardenias are a favorite type of garden shrub; they are known for their snow-white blooms that pop against their dark green leaves. But, their strong scent attracts many gardeners. The finicky gardenia prefers mild, cooler temperatures, about 62 degrees Fahrenheit, as well as humidity. This dual need can make it difficult to keep them from drooping and dropping their blooms if you have them in your house. The challenge — especially in winter — is to find a place in your home cooler than the rest of your house, yet humid. Bathrooms or a laundry room are two rooms that might provide cool, humid environments. Although gardenias can survive without pruning, annual clipping can keep the bush shapely and attractive and at the size you prefer. Gardenias do well as ornamental shrubs and also as large bushes. A shrub can be pruned on old and new wood alike but will bloom regardless of whether or not it is pruned.
Rose bushes in their many different types can easily be trained to grow as standards. Be sure to select a re-blooming or ever-blooming variety, a plant that will bloom several times a year as opposed to one that only blooms once a year so you can enjoy beautiful roses all season; some rose varieties have short blooming seasons. Remove dead blooms, and prune branches in the early spring to keep the tree looking its best. Roses do not do well if pruned when weather is cool or cold so wait until you see new growth on your shrub before clipping. Only cut back a ¼-inch above a bud, and always leave two healthy leaves on the stem to ensure that the plant remains strong. Rose bushes can do well as ornamental plants, but some varieties can also grow up to 10 feet tall. Also, make sure your rose bush receives adequate sunlight because roses need six hours of sunlight a day. This sunlight should be morning sun as opposed to afternoon sun because rose bush leaves are prone to mildew, and the morning sun will dry the dew that causes mold and other fungi diseases.
Hibiscus makes an excellent standard plant because its large, woody shrubs are easy to train. These plants come in a wide variety of bloom colors and can live in different climates. Some hibiscus varieties can withstand cold climates, while others cannot survive low temperatures. If you live in a cooler climate and you choose a variety sensitive to the cold, keep it in a container to bring indoors during the winter season.
Bougainvilleas present an interesting challenge as a standard tree because they are vines and need intense heat. In fact, they need at least five hours of sunlight a day. You must grow bougainvillea in a pot or container because it is sensitive to the cold, and it must have some kind of support. One way to support the plant involves creating a braided trunk. Start by choosing three bougainvilleas only a few inches in height with only a few, if any, side branches. Next, fill a pot or container with soil, and put a stake in the center. Place the three plants evenly around the stake, as close to the stake as possible, and water well. Braid the plants around the stake until you reach the top of the stake. Cut off any remaining side branches, but leave two remaining branches at the end of each vine. As the vines grow, continue to braid the stems, and cut off any new side branches, but always leave the two branches at the end of each vine. When the vines reach the top of the stake, pinch the top growth tip of each vine. Leave at least three sets of leaves at the end of each vine. These will branch out and create your standard top. Since bougainvilleas grow fast, you can create your standard tree in as little as 2 to 2-1/2 years. Some varieties that make excellent standard trees include Barbara Karst, San Diego, superstition gold, torch glow, Jamaica red, violet, and double orange pink.
Topiaries
Topiary is the art of creating sculptures out of trees and shrubs by means of careful pruning. These include geometric forms, arches, animals, or any shape you can come up with. Its origins date back to the Roman era, but it became a popular garden art form in England during the Renaissance period. It fell out of favor in the 18th century but enjoyed a revival in the mid-1800s. In 1962, Walt Disney brought topiaries back in favor when he used them in his creations of Disneyland® and Disney World®. Topiaries have never been as popular in the United States as they are in Europe, but for creative-minded people, they can add an interesting aspect to the garden.
You can create topiaries in any size, making them interesting and fun. Shapes and sizes are only limited by your imagination, although artistic skill definitely helps. People often use trees and shrubs like evergreens with small leaves or needles for topiaries, although you can use some deciduous trees, which is discussed further in this chapter. A pruned hedge is a form of topiary in perhaps its simplest form.
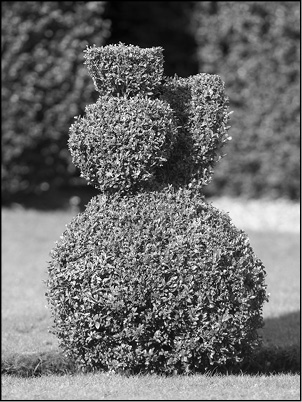
You can get creative when pruning bushes. Geometric-shaped bushes like these add an interesting element to a garden.
The ideal plant to choose as a topiary grows slowly and tolerates repeated pruning without suffering any stress. You should also choose one capable of re-sprouting from older wood and hardy enough to withstand the cold.
How to create your topiary
You should plant the plant or plants you choose for your topiary in an area that receives full sun. The tree or shrub needs to receive light on all sides or the sculpture will have bare parts and holes. Start by shaping your plant when it is young — although you can create topiaries from older, dense, overgrown plants, but training at this stage is more difficult. To make your job easier, especially if you have never created topiary before, you may want to create a frame from wire or wood that you form into the desired shape of your topiary. If you choose not to use a frame, make sure you prune slowly, and step back from time to time to examine your shape. Begin pruning as soon as any growth starts, and continue to shear throughout the summer. If you are using an evergreen as your topiary, you will probably only need to shear it two to three times a year. If you are using a deciduous plant, you may need to prune more often — these grow faster than evergreens. Clip all around the tree or shrub, and remove any unwanted branches between the sculpted areas. It is a good idea to keep the heaviest shapes toward the bottom of plant so it does not become top heavy and stressed from the weight.
Once your topiary is fully grown and is sculpted to your desired shape, you will need to prune it one to three times a year, depending on the plant you have chosen. If you live in a colder climate, prune your topiary at midsummer to lessen the chances of your pruning stimulating re-growth before spring of the following year. If you live in a warm climate, do it at the coolest time of the year so the sun does not scald the newly pruned wounds.
Types of topiaries
You can create three types of topiary: a topiary made from vines, a topiary made from a shrub or tree, and a topiary made by combining two or more plants into a desired sculpture.
Vine topiary is created when vines are allowed to grow on top of an already existing topiary. Choose a plant that grows in vines, such as an English ivy or Boston ivy, and make sure your vine grows quickly and tolerates changing conditions.
You may want to first fill in your shape with sphagnum moss, a genus of moss made up of 350 different species that is sometimes called peat moss, to make your topiary look fuller. You can find sphagnum moss growing in the wild, but you can also purchase it at some nurseries or on the Internet. After you have created your topiary form, plant the vine around the form. This allows the vine to grow up the form. Vine topiary can grow out of the ground or in a pot or container. As the vines grow, train it by wrapping it around the form. Prune or pinch back any growths from the vine that you cannot train. You will end up with an attractive and unique topiary.
Creating topiary from a shrub or tree is a little more difficult than when you use a vine to grow over and around an existing topiary. Your best choice is to use a juvenile shrub as opposed to one fully grown, but you can do the latter, too, although an older shrub is more difficult to train. If your shrub is in the ground, it will require more time and patience than if it is in a container. Start by trimming off no more than 1 to 3 inches to create your desired shape. This will prevent you from trimming too many leaves, and it will also encourage additional growth that will help your shrub become bushier or denser. Also, taking more than 3 inches could cause parts of the shrub to go into shock and die. Every three months or so, when there is active growth, continue to train and prune. Even after your topiary is the desired form, you will need to continue to prune new growth to keep the desired shape.
Using a metal or wooden frame creates topiary from a shrub more easily. Expert pruners often use frames because they make the job easier. You can buy a frame or make one yourself. Begin by pushing a stake or pole into the ground, as close as possible to the center of the plant. Next, secure the frame to a point on the stake to prevent the frame from shifting over time. Wait until new stems emerge from the frame, and then neatly clip them back. Should you want some stems to emerge from the frame in order to fill out the shape, tie those loosely to the frame with a twine that will biodegrade as the shrub grows.
Topiaries using more than one plant require careful planning. A frame is a must in creating this type of topiary. You can either plant two — or more — shrubs side by side or let one grow up inside and through the other to create your desired shape. You can use shrubs of the same type of plant or different plants to make the visual more interesting. This, of course, is a higher level of difficulty and will be more time consuming, especially when you consider that no matter how many plants you use in your topiary or how much training and pruning are involved, a plant will eventually go back to its natural growth pattern. As long as you do not mind maintaining your creation, a topiary offers a source of beauty and pleasure.
Choosing your plant
You can create topiaries from both evergreens and deciduous trees. Not all plants make good candidates for topiaries. Your best bets include plants that are slow-growing, are able to re-sprout from older wood, and are able to handle the stress of repeated pruning. Here are a few that work well as topiaries.
Boxwood
Evergreens make great topiaries because their needles or leaves make crisp, straight cuts and their leaves remain on the tree all year. A particularly popular evergreen often used as a topiary is the boxwood, a broadleaf evergreen desired for its rounded, bushy growth. A broadleaf evergreen has leaves instead of needles.
Boxwoods are one of the oldest plants used for ornamental uses, dating back to the Egyptians, Greeks, and then the Romans. In fact, ancient woodcarvings from China dating back to 1600 B.C. show pictures of boxwoods. They make excellent topiaries because of their denseness, hardiness, and longevity; plus, they are easy to grow. Boxwoods have shallow root systems, and you can easily transplant them. Their denseness makes them easy to use as topiaries, but they also do well when shaped around a metal or wooden frame.
If you will freehand your boxwood topiary — that is, without a frame — your best shape choices include either a cone or a ball. If your desired shape is more complex, then a frame is strongly recommended.
You need to prune boxwoods several times a year. Use long-handled shears to make shaping and cutting easier without straining your wrists. Prune every three months, cutting away longer growths that shoot out beyond your desired shape. Never prune more than 3 inches. As you prune, your boxwood will become bushier. If you live in a cold climate, choose a rounded shape on the top so heavy snow and ice will not damage the boxwood.
If you are using a frame, choose a form that will fit around the shape of your boxwood. Take the frame apart at its center seam, and then place the two sides of the frame on either side of your boxwood, and push any rods into the soil around the boxwood. Next, pull the branches of your boxwood through the frame, and then begin to cut a rough shape of your topiary. Over time, your topiary will take on its intended form.
English yew
The English yew, the oldest tree in Europe, is another popular choice as a topiary because it grows low — about 2 to 4 feet high and 10 feet wide — and responds well to heavy pruning. They also can thrive in the shade, although they do just as well in full sunlight. When selecting a yew plant, ask about its growth pattern because yews come in a variety of shapes. The growth pattern should correspond to the shape of the topiary you want to create.
While most topiaries are best grown from young plants, yew topiaries can do well when shaped from an old, overgrown plant because yews are dense and stems sprout vigorously, even from old wood. Another reason to use an already established yew for your topiary is because yews grow slowly.
Yews are extremely hardy and can handle periods of drought. Prune your yew at least once a year but preferably twice a year after new shoots appear, in late spring and mid-autumn.
Hollies
Hollies are evergreens suited to trimming. They require full to partial sun and do well in freezing temperatures. In fact, holly is one of the most prunable plants, but make sure you wear gloves to protect against its spiky leaves. When dealing with hollies, remember you need to properly drain them, you should not water them too much, and you should not disturb the roots; transplanting a holly would probably harm the plant. They do bounce back if they drop their leaves, growing new ones quickly. Hollies come in a variety of types and sizes, making these plants a great choice when creating topiaries. But, they also grow slowly so if you plan to create a large topiary, choose one close to the size you need your sculpture.
Juniper
Junipers are popular evergreen plants and are used as topiaries because their narrow, needled leaves are easily shaped. The plant also withstands more severe pruning than many other plants. They are also popular because they do well in both cold/dry and hot/dry climates, and they can survive in just about any type of soil. Most junipers grow slowly, although some varieties grow quickly, which means they need little pruning — about once a year — so they will keep their topiary shape longer. Slow growth also means you will need to choose a mature juniper close in size to your desired sculpture.
Traditional juniper topiaries include ball and pad styles, or round and square shapes, but junipers are suitable for whatever shape you choose to create. Use hand shears and create your shape, pruning away any unnecessary branches. If you decide to create balls, cones, and spirals, garden wire may help and lessen the chances of snipping too much. Junipers mostly grow slowly so if you overdo your pruning, you will have to wait until the next year to correct your mistakes.
Once you have shaped your juniper, ignore any new shoots emerging in the early spring. Wait until mid-June to prune any of the stems. If you prune a Juniper too soon in spring, you could bruise the sappy new growth and damage the shape of your topiary. By mid-June, the juniper’s leaves will be stronger and can withstand pruning. If you do need to prune again, wait until September. But, always remove dead branches because they are susceptible to disease.
Although, as stated, most junipers are slow growers, there are a few fast-growing junipers, such as the Pfitzer juniper. This variety can grow 12 to 18 inches per year. Because of the speed of growth, these junipers may need trimming two or three times a year. In this case, trim back new growths, even if they are inside the plant. Do not be afraid to prune some parts back to the previous year’s wood in order to keep your topiary shape and size.
Arborvitae
The arborvitae is a cold-weather evergreen in the cypress family. It is popular because, beyond needing moist, alkaline soil and cool temperatures, it does not need much care. It has a natural cone shape and dense foliage that makes it a favorite choice as a topiary, particularly if you seek a spiral shape.
Arborvitae grows fast and reaches heights of more than 40 feet. Their popular, soft, fan-like leaves and beauty make them a favorite in many gardens. You can plant them in full sun or partial shade and maintain them easily, but you must protect them with netting if you live in a cold climate — snow and ice can damage their soft branches. Arborvitaes only need pruning once a year, but you should do it in fall or early winter. If you prune arborvitaes in spring or summer, their tips will turn brown.
Use pruning shears for your arborvitae topiary, and go slowly, especially if you hope to achieve a smooth, spiral shape. An easy way to prune this shape is to tie a ribbon to the top tip of the tree. Wind the ribbon around the plant, starting at the top of the tree working all the way down to the base. Wind the ribbon at the width you want your spiral. Start your pruning halfway down the tree and prune up. Remove one-third of each branch above the ribbon, but stop when you have reached 1 foot from the top of the tree. Step back every now and then to make sure you prune on track. Next, move downward, again cutting one-third of the branches above the ribbon, until you reach the bottom of the plant. The bottom half’s pattern should match the top half’s. When you finish that, go back to the top of the tree, and cut each branch you want to remove to about a ½ inch from the trunk. Do not cut the branches that are part of your spiral, only the larger ones. Now, step back, and take a look at your topiary. Remove any uneven branches until you have your desired spiral shape. Once you have done this, you should only need to prune your arborvitae topiary once a year.
Bonsai
If you are looking for an artistic challenge in pruning styles, you might want to try your shears at creating a bonsai. It is not a particular plant, as some people think, but rather a Japanese word used to describe the growing of plants in shallow trays or pots, particularly woody plants. Bonsai is a miniature version of a tree planted in a pot or tray.
Although the history of bonsai was not well documented, bonsai existed as an artistic form in China about 2,000 years ago. By the 1100s, the plant art form spread to Japan and began to gain popularity. The Japanese perfected the art of bonsai, and it became an important part of their culture. The idea behind the technique of bonsai is that the plant you choose, the pruning you do, and the mood you create are choices decided by and unique to you. You choose every aspect of your plant, from the container to the shape of the branches. Constant pruning keeps the bonsai small and healthy and prevents it from potentially growing into a huge tree or bushy shrub. Perhaps one of the most interesting traits about bonsai is that you never finish creating it. When you choose this artistic form of pruning, you are in it for the long haul.
If you are creating a traditional bonsai, choose a dwarf or a slow-growing plant. Your plant should range in height from 3 inches to 3 feet. You can choose either an evergreen tree or a deciduous one, but make sure it has either short needles or small leaves because trees with smaller needles or leaves will look in better proportion to the small bonsai you are about to create.
Also, choose a plant that does not mind poor, rocky soil. Moist soil rich in nutrients will cause your tree to grow quickly and fuller, which will create a more difficult job for you, especially if you have never done a bonsai before. If your tree’s shape is distorted or stunted, this simply adds to your design. In the world of bonsai, a tree with growth predominantly on one side or thick at the base of the trunk is particularly favored. You can purchase plants and tools for bonsai online from websites like Sleepy Hollow Bonsai (www.shbonsai.com/index.html).
Once you have picked out your bonsai plant and your container — either a shallow tray or pot — start with the roots and untangle them, cutting off any too long to fit in your container. If you are growing your tree in a shallow tray and it has a taproot in addition to feeder roots, cut off the taproot. Then, carefully replant your tree in your container with fresh soil.
Now, you are ready to do some initial pruning. This means making a decision on how you want your bonsai to grow and having a mental picture in your mind on how you want it to look when finished. If you have no idea, look at photographs of bonsai plants, or visit the Bonsai Site’s gallery of pictures (www.bonsaisite.com).
To start your pruning, clip off some of the branches to thin out your plant. Your goal is to make the tree look old because that is the premise of the bonsai look. Prune these branches close to the trunk. Next, prune back the top so your tree is less than 4 feet tall but at least 3 inches tall, according to the shape and size you desire. Shorten the trunk to a few inches above the desired height. Heavily water your tree, and then cover it and its pot with a clear plastic bag. Place your tree in a cool place where it will receive light but not direct sunlight, and leave it this way for two to three weeks while it recovers from the pruning. Then, place it in direct sunlight.
There are two schools of thought when it comes to training your tree to grow into a bonsai shape. Some growers prefer training their plant immediately after planting it in its container; others like to wait several weeks to a year in order for the plant to get established in its container. You should consider the characteristics of your chosen plant type when you decide. Before you begin to train the shape of your bonsai, make sure you consider the time of year and the type of plant you are using:
- If you choose an evergreen bonsai, train it in fall or winter before its new growth for the year begins.
- If your bonsai is a deciduous tree, train it in early summer when its sap is flowing, and it is more flexible.
- Do not train your bonsai in the spring because you can damage its tender, dormant buds.
- You can use wire to force your tree to keep its desired shape. Before you can use the wire, the buds need to be growing so that the wire placed around them in training will not damage them.
- When dealing with a plant with a heavy trunk, you will need 8- to 9-gauge aluminum or copper wire.
- When training a plant with a smaller trunk or when shaping the branches and tops of larger trees, use 18- or 20-gauge aluminum or copper wire.
Once you have decided when to train your plant and which wire to use, stick the wire through the holes in the bottom of your pot or container, and wrap it around your plant upward in a 45-degree spiral. Carefully bend your tree to the desired shape. The wire will hold it in place. Slip little pieces of paper under the wire as you bend the trunk. This will protect the bark. You can remove the wire once your tree grows in its new shape; for deciduous trees, this will occur after three or four months, but evergreens may take as long as a year. Do not leave the wire on any longer than necessary, or you run the risk of your tree growing around it, which will permanently disfigure the trunk.
Keep a close eye on your bonsai to make sure it is growing according to plan. Pinch off any sprouts growing in the wrong places, and prune branches growing too long. Decide which side of your bonsai is the front. This will be the side you want to look old and thinned out. In the back, allow the foliage to grow denser. This will give your tree body and will also produce additional leaves for healthy growth. Also, allow one branch near the bottom of your tree to grow freely. This free-growing limb will use most of your tree’s energy so it is easier to shape the remainder of the plant. Once your tree is trained, clip off this branch, and seal or paint the wound.
After a few years, you will need to revisit your bonsai’s root system, as your tree will become root bound, meaning the roots will tangle together from growing in a contained space. If your bonsai is a deciduous tree, you will need to re-pot it every year or two. If it is an evergreen, you will have to re-pot it every two to four years, depending on the age of the tree. Carefully tip the tree out of its pot; if the roots have become a thick, tight ball, it is time to re-pot. Wash off the soil by gently swishing the roots in water. Next, cut off a third of the roots growing on the outside of the root ball. Also, prune off part of the large, fleshy roots, but make sure they are not attached to the large, fibrous roots. Then replant your tree in the same pot, using fresh soil. Water it, and cover it with a clear plastic bag, and again, keep it in a cool place out of direct sunlight for two to three weeks.
Bonsai-style pruning in the garden
Although a true bonsai tree is grown in a shallow tray or container, you can also create the style and influence in your garden. The look is best achieved with trees growing on uneven land. The idea is to create a small tree that resembles an older, larger tree. Any tree can be dwarfed in this manner, but the best choices are slow-growing conifers and dwarf trees or shrubs.
Start by pruning some of the branches at the trunk of your tree, especially any long or large limbs. Train the remaining branches by wrapping aluminum or copper wire around them in a 45-degree spiral. First, stick the base of the wire in the ground, bend the tree carefully, and spiral the wire upward. After your tree has had a season of growth, you can remove the wire. During its growing season, pinch and snip new sprouts, and do your heavy pruning when your tree is dormant in late fall. You may also have to do occasional root pruning.
Choosing your bonsai
Technically, you can grow and prune any plant as a bonsai. But some trees make particularly good choices in the art of creating a bonsai. Sometimes people confuse bonsai with dwarfing a tree, but the latter involves permanently creating genetic miniatures of trees, whereas a bonsai is a plant that looks like a miniature tree because of training, pruning, root reduction, defoliation, and grafting. A dwarf tree may need occasional pruning, as all trees do, but a bonsai is a lifelong effort.
Juniper
Juniper, a woody, poplar evergreen, makes a great choice when creating a bonsai because it can handle severe pruning, and it is easy for even a beginner to create the perfect bonsai look of an aged tree. Because it is an evergreen, it will need its roots pruned in early spring or late fall. Junipers need full sunlight occasionally so if your juniper bonsai is an inside bonsai, you should place it where it will receive morning sunlight — at least two hours a day — with afternoon shade.
When growing your juniper bonsai, you need to pinch off any new growth as soon as it appears. If you do not, then branches will form, and your juniper will appear ragged instead of aged — the look of a true bonsai. If your juniper is an inside bonsai, you will also need to prune its roots every other spring by removing it from its tray or pot. Prune off one-third of the roots, and then re-plant it in the container with two-thirds-part fresh soil and one-thrid-part sand. Mist your juniper’s leaves twice a day for two weeks. This will help your tree get over the shock that can result from pruning its roots and then re-planting.
Although junipers are considered hassle-free trees, you should not become inattentive when taking care of your juniper bonsai. A juniper can appear healthy even if it has died. This picture of health can appear for weeks or even months after the tree has stopped growing. In addition, junipers need seasonal variations in temperature so if your juniper bonsai is an indoor plant, you must place it outside from time to time. But, do not place your tree outside during extremely cold or hot times because juniper does not like extreme temperatures.
Chinese elm
Chinese elms are a popular choice for creating bonsai because they are strong, sturdy, and handle extensive pruning without going into shock. This tree adapts to various climates and does well both indoors or outdoors.
Chinese elms benefit from having all of their small, serrated leaves pruned off just after the leaves have expanded. This forces a second group of leaves to sprout that tend to be smaller and more in line with the small size of a bonsai tree. Chinese elms grow fast, and you can leaf prune twice in the spring and again in the fall, when the color of second group of leaves tend to be more vibrant.
If your tree needs major branch pruning, do it in late spring or early summer, when the tree is at its strongest, but be careful not to prune too much because you could weaken your tree. A good rule of thumb is to simply go on your feelings, and prune your Chinese elm when it looks like it needs pruning. Remove sucker growths at the base of the plant.
Chinese elms are versatile when it comes to creating bonsai. You can either prune off the branches to get your desired form, or you can use the wiring method. When working with wire, wrap it around the top and the side branches you want to grow, while pruning off unnecessary branches on the opposite side of the tree. Make sure you circle the wire at a 45-degree angle, and do not wrap it too tightly because the wire could scar the bark. The bare side missing branches becomes the front of your Chinese elm, and the wired side becomes the back. Take care to keep tabs on your tree if you choose the wiring approach: Chinese elms grow fast so your wiring could wind up embedding into the tree if left unattended. After the tree’s branches are growing in the desired direction, you can remove the wire.
Your best time to root prune is in spring when your tree’s leaves begin to bud. The Chinese elm can handle extensive root pruning because like the rest of the tree, the roots will grow back quickly. You will probably want to do this every other year. Use sharp scissors to cut back the roots because the Chinese elm has pulpy roots that can be easily crushed if mangled when pruning, which in turn can lead to root rot.
You can plant Chinese elms as outdoor bonsais because they can handle varying temperatures, including as low as 20 degrees in winter. You will need to protect its roots in cold temperatures by putting mulch or insulating material around the base of the tree. Thanks to its stocky build and quick growth pattern, you can easily prune any bonsai style you desire. As with a bonsai grown in a container, you should cut off new growth immediately or use a wire until you have trained your Chinese elm to grow in the pattern you have chosen.
A Chinese elm bonsai grown in the ground will need to have its roots pruned, just like a bonsai in a container, in order to maintain its small stature. The best time to do this is in the late fall and early spring. Push your shovel into the ground in a circle around your Chinese elm, about 2 to 4 feet from the trunk. Chinese elms are also prone to surface roots. You can do little about surface roots because cutting them off can kill a tree. But, keep in mind that a rocky, unlevel ground surface in a garden is the perfect visual setting for a bonsai.
Myrtle
Myrtles are naturally dense plants that are easily pruned to create bonsai. This tree tolerates some shade but must also have plenty of sunlight, and its container must provide good drainage. It makes an excellent choice as a bonsai because the dry air of central heating or air conditioning do not bother it, and it adapts to household atmospheric conditions. While myrtles are a huge family of plants, the crape myrtle, in its many varieties, is normally used as a bonsai plant because of its beautiful flowers and attractive red and silver peeling bark.
Crape myrtles are native to Japan and Korea, but today they are found throughout the United States and all over the world. Crape myrtles are known as low-maintenance plants, but when creating a bonsai, there is always maintenance needed to keep it small over its lifespan and in the form of the bonsai. They are deciduous plants, and their large variety of colors make them a popular choice for bonsai, particularly because they are hardy and can tolerate the extensive pruning involved.
Most crape myrtles used for creating bonsais are of the dwarf variety. Whether indoors or out, they need a sunny area and good drainage. Because crape myrtles are favored for their beautiful flowers that bloom on the short shoots of the current year’s growth, you will need to be extremely careful with how you prune your bonsai to ensure your plant flowers again the following year. Prune your heavier branches in the fall when your tree has no flowers. This will stimulate bud production for the following year, and heavy pruning will thicken the trunk. In the spring, let new shoots grow for several weeks, until you are into late spring or early summer. At that time, cut back new shoots to two or three leaves so the buds at the axils of these leaves, or the point where the leaf attaches to the stem, will produce new flower-bearing shoots.
When creating your bonsai shape, wire the trunk and branches from the spring to the fall. Be careful of how tight you wind the wire on the crape myrtle’s smooth bark to prevent any scarring or damage. The crape myrtle’s delicate branches make it easy to train so you can also forgo the wiring if you desire a bonsai with a broom look. In the year after you train your plant, pinch off any new growths. This will promote branch ramification, which will give your crape myrtle bonsai the desired look of a large tree in a smaller form.
Pine
Pines are a classic favorite of bonsai fans, yet they are also one of the most difficult choices. Unlike deciduous trees and many conifers — which produce new leaves on a continuous basis — pines only have one growth spurt each year, or sometimes two growth spurts if the pines grow in mild climate. In addition, it is time consuming to train a pine to the perfect bonsai shape. But once that shape is reached, pines are easier to maintain than other bonsai plants because they require little routine maintenance.
By shortening the candles, which is the new growth, or expanding new growth shoots, which are what the candles become as the needles lengthen and cluster from a single stem, you can control the size of a bonsai pine. Expanding new growth shoots simply means that you pinch back the new shoots. This will keep your pine from growing larger and will make your bonsai fuller and bushier. You should remember that although they only have one or two growth spurts each year, their growth spurt is extensive, making them fast growers so choosing a pine for your bonsai creation means you must be willing to give it the time and attention it will demand. The best time to do your pruning is in late spring so your pine does not lose too much sap.
Use wiring when creating your pine bonsai. Wiring trains your tree’s branches and trunk to grow in the direction you desire, and it also slows the flow of its sap and helps to distribute energy and vigor throughout your pine instead of just directing the energy to the branch tips. A popular pine bonsai shape is one with a completely straight, upright, and tapered trunk, although the idea behind the bonsai is that your tree can be any shape you choose. To create this popular shape, prune off the bottom branches, and position the first main branch of your bonsai about one-third of the way up the trunk. The rest of the branches should spiral upward above this main branch, growing tighter as they reach the apex or top of the tree, thus forming the shape of a triangle.
Spruce
Spruce is another evergreen you can create into a bonsai but can prove to be a frustrating choice, especially if you are new to the bonsai game. Spruces are difficult to train, especially through wiring. They are also difficult to style. The time commitment for this tree may be greater, but it does not mean you should avoid choosing a spruce as your bonsai. If you do not feel experienced enough, you can always try your hand at another type of tree first in order to get a feel for what is involved in this type of artistic pruning.
There are 35 varieties of spruce in the United States alone, including some dwarf species. When purchasing a spruce, do not buy a variety that is grafted because they tend to bulge at the base. You can tell if your spruce has been grafted by the color of its needles. Green spruces have color variations that range from green to blue, whereas blue spruces are entirely blue and almost all have been produced from grafting. If you do not know for sure if a spruce has been grafted, ask the nursery you are purchasing it from.
When creating your bonsai, prune back the tree’s side branches and its visible dormant buds. In the spring, the lateral shoots will appear. When the shoots are about 1 inch long, pinch them to make your spruce bonsai denser. Leave any major pruning until late summer or fall because spruces are sensitive trees and will not tolerate pruning in spring when they grow the most.
During the fall or winter, when the tree does not grow as quickly and tolerates it better, you can wire the branches for training. Spruces have thick branches so use thick wiring when training your spruce as you desire. Also, use the wiring to bend those branches at least 1 inch thick so you do not risk breaking or snapping a limb. Otherwise, the branches may die back quickly. Because of the natural pyramid-shaped growth pattern of spruce, you might want to consider pruning this shape when creating your bonsai.
Compared to other bonsai plant types, spruce bonsais need a larger root ball so your container may be deeper than a traditional bonsai tray or pot. When you do prune the roots, cut them by one-third, and plant them in fast-draining soil. Do not start wiring or branch pruning until the plant has been in the container for three months after you pruned its roots.
Case Study: Talking With A Bonsai Expert
Ashley Carrier is a principal bonsai expert at Bonsai Outlet.
See www.bonsaioutlet.com.
When considering why and in what ways to prune your bonsai, remember two guiding principles:
•You are emulating a full-growth tree.
• You are encouraging the health and aesthetic of your miniaturized bonsai tree.
In addition, ask yourself whether you are pruning to form your bonsai or to maintain your bonsai once you established the form. Form pruning lays the foundation for maintenance pruning and is more drastic and takes a longer time from which to recuperate than maintenance pruning.
Pruning your bonsai at the appropriate time depends upon the species of your tree. Your best time, though, is when your tree produces new growth. For deciduous trees — maple and cherry — early spring is your better choice. Pines and spruces fair better in mid-spring, while early to midsummer is recommended for junipers.
Learn your bonsai cycles, and time your pruning accordingly. With deciduous trees, pinch back new shoots to two pairs of leaves, while removing any shoots growing vertically. Pines should have their candles reduced by approximately one-half, with the ones remaining being shortened. You pinch back the new shoots on spruces to half their length to encourage buds to form at the base rather than at the growing end. Because junipers push out new growth throughout their growing season, you should thin that growth regularly to avoid overgrowth that causes self-shading.
You should perform all pruning with clean hands and sharp scissors, pruning shears, or leaf trimmers. For example, leaf pruning — defoliation — to reduce the leaf size or to get rid of unattractive leaves is done by cutting approximately two-thirds of the leaves from your bonsai tree directly behind the leaf. The quality and condition of your tools can significantly affect the appearance and health of your bonsai.