
Chapter 11: Pruning Hedges
The idea of a planting shrubs or trees to create a hedge or hedgerow goes back several thousand years to Roman times. They were popular in England when the government issued the Enclosure Acts, which allowed citizens to enclose their land with permission from the government. In 1836 and 1845, the government passed the General Enclosure Acts, which allowed citizens to enclose their land without government approval. People created hedges using thorny bushes and trees gathered from the English countryside. They carefully crafted these hedges by tying and twisting the limbs together so they formed an impenetrable barrier. Because the hedges were used in the countryside and space was not as big of an issue as it currently is, they were not always sheared back to a neat form. In the formal gardens of England under the reign of Queen Elizabeth I, knot gardens — made of a variety of tightly sheared shrubs — became popular. They are called knot gardens because when viewed from above, such as out of a castle window, the lines of tightly sheared shrubs seem to weave around each other, creating the appearance of a Celtic knot. Over time, as their designs became more elaborate, these famous knot gardens became difficult to maintain and required a staff of gardeners who did nothing all day but trim the hedges with manual shears. The size of plants used for knot gardens was much smaller than plants used in hedgerows because they had a purely ornamental purpose. Some of the European knot gardens, such as those found in France and England, are still around today, and their fantastic designs are still meticulously maintained.
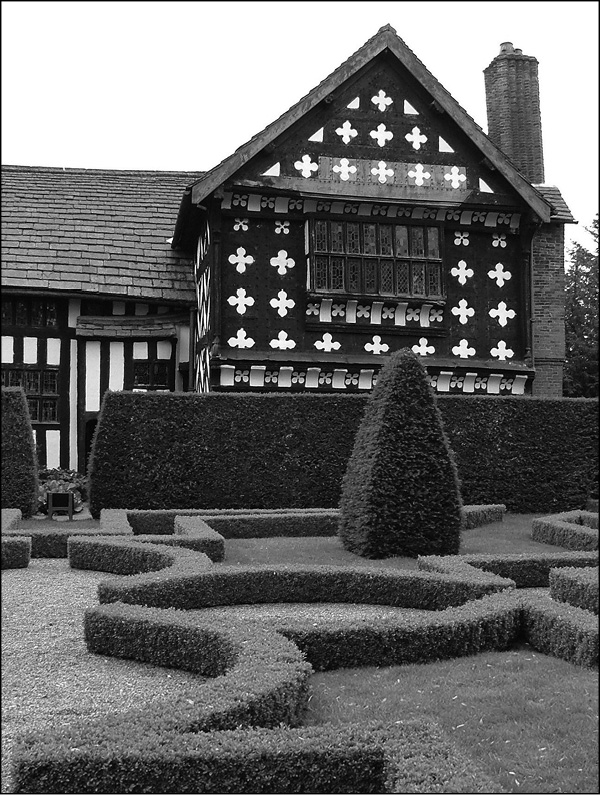
This English knot garden requires a significant amount of upkeep and labor.
If you would like to try your hand at making your own knot garden, be prepared to spend considerable time in keeping it neat and tidy. Knot gardens require daily clipping and trimming so you should only consider this undertaking if you have the time to devote to it. First, draw out a design on graph paper centering on a focal point in the garden, such as an interesting specimen plant, statue, or fountain. Choose plants that complement — they should be the same size at maturity and have similar leaf texture. These can include evergreen shrubs or hollies, for example. Shrubs that grow large, such as privet or boxwood, need more maintenance than low-growing bushes or herbs do, such as lavender or germander, which need pruning only two or three times a year. Keep in mind that some bushes die back in the winter and may leave your garden looking bare. Planting blooming plants with similar bloom times and colors will give the knot garden a sense of order. A row of shrubs having the same color blooms can have a dramatic impact. For example, use two or three different varieties of the same shrub that produce different color blooms, and plant one color per line. This creates the appearance of lines of color weaving under and over each other. Take your time laying out the garden to get the design just right, and use mulch or fine gravel to fill in the empty areas between lines in the design. Start small because you can always add on to your knot garden as the years pass. Do not limit yourself to permanent bushes or shrubs in your knot garden. You can lay out the planting beds in the desired pattern and fill them with your favorite vegetable plants.
In the United States, inexpensive fencing, drier climate, and the rapid advancement of settlers throughout the west prevented the idea of growing a hedge to hold livestock or to make a long-lasting knot garden to take hold. Nowadays, hedges are used exclusively in residential and commercial landscaping. The modern hedge is a mix of old hedgerows and the formal knot gardens. They designate a barrier, create a formal appearance, function as a backdrop for other plants, hide unsightly objects, create privacy, make a shelter for wildlife, create a windbreak, and occasionally create art. Of course, one hedge can serve all of these purposes at the same time. When creating a windbreak, which is a row of hedges or trees used to lessen or create a barrier to wind, remember that each foot of hedge height equals 10 feet of wind protection; an 8-foot hedge creates 80 feet of wind protection.

Large shears can be used to trim a hedge.
To shear a hedge or prune it into a nice neat shape, you have to keep an even line across the top going the entire time, and the bottom must be wider than the top so sunlight can reach the bottom branches of the hedge. If the top of the hedge is the same width or wider than the bottom, the bottom portion will eventually lose its leaves and become a collection of woody branches. Once you have woody branches at the bottom of the hedge, it is difficult to get them to green up again. The best way to ensure you continue to cut on the same level the entire time you prune a hedge is to set up posts on each end of the hedgerow, and tie a string between the posts. You can use a string level you hang on the string so you know when you are holding the string steady to get a perfect shear. String levels are really inexpensive, and you can pick one up at the same hardware or department store where you buy the string. After you cut across the top of the hedge, you can probably correctly estimate how to cut the sides and ends, as long as you keep in mind that the bottom must be wider than the top by just a few inches. The amount will differ depending on the height of the hedge after you make the top cut.
You should shear all hedges when they begin to look ragged. If you wait too long, you will expose woody stems when you shear it back, and you will create gaps along the hedgerow. You cannot maintain a formal hedge too much. The more you shear it and keep it in shape, the better it will look because the plant’s energy and auxin levels can remain within the shrub and do not get wasted on growth you will cut away. In areas with heavy snowfall, shear the bushes into a rounded shape so heavy snow cannot accumulate and break branches, causing wounds that can damage or destroy the shrub. For a single specimen, shear in whatever way you desire, but once again, be sure you make the bottom slightly wider than the top.
The only exception to frequent shearing of a formal hedge is if the hedge consists of blooming plants. In that case, shear the hedge immediately after each bloom period. Shearing a blooming hedge freshens up the hedge, increases the level of green growth, and prevents the plants from using their energy to create seeds.

A well-kept hedge is an attractive way to add privacy to your property.
Hedgelaying
Hedgelaying, also called hedge pleaching, is an old method of managing hedges that creates an impenetrable wildlife or livestock barrier. Hedgelaying began in Roman times, but it became more popular during Saxon times of England as a way to keep livestock in and predators out. Pleaching hedges still serves those purposes, but it also provides a safe haven for wildlife. In fact, hedgelaying has experienced a surge in popularity in some areas because of its conservation benefits. To learn about pleaching trees, see Chapter 7.
It requires some thought and practice, but the idea behind hedgelaying is simple. You should cut large branches of robust, large shrubs at least 8 feet tall halfway through and lay them over each other all going in the same direction. Then, set upright posts along the sides of the laid branches. Tie the laid branches to the posts and to each other so they remain in place. This creates a tight fence animals cannot penetrate. Because the shrub branches are not completely cut through, not all branches die, and new growth sprouts along the branches that you then trim at the desired height after two years. As these branches become older and thicker, you can cut them halfway through and lay them the same way as the previous branches.
If you are preparing a hedge for hedgelaying, prune the side branches only for a few years prior to laying the hedge. This makes the hedgerow look like a long wall of green until it is successfully laid. You should practice hedgelaying in a rural setting because it can result in large sections of dead shrubs if not done correctly, which can appear unsightly if you have neighbors living nearby. But, it is an interesting and ancient way of managing hedges that is becoming lost in modern times because of its work-intensive requirements. A laid hedge is not only useful and beautiful, but it is also a valuable shelter for wildlife. A good hedgelayer is considered an artist in some parts of the world.
Popular Evergreen Bushes for Hedges
Some of the more popular evergreen bushes to use as hedges are:
- Boxwood (Buxus spp.).
- Privet (Ligustrum spp.).
- Holly (Ilex spp.).
- Canadian hemlock (Tsuga Canadensis).
- American arborvitae (Thuja occidentalis).
- Yew (Taxus spp.).
Boxwood
A boxwood hedge can live for several hundred years, and you can shear it into a tight form or leave it to grow in a more natural, bushy shape. Choose a variety suitable for your climate because some varieties can turn brown in colder climates. Boxwood is one of the slower-growing hedge plants, growing only a few inches each year. It is more shade tolerant than some other evergreen shrubs. But, boxwood emits a strong ammonia smell certain times of the year so think about planting them away from entryways and windows.
Privet
Privet is used as a hedge throughout the United States. It grows so well that it is discouraged in some parts of the United States because of its ability to spread far and wide with the help of seed-eating birds. Privet is an easy-to-grow hedge because it has a complicated root system consisting of shallow surface roots and a deep taproot, which is the central main root that reaches deep into the ground and has other roots growing off it; such a root system makes it drought tolerant once established. It can recover quickly from the most severe pruning because it grows fast and can reach heights of 4 to 15 feet so you do not need to worry if your shearing job is a little off: You will have the chance to correct it in a few weeks. If your privet gets out of hand or if you moved into a home with large unsightly privet, cut it back to 6 inches from the ground; it will come back as a healthy, multi-branched shrub.
Holly
Holly is a good shrub for a hedge if you use a variety that grows well in your area because some varieties are not cold hardy. The American holly (Ilex opaca) has the classic thorny leaves you think of when you think of hollies, but some varieties like yaupon holly (Ilex vomitoria) have smooth leaves. All hollies will recover after they are drastically cut back, sending out numerous new shoots by the next season. The best way to manage a holly hedge is to start pruning early in the life of the plant so new growth fills in and creates a thick, beautiful hedge. To create an interesting and different hedge, you can prune a yaupon holly in a way that you remove all lower lateral limbs from the bottom two-thirds of the trunk, leaving only the most attractive multiple bare trunks. Leave the top third of the hedge covered in vegetation. Then, cut the top growth back to the desired height to create a bonsai-style hedge. There is a weeping variety of yaupon holly available, but its crooked trunk and curved branches make it more suitable as a corner plant.
All hollies have the potential to produce the classic red berries, but only the Chinese hollies, such as the Burford holly (Ilex cornuta), produce berries on female plants without a male pollinator. All other varieties need a male pollinator planted close by for the female plants to produce berries. Of course, this is not a problem if you plant the shrubs in a row. Unfortunately, there is not an easy way to tell if a holly plant is male or female so you can expect some hollies in a hedgerow to not have berries, unless they are a variety of Chinese holly.
Canadian hemlock
Canadian hemlock and Carolina hemlock (Tsuga caroliniana) can be sheared in late spring or early summer and provide a hedge with graceful, feathery foliage. Hemlock grows slower than most hedges but lasts a long time. The limbs thickly grow from the ground up. Because the natural form is a tree, the plant needs proper shearing to maintain its shape. It will spread out as far as 30 feet and become unruly if not sheared regularly. Hemlocks can tolerate shade more than other shrubs used as hedges. The native habitat of hemlocks is cool and moist so you should not grow them in USDA Horticultural Zones 8 and warmer. Because of the potential to grow large, you should not plant hemlocks close to a house.
American arborvitae
The American arborvitae grows slowly when young, but growth speeds up when it is around 4 or 5 years old. They are one of the few conifers that break green growth from woody stems after a severe shearing so they can handle extensive pruning even though they need little care. The best times to prune your arborvitae are in fall and early winter. If pruned in summer, their branch tips tend to brown. Arborvitae do best in full sun or partial shade, and they do well in cold climate and moist soil. Hot, dry soil will cause your arborvitae to suffer. You should put a protective net or burlap over them in winter — snow and ice can damage and break their branches. Netting is actually the better choice because mold and mildew can grow under burlap. Because of their multiple trunks and limbs and how terrible they initially look after sheared back, most people do not know what to do with arborvitae and simply have them removed from the landscape when they become too large. Although you may feel your arborvitae is too close to your house, you can manage these hedges effectively. The best way to handle an overgrown arborvitae is to grab your shears, take a deep breath, and dive in. If planted for a hedge, plant three arborvitae 5 feet apart for dense coverage. An arborvitae hedge can be attractive if all you do is simply shear off the top at the desired height once a year. In addition, you do not necessarily have to create an arborvitae hedge in order to get a hedge-like feel. Many gardeners plant arborvitae side by side, about 5 feet apart, and then let them grow naturally, with occasional pruning of dead branches. Over time, the arborvitae will grow into each other, creating a tall, naturally formed hedge.
Yews
Yews have thin evergreen leaves that grow thickly and make a dense hedge. There is a yew for every landscape because you have many different varieties to choose from. Yews are classified as medium-fast growers, and some types only grow a few feet tall so they may never need shearing. You can cut back yews hard, and they will sprout new growth from old wood. Foundation planting, or planting close to a structure that sits on a cement foundation, is not recommended because of the large and woody root system of a yew.
Barrier hedges
You can use hedges for barriers to prevent pedestrian traffic or to make you feel more secure. The best hedges for barriers are shrubs with thorny branches. Keep in mind that having thorny barrier plants in a place where someone could get injured without crossing your property could result in a personal injury lawsuit. If you have a homeowners association where you live, you should also check to see if you can have barrier hedges before you plant. Good choices for a thorny or barrier hedge include:
- Barberry (Berberis atropurpurea).
- Hawthorn (Crataegus monogyna).
- Crabapple (Malus sylvestris).
- Shrub roses (Rosa rugosa).
Barberry
Barberry grows 4 to 5 feet tall and has bright red foliage and vicious thorns that make it a good barrier hedge. In the fall, it produces bright red berries that attract a variety of songbirds. You should plant it 2 to 4 feet apart to create a solid, impenetrable hedge. Barberry grows well in USDA Horticultural Zones 4 through 8, but it will suffer fungal problems in warm, humid climates.
Hawthorn
Hawthorn, or European Hawthorn, grows wildly throughout North America, but it is also cultivated. The hawthorn has long and stiff thorns. It is one of the few plants still used as a livestock barrier. It produces a profusion of white or pink flowers that look similar to berry blossoms. After the flowers die, a red fruit, called a haw, grows. The haw is about the size of a crabapple, and you can leave it on the plant for wildlife to eat, or you can use it to make jellies and jams. You can shear hawthorn bushes into a tight hedge. There are several varieties available that grow to different sizes and have varying degrees of thorniness so choose one appropriate for your landscape. Hedgelaying is often done with the hawthorn.
Crabapple
Crabapple varieties are shrubs or small trees that can grow up to 50 feet tall. They create a point of interest in the spring when they bloom pink, white, or red flowers and in the fall when they lose their leaves and only the red crabapples remain. A wide range of wildlife and birds eat crabapples, and people harvest the fruit for jams and jellies. For use as a flowering hedge, prune right after blooming for better bloom production the next year. For the best flowering results, choose varieties growing on their own roots rather than grafted varieties. The fruit may not be as large, but they make a better hedge with a longer life, less suckering, and more disease resistance. If you want maximum fruit production for the next year, delay pruning until after the fruit matures in winter or early spring if you want maximum fruit production for that year. Late fall and winter are good times to rake up old fruit on the ground that could spread fungal diseases to the plants.
Shrub roses
Shrub roses are suitable for planting 2 feet apart in average, well-drained garden soil. The blooms are single, daisy-like blossoms, not like florist roses with multiple petals. Although they have plenty of thorns and can reach heights to 6 feet or higher, their most interesting feature is the large and colorful rose hips or seed pods that appear after the blooms fade. Shrub roses grow best in USDA Horticultural Zones 2 through 8. Like the barberry, they will suffer from mildew problems in areas with high humidity. You can shear them after blooming, but this means you will remove the rose hips. Shrub roses grow up to 10 feet tall.
Creating a Hedge
Modern hedges are a group of bushes usually planted and maintained in a long row. The first thing to do when planning a hedge is to find the right shrub for the job so you should figure out what height you want your hedge. Think about what areas the hedge will shade, such as your neighbor’s yard or a vegetable garden. Check to see if the sight line of someone driving by or your sight line backing out of the driveway will be blocked. Do the research to find out what bushes are right for your climate and planting zone by contacting your local county extension office for suggestions for the right bush to plant as a hedge or by researching it on the Internet. If a neighbor’s yard has a hedge you like, ask your neighbor about it, and inquire about how to maintain the plant. Be careful when shopping in a catalogue or actually buying on the Internet when it comes to purchasing plants. A shrub or tree is likely a long-term addition to your landscape, and a bad purchase decision can be costly in terms of the initial cost and eventual removal if the plant turns out to be the wrong choice or is of poor quality. Buy your shrubs and prepare to plant them in early spring in areas where the ground freezes in winter. If you live in a climate where it does not freeze in the winter, purchase shrubs in the fall.
Measure the area to find the exact length of your new hedge and how many plants you will need for fast coverage. A good rule of thumb is to plant a bush every 2 feet for a nice thick hedge. If you order the shrubs and they come by mail, they are probably bare root, which means the roots have no soil around them, so immediately soak the plants in a bucket of warm water while you prepare the planting area. If you cannot plant the bare root plants in less than 24 hours after receiving them, you need to dig a trench, lay the root sections in the trench, and cover them with damp soil until you are ready to plant. This is called “heeling in” the plant. Soaking some bare root plants for more than 24 hours can drown them by cutting off oxygen to their roots. If you are buying container plants, be sure they stay in a sheltered area and receive water every day until planted.
Mark off the area you will plant your hedges by hammering two stakes in the ground at each end of the proposed hedgerow, and draw a string between them. Because the plants are planted so close together, it might be easier to dig a trench to plant them in rather than digging a series of smaller holes. After you dig the trench, add your new plants 2 feet apart. Run water around the roots while you backfill with the same soil removed from the hole. If you have chosen the right shrub for your area, you do not need to add any amendments to the soil other than a little compost. If you are adding drip irrigation — also known as trickle irrigation, where water is allowed to drip slowly onto the roots of plants through a drip hose or valve — put it down after filling the area around the new plants. Then, cover the irrigation line, as well as the root zone of the new plants, with a 1-inch layer of mulch.
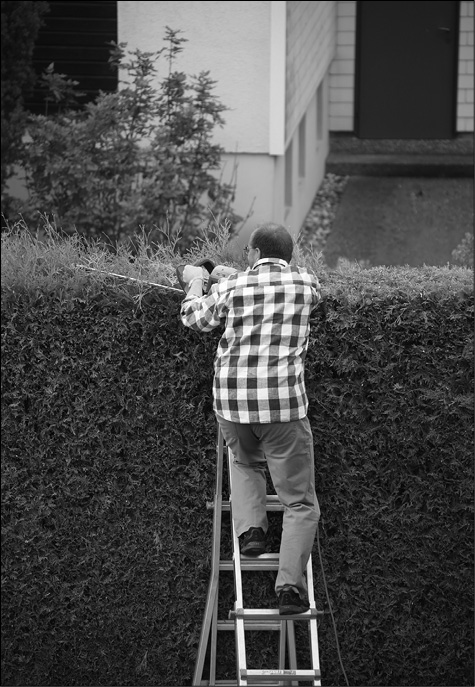
This man is pruning the hedge in his backyard to give it a neat appearance.
Pruning must begin as soon as you plant the shrubs. If the plants already have lateral branches extending out at ground level, then cut a third off the top of the shortest plant in the group. Then, cut all the other plants to the same height as the one you just cut. Do not prune again until the following season. If the plants are spindly with only top growth, cut them all down to 3 to 4 inches from the ground. This will encourage basal branching. Remember that a hedge only looks good if the branches extend from the base of the plant to the top. Early in the second spring, cut all the plants back halfway. From the third year on, shape by cutting back half all new growth, keeping in mind that the bottom should be wider than the top. Repeat as needed to keep your hedge in shape until you achieve the final height. Once you obtain your desired height, prune as needed. Remember that flowering shrubs are pruned as soon after the bloom period as possible so you do not damage blooms developing for the next season. If the shrubs bloom more than once during the season, such as some roses and azaleas, prune as needed right after each bloom period.
Keep the planting area free of weeds for as long as possible. Eventually, the hedges will shade out any weed competition. If you have chosen plants appropriate for your area, minimal fertilization will be required, but be sure the plants receive adequate moisture until they are established, which is after at least one growing season. If one shrub dies in the hedgerow, replace it as soon as possible. If you wait too long, the roots from the remaining shrubs will grow into the space of the dead plant used. It is easier to replace the plant quickly rather than to spend time cutting and damaging roots from the neighboring shrubs.
Up to this point, the discussion on hedges has centered on the formal shearing of hedges and creating clean, formal lines. With certain landscapes or plant varieties, a more natural look is needed, especially with shrubs that bloom on long canes or new shoots, such as spirea, nandina, or lady banksia rose. In these situations, shearing will ruin the overall shape of the plant and destroy the bloom or berry production. To keep the natural shape of a shrub but decrease the size, locate the largest unruly cane that needs taming. Follow the unruly cane down to a main branch or to the ground, and cut there. This is called a heading cut. When cutting the unruly cane from a main branch, remember to cut at the main branch without leaving a stub. A rotting stub left on the plant creates a favorable environment for disease. Take a few steps back, and carefully choose the next cane to remove. Repeat until the plant reaches the desired height and size. The procedure may seem tedious and time consuming, but the plant will look better and more natural when you finish.

Hedge mazes, such as this, developed from the English knot garden.
An old, overgrown hedge
If you find yourself looking at a row of privet or other hedge plant that has not seen a pruning shear in ten years or more, you may wonder what to do to make it look good again. Your approach depends on how much growth is growing near the bottom of the hedgerow.
- If the bottom of the hedgerow has no green growth at the bottom, cut the entire row down to 4 to 5 inches from the ground, and start pruning as if you had a new plant.
- If the hedge looks salvageable, cut out the dead limbs with a saw or loppers. Try to cut the dead limbs back to a live branch or the ground. Next, stand back and look at the largest limbs reaching skyward, and cut them back to the base of the plant where they join a main limb or emerge from the ground. Now, you should only have the smaller unruly growth. Cut it all back to a level half of the eventual height of the hedgerow. As it grows, continue to cut off half the new growth until you obtain the desired size. It should grow in thickly and create a nice hedge. Remember the ideal shape for the hedge is a little wider at the bottom so lower limbs get some light and remain full and green.
A hedge for wildlife
A group of shrubs provides a natural shelter for wildlife, and the larger the group of shrubs, the more wildlife protection it provides. Any hedge can provide protection for small animals just because it provides shelter from wind and rain, but if you want to attract more wildlife to your hedge, you simply need to make a few changes in the design. Although attracting wildlife may not be the best choice for everyone, it can add some fun to your landscape.
Wildlife likes a diversity of plants in a hedge that provides shelter and food throughout the year. Keep in mind that wildlife is not concerned about how neat, sheared, and uniform your hedges look to the neighbors. If you live in an area where you can get away with it, think about diversifying and letting your shrubs get a little unruly. Do some research and find out what native shrubs and small trees are browsed by wildlife most often in your area. For example, dogwood and American beautyberry are popular wildlife plants in the southeastern United States. Both of these plants attract various types of birds and animals because of their berries. Take note of the different sizes of shrubs and whether they thrive in sun or shade and what type of wildlife they attract. Find out what wild berry plants and native vines grow in your climate, and finally, look for a recommended wildflower mix. Try to find a wildflower mix containing some native grasses, along with the wildflower seed. Birds and small mammals eat native grass seeds, and birds use the leaves for nest building.
A wildlife hedge needs a wider space than a conventional hedge because of the diversity it provides. The ground does not need any special preparation except the removal of existing grass and weeds. Plant the small trees first, about 10 feet apart, and inter-plant shrubs that grow slightly smaller. On the sides of the larger shrubs, plant lower-growing blooming perennials so you can see the butterflies and hummingbirds during the summer. Lastly, plant a few berry vines around the entire hedgerow, topping off everything by scattering wildflower and native grass seed around the outer perimeter. If you have an old wooden fence to act as the center of your wildlife hedge, you are lucky because it adds interest and support to the entire planting. Long stretches of barbwire fence normally kept clear of vegetation make a great place to start a wildlife hedge. Although it sounds like you will create an eyesore by planting in layers, you and the wildlife receive great rewards. You are rewarded with the beauty of the layered hedges, as well as the wildlife they attract, and wildlife is rewarded with possible food and habitat. Be sure to use native plants because non-native plants, such as privet, grow quickly and overwhelm the wildlife hedge in a few years. The same goes for choosing vines; choose native and noninvasive vines, such as trumpet vine or cross vine. You can use a much smaller variation of this wildlife hedge design if you live in a suburb by dedicating a corner of your yard for wildlife. If you only have a patio, plant a combination of native plants in containers close together to attract wildlife. Add to the attraction by putting up a bird feeder or two. In a big city, it can be a welcome sight to look on your patio and see colorful hummingbirds or butterflies.