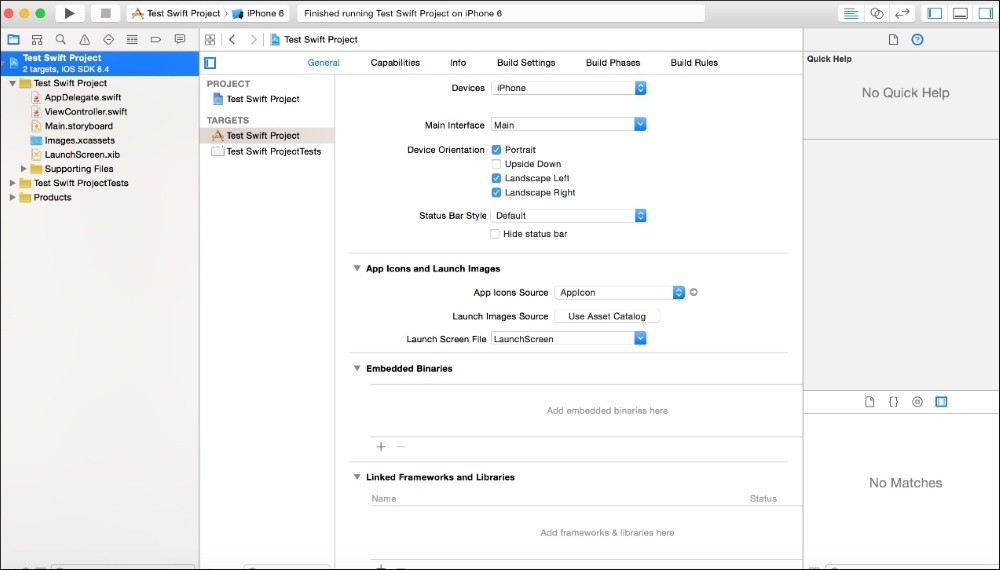
Before starting to code, you must add a specific library for SQLite. Within Xcode, ensure that the General tab is selected and visible. At the end of the page, look out for the Linked Frameworks and Libraries section. View and click on the icon with the plus sign, as shown in the following screenshot:
A modal window will appear; please enter the word sqlite, and from the list of information, select the libsqlite3.dylib option, as shown in the following screenshot:
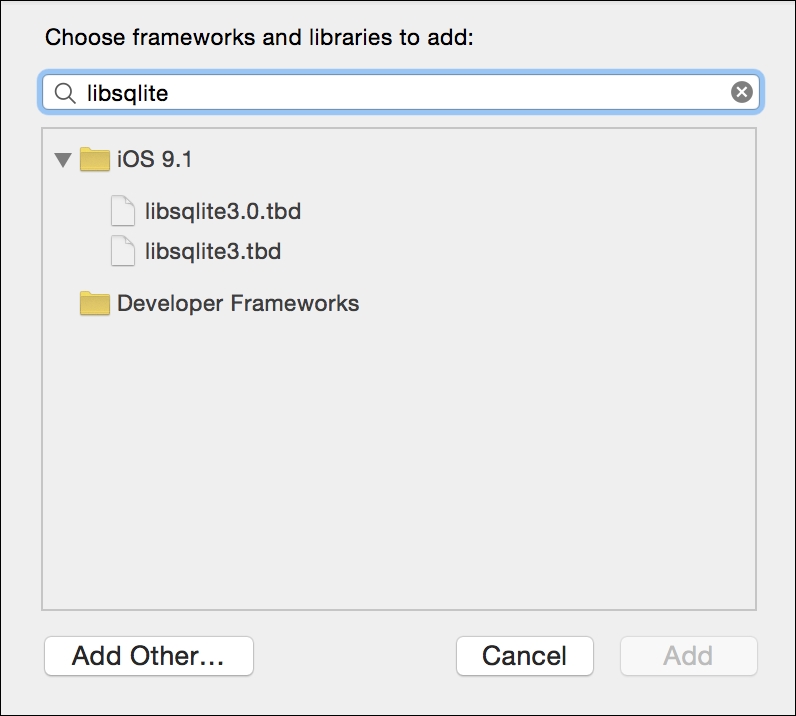
After selecting it, click on the Add button to move forward.
As part of this chapter, we will use
FMDB and an Objective-C wrapper around SQLite to show the database SQLite with Swift. FMDB stands for Flying Meat Database, and it easily interacts with SQLite and actually saves time and effort. For example, the FMDB will be linked to one SQLite database and will be there for the execution of SQL queries. The output is FMResultsSet, which shows results for queries executed on the FMDB.
The FMDB approach with an application that performs the SQL commands of Insert, Select, Delete, and Update will be used on a table called Mortgage. The Mortgage table will have a Name field and a Mortgage Roll Number field for the account details, as a very simple example.
The following is a screenshot of the actual user design using the View controller scene tool within Xcode to create the basic screen layout. This will outline and show the resulting action to be followed and executed when a button is clicked:

There are many tools to manage the SQLite database, and one of these is the SQLite Manager Add-on in the Firefox browser, to administer the database. The add-on can be obtained from https://addons.mozilla.org/en-US/firefox/addon/sqlite-manager/.
The add-on product has some of the following features for administrators:
- Manage the SQLite database on your machine
- Get a tree view of database objects
- There are easy and helpful dialogs that are easy to manage as well, for example, triggers, views, and tables
- A platform to execute SQL queries
- Export tables or views in UTF-8/UTF-16
- It is also possible to execute multiple SQL statements in the Execute tab
Open Firefox and install the extensions from the aforementioned link. The following screenshot shows how the extension is installed:

When you click on the Install Now button, the add-on is installed. Then go to Tools | Menu Option and you will find SQLite Manager. Once you click on that option, the following screen will appear:
In order to add data to the system, the database must be created.
When you click on the Install Now button, the add-on is installed. Once you go to Tools | Menu Option, you will see the SQLite Manager option. When you click on that option, the following screen is seen.
Create the new database and ensure that a table is created for this small test application with SQLite. In this scenario, we have a database called Mortgagedata.sqlite, and a table called Mortgage_data with two fields: mortgage_rollno and mortgage_name.
The following screenshot shows the screens to call up SQL Manager in Firefox:

When you click on the SQL Manager option to create a database, a pop up will be displayed where the user enters the database name, as shown in the following screenshot:
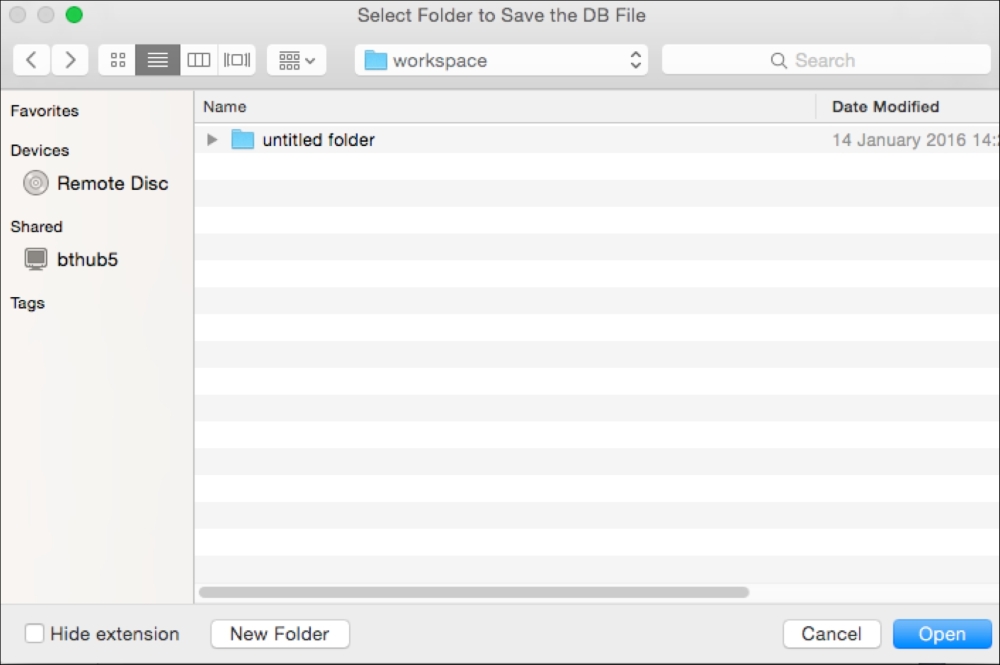
Next, after the database is created, the user has to select a disk directory to store the database in, as shown in the next screenshot:
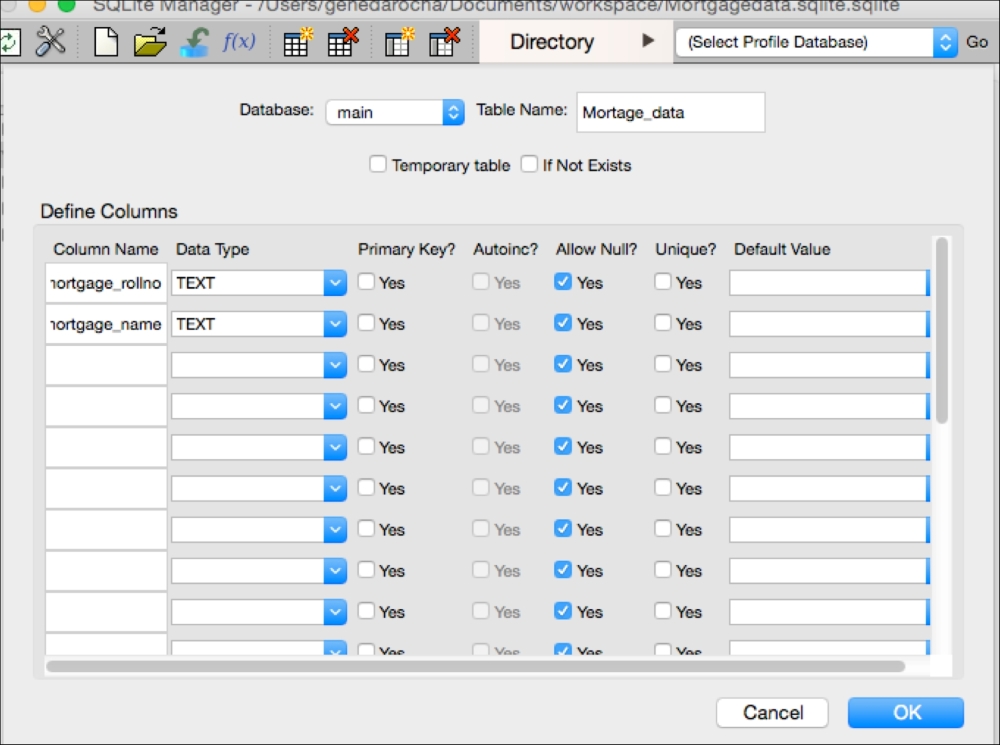
Next, you need to create a table, as shown in the preceding screenshot, with two rows:

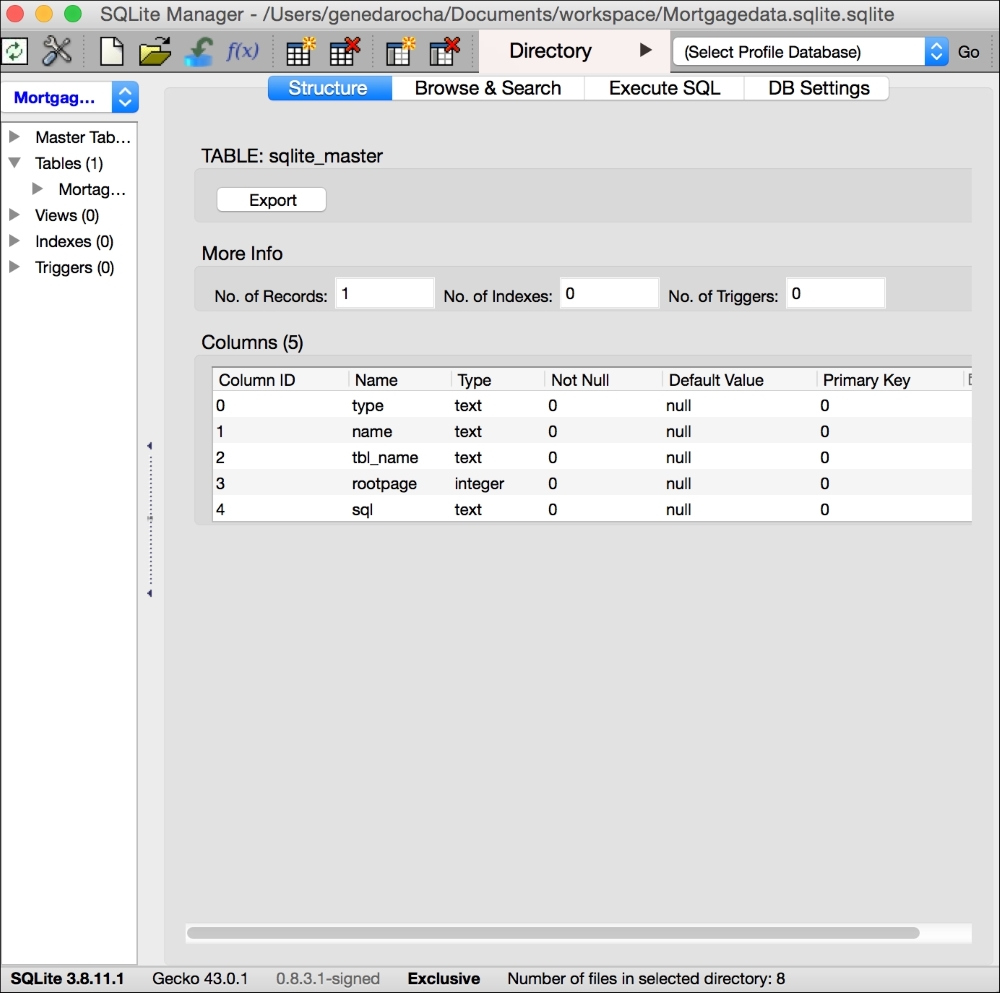
The preceding screenshot now shows what the table structure looks like before further work is carried out.
Next, a class, that is a subclass of NSObject, has to be created. Call this class Mortgage_data and set up its properties as per the requirements of this test scenario. These properties will form part of the database schema and foundations for your small database and table:
Class Mortgage_data: NSObject {
    Varmortgage_rollno: String = String()
    Varmortgage_name: String = String()
}FMDB is a SQLite library written on top of SQLite to handle database operations easier.
Since FMDB is built in Objective-C, a bridging header is required to link it up with the simple app. A .h file has to be included, which is FMDatabase.h.
This is required to ensure that the linking works for the Objective-C and Swift technology produce the results we want. Next, we need to create a database in SQLite Manager and copy it to the right place.
In the following code, we show the function to copy a database. In this instance, we need to create and use a function called copyFile, which will copy the files to the application's document directory. Methods such as applicationDidFinishLaunch work with AppDelegate by passing the database name in, as part of the requirements argument.
See the following class:
class func copyFile(fileName:NSString){
    var database_path:NSString=getPath(fileName)
    var MortgageManager=NSFileManager.defaultManager()
    if !MortageManager.fileExistsAtPath(database_path){
    var fromthePath:NSString= NSBundle.mainBundle().resourcePath.stringByAppendingPathComponent(fileName)
    MortgageManager.copyItemAtPath(fromPath,toPath:database_path, error: nil)
}
}
When using the FMDB way of interacting with SQLite, a class called ModelManager is created as part of NSObject{}, so that a variety of functions can reside, or be inserted, within it. This is mandatory and is shown in the next code snippet.
In the following code, you will see that after the database object has been copied, it needs to be initialized, a Swift file has to be named and added to the ModelManager, and a shared instance of the type of ModelManager has to be defined out of the class block, as shown in the following:
let mortgage_instance=ModelManager()Then, set up the database object for the FMDB, namely, the FMDatabase object, and together with the database object, set up and reset it as shown in the following:
var database:FMDatabase?= nil
class var instance:ModelManager{
mortgage_instance.database=FMDatabase(path:Util.getPath("Mortgagedata.sqlite"))
var Mydatapath=Util.getPath("Mortgagedata.sqlite")
println("The Current Path is> : \(Mydatapath)")
return mortgage_instance
}
The next part of the process is to interrogate the database with the following command, the insert command, as an example wrapped in the assigned value Mortage_Inserted. The other class, like ModelManager, will have the Mobile_data method added to it. The ModelManager method is then trying to open the Mortgage database by using the method for opening, namely, the FMDatabase class. Then the executeUpdate method is allocated and used as part of the FMDatabase class to push and pass down the SQL query and the input parameters. To finish this off, part of the operation, the close method, is used. See the following code on how the database is connected:
func addMortageData(Mortage_Data:Mortgage_data)-> Bool {
        mortgage_instance.database!.open()
        let Mortage_Inserted= Mortgage_instance.database!.executeUpdate("INSERT INTO Mortgage_Data (mortgage_rollno, mortgage_name) VALUES (?, ?)",withArgumentsInArray:[Mortgage_data.mortgage_rollno,Mortgage_data.mortgage_name])
        mortgage_instance.database!.close()
        return isInserted
    }
The Insert Button has an action method; call this method to send through the Mortage_data class, which holds the mortgage_rollno and mortgage_name field names, as shown in the following:
@IBAction func btnInsertClicked(sender: AnyObject) {
var mortgage_data: Mortgage_data = Mortgage_data()
Mortgage_data.mortgage_rollno = tmp_ Mortgage_data.mortgage_rollno.text
Mortgage_data.studentName = Mortgage_data.mortgage_name.text
var Mortgage_insert = ModelManager.instance.MortgageData(Mortgage)
if Mortgage_insert {
Util.invokeAlertMethod("", MortgageBody: " Data Inserted ", delegate: nil)
        } else {
Util.invokeAlertMethod("", MortgageBody: "Error in inserting data", delegate: nil)
        }

    Mortgage_data.tmp_rollno.text = ""
    Mortgage_data.tmp_name.text = ""
    Mortgage_data.tmp_rollno =.becomeFirstResponder()
}
FMDB is well documented and popular on the Internet. Next, the actual SQL query is passed through the executeUpdate method, which is part of the FMDatabase class and is linked up as parameters, as part of an argument:
func Mortgage_Updatedata(Mortage_data: Mortgage_Data) -> Bool {
    ModelManager.instance.database!.open()
    let Mortgage_Info_Updated {
 = sharedInstance.database!.executeUpdate("UPDATE Mortgage_data SET Mortgage_name=? WHERE Mortgage_rollno=?",withArgumentsInArray: [Mortgage_data.Name, Mortgage_data.rollno])
Mortgageinstance.database!.close()
return Mortgage_Info_Updated
}
The following code shows how the @IBAction function is called using the btnUpdateClicked function with the relevant fields and text information, to perform the update based on the click of the button called btnUpdateClicked:
@IBActionfuncMortgage_UpdateClicked(sender:AnyObject){
    var Mortgage_data:Mortgage_data=Mortgage_data()
    Mortgage_data.mortgage_rollno =tmp_mortgage_rollno.text
    Mortgage_data.mortgage_name=tmp_mortgage_name.text

    var Mortgage_Data:Mortgage_data=Mortgage_data()
    var tmp_roll_no: String ="mortgage_rollno"
    var tmp_name: String ="mortgage_name"


var Mortgage_Info_Updated = ModelManager.instance.updateStudentData(Mortgage_data)
if Mortgage_Info_Updated {
Util.invokeAlertMethod("", strBody: "Mortgage Record has been updated ", delegate: nil)
} else {
Util.invokeAlertMethod("", strBody: "Error in updating the Mortgage record", delegate: nil)
}

    Mortgage_data.tmp_rollno.text=""
    Mortgage_data.tmp_name.text=""
    Mortgage_data.tmp_rollno=.becomeFirstResponder()
}
To perform the delete operation, use the DeleteMortgateData method. First, the ModelManager class is used to open the database, using the FMDatabase class as utilized previously. Thereafter, again use the executeUpdate method, and using an argument, pass the SQL delete query and close the database by invoking the close method, as defined in the FMDatabase class. Details of this operation are as follows:
func deleteStudentData(Mortgage_data:Mortgage_Data)-> Bool {
    Mortgageinstance.database!.open()
let Mortgage_isDeleted_var= Mortgageinstance.database!.executeUpdate("DELETE FROM Mortgage_data WHERE Mortgage_data_rollno=?",withArgumentsInArray:[Mortgagedata.name])
sharedInstance.database!.close()
return Mortgage_isDeleted
}
As previously used, the same ModelManager method is used for SQL operations:
@IBAction func btnDeleteClicked(sender:AnyObject){
var Mortgage_data:Mortgage_data=Mortgage_data()
    Mortgage_data.mortgage_rollno =tmp_mortgage_rollno.text
Mortgage_data.mortgage_name=tmp_mortgage_name.text

var isDeleted_var=ModelManager.instance.deleteStudentData(studentInfo)
if isDeleted_var{
Util.invokeAlertMethod("",strBody:"Record Deleted", delegate: nil)
}else{
Util.invokeAlertMethod("",strBody:"Error- On Deleting Record", delegate: nil)
}
    Mortgage_data.tmp_rollno.text=""
    Mortgage_data.tmp_name.text=""
    Mortgage_data.tmp_rollno=.becomeFirstResponder()
}
The next operation is the SelectMortgageData operation, which will be added to the ModelManager method. This will open the database by using the open method within the FMDatabase class. This is then followed by the executeQuery method, using the FMDatabase class, which accepts the input SQL query:
func SelectMortgageData (){
    Mortgageinstance.database!.open()
var mortgage_resultSet:FMResultSet!= Mortgageinstance.database!.executeQuery("SELECT * FROM Mortgage_data",withArgumentsInArray: nil)
        var tmp_roll_no: String ="mortgage_rollno"
        var tmp_name: String ="mortgage_name"
if resultSet{
while mortgage_resultSet.next(){
    println("roll no data is : \(mortgage_resultSet.stringForColumn(tmp_roll_no))")
    println("name data is : \(mortgage_resultSet.stringForColumn(tmp_name))"
}
}Mortgageinstance.database!.close()
}
The following method is called from the previous action:
@IBAction func btnDisplayRecordClicked(sender:AnyObject){
ModelManager.instance.MortgageData()
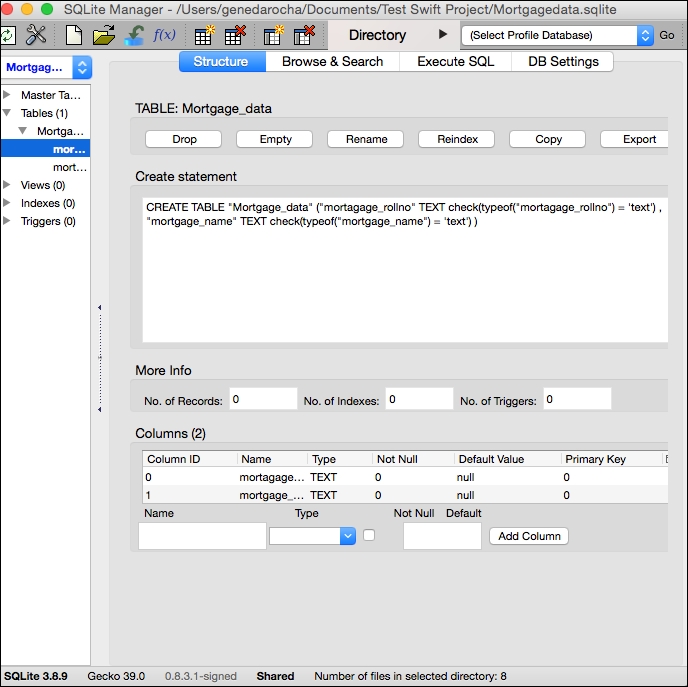
}The SQLite scheme using Firefox can be viewed as shown in the following screenshot. Go to Firefox, and under the Tools menu, invoke SQLite Manager. Click on the Mortgage Manager table and you can see the structure of the table, as shown in the following screenshot:
An alternate method for using FMDB this way is to use it directly in the Swift programming language, as shown in the following code. When setting up Xcode with Swift, you will be prompted for the bridging component for linking them up, but it can be done as described here.
The code is added in the place where the IBAction is set up. The method will require the use of the SaveMortgageData action method, which will open the database, take text/information from the data fields, build an SQL database, and execute the statement. Once the operation is complete, the database will be closed. Then the text fields will be initialized, ready for the next input. Therefore, the IBAction method using the default template will have to be modified as follows:
@IBAction func SaveMortgageData(sender: AnyObject) {
let Mortgage_data_save = FMDatabase(path: Database_path as String)

if Mortgage_data_save.open() {

let insertdata = "INSERT INTO Mortgage_data (mortgage_rollno, mortgage_name) VALUES ('\(tmp_mortgage_rollno.text)', '\(tmp_mortgage_name.text)')"

let mortgage_result = Mortgage_data_save.executeUpdate(insertdata,
            withArgumentsInArray: nil)

        if !mortgage_result {
Msg_info.text = "Error inserting Mortgage Details"
println("Error: \(Mortgage_data_save.Mortgage_ErrorMessage())")
        } else {
Msg_info.text = "Mortgage Details inserted to system"
tmp_mortgage_rollno.text = ""
tmp_mortgage_name.text = ""}
    } else {
println("Error: \(Mortgage_data_save.Mortgage_ErrorMessage())")
    }
}
After using this creation process and method for an application that is created with Swift and SQLite, you can see how the basic components and the SQLite 3 library have been successfully added to the new project.