The most important thing is to get live clams, mussels, and oysters in their shell—size isn’t crucial. By law, they will be labeled with the harvest date and location; you can also ask your fishmonger where they come from. They all have slightly different flavors depending on where they were harvested. Shoot for two days old, but anything less than one week old is OK. After that their death rate could be high. As long as they are alive, they are fine.
Store fresh live bivalves in the refrigerator in a bowl covered by a few layers of wet paper towel or with a bag of ice. Do not submerge them in water, or they will drown. They need air, and they will rapidly deplete the air in the water. In the wild, they are often above water at low tide, so they can handle being out of the water.
When it is time to cook them, sniff each and every one of them. They should smell like the ocean. Discard any that smell funky. Any that rattle or are too heavy are probably dead and filled with sand. Some people advise pressing the shells closed if they are open a bit and discarding them if they don’t stay closed. Don’t bother. Sometimes they pop open again, yet they are still alive and fresh. Despite what you may have read, you do not have to discard the ones that are slightly open, as long as they smell fresh. If the two shells slide horizontally, the clam is probably dead. If it resists, the adductor muscles are probably still alive and working. The rule is: When in doubt, throw it out.
Wild bivalves often live in the sand or mud, while cultured bivalves grow on ropes hung above the bottom. Scrub the shells well under cold running water, especially when working with wild bivalves, because dirt, mud, and sand can ruin the eating experience.
The next step is to get them to spit their sand out. Soak them in a bowl of salted water for several hours, or up to 24 hours. They will open a bit, suck in the saltwater, and spit out the sand. Old salts call this “purging.” The best way to purge is with a bucket of ocean water. If you are lucky enough to dig the clams yourself, bring them home in buckets of seawater. If you bought them in a store, make your own approximation. The oceans vary in salinity, but on average seawater is about 3.5 percent salt. The Simple Blonder Wet Brine (page 160) is 6.3 percent, so make a batch and dilute it by almost doubling the water. Try to keep the temperature of the water similar to the temperature of the clams. If you dug them in summer, leave them at room temperature. If you bought them in the store, purge them in the fridge. Use lots of brine or try to change the water every 2 to 4 hours to make sure they don’t deplete the oxygen supply.
Some people say that putting clams in the freezer for about 15 minutes makes opening them a bit easier. That has never worked for me. What does work is the opposite. Put them in some hot water—not boiling water, just hot from the tap—for about 10 minutes. This hot water trick also works on oysters.
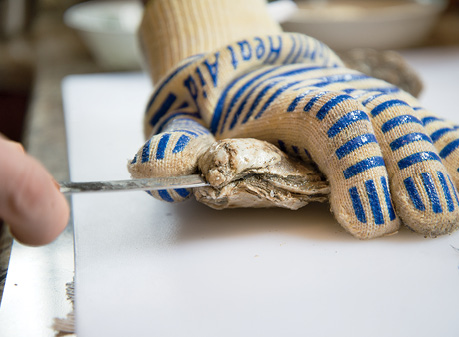
If you plan to shuck them yourself, you should buy a clam-shucking knife so you don’t ruin your paring knife. While you’re at it, get some protective gloves.

I prefer to open clams from the lip side, oysters from the hinge side. Hold the clam in the upturned palm of your hand, with the pointed hinge facing the heel of your palm and the lip facing your fingers. Hold your hand over a large bowl to catch the drippings. That juice, called the liquor, is full of flavor, and it makes a fine pasta sauce and poaching liquid.
Insert the blade of your knife, not the point, between the thin lips. Wiggle it in a bit and slide it all around the exterior almost to the hinge on both sides. Do not push the knife in very far, or you will cut the meat in half. Now twist the knife so the opening is large enough to pry it open with your fingers. If the shell breaks, don’t sweat it. Pull open the top shell, twist it off, drain the clam into the bowl, and discard the shell.

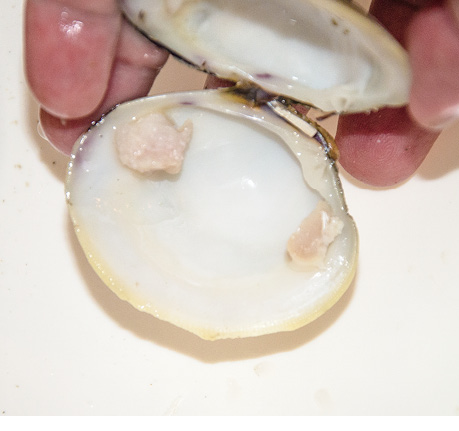
Cut the two upper adductor muscles that hold the clam to the shell on both sides. This is good meat. Don’t lose it. You can see the adductor muscles in the photo at right.
Dump all the meat and liquor into the bowl and discard the bottom shell. After the clams are all shucked, pour everything through a fine-mesh strainer to separate the liquor.


The method for opening oysters is different than the method for opening clams. Make sure the oyster is stable and flat side down. If it slips, you can do serious damage to your hand. Start at the pointed hinge and insert the tip of a sturdy pointy knife.
Once you break the hinge, flip the shell over so the flat side is up, wiggle the knifepoint in, and twist the blade to pop open the shell.
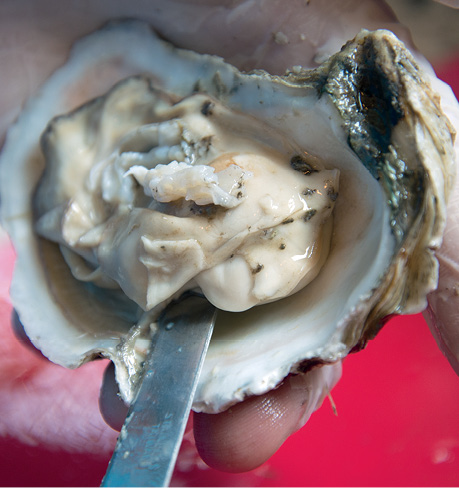
Work the blade around the perimeter of the shell with the tip pointing up, scraping along the inside to cut the adductor muscles that hold it to the shell.
The oyster and liquor should all be in the cup-shaped bottom shell. Run the blade along the shell to cut it free.