learning to knead
Butter, sugar, eggs, and milk. These are the distinguishing ingredients that appear in my yeast dough formula that goes back many years—several decades, in fact.
The recipe for the rolls appeared in my baking file when I was fourteen, although the little metal box holding a reasonably large collection of index cards for this yeasty delight and other baked goods began in earnest at age seven. Working with yeast was at times a challenge because my late mother, whose very cakes and cookies were sought after—if not envied—by others (by today’s standards her range was small but noteworthy), never did seem to connect with yeast baking. Her impatient personality did her in. The proofing, the waiting! The rising, the waiting! The forming, the waiting! The baking! All of this seemed to have eluded her. Her agitation probably killed off any potentially thriving organisms of yeast. Irrespective of this or perhaps in spite of it, I managed to convince her to add fresh yeast cakes to the shopping cart one Saturday at the market, just for me, and so my odyssey began.
It was, as memory serves up, a jerky start.
Intermittent intervals of reading about yeast in whatever form I could, rushing into the kitchen to make a batch of dough, checking its swollen progress, viewing the state of a prepared and enlarging loaf, and finally baking whatever resulted was like playing culinary ping-pong. Back and forth, hit and miss. I made all the classic blunders: giving the dough too much or too little liquid; using those same liquids at the wrong temperature; misjudging the amount of flour; adding salt at an ill-timed juncture; or, worst of all, overfilling the individual baking cups in such a way that the tops of the rolls interlinked to form one gloriously solid shelf of bread (hilarious, but only in retrospect). And then there was the time that I doubled the yeast—or was it tripled?—only to walk into our tiny kitchen to see an overspill of dough exiting the top of the bowl, past its sides, over the countertop, and straight down the cabinet into the vented grill at the base of the dishwasher. Somehow the dough crept into the sides of the dishwasher itself and gummed up the rubber seals, and then, you guessed it, the unit was reduced to, in a word, junk.
Months passed, and I convinced my mother to buy more yeast. (By that time, she had gotten over the equipment fiasco—barely—and besides, we had a new dishwasher.) This was after my baking foray into shortbread. The return to bread baking probably seemed like a good and relieving shift from my insistence on buying butter in three-pound lots every few days and cranking out cookie dough after cookie dough. After all, how much shortbread can one really consume in a week? I became a recipe sleuth and, finally, learned to predict errors and inconsistencies. And then I learned how to knead a dough properly—by hand. This was key. Years later, I cannily thought that the whole process could be adapted to using a heavy-duty mixer fitted with the correct attachment and, with the formula in hand, I discovered how not to create a responsively refined dough. This is not a recipe for an electric mixing device, a notion that many contemporary bread bakers have concluded in their writings on far more complicated offerings than what you have below. You can be sure that the dough hook tortured this genteel and submissive dough. (Don’t get me wrong: while a heavy-duty electric mixer does come in handy, I find that this dough is ever-so-better and more responsive when made by hand.)
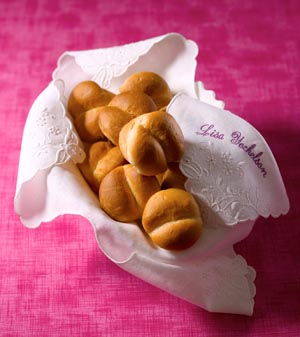
Here are the rolls that are a personal nod to both
my own baking chronicles and thoroughly American style. They are especially and wonderfully light, buttery, a little eggy, and sweet in the demure, simple way that some dinner rolls are, historically. And the dough unquestionably flourishes in the hands of a baker.
Of any age.
a 14-year-old’s rolls still
tasty after all these years

serving: 2 dozen rolls
ahead: best on baking day; or freeze for 3 weeks, defrost, bundle in aluminum foil, and reheat in a preheated 300 degrees F oven for 10 minutes
lightly sweetened yeast dough
21/4 teaspoons active dry yeast
1/4 teaspoon granulated sugar
1/4 cup warm (105 to 110 degrees F) water
1 cup milk
8 tablespoons (1 stick) unsalted butter,
cut into tablespoon-size chunks
1/4 cup granulated sugar
2 large eggs, lightly beaten
41/2 cups unsifted bleached all-purpose flour, plus an additional 2 tablespoons,
as needed for kneading and shaping
1 teaspoon salt
butter mop (optional)
3 tablespoons unsalted butter
(preferably clarified butter), melted and warm
For the dough, stir together the yeast, the 1/4 teaspoon sugar, and the warm water in a heatproof measuring cup. Allow the mixture to stand until swollen, 6 to 7 minutes.
Place the milk, the chunks of butter, and the 1/4 cup sugar in a medium-size saucepan and set over low heat. When the sugar has dissolved, remove the saucepan from the heat; pour and scrape the mixture into a medium-size heatproof mixing bowl. Cool to warm, about 105 degrees F. Quickly blend in the eggs and yeast mixture.
Place 3 cups of the flour in a large mixing bowl and blend in the salt. Add the yeast mixture and mix to combine, using a wooden spoon or flat wooden paddle. Let stand for 5 minutes. Add 1 cup more of the flour, mix well, and let stand for 1 minute. Place the remaining 1/2 cup flour on a work surface, and knead the dough on it, incorporating all of the flour. The dough should be moderately soft. Continue kneading the dough for 6 minutes longer, adding the additional 2 tablespoons flour only if the dough begins to seriously adhere to the work surface.
Turn the dough into a bowl heavily coated with softened unsalted butter, lightly turn to coat all sides in a film of butter, make several cuts in the dough with a pair of kitchen scissors, cover tightly with a sheet of food-safe plastic wrap, and let rise at cool room temperature for 1 hour and 30 minutes (in humid weather or on a rainy day) to 2 hours, or until quite puffy and doubled in bulk.
Remove the plastic wrap. Lightly compress the dough with a rubber spatula, cover loosely with the plastic wrap, and let stand for 10 minutes. Remove and discard the plastic wrap.
In the meantime, film the inside of 24 muffin/cupcake cups (12 cups to a pan, each cup measuring 23/4 inches in diameter and 13/8 inches deep, with a capacity of 1/2 cup) with nonstick flour-and-oil spray.
To form the rolls, divide the dough in half. Cut each half into 12 even-size pieces. Cut each of the 12 pieces into 2 even-size pieces. Roll the pieces into a smooth, slightly elongated, somewhat oval ball. Place 2 ovals in the bottom of each prepared muffin cup.
Cover each pan of rolls loosely with a sheet of food-safe plastic wrap. Let the rolls rise at room temperature for 45 minutes to 1 hour, or until doubled in bulk. They should look puffy but stable.
Preheat the oven to 375 degrees F in advance of baking.
Remove and discard the sheets of plastic wrap covering the rolls.
Bake the rolls in the preheated oven for 15 to 18 minutes, or until set and a golden color on top. Cool the rolls in the pans on cooling racks for 5 minutes.
For the butter mop (if you are using it), brush the warm melted butter on top of the rolls. After 5 minutes, carefully remove the rolls, using the tip of a round-edged flexible palette knife to nudge them out, if necessary, for they are fragile when freshly baked. Serve warm or at room temperature. Store in an airtight container.
notes
• mixing and kneading the dough by hand creates the finest, airiest rolls
• the slow first rise at cool room temperature, taking up to 2 hours, makes the lightest rolls
• using clarified butter for brushing on the tops of the baked rolls gives them a finish with the pure taste of butter; the final swipe with butter is an optional, but flavorful, finish
• upon seeing a basket of these rolls, a friend offered this assessment: “These look like the brown-and-serve rolls my mother served when I was a kid.” (A compliment, I presume?)

a 14-year-old’s rolls still tasty after all these years