A combination is a forcing variation, normally with a sacrifice, intended to be to the benefit of the player making the combination.
A combination is not classified as clear or unclear; it is either sound or unsound: it works or it doesn’t.
Combinations range from the trivially simple (e.g. a simple piece sacrifice followed by mate in one) to the hideously complicated, with multiple sacrifices by both sides and many long variations. Nevertheless, most combinations you will encounter in chess will be made up of the basic tactical ideas we discussed in the previous chapter. That is why, although it is not so important to know the names of individual tactical devices, it is vital to see how to use and combine these tactical building blocks, one with the other.
We start with one of the classics: a simple but highly attractive mating combination. I shall indicate [in square brackets] which specific tactical devices are involved.
Réti – Tartakower
Vienna 1910
1 e4 c6 2 d4 d5 3 Nc3 dxe4 4 Nxe4 Nf6 5 Qd3 e5?! 6 dxe5 Qa5+ 7 Bd2 Qxe5
It appears that Black’s play has worked, and that White must now defend the e4-knight in some clumsy way. However...
8 0-0-0

White has a tactical defence! This was not a serious tournament game, so Tartakower light-heartedly took the knight.
8...Nxe4?
8...Qxe4? 9 Re1 [pin] wins the queen; 8...Be7 9 Nxf6+ Qxf6 (not 9...Bxf6? 10 Re1 [pin]) allows White a pleasant development advantage, but the game would continue.
9 Qd8+!!
Decoying the black king into a deadly double check.
9...Kxd8 10 Bg5++ Kc7
Or 10...Ke8 11 Rd8#.
11 Bd8# (1-0)
No fewer than four of the king’s possible flight squares are blocked by his own pieces. Shame on them!
The next position shows some deeper ideas.
Peres – Ziatdinov
Netherlands 1994

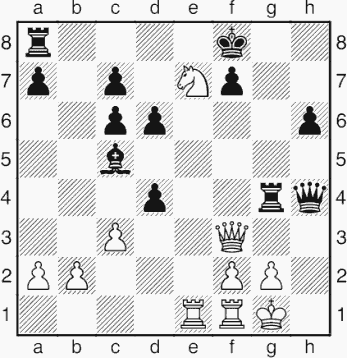
Your first thought on seeing this position from White’s side may well be “if that rook weren’t there on g4, I could fork his king and queen”. The trick is now to make the logical leap and find a way to force a win by bringing about a position where this potential knight fork becomes reality. Remembering that the fork will win queen for knight, a major material sacrifice may well be justified.
1 Re4!
[Distraction; Pin] This move neatly solves the problem of the black rook! White both attacks the black rook, and pins it against the black queen.
1...Qg5
Black tries to limit the damage to an exchange. 1...Rxe4 2 Ng6+ [pin; fork] is the main idea behind the sacrifice, and wins for White: 2...Kg7 3 Nxh4 [decoy] 3...Rxh4 4 Qg3+ [fork] picks off the h4-rook, while 2...Ke8 3 Nxh4 Rxh4 4 Qxc6+ [fork] eliminates the poor beast in the corner. On the other hand 1...h5 2 Ng6+ [fork] exploits two pins at once: the black rook may take the knight, but this opens a line so the white rook can take the queen.
2 Rxg4 Qxe7 3 Qg3 1-0
The threat of Rg8# forces more material gains.
Many combinations aim neither to give mate nor to win pieces directly, but rather to open the way for a pawn to promote. The following is a good example.
Capablanca – Spielmann
New York 1927 (WGG 22)

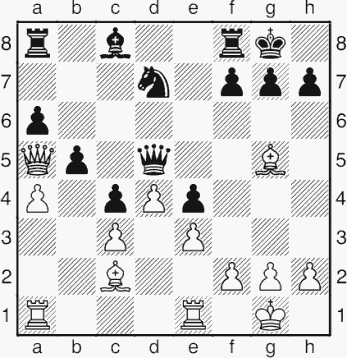
18 axb5!
[Pin] This sacrifice is not especially deep, but demonstrates in clear-cut fashion how the possibility of creating a devastating passed pawn must be borne in mind in even the most innocent-looking positions. Indeed, the task of calculating the sacrifice would be within the capabilities of most experienced players, yet most would simply move the bishop without much thought, oblivious to the existence of something enormously better.
18...Qxg5 19 Bxe4 Rb8
19...Ra7 20 b6! [discovered attack] 20...Qxa5 21 bxa7 and White gains material.
20 bxa6 Rb5 21 Qc7!
Now Black can only thrash around a little; the a-pawn is not to be stopped.
21...Nb6 22 a7 Bh3 23 Reb1 Rxb1+ 24 Rxb1 f5 25 Bf3 f4 26 exf4 1-0
Knaak – Christiansen
Thessaloniki Olympiad 1988

When ahead on material, but under attack, the ideal thing to do is exchange off the opponent’s main attacking pieces. Knaak finds a neat way to do so.
25 Qe2!
25...Qxe2+
Black must allow the queens to come off, since White mates in the case of 25...Rxe2 26 Rd8+ Re8 27 Rxe8#.
26 Nxe2 Be5 27 b4 b5 28 Rd7 Ra8 29 Nd4 a6 30 Nc6 Bf6 31 g5 Bb2 32 Ne7+ Kh8 33 Nd5 a5 34 bxa5 1-0

Here is a very silly position, constructed by Matsukevich for the purpose of illustrating the tactical theme of “The Windmill” (also known as the “See-Saw”). Watch how all of Black’s pieces drop off.
1 Rxg6+ Kh7 2 Rg7+ Kh8 3 Rxg5+ Kh7 4 Rg7+ Kh8 5 Rxf7+ Kg8 6 Rg7+ Kh8 7 Rxe7+ Kg8 8 Rg7+ Kh8 9 Rxg4+ Kh7 10 Rg7+ Kh8 11 Rxg3+ Kh7 12 Rg7+ Kh8 13 Rxd7+ Kg8 14 Rg7+ Kh8 15 Rxc7+ Kg8 16 Rg7+ Kh8 17 Rxb7+ Kg8 18 Rg7+ Kh8 19 Rxg2+ Kh7 20 Rg7+ Kh8 21 Kxa1 and now Black must lose one of his knights. Note that in this example White had a great deal of choice as to the order in which he took the black pieces. The point of this is to show that if you can set up a windmill, then it may not matter how much material you are down. The theme (in more sensible form) crops up frequently in practice.
Here is a simple example, in which White is heavily behind on material, but sees a chance to set up a windmill, and invests his queen.
Krejčik – Leitgeib
Vienna 1951

27 Qxg5
27...hxg5 28 Rxg6+ Kh7 29 Rxe6+ Kg7 30 Rg6+ Kh7 31 Rxd6+ Kg7 32 Rg6+ Kh7 33 Rxc6+ Kg7 34 Rg6+ Kh7 35 Rxb6+ Kg7 36 Rg6+ Kh7 37 Ra6+ 1-0
White will be a rook up.
Bishop and rook is the normal team in a windmill, but not the only one.
Alekhine – Fletcher
London simultaneous 1928

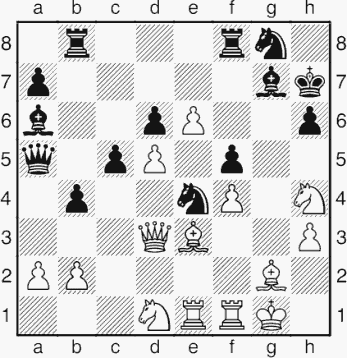
Here we have Alexander Alekhine, newly crowned world champion, with his queen and rook skewered. Mr Fletcher may have thought it was his lucky day. Well, in a sense it was, for his game has gone down for posterity.
35 Qxe4! fxe4
Perhaps in taking the queen, Fletcher hoped the game would end in perpetual check. However, he had no good option: 35...Ne7 and 35...Bxf1 36 Rxf1 Ne7 both leave Black material down and doomed to lose.
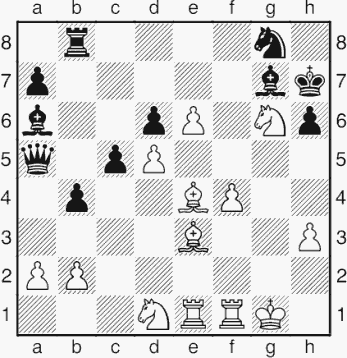
36 Bxe4+ Kh8 37 Ng6+ Kh7 38 Nxf8++ Kh8 39 Ng6+ Kh7

Now what?
40 Ne5+! Kh8 41 Nf7# (1-0)