In this short chapter I am looking mainly to explain some of the key endgame principles, and pass on some of the genuinely essential knowledge. There are some enormous tomes of endgame theory in print, and I suggest you consult these for further details. There are also detailed definitions of some endgame terms in the glossary, and examples of endgame play throughout the book.
One point I’d like to make is that the myth of the endgame being about effortless technique and memorizing a mass of theory, is pure nonsense. Playing the endgame well involves a great deal of hard work and calculation at the board. It is worth knowing some key positions from which to take bearings, but these are at best background knowledge, except in some very simplified positions.
This endgame is absolutely fundamental. All chess-players must know and understand it so well that they can quickly assess any position without difficulty. This is because many endgames can simplify down to king and pawn vs king.
In many positions the assessment depends on possession of the opposition, which is a way in which kings fight for position, and is a term defined in the glossary.
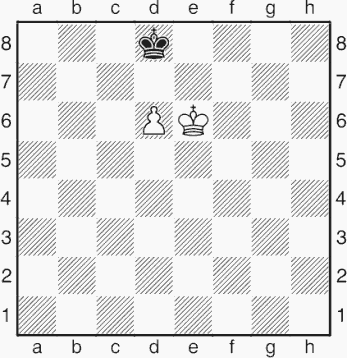
This is one of the fundamental positions, of great importance.
If White is to play, he wins:
1 d7 Kc7 2 Ke7
The pawn queens next move.
On the other hand, if Black is to play, then the game is a draw after 1...Ke8 as we are about to see.

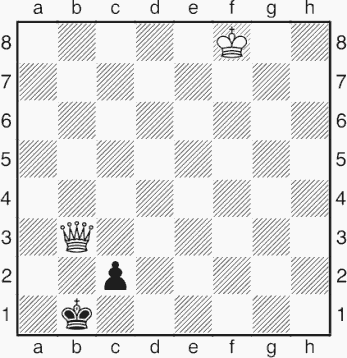
In the previous position, both sides benefited from it being their turn to move. Here the opposite is the case: if Black is to play he loses, since after 1...Kd8 we have the position we have just seen, whereas White can only draw if he is to move:
a) 1 Kd5 Kd7 2 Kc5 Kd8! (the only move; 2...Kc8? 3 Kc6 Kd8 4 d7 Ke7 5 Kc7 wins for White) 3 Kc6 Kc8 achieves nothing for White.
b) 1 Ke5 Kd7 2 Kd5 Kd8! 3 Ke6 Ke8.
c) 1 d7+ Kd8 2 Kd6 is stalemate, while other king moves by White allow Black to take the pawn.
A situation in which it is a disadvantage for either side to have the move is called a reciprocal zugzwang.
Now let’s consider a situation with the pawn further back.

This is another key position. The player with the pawn generally does best to keep his king in front of the pawn, but this alone is not enough to guarantee victory when the pawn has not crossed the half-way line.
1...Ke7! (the only move to draw) 2 Kd5 Kd7! (again Black has no choice: 2...Ke8? allows 3 Ke6 Kd8 4 Kf7 and the pawn waltzes through to queen) 3 e5 (3 Kd4 Ke6 is obviously no way for White to make progress) 3...Ke7!. Now the presence of the pawn on e5 means that White cannot keep the opposition, so he must either go backward or settle for 4 e6 Ke8!, when we have a familiar drawn position.
The rook’s pawn is a special case.

Here the defender’s drawing chances are far better. The opposition is not so vital; provided the defending king can place himself in front of the pawn the game is drawn.
1 Ke4 Kd6 2 Kf5 Ke7 3 Kg6 Kf8 4 Kh7
4 h4 Kg8 5 h5 Kh8 6 h6 Kg8 7 h7+ Kh8 8 Kh6 is stalemate.
4...Kf7 5 h4 Kf8
If there were an “i”-file to the right of the h-file, this would of course be a very simple win. But there is no such thing, and the position is drawn.
6 h5
6 Kg6 Kg8 7 h5 Kh8 8 h6 is no better.
6...Kf7 7 h6 Kf8 8 Kh8
8 Kg6 Kg8 9 h7+ Kh8 is a draw we have seen before.
8...Kf7 9 h7
9 Kh7 Kf8 just repeats.
9...Kf8

Now it is White who is stalemated. Even keeping the black king away from the queening square isn’t necessarily enough with a rook’s pawn!
When there are several pawns, there are some interesting effects possible.
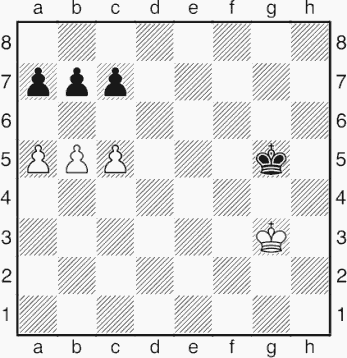
This is another idea that every chess player should know. Three pawns can actually batter their way through against three pawns opposing them like this.
1 b6! cxb6
1...axb6 2 c6! bxc6 3 a6 is similar.
2 a6! bxa6
2...bxc5 3 axb7 and a queen appears.
3 c6 and White’s pawn promotes.
Clearly such a cascade of pawn sacrifices only works when the attacking pawns are far advanced, and there are no enemy pieces to stop them promoting once they are past the enemy pawns.
Now we move on to endings with major pieces.
This is an important ending, which often arises in practice.
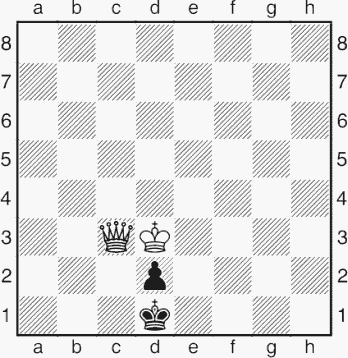
This is a typical sort of position that might arise from a king and pawn ending in which White has narrowly won the race to promote. Is the position, with White to play, a win or a draw? Can Black be prevented from promoting? Firstly, if the pawn is any further back than its seventh rank, then the queen wins without difficulty. But surprisingly, when the pawn has reached its seventh rank, the result depends on which file the pawn is on. If it is on the b-, d-, e-, or g-file, then the following method is effective.
1 Qc5+
White must operate with queen checks.
1...Kb2 2 Qb4+ Kc2 3 Qc4+ Kb2 4 Qd3

A critical point. The queen attacks the pawn from behind at a time when it has no support from the king.
4...Kc1
The only square.
5 Qc3+!
Forcing the black king in front of the pawn.
5...Kd1
Now the white king can make a step towards the pawn.
6 Kf7 Ke2
Now the checking procedure starts again.
7 Qe5+ Kf2 8 Qf4+ Ke2 9 Qe4+ Kf1 10 Qd3+ Ke1 11 Qe3+ Kd1 12 Ke6 Kc2
And once more.
13 Qc5+ Kb1 14 Qb4+ Kc2 15 Qc4+ Kb2 16 Qd3 Kc1 17 Qc3+ Kd1 18 Kd5 Ke2 19 Qe5+ Kf1 20 Qf4+ Ke2 21 Qe4+ Kf2 22 Qd3 Ke1 23 Qe3+ Kd1 24 Kc4
White moves in for the kill.
24...Kc2 25 Qc3+ Kd1 26 Kd3
The pawn no longer seems such a threat! White mates in trivial fashion. Although it takes a while, this is a very simple procedure to remember.
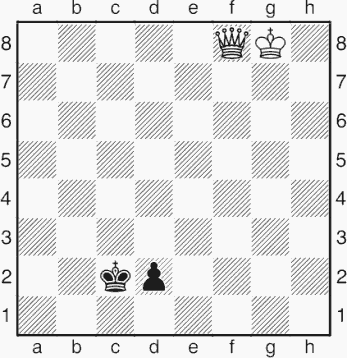
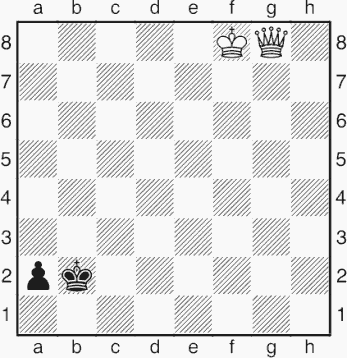
However, with a bishop’s (c- or f-) pawn, things are totally different.

White may begin as normal.
1 Qg7+ Kb1
Not 1...Kb3??, as this allows 2 Qa1, when White permanently stops the pawn.
2 Qb7+ Ka2 3 Qd5+ Kb2 4 Qd4+ Kb1 5 Qb4+ Ka2 6 Qc3 Kb1 7 Qb3+
At this critical moment, Black need not go in front of the pawn. Instead...
7...Ka1!
Now if White takes the pawn it is stalemate. Since Black is threatening to promote, White gains no respite to bring in his king, so the game is drawn.
With a rook’s (a- or h-) pawn, the king can be forced in front of the pawn.
However, so long as he only plays into the corner when forced to do so by a queen check, the enemy king will have no time to approach. Thus:
1 Qg7+ Kb1
Again, the queen must on no account be allowed to get in front of the pawn.
2 Qg1+ Kb2 3 Qd4+ Kb1 4 Qb4+ Ka1
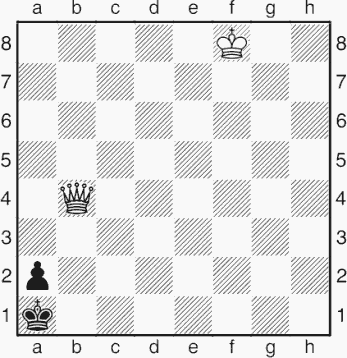
Already we see the problem. The white king cannot approach, since Black would be stalemated. There is no way around this problem, and the game is drawn.
Rook vs pawn is often far harder to judge. In the most famous position of this type, the Saavedra Position, the pawn even wins, but this is an exception. The rook is nothing like so agile as the queen, so a far-advanced pawn supported by its king will tend to draw against a lone rook. If the attacking king is too far away, all the rook can do is sacrifice itself for the pawn. The diagram shows one helpful trick.
1 Rg5!
By placing itself on the fifth rank, the rook cuts off the king from its pawn, and also prevents the pawn from advancing, since 1...d3 2 Rg3! d2 3 Rd3 rounds up the pawn in the nick of time. Thus after Rg5, Black will just have to shuffle his king. White will then bring his king back into the action at his leisure, winning easily.
You may well have heard the idea that “two connected passed pawns on the sixth rank are stronger than a rook”. The next diagram illustrates what is meant.
However, remember that this is a very specific instance, and that in almost all cases a rook is far stronger than two pawns.
1 c6
White sets up the dreaded formation. The black king is too far away to help, so it’s between the pawns and the rook.
1...Rd3
1...Rc3 is similar.
2 c7
2 d7, with 3 c7 to follow, is just as effective.
2...Rc3
Else the c-pawn promotes.
3 d7
One or other of the pawns will now queen. The best Black can do is 3...Rxc7 4 d8Q, with rook vs queen; although not trivial, this is a loss for the rook.
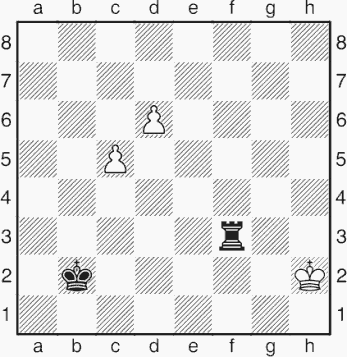
This is another fundamental ending, since so many other endings can simplify to it. Let’s start with a key drawing procedure.
Here we see White employing a standard drawing method, attributed to Philidor. This position looks fairly dangerous for White, with the black king and pawn both able to advance to their sixth rank, putting the white king in danger. However, White has a reliable drawing method.
1 Ra3!
The key is to put the rook on the third rank, so that the black king is unable to lead the charge; the pawn must go first, which in turn allows White another simple defensive idea.
1...f3
There’s little else for Black to try. If the rook retreats, the white king can come to the second rank, while if Black shuffles, White can do the same (e.g. Ra3-c3-a3). 1...Rh2 2 Rb3 Rh3 3 Rxh3 Kxh3 4 Kf2 Kg4 5 Kg2 is a drawn pawn ending.
2 Ra8!
Yes, to the very end of the board. White’s defence is to be based on a barrage of checks to the black king. In almost all such instances, it pays for the checking piece to be as far from the enemy king as possible.
2...Kg3 3 Rg8+ Kf4 4 Rf8+
White will keep checking the black king, which, following the pawn’s advance to f3, has no accessible shelter. In such instances, the standard way for a king to evade the checks is by advancing towards the rook, but this will not be effective here, since after, e.g., 4...Ke4 5 Re8+ Kd5 6 Rd8+ Ke6 (not that Black has any threats with his king here) White can win the f3-pawn by 7 Rf8 Rb3 8 Kf2.
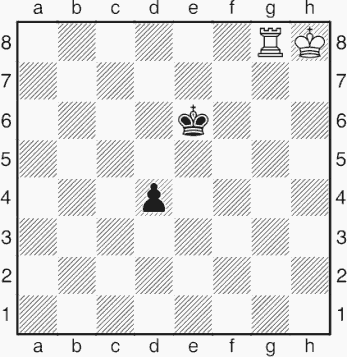
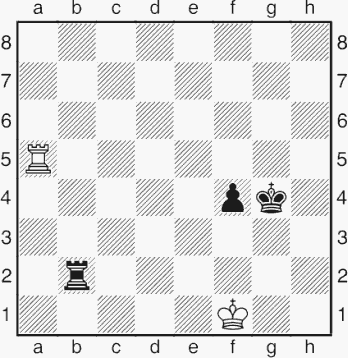
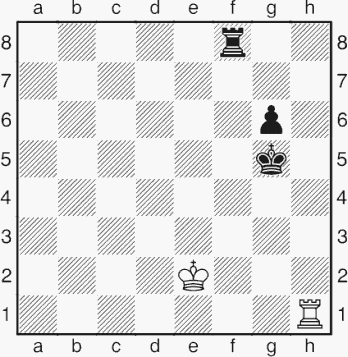
If the defender cannot get his king in front of the pawn, then a position such as the following can arise:

Here we see that the black king is cut off from the area in front of the pawn by the white rook standing on the f-file. This factor constitutes a major advantage for White, since his king can shepherd the pawn up to the seventh rank without difficulty:
1 g5 Rg1 2 Kh6 Rh1+ 3 Kg7 Rg1 4 g6 Rh1 5 Kg8 Rg1 6 g7 Rh1
We have now arrived at the famous so-called Lucena Position. White has a little trick to get the pawn through. This is the best-known endgame position. Even players with no other endgame knowledge tend to know this one.

The problem is to extract the king from in front of the pawn. There is some choice in how to do this, but the important thing is to know and understand a method that works. The black pieces are doing quite a good job of preventing this: the rook prevents the king from going to the h-file, while access to the f-file is denied by the black king.
7 Re2+ Kd7
7...Kf6 allows the white king to reach the f-file with the black king now preventing checks from the black rook: 8 Kf8 and the pawn queens.
7...Kd6 8 Re4 Kd5 9 Rf4 Ke5 10 Rf2 and the black king does not have time to get back to e7 to prevent Kf8.
8 Re4!
The reason why the rook needs to go to the fourth rank will become clear shortly. 8 Kf7 allows a barrage of rook checks: 8...Rf1+ 9 Kg6 Rg1+ 10 Kf6 Rf1+.
8...Kd8
There isn’t much for Black to do. 8...Rf1 9 Kh7 leads to a similar finish.
9 Kf7 Rf1+ 10 Kg6 Rg1+ 11 Kf6 Rf1+
11...Rg2 allows White time for 12 Re5 and bringing the rook to g5.
12 Kg5 Rg1+ 13 Rg4
The rook turns out to be ideally placed to stop the checks. The pawn queens shortly.
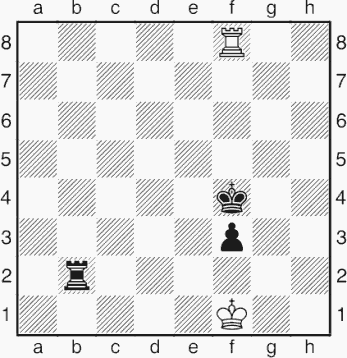
We now consider the main defensive method when the king is cut off:
Here we see that the king being cut off does not mean automatic loss. If the pawn is not very far advanced, then the rook can defend by checking from in front of the pawn:
1 Rg1+ Kh5 2 Rh1+ Kg4 3 Rg1+ Kh5 4 Rh1+ Kg5 5 Rg1+ Kh6 6 Rh1+ Kg7 7 Rg1
It is impossible for Black to make progress. Let us consider one attempt:
7...Rf5 8 Ke3 Kf6 9 Ke4 Rg5 10 Rf1+ Rf5
10...Kg7 11 Rf4 and the white king gets in front of the pawn, via f3.
11 Rxf5+ gxf5+ 12 Kf4
As we have seen, this is a simple drawn king and pawn vs king position.
It would be wholly inappropriate to go into great detail in a non-specialist work, but this method suffices to draw when the rank on which the pawn stands (viewed from its own side of the board) plus the number of files by which the king is cut off is five or less.
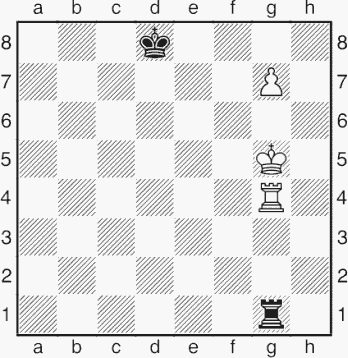
One of the best known endgame principles is that rooks belong behind passed pawns, whether of the same colour or the opponent’s. This is largely an extension of the idea that rooks are most effective when active, and are relatively feeble when passive. As an aside, regarding rook activity in general, I recall veteran IM and trainer Bob Wade once being asked how one could judge whether a rook was really active or not. His reply: “It should be attacking something just about every move.”
Here we see a rook behind an outside passed pawn of its own colour.

This is a very favourable arrangement for White – so much that the position is very easy to win. The black rook has no freedom of movement, whereas the white one has plenty. White can win this ending very much as though it were just a king and pawn ending in which he has as many tempo moves as he likes (and the ability to use the rook actively, and the possibility of bringing the king to c7 with decisive effect). If Black moves his king to c7 and takes the pawn with his rook, then after the rook exchange White will win the pawn ending with ease since the black king will be so far from the action.
1 Rb5+ Kd6 2 Ke4 Kc6 3 Rb3 Kd6
Or 3...Rxb7 4 Rxb7 Kxb7 5 Ke5 followed by Kf6, and taking pawns; 3...Re8+ 4 Kd4 Rb8 5 Ke5 and White has made obvious progress.
4 Kd4 Kc6
4...Ke6 5 Kc5 and the king will support the b-pawn: 5...Kd7 6 Kb6 Kd6 7 Ka7 wins the rook for the pawn.
5 Ke5
Black is helpless against the white king decimating his kingside.
Next, a practical example with a defending rook profiting from being behind the enemy passed pawn.
Glek – Lobron
Berne 1994

Here the active position of the black rook, behind White’s passed pawn, allowed him to save the game without much difficulty.
51...Rd1 52 Rd6 Kf7 53 Kf4 Rf1+ 54 Ke5 Re1+ 55 Kd4 Rg1
Now the rook turns its attention to the kingside pawns. White did not have to allow this, of course, but there was no other way for him to try to make progress.
56 g4 Rg3 57 Re6 Rxh3 58 Re4 Rh1 59 d6 Kf6 60 Kd5 Rd1+ 61 Kc6 Rc1+ 62 Kb7 Rb1+ 63 Kc7 Rc1+ 64 Kd8 Rd1 65 d7 g6
Lobron has defended very alertly. Although he will shortly be obliged to give up his rook for the d-pawn, Black will be able to create a passed pawn of his own. This is a standard theme in rook endings, but he will delay sacrificing his rook as long as possible, so as to gain as much time as possible in the race to come.

66 Rc4 Kg5 67 Kc7
67 Ke7!? h5 68 Rc1 Rxd6+ is also a draw.
67...h5 68 Rc6
Threatening 69 Rd6
68...Rxd7+ 69 Kxd7 h4
There is no point letting White have the g6-pawn just yet.
70 Ke6 h3 71 Kf7 Kxg4 72 Rxg6+ Kf3 73 Rh6 ½-½
All White can do is sacrifice his rook for Black’s h-pawn.
However, just because a rook is in front of a passed pawn, it should not be considered harmless.

Here we see a standard idea. Black has no way to prevent White from winning immediately by means of a small trick. The immediate threat is Re8+ followed by a8Q. It seems that 1...Kf7 solves this problem, but then comes 2 Rh8 when 2...Rxa7 loses the rook to the through check 3 Rh7+. In order to avoid this trick, the black king would need to stand on one of the highlighted squares or else have some pawn shelter from checks.
A passed pawn far distant from the main theatre of action is very useful in diverting the enemy forces from the part of the board where you wish to operate in earnest.
Dreev – Lerner
Simferopol 1988
This is an excellent example of the value of an outside passed pawn in rook endings. If you find it surprising that White might win this position, study the moves especially carefully.
45 Rc6
White wishes to exchange his d6-pawn for Black’s a5-pawn. 45 Ra7? Rxd6 46 Rxa5 Rd2 is far less good for White, since his king’s freedom is limited by the active black rook.
45...Ke8
45...Rb8 46 Ra6 Ke8 47 Rxa5 Kd7 48 Ra7+ Kxd6 49 Rxf7 gives Black no hope.
46 Ra6 Kd7 47 Rxa5 Kxd6 48 Ra7 Rf8?!
48...Rd7 might be a better try.
49 a5 Kc6 50 h4 g5 51 h5 g4 52 Ke2 f5 53 a6 Rb8 54 Rh7 Rb2+ 55 Ke3 Ra2 56 Rxh6 Kd6 57 Rg6 Rxa6

White has managed to convert his previous advantage to a clear plus on the kingside.
58 h6 Ra1 59 Kf4 Rg1 60 Rg8 Rxg2 61 h7 Rxf2+ 62 Kg3 Rf3+ 63 Kg2 Rh3 64 h8Q Rxh8 65 Rxh8
Black’s pawns are not far-advanced, and the white king is well placed. Therefore it is a fairly simple matter for White to mop up.
However, as Chris Ward explains in his book Endgame Play, inexperienced players might expect the pawns to have a chance here. Not so!
65...Ke5 66 Kg3 Ke4 67 Rh1 Ke5 68 Re1+ Kf6 69 Kf4 Kf7 70 Ra1 Kf6 71 Ra6 Kf7 72 Ke5 Kg6 73 Rxe6+ Kg5 74 Re8 1-0
A bishop obstructed by many pawns on its own colour squares can be a catastrophic liability in the endgame.
Cherniak – Bogdanovich
Moscow Ch 1989
This is a fairly extreme case of a bad bishop ending. The black bishop is obstructed by several pawns fixed on squares on its own colour. In the following play we see White striving to find a way to open up the position in order to penetrate with his king on Black’s hopeless dark squares.
Black’s bishop may be viewed as canned meat; it may help the can keep its shape, but is helpless against an opponent with a can opener!
27 Be4
27 Bxh7? would be a horrible mistake since 27...g6 28 h4 Kf8 29 h5 Kg7 30 hxg6 fxg6 traps and wins the bishop.
27...Kf8 28 Kd4 g6 29 Ke3
Time is not of the essence here. Black’s move ...g6 has given the white king a possible entry square on h6, so the change of track is logical.
29...Kg7 30 Kf4 h6 31 h4 Be8 32 Bd3 Bd7 33 Ba6 Kh7 34 Kg4 Kg7 35 Bd3 Bc8 36 f4 Bd7 37 h5

37...Bc8
37...gxh5+ 38 Kxh5 allows White to make progress.
38 Kh4 Bd7 39 Be4 Be8 40 Bf3 Bd7 41 g4 Be8 42 g5 Bd7 43 hxg6 fxg6 44 gxh6+ Kxh6 45 Be4 Be8 46 Bd3 Bd7 47 Ba6 Kg7 48 Kg5

Now Black will be zugzwanged out of one of his pawns, and so the rest will follow.
48...Kf7 49 Bd3 Bc8 50 Bxg6+ Ke7 51 Be4 Bb7 52 Kg6 Ba8 53 Bg2 Bb7 54 Bf3 Ba8 55 Bg4 Bb7 56 Bxe6! Kxe6 57 f5+ 1-0
After 57...Kxe5 (57...Ke7 58 Kg7; 57...Kd7 58 f6 Ba6 59 f7 Ke7 60 Kg7) 58 f6 Black is powerless to stop the pawn.
If a king is moving between squares on the same diagonal, there is a single shortest route for its journey. In other cases, it has a choice of routes that take the same number of moves. For instance there are seven routes from e1 to e4 that take three moves. (You may, as an exercise, count the number of king routes from e1 to e8 that take seven moves if you wish.)
This point is easily forgotten in the heat of battle...
Bronstein – Botvinnik
Moscow World Ch (6) 1951

Black’s e-pawn is sufficiently strong to rule out any winning chances for White. It seems White has a number of safe ways to play, but for one fatal moment, Bronstein apparently forgot that kings do not have to travel in straight lines...
57 Kc2??
This was not a time-trouble blunder – Bronstein had plenty of time to think. He just forgot that for the black king to travel from f4 to f2 did not have to involve it going via f3. One naturally assumes that the black king will stay next to its pawn. Instead after 57 Ne6+ Kf3 (57...Kg3 is met by 58 Nd4) White has two ways to draw: 58 c5 e2 59 Nd4+ Kf2 60 Nxe2 Kxe2 61 Ka4 Kd3 62 Kxa5 Kxc3 63 Kb6 Kc4 64 Kxb7 Kxc5 or 58 Nd4+ Kf2 59 Ka4! e2 60 Nc2 e1Q 61 Nxe1 Kxe1 62 Kxa5 Kd2 63 Kb4 b6.
57...Kg3 0-1
57...Kf3 58 Nf7 e2 59 Ne5+ was clearly the line Bronstein envisaged.
Instead after 57...Kg3 he resigned since the pawn cannot be stopped. This awful oversight haunted Bronstein for decades.
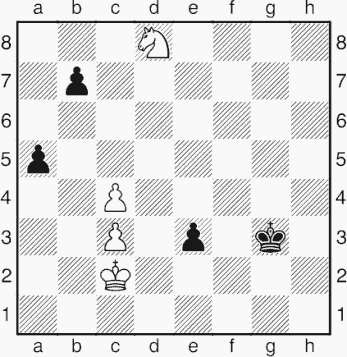
These are the sad possibilities:
a) 58 Ne6 e2 59 Nd4 is not check.
b) 58 Nf7 e2 59 Ne5 again is not the saving knight check that White needed.
c) 58 Kd1 Kf2 59 Ne6 e2+ and the pawn promotes.
d) 58 Kd3 Kf2 59 Ne6 e2 60 Nf4 e1Q and White cannot play 61 Nd3+.
A tragedy for Bronstein, and an unexpected windfall for Botvinnik, who went on to retain his title by drawing the match.
This is another important ending, with a reputation for being deadly dull, with long checking sequences during which the position hardly changes. It is also a fiendishly difficult ending to understand, even though it is one for which computer databases have already provided definitive analysis.
The following example illustrates some important themes.
Botvinnik – Minev
Amsterdam Olympiad 1954

This is an instructive queen ending.
57...Qh8+
Or 57...Qh1+ 58 Kg5.
58 Kg6 Qc3 59 g4 Qd2 60 g5 Qd4 61 Qf5+ Ka4 62 Kh5 Qh8+ 63 Kg4 Qh1 64 Qf4+ Ka5 65 Qe5+ Ka4 66 g6 Qd1+ 67 Kg5 Qd8+ 68 Kf5 Qc8+ 69 Kf4 Qc1+ 70 Qe3 Qc7+ 71 Qe5 Qc1+ 72 Kf5 Qc8+ 73 Kg5 Qd8+ 74 Qf6!
After 74 Kh6? Qh4+ 75 Kg7, 75...Qh3? was given by Botvinnik, but 75...Ka3 is a draw, the computer database informs us!
74...Qd5+ 75 Qf5 Qd8+ 76 Kh5 Qe8
76...Qh8+ 77 Kg4 Qg7 78 Qf7 Qc3 79 g7! gets the pawn through, since 79...Qd4+ 80 Qf4 pins the black queen to the king.
77 Qf4+? Ka5? 78 Qd2+ Ka4 79 Qd4+ Ka5 80 Kg5 Qe7+ 81 Kf5! Qf8+ 82 Ke4 Qh6 83 Qe5+ Ka4 84 g7 Qh1+ 85 Kd4 Qd1+ 86 Kc5 Qc1+ 87 Kd6
87 Kd5 Qc8 only slows down the winning process, despite Botvinnik’s opinion that “the white king doesn’t stand too well, whereas Black’s king is well placed”.
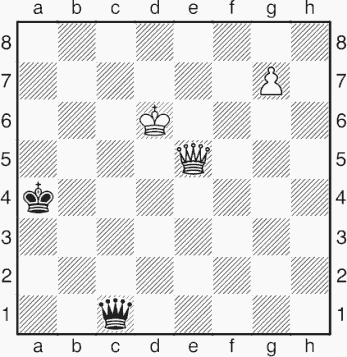
87...Qd2+
After 87...Qa3+, 88 Kd5 gets a “!” from Botvinnik, though it is not the quickest, which is 88 Kc7 Qc1+ 89 Kb8 Qb1+ 90 Kc8 Qc2+ 91 Qc7.
88 Ke6 Qa2+ 89 Qd5 Qe2+ 90 Kd6 Qh2+ 91 Kc5! 1-0
No matter how Black plays, a cross-check will force off the queens.
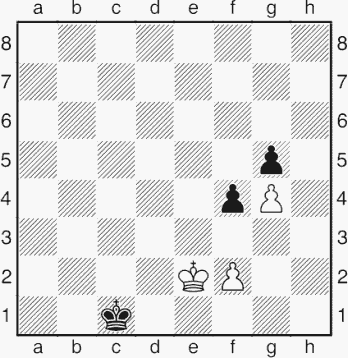
A fortress is a position in which one side holds a draw despite being substantially down on material due to some feature of the position preventing any progress from being made.
The most striking examples occur when a queen faces a rook, but the rook is well placed and supported by pawns. There may be no way for the queen to force any progress or to gain useful support from other pieces. Typically the attacking king will be cut off along rank and file by the rook, and so is denied any opportunities to penetrate the defences. Breaking a near-fortress can require considerable imagination and skill.

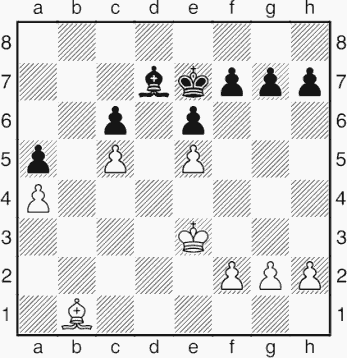
The diagram position could have arisen in Troianescu–Botvinnik, Budapest 1952. White does not have a fortress, but it is close – Black must play extremely accurately to win. The following variation is Botvinnik’s analysis.
1...Kf8 2 h4 Ke7 3 Kg2 f5 4 Kg1 h6 5 Kg2 Ke6 6 Kg1 Ke5 7 Kg2 g5 8 hxg5 hxg5

White has problems finding moves.
9 Kg1
9 Kf1 Qb1+ 10 Ke2 Qb5+ 11 Ke1 Qa6 and the queen penetrates to f1.
9...Qc2 10 Kg2 Qc3 11 Kf1
11 Rd8 Qc6+ 12 Kg1 Ke4 13 Kg2 f4 14 gxf4 gxf4 15 exf4 Qg6+ 16 Kf1 Kf3 and White will soon be mated.
11...Qa1+ 12 Kg2

12...Qxd4!
Did you see this coming? The winning method involves reaching a winning king and pawn ending with level material.
13 exd4+
13 f4+ Ke4 14 exd4 g4! wins for Black.
13...Kxd4 14 Kf1!
The best try. Passive play, viz. 14 Kh3 Ke4 15 Kg2 Kd3, does not help:

a) 16 Kh1 Kd2! 17 Kh2 Kd1! wins: 18 Kh3 Ke2; 18 Kg2 Ke1; 18 Kg1 Ke2; or 18 Kh1 f4.
b) 16 Kf1 Kd2 17 Kg2 Ke1 18 Kg1 Ke2 19 Kg2 f4 20 g4 (20 gxf4 gxf4 21 f3 Ke3 22 Kg1 Kxf3 23 Kf1 is a familiar position, where the opposition does not save White) 20...Ke1 21 Kg1 f3 and f2 drops.
14...Kd3 15 Ke1 f4 16 g4 Kc2!
16...f3? 17 Kd1 Ke4 18 Kd2 Kf4 19 Kd3 Kxg4 20 Ke3 picks off the f3-pawn, with a draw.
17 Ke2 Kc1!
18 Kd3
18 Ke1 f3 19 Kf1 Kd1 20 Kg1 Ke1, etc.
18...Kd1 19 Ke4 Ke2 20 f3 Kf2 21 Kf5 Kxf3 22 Kxg5 Ke3
Black promotes first, and will win the queen vs pawn ending since White has a knight’s pawn.
A common feature of the endings we have looked at is the king, normally a feeble stay-at-home piece in the middlegame, becoming an important fighting unit. This is because there is little danger, with substantially reduced force, of the king being subject to a mating attack in the ending. The king is particularly adept in holding back pawns, or in decimating a cluster of pawns. Strong players will begin activating their king at the earliest feasible point in an endgame, and will bear this in mind during the late middlegame.
The next example provides a simply superb example of a number of important endgame themes: passed pawns, rook activity, king activity and an admirable avoidance of materialism when the initiative is at stake.
Capablanca – Tartakower
New York 1924 (WGG 21)

How would you assess this ending? It may seem that the c3-pawn is a serious weakness, but it turns out that the g6-pawn is just as easily attacked. Moreover, it is far easier for White to create a passed pawn on the kingside than it is for Black on the queenside. Thus White should play very actively, rather than try to defend his queenside.
29 Rh1 Kf8 30 Rh7 Rc6 31 g4 Nc4 32 g5
“Threatening Rh6 followed by f5, and against it there is nothing to be done.” (Alekhine)
32...Ne3+ 33 Kf3 Nf5
“Or 33...Nd1 34 Rh6 Kf7 35 f5 Rxc3 36 fxg6+ Kg8 37 Ke2 Nb2 38 Bf5 with an easy win.” (Alekhine)
34 Bxf5
Capablanca sees a rook ending as the simplest way to win. His rook is very active, he has a passed pawn, and he has foreseen a superb way to introduce his king into the thick of battle.
34...gxf5

Glancing at this position superficially, we see that White is about to lose a pawn. A deeper look shows that White has in fact made enormous progress.
35 Kg3!
“Decisive! White sacrifices material in order to obtain the classical position with king on f6, pawn on g6 and rook on h7, whereupon the pawns tumble like ripe apples.” (Alekhine)
35...Rxc3+ 36 Kh4 Rf3 37 g6!
A memorable move, making way for the king.
37...Rxf4+ 38 Kg5 Re4 39 Kf6!

Again highly instructive. White does not take the black f-pawn; instead this pawn will shield the white king from checks. It does not matter at this point that Black has a mobile passed pawn, since White’s threats are so immediate.
39...Kg8 40 Rg7+ Kh8 41 Rxc7 Re8
White was threatening mate, so the rook must go passive.
42 Kxf5
Now that Black is wholly passive, White kills off any counterplay by eliminating this pawn.
42...Re4 43 Kf6 Rf4+ 44 Ke5 Rg4 45 g7+ Kg8
45...Rxg7 46 Rxg7 Kxg7 47 Kxd5 Kf6 48 Kc6 is a trivially won king and pawn ending.
46 Rxa7 Rg1 47 Kxd5 Rc1 48 Kd6 Rc2 49 d5 Rc1 50 Rc7 Ra1 51 Kc6 Rxa4 52 d6 1-0