
In this group of openings Black responds to White’s opening move 1 e4 with some reply other than the symmetrical 1...e5. Black’s main options are to challenge the e4-pawn directly, hinder White in establishing a second central pawn on d4, or allow White to occupy the centre, preparing to counterattack in hypermodern fashion.
This is an opening for those who do not find the Najdorf and Sveshnikov Sicilians enough like living on the edge. From the outset, both sides are posed with awkward problems, and must find original solutions or suffer catastrophe. The critical lines are the megalomaniac Four Pawns Attack (2 e5 Nd5 3 d4 d6 4 c4 Nb6 5 f4) and the Modern (2 e5 Nd5 3 d4 d6 4 Nf3), which aims for a nagging edge. Other systems include the unusual Chase Variation (2 e5 Nd5 3 c4 Nb6 4 c5 Nd5), the solid but dangerous Exchange Variation (2 e5 Nd5 3 d4 d6 4 c4 Nb6 5 exd6) and the dull 2 Nc3, which tends to be popular with club players; the most interesting answer is 2...d5 3 e5 Ne4, but the soundest is no doubt 2...e5, transposing to the Vienna or Four Knights.
I can recommend the Alekhine Defence to ambitious players who are willing to specialize. If you are wondering about the rights and wrongs of Black’s many knight moves, Black claims that they have provoked White’s pawns into becoming overextended, so the time is well spent.
A majority of the world champions have played the Alekhine Defence, but never as more than an occasional weapon.
Pin-breaking; ...Bg4? met by Bxf7+
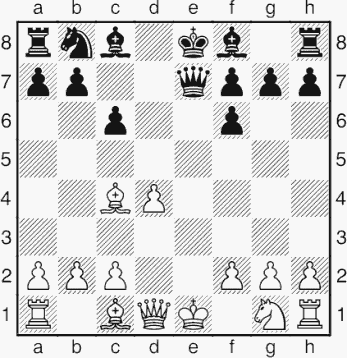
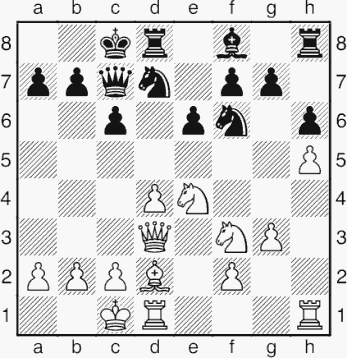
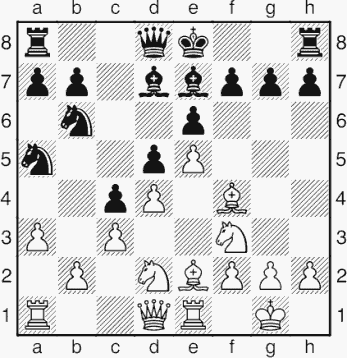
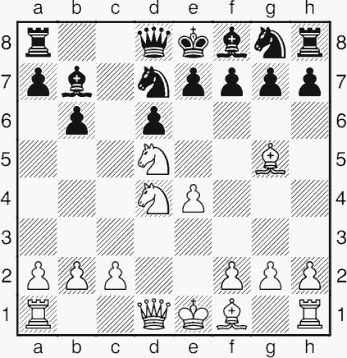
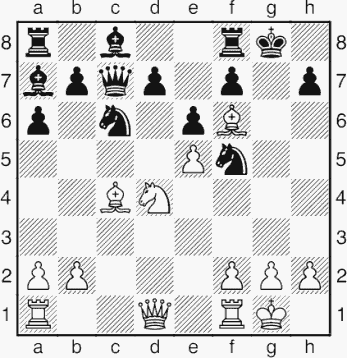
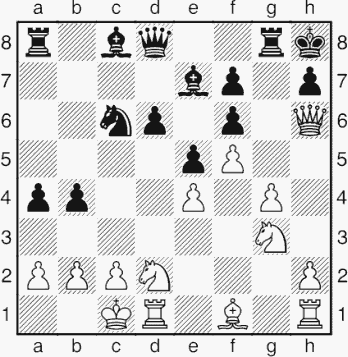
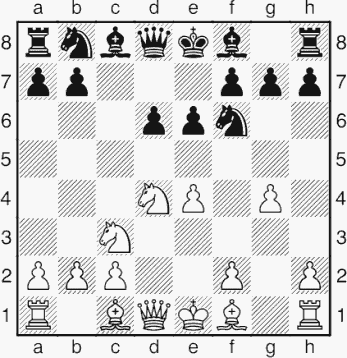
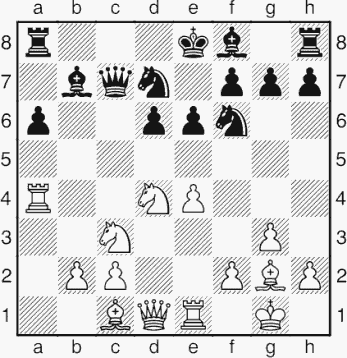
1 e4 Nf6 2 e5 Nd5 3 d4 d6 4 Nf3 g6 5 Bc4 Nb6 6 Bb3

This is a perfectly normal position in the Alekhine Defence, but one that illustrates the care that must be exercised when pinning knights.
6...Bg4? 7 Bxf7+ Kxf7 8 Ng5+
White’s next move will be 9 Qxg4, regaining the piece with an extra pawn and an overwhelming position. This Bxf7+ trick crops up frequently in many openings as a reply to an incautious ...Bg4 pin.
Bxf7+ sacrifice
Rozentalis – Yermolinsky
Moscow Olympiad 1994
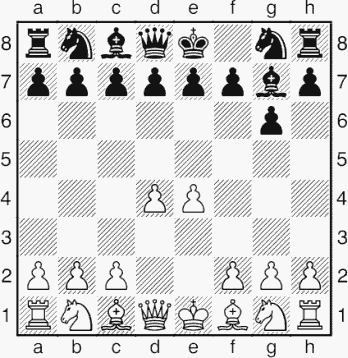
1 e4 Nf6 2 Nc3 d5 3 exd5 Nxd5 4 Bc4 c6 5 Qf3 Nf6 6 h3 Nbd7 7 Qe2 g6 8 Nf3

With this standard developing move, White sets a simple but easily overlooked trap.
It would take just one incautious move for the trap to be sprung, viz. 8...Bg7?? 9 Bxf7+ would be catastrophe for Black, since after 9...Kxf7 10 Ng5+ Ke8 (10...Kg8 11 Qe6+ Kf8 12 Qf7#; 10...Kf8 11 Ne6+ picks off the queen directly) 11 Ne6 Qa5 12 Nxg7+ Kf7 13 Ne6 White emerges with an extra pawn, while Black’s position is shattered.
However, Yermolinsky was alert:
8...Nb6
Black needs to cover the e6-square, so uses his c8-bishop for the purpose.
9 Bb3 Bg7 10 0-0 0-0 and a fairly normal position resulted. Black has avoided the trap, but had to place his knight on b6 a little earlier than he might have liked.
Alekhine, loose pieces
Chachalev – Ayupbergenov
Volgograd 1994
1 e4 Nf6 2 e5 Nd5 3 d4 d6 4 Nf3 dxe5 5 Nxe5 g6 6 Bc4 c6 7 Qf3 Be6 8 Nc3 Nd7 9 0-0 Bg7 10 Re1 0-0

In this perfectly normal position Black has no great threat, but unfortunately White now gives him one!
11 Bd2??
Surprisingly catastrophic.
11...Nxe5 12 dxe5 Nxc3 0-1
Black wins a piece due to the loose bishops on c4 and d2.
Alekhine, bizarre queen trap
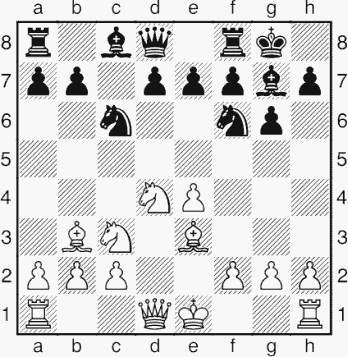
de Firmian – Rohde
USA Ch (Long Beach) 1989
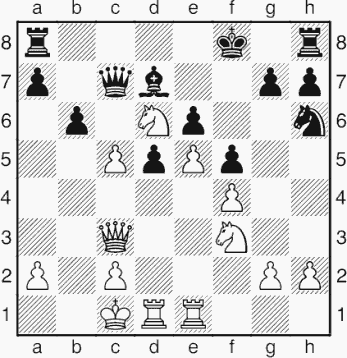
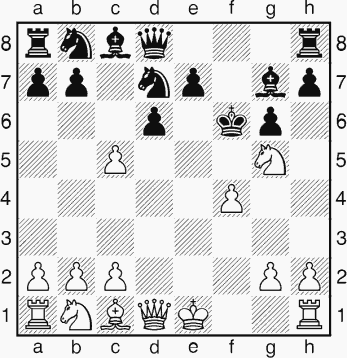
1 e4 Nf6 2 e5 Nd5 3 d4 d6 4 Nf3 dxe5 5 Nxe5 Nd7?!
This is a highly ambitious and precarious line for Black, introduced by Bulgarian players in the early 1960s.
6 Nxf7 Kxf7 7 Qh5+ Ke6 8 c4 N5f6 9 d5+ Kd6 10 Qf7 Ne5 11 Bf4
White now threatens c5, so Black has no choice.
11...c5 12 Nc3 a6

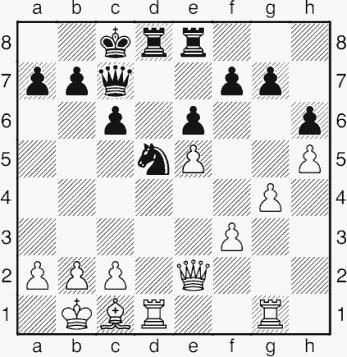
This chaotic mess is actually a well-known theoretical position. When this line became fashionable around the beginning of the 1990s, three high-rated players fell victim to the same trap, even though it was already known, and recorded in theoretical works.
13 0-0-0??
The critical line (and maybe the long-elusive refutation of 5...Nd7?!) appears to be 13 b4 Qb6 14 Rc1 g5 15 Bg3 h5 16 bxc5+ Qxc5 17 Qg6 Qd4 18 Qc2!.
13...g6!
Now Black is winning, since White has no decent way to meet the threatened ...Bh6, diverting the f4-bishop and so freeing the e5-knight to take the white queen.
14 Bxe5+
14 Re1 Bh6 is no better for White.
14...Kxe5 15 d6 Bh6+ 16 Kc2
16 Kb1 Qf8! 17 Rd5+ Nxd5 18 Qxd5+ Kf6 19 Ne4+ Kg7 20 Qe5+ Kf7 21 dxe7 Qxe7 22 Nd6+ Qxd6 (forced, but quite sufficient to win) 23 Qxd6 Bf5+ 0-1 Elburg–Krantz, Correspondence 1990; a rook will come to d8 next move with decisive effect.
16...Qe8 17 Rd5+ Nxd5 18 Qxd5+ Kf6
19 Ne4+
19 Bd3 exd6 20 Qxd6+ Kf7 21 Ne4 Qc6 22 Qe5 Rd8 0-1 Rozentalis–A.Sokolov, Berne 1992 – Black intends ...Bf5 and then ...Rxd3.
19...Kg7 20 Qe5+ Kf7
Not 20...Kg8?? 21 Nf6+.
21 Bd3
21 dxe7 Qa4+ wins easily for Black.
21...Bf5
Black even has a choice at this point: 21...Bg7 22 Qf4+ Kg8 23 Re1 Qf8 24 Qg5 exd6 25 Qd5+ Qf7 26 Nxd6 Qxd5 27 Re8+ Bf8 28 cxd5 c4 29 Bxc4 b5 30 Bb3 Kg7! (not 30...Bf5+?? 31 Nxf5 Rxe8 32 d6+) 31 Nxc8 Bc5 32 Re7+ Kh6 0-1 Rublevsky–Hauchard, Oakham 1992.
22 g4 Bxe4 23 Bxe4 e6 24 Re1 Qa4+ 25 Kd3 Rhe8 26 h4 0-1
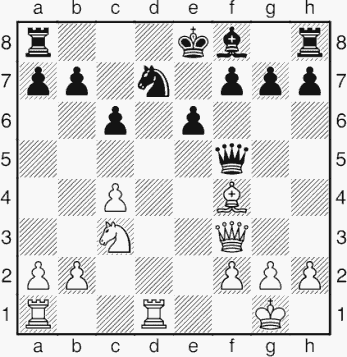
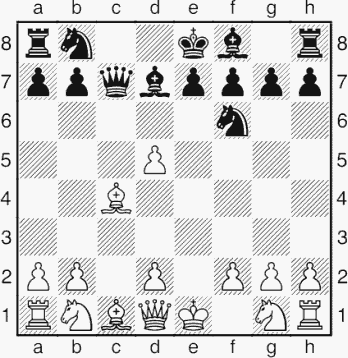
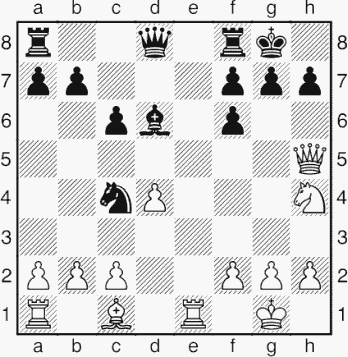
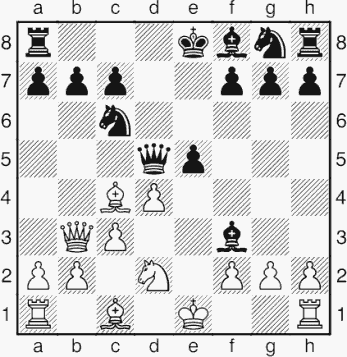
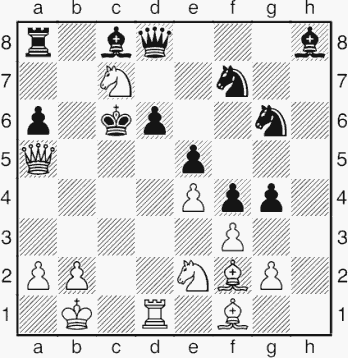
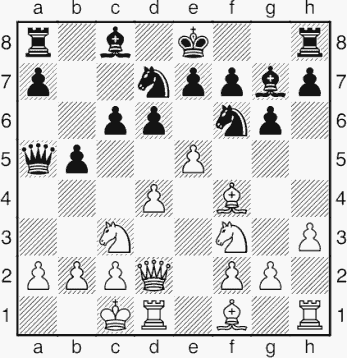
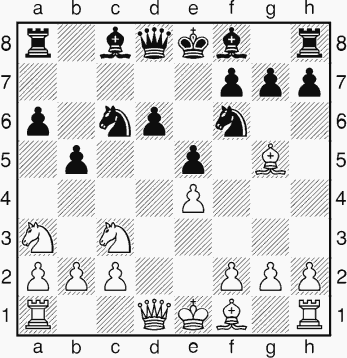
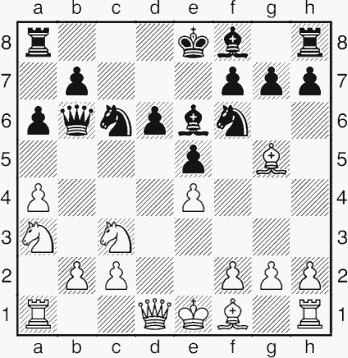
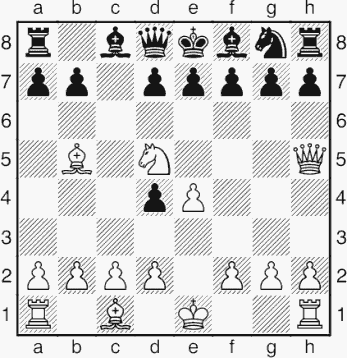
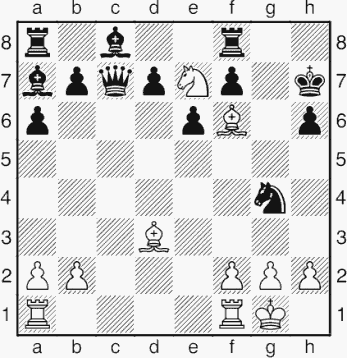
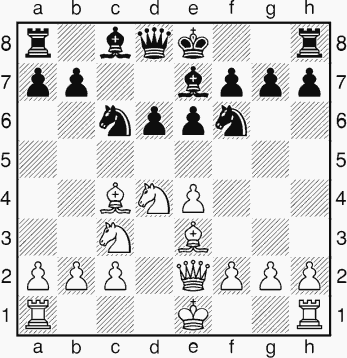
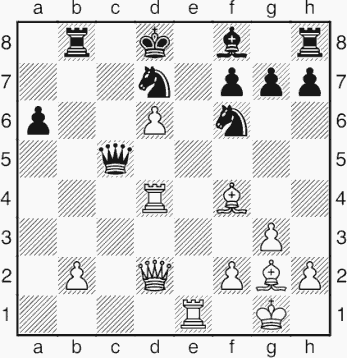
Topalov – Carlsen
Morelia/Linares 2008
1 e4 Nf6 2 e5 Nd5 3 d4 d6 4 Nf3 dxe5 5 Nxe5

5...c6
This has become the main line of the Alekhine in modern practice, and leads to positions a little like some from the Caro-Kann or Scandinavian. This move has made the Alekhine a “respectable” opening in the eyes of some players who previously felt it was rather dubious, with Nigel Short even using it, after roundly condemning the opening for years. 5...c6 came to the world’s attention after excellent pioneering work by Tony Miles.
5...g6 was the main line for much of the 1990s, but is a little less flexible, as Black may find it useful to play a set-up with ...e6 instead, and in this line the move ...c6 normally proves necessary in any case. 6 Bc4 c6 7 0-0 Bg7 8 Re1 0-0 9 Bb3 Be6 10 Nd2 Nd7 is a typical continuation. 6 c4 is also a good reply, when Black may not equalize after 6...Nb6 7 Nc3 Bg7 8 Be3 c5 9 dxc5. However, 5...g6 allows White no more than a small plus, and a player well versed in its subtleties should find it a reliable choice. A study of the games of Latvian GM Kengis will provide many ideas for how Black can generate counterplay.
6 Bd3
6 Bc4 Nd7 7 Nf3 and now 7...N7f6 intending ...Bg4 and ...e6 gives Black more comfortable development, and White fewer targets, than the older lines with ...g6 already played. 7...N7b6 8 Bb3 Bg4 is also quite viable; note that 9 h3 can be met by 9...Bh5, which would be impossible together with ...g6.
6 c4 is now comfortably met by 6...Nb4, threatening ...Qxd4.

In the Alekhine, Black must be open-minded and avoid playing by routine, such as automatically dropping the knight back to its normal square, b6.
6 Be2 has been preferred by some top-level players lately, but is rather cautious. 6...Bf5 7 g4 (7 0-0 Nd7 8 Nf3 e6 9 c4 N5f6 10 Nc3 and it is hard for either side to find targets in the opponent’s position) 7...Be6 8 c4 (8 f4 f6 9 Nd3 Bf7 10 0-0 Na6 gives White at least as many problems as Black) 8...Nb6 9 b3 f6 and White had to sacrifice a pawn in Kasparov–Short, Moscow rapidplay 2002.
6...Nd7 7 Nxd7
7 0-0 Nxe5 8 dxe5 Be6 9 Nd2 g6 10 Nf3 Bg7 11 h3 Nb4 12 Be4 Bc4 was quite acceptable for Black in Adams–Short, London 2008.
7 Nf3 N7f6 8 h3 prevents ...Bg4 but allows another standard idea: 8...Nb4 9 Bc4 (9 Be2 Bf5 10 Na3 e6 gives White little) 9...Bf5 10 Na3 e6 11 c3 Nbd5 12 Nc2 Be7 led to a draw in Adams–Carlsen, Moscow 2007, albeit only a blitz game.
7...Bxd7 8 0-0 g6 9 Nd2
9 Re1 Bg7 10 c3 0-0 11 Bg5 is another way to play the position, adopting a fairly active stance.
9...Bg7 10 Nf3 0-0 11 Re1?!
11 c3 is much better (when 11...Qc7 12 Re1 c5 is one possibility), as this prevents the little trick that Black now pulls off.
11...Bg4! 12 c3?! c5!

13 Be4?!
L.B.Hansen points out that Topalov should have bailed out by 13 dxc5 (best, even though it walks right into the teeth of Black’s idea) 13...Nxc3! 14 bxc3 Bxc3 15 Bh6! Bxe1 16 Bxf8 Kxf8 17 Be4!.
13...cxd4 14 cxd4 e6
Black now has a dream position: a clear plus as Black without having taken any major risks.
15 Qb3?! Bxf3 16 Bxf3 Bxd4 17 Bxd5 Qxd5 18 Qxd5 exd5 19 Rd1 Bg7 20 Kf1
After 20 Rxd5 Rfd8 21 Rxd8+ Rxd8 22 Be3 Bxb2 23 Rb1 b6! Black keeps an extra pawn.
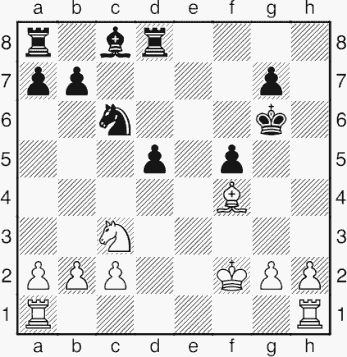
20...Rfd8 21 Bg5 Rd7 22 Rd2 h6 23 Be3 d4 24 Rd3 Rc8 25 Bd2 Rc2 26 Rb1 Re7 27 a4 f5 28 b3 Rec7 29 Be1 Kf7 30 Rd2 Rc1 31 Rxc1 Rxc1 32 Ke2 Rb1 33 Rd3 Ke6 34 h4 Kd5 35 Bd2 Ke4 36 Rg3 f4! 37 Rd3
37 Rxg6? allows 37...d3#.
37...Be5 38 f3+ Kd5 39 Be1 Bd6 40 Bd2 g5 41 hxg5 hxg5 42 Be1 g4! 43 fxg4 Ke4! 44 g5 0-1
There follows 44...Rxe1+! 45 Kxe1 Kxd3. This game showed how effective a surprising choice of opening variation can be. Even as a teenager, Magnus Carlsen was very shrewd in chess psychology.
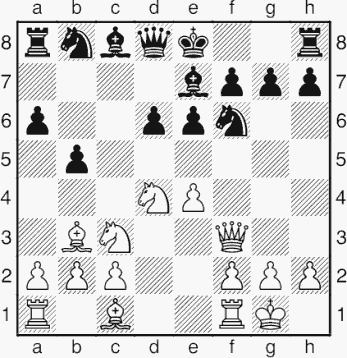
Dhar – Mohota
Calcutta 1996
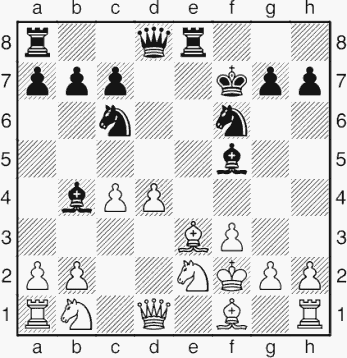
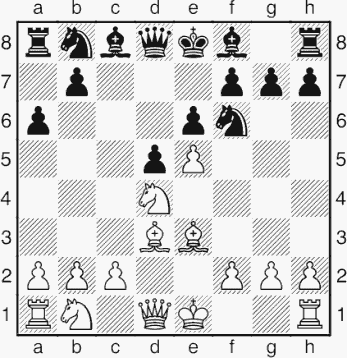
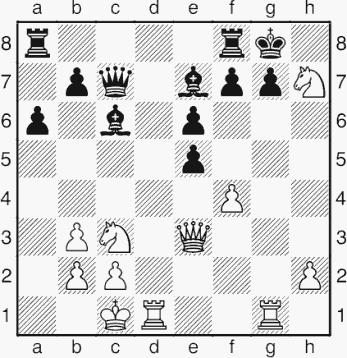
1 e4 Nf6 2 e5 Nd5 3 d4 d6 4 c4 Nb6 5 Nf3 Bg4 6 Be2 dxe5 7 Nxe5 Bxe2 8 Qxe2 Qxd4 9 0-0 N8d7 10 Nxd7 Nxd7?! (10...Qxd7 is better) 11 Nc3 c6 12 Rd1 Qe5 13 Qf3 e6 14 Bf4 Qf5
15 Nb5!
An excellent way to exploit Black’s backward development.
15...Rc8
15...cxb5 16 Rxd7 Bc5 (16...Kxd7 17 Qxb7+ Ke8 18 Qxa8+ removes most of Black’s queenside) 17 Rxb7 0-0 18 Rxb5 gives White a solid extra pawn.
16 Nc7+ Kd8

17 g4!
The point is to deny the black king a safe route to the kingside. “What route to the kingside?” you may exclaim. Well, if you have been calculating a sacrifice on d7, you will have seen one. After 17 Rxd7+ Kxd7, 18 g4! is just as good, but 18 Qd1+ Ke7 19 Qd6+ Kf6 leads White absolutely nowhere.
17...Qc5
17...Qg6 18 Rxd7+ Kxd7 19 Qd1+ Ke7 20 Qd6+ Kf6 21 Qd4+ Ke7 22 Bd6+ Kd7 23 Be5+ Ke7 24 Qd6#.
18 Rxd7+ Kxd7 19 Rd1+ Ke7 20 Qd3 1-0
The threat to win the black queen is quite enough, but White also has mating ideas with g5 followed by Qd7#.
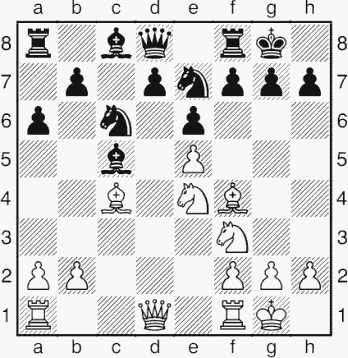
J. Fries Nielsen – C. Hansen
Esbjerg Vesterhavs 1981
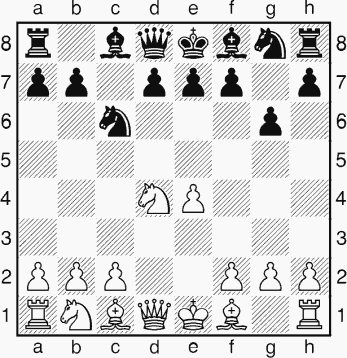
1 e4 Nf6 2 e5 Nd5 3 d4 d6 4 Bc4 Nb6 5 Bb3 Bf5 6 Nf3 e6 7 0-0 Be7 8 a4 dxe5 9 Nxe5 N6d7?
This move needlessly invites what turns out to be a very strong sacrifice on f7. 9...0-0 would be wholly appropriate.

10 Nxf7 Kxf7 11 Qf3
From here to the end of the game, no one, including powerful analysis engines, has come up with any significant improvements for Black.
11...Ke8 12 Qxb7 Nb6 13 a5 Qc8 14 Qf3 Nd5 15 c4 Rf8
If only Black could have castled...
16 cxd5 Bxb1 17 Qe2 Bf5 18 dxe6

The upshot is a position with three pawns for the piece, but what pawns! The e6-pawn especially is right in Black’s face, while the a5-pawn restricts Black’s queenside options.
18...Qb7 19 Ba4+ Kd8 20 d5 Qb4 21 Bd2 Qd4 22 Bc3 Qd3 23 Qe5 Qe4 24 Qxg7 Qg4 25 d6 cxd6 26 a6!
Clearing a5 for the bishop.
26...Qxg7 27 Ba5+ Kc8 28 Rac1+ Nc6 29 Rxc6+ Kb8 30 Bc7+ Kc8 31 Bxd6+ Kd8 and 1-0
In view of 32 Bc7+ Kc8 33 Be5+ Kd8 34 Rd1+ Bd6 35 Rdxd6+ Ke7 36 Rc7#. A beautiful game.
A very solid defence, with plenty of sharp variations for those looking for them. Compared to the French, Black does not block in his queen’s bishop, but the drawback is that, apart from supporting ...d5, the move ...c6 is not terribly useful. The Advance Variation (3 e5) has gained enormous popularity in recent decades, with 3...Bf5 (3...c5 also has enthusiastic adherents) first being met with the aggressive 4 Nc3, preparing 5 g4 and a pawn-storm, but more lately, flexible play such as 4 Be3 has proved highly venomous. The Panov Attack, 3 exd5 cxd5 4 c4, has many adherents amongst classically-inclined players. The main line of the Caro-Kann runs 3 Nc3 dxe4 4 Nxe4, when Black has a number of ways to counter White’s spatial plus: 4...Nf6, which counterattacks at the cost of structure; 4...Nd7 intending 5...Ngf6 and methodical exchanges; and 4...Bf5 5 Ng3 Bg6, aiming for “full-employment” of the black pieces.
The Caro-Kann has been a favourite of a number of world champions, most notably Karpov in recent decades, though Kasparov played it occasionally as a junior.
Caro-Kann with 5...exf6 (...Qe7+, ...Qb4+)
1 e4 c6 2 d4 d5 3 Nc3 dxe4 4 Nxe4 Nf6 5 Nxf6+ exf6 6 Bc4?! Qe7+!
This is a good equalizing idea.
7 Be3??
7 Qe2 Be6 8 Bxe6 Qxe6 9 Qxe6+ fxe6 leads to an extremely boring endgame where Black has nothing to fear, while 7 Be2 is obviously a concession. Thus White, having played the apparently aggressive move 6 Bc4, may be tempted into a fatal mistake. Of course, 7 Ne2?? Qb4+ is just as bad.
7...Qb4+
Black wins a piece for nothing.
I am aware of one grandmaster coming very close to losing a piece in this fashion (the same theme, but in a slightly different setting). It is not so easy to see the idea, since “normally” in the opening there would be some way to parry the check while defending the bishop, but with White’s queen’s knight no longer extant, there is no way to save the bishop.
Caro-Kann, loose pieces
Nilsson – Dahl Pedersen
Copenhagen Politiken Cup 1996
1 e4 c6 2 c4 d5 3 exd5 cxd5 4 cxd5 Nf6 5 Bb5+ Bd7 6 Bc4 Qc7
In this fairly innocent-looking position, White finds a self-destruct.
7 Qb3?? b5
Yes, that is a loose bishop on c1! Unfortunately there are no tricks to save White.
8 Na3
Other ways to drop a piece are 8 Bxb5 Qxc1+ and 8 d6 Qxc4.
8...bxc4 9 Nxc4 Nxd5 10 Ne2 Nc6 11 d4 e6 0-1
Caro-Kann, queen win
Nunn – Ki. Georgiev
Linares 1988
1 e4 c6 2 d4 d5 3 Nc3 dxe4 4 Nxe4 Nd7 5 Ng5

This is one of the main lines of the Caro-Kann, although it was practically unknown before the late 1980s. For quite a while the various knight sacrifices on e6 or f7 claimed victim after victim.
5...h6? 6 Ne6! Qa5+
6...fxe6 7 Qh5+ mates.
7 Bd2 Qb6 8 Bd3 fxe6??
This allows a not especially deep sequence that wins material – rather surprising given that both players are top-class grandmasters. Black should get on with his development, and accept that he is somewhat worse.
9 Qh5+ Kd8 10 Ba5
Although Georgiev rather unsportingly played on, he of course lost in the end. Perhaps he envisaged that by doing this he would stop the game being quoted around the world in chess magazines. He was unlucky: many magazines cited the game as ending at move 10!
Caro-Kann, checkmate in the Fantasy Variation
Tartakower – Anon.
Paris 1932
1 e4 c6 2 d4 d5 3 f3

This is the unusual Fantasy Variation – a rather under-rated system against the Caro-Kann. The move looks strange since it weakens the white kingside, but by keeping the central tension, White challenges Black to start forcing matters in the centre.
Black’s next few moves are very natural, but lead to disaster.
3...dxe4
This looks the most natural. Instead, 3...e6 4 Nc3 Nf6 5 e5 Nfd7 6 f4 c5 transposes to one of the main lines of the French Defence (1 e4 e6 2 d4 d5 3 Nc3 Nf6 4 e5 Nfd7 5 f4 c5).
4 fxe4 e5
A logical central thrust.
5 Nf3
Not 5 dxe5? Qh4+ when the white king must go walkies.
5...exd4?!
This is asking too much from the position. If White now had to recapture on d4, there would be no problem. However, White can play a strong gambit. Instead, 5...Be6 is normal, and quite OK for Black.
6 Bc4
There is now considerable pressure building up on f7, and the position is already very dangerous for Black, so it is easy to understand that with his next move he should try to catch up in development by getting a piece out with check. However, it turns out already to be too late for this approach.
6...Bb4+?
Black would have a chance of surviving with 6...Be7, but this is also far from easy for Black.
7 c3!
Now Black is really in trouble. Unfortunately for him, White’s lead in development is such that further tactics and sacrifices are possible in answer to Black’s ambitious bishop move.
7...dxc3 8 Bxf7+! Kxf7
8...Ke7 9 Qb3 cxb2+ 10 Qxb4+ Kxf7 allows White an enormous attack, as in Gallagher–Sathe, London 1985. Indeed, Gallagher has snared several victims in this line.
9 Qxd8 cxb2+ 10 Ke2 bxa1Q
Black regains the queen and so is a rook and knight up. However, his material plus is of no help since it is White to play and he now has a forced mate.
11 Ng5+ Kg6 12 Qe8+
In the later game Tatai–Mariotti, Reggio Emilia 1967/8, Black elected to resign at this point. Mariotti was probably left wishing that he had studied Tartakower’s games!
12...Kh6 13 Ne6+ g5 14 Bxg5# (1-0)
Next a typical and thematic example of play in one of the main lines of the Caro-Kann. Black’s manoeuvring is highly instructive.
Timman – Portisch
Antwerp Candidates (2) 1989
1 e4 c6 2 d4 d5 3 Nd2 dxe4 4 Nxe4 Bf5 5 Ng3 Bg6 6 h4 h6 7 Nf3 Nd7 8 h5 Bh7 9 Bd3 Bxd3 10 Qxd3 e6 11 Bf4
After 11 Bd2, 11...Qc7 comes to the same thing, but the transposition is not compulsory for Black.
11...Qa5+ 12 Bd2 Qc7
12...Bb4 is the latest fashion, encouraging White to advance his c-pawn, and so loosen his queenside.
13 0-0-0 Ngf6 14 Ne4 0-0-0 15 g3
There is nothing organically wrong with Black’s position, but he is short of space. His main task is to exchange off the right pieces to avoid a nagging disadvantage.
15...Nxe4 16 Qxe4 Be7 17 Kb1 Rhe8 18 Qe2 Bf8 19 Bc1 Bd6
19...e5 20 dxe5 Nxe5 21 Bf4 is very good for White.
20 Rhe1 Qa5
Black now causes White some inconvenience by attacking the h5-pawn.
21 Nd2 Nf6 22 g4
Now Black has gained more scope for his bishop.
22...Bc7 23 Nb3 Qd5 24 f3
24 c4 Qg2 25 Rg1 Qe4+ is quite satisfactory for Black.
24...Bg3!? 25 Rg1 Qd6
Black has established a firm grip on the dark squares, which White decides he must challenge vigorously.
26 Nd2! Qc7 27 Nc4 Nd5 28 Ne5 Bxe5 29 dxe5
The latest exchange has left Black with a knight versus White’s bishop. There are several reasons for supposing that Black should be OK here:
1) the pawn structure is symmetrical;
2) White’s bishop is slightly “bad” since the e5-pawn is fixed on a dark square;
3) Black is excellently poised to control the open d-file.
29...Qb6
Not just a cheap threat, since White has no particularly ideal way to prevent ...Nc3+.
30 Bd2 Rd7
Black hastens to get counterplay on the d-file. Note that given a little free time, White could make progress on the kingside by playing g5.
31 c4 Qa6
Black keeps his knight on its central post for a long as possible, given its nuisance value.
32 Rge1 Nb6 33 b3 Red8 34 Bb4 Rxd1+ 35 Rxd1 Rxd1+ 36 Qxd1

It is well known that queen and knight work together well, so the exchange of all the rooks is welcome for Black.
36...Nd7 37 Bd6
Timman plays it safe. 37 Qd6?! Qb6 38 Qe7 is extremely risky, and at any rate gives White no winning chances:
a) 38...Nxe5 39 Bd6 (39 Qf8+ Qd8 40 Qxg7 Qd1+ 41 Kb2 Nd3+ 42 Ka3 Qc1+ 43 Ka4 b6 wins for Black) 39...Qg1+ 40 Kb2 Qd4+ is a draw; White has no way to escape from the checks.
b) 38...Qg1+ is possible too: 39 Kb2 Qd4+ 40 Ka3 (40 Bc3 Qf2+ and 41...Qxf3) 40...c5.
37...Qa5 38 Qe2 b5 39 cxb5 Qxb5 40 Qe3
The exchange of queens certainly would not offer White winning chances, viz. 40 Qxb5 cxb5 41 Kc2 Kb7 42 Kd3 Kc6 43 Kd4.
40...Kb7 41 Qf4 Qd3+ 42 Kb2 Qe2+ 43 Ka3 Qa6+ ½-½
V. Ragozin – Boleslavsky
Sverdlovsk 1942
1 e4 c6 2 d4 d5 3 Nc3 dxe4 4 Nxe4 Nf6 5 Nxf6+ exf6 6 Bc4?! Bd6?!
As we saw in the traps, 6...Qe7+! is a good solid move here.
7 Qe2+ Be7 8 Nf3 0-0 9 0-0 Bd6 10 Re1 Bg4 11 Qe4!

White has managed to secure the initiative.
11...Bh5
11...f5 12 Qd3 Bxf3 13 Qxf3 Qh4 14 g3 (14 Bxf7+!? is an interesting sacrifice) 14...Qxd4 15 Bd3 g6 16 Bh6 Rd8 17 Rad1 gives White a strong attack for the sacrificed pawn.
12 Nh4 Nd7 13 Qf5 Nb6 14 Qxh5 Nxc4
15 Bh6!?
A wonderful attacking idea, but with an unclear assessment.
15...Qd7?
15...gxh6 is best; White has a variety of ways to regain the piece, but no clear win that I can detect: 16 Nf5 Bf4 17 h4; 16 b3 Nb6 17 Nf5 Bf4 18 Re4 Bg5 19 f4 wins back the piece; 16 Qxh6 can be answered by 16...Re8 or 16...Qa5.
16 Bxg7 Kxg7 17 Nf5+ Kh8 18 Re4 Bxh2+ 19 Kh1!
Instead 19 Kxh2 Nd6 enables Black to limp on.
1-0
19...Nd6 20 Nxd6 Qxd6 21 Rh4 forces mate.
Although apparently a quiet choice, the French is a controversial opening, popular with fighters who like to create board-wide chaos. Black accepts certain difficulties from the start: a spatial inferiority and often problems developing the c8-bishop.
Some find the French dull; others regard it as the sharpest and most cut-throat of openings. It is an opening of great diversity: the Exchange Variation (3 exd5 exd5) is indeed sleep-inducing, whereas the Winawer (3 Nc3 Bb4) can lead to extremely messy situations, for example the Poisoned Pawn (4 e5 c5 5 a3 Bxc3+ 6 bxc3 Ne7 7 Qg4 Qc7), not to be confused with the variation of the Sicilian Najdorf. After 3 Nc3, the quieter option is 3...Nf6, when 4 e5 Nfd7 5 f4 is the most popular choice if White wants to force the pace, while 4 Bg5 is more traditional, when 4...Be7 is the solid Classical and 4...Bb4 the counterattacking McCutcheon.
White’s other options on move three are:
The Tarrasch (3 Nd2) gives Black a choice between the simplifying 3...c5, the sharp 3...Nf6, and a host of minor options besides.
In the Advance Variation (3 e5, with 3...c5 4 c3 normally to follow) White will generally try to attack on the kingside, while looking for ways to frustrate Black’s queenside counterplay.
French, trapped pieces
I. Ivanov – Gausel
Gausdal 1993/4
1 e4 e6 2 d4 d5 3 e5 c5 4 c3 Nc6 5 Nf3 Bd7 6 a3 c4 7 Bf4 Na5 8 Nbd2 Ne7 9 Be2 Nc8 10 0-0 Nb6 11 Re1 Be7
It looks as though Black has just played a straightforward developing move, but there was a darker intention...
12 a4??
Fiddling while the kingside pieces burn.
12...g5 0-1
If the bishop moves, then 13...g4 wins the f3-knight.
Throughout this book you will see many disasters occurring on the f7-square. Here is another...
French Tarrasch, Bxf7+
Keres – Botvinnik
USSR Ch (Moscow) 1955
1 e4 e6 2 d4 d5 3 Nd2 Nc6 4 c3 e5 5 exd5 Qxd5 6 Ngf3 Bg4 7 Bc4 Bxf3 8 Qb3
Black is already in some trouble here.
8...Na5? 9 Qa4+ Qd7 10 Bxf7+!
White wins a pawn and keeps a great position. Black has no chance of saving the game.
10...Kd8 11 Qxd7+ Kxd7 12 Nxf3 exd4 13 Nxd4 c5 14 Nf3 Ke7 15 Bd5 Nf6 16 Bg5 h6 17 Bxf6+ Kxf6 18 0-0-0 Bd6 19 g3 Rhe8 20 Nd2 Bf8 21 Ne4+ Kf5 22 f3 Red8 23 h4 Nc6 24 h5 Be7 25 Rhe1 Ne5 26 Nf2 g5 27 hxg6 1-0
In view of the space disadvantage Black suffers in the French and the fact that White tends to establish a pawn on e5, Black must be very wary of castling kingside too early, as this may present White with a ready-made attack. Here is an extreme case, where White lands the Bxh7+ sacrifice immediately.
French, early ...0-0? met by Bxh7+!
1 e4 e6 2 d4 d5 3 Nc3 Nf6 4 e5 Nfd7 5 Nf3 c5 6 dxc5 Nc6 7 Bf4 Bxc5 8 Bd3
This is a fairly normal-looking position from the French Defence, but if Black now innocently castles, White can seize total control of the game.
8...0-0? 9 Bxh7+!
This is a standard sacrificial idea that we encounter many times throughout the book. As an aside, spotting when “stock” sacrifices might work is still an area where strong human players can sometimes outdo computers.
For further details on the Bxh7+ sacrifice, see the chapter “Attack and Defence”, later in this book.
9...Kxh7 10 Ng5+ Kg6
10...Kg8 11 Qh5 wins trivially.
11 Qd3+
11 Qg4 is the other routine follow-up to the sacrifice, but is far less convincing in this instance in view of 11...Ndxe5. Note that instead 11...f5? 12 Qg3 transposes to the analysis of 12 Qg3 in the note to White’s 12th move below, in which Black avoids serious trouble by the skin of his teeth.
11...f5
Otherwise mate follows instantly, with the white queen penetrating to the h7-square.

12 Nxe6
12 Qg3 is OK, but 12...Bxf2+!? 13 Kxf2 Ndxe5 14 Nxe6+ Ng4+ (Black’s idea in sacrificing the bishop) 15 Qxg4+ fxg4 16 Nxd8 Rxf4+ leads, miraculously, to an unclear ending.
12...Ndxe5
Other moves allow White a material advantage and an on-going attack.
13 Qg3+
13 Nxf8+ Qxf8 is messy.
13...Ng4 14 Nxd8 Bxf2+
Black has found another miracle save, but remains worse.
15 Qxf2 Nxf2 16 Kxf2 Rxd8
White has a large advantage here. Material is level, but White’s pieces are far better placed and will have little trouble attacking Black’s weak pawns and exposed king.
Tiulin – Riabov
Correspondence 1929–30
1 e4 e6 2 d4 d5 3 Nc3 Bb4 4 e5 c5 5 Bd2 Nc6 6 Nb5 Bxd2+ 7 Qxd2 Nxd4 8 Nd6+ Kf8 9 0-0-0

9...f6
9...Nh6 is safer.
10 f4 Nc6 11 Nf3 Nh6 12 Qc3 b6 13 Bb5 Bd7 14 Rhe1 f5 15 Bxc6 Bxc6 16 b4!
A startling way to make inroads into Black’s sensitive dark squares.
16...Bd7 17 bxc5 Qc7
In this position it seems that Black has everything in order: he will recapture on c5 and begin to take over the initiative, still a pawn up. As so often is the case, a sacrifice radically alters the picture.
18 Rxd5!! exd5
If Black does not accept, he is worse.
19 e6
A critical moment has arisen, with a major choice for Black. However, it seems that there is no way out of his problems.
19...Re8
Or:
a) 19...Be8 20 e7+ Kg8 21 Qe5 Nf7 (21...Qxc5 22 Ng5) 22 Nxf7 Qxe5 23 N7xe5 bxc5 and despite his extra exchange Black is still in some trouble due to his lack of development, e.g. 24 c4 d4 (24...dxc4 25 Rd1 with Rd8 to follow) 25 Nd3 Rc8 26 Re5.
b) 19...Bxe6 20 Rxe6 Nf7 (20...Ng4 21 h3 Nf6? 22 Rxf6+ gxf6 23 Qxf6+ Kg8 24 Qe6+ Kf8 25 Ne5 forces mate) 21 Qe3 threatens mate in two by 22 Re8+; Black has no satisfactory continuation, e.g. 21...Nxd6 (21...Qd7 22 c6 Qd8 23 Nxf7 Kxf7 24 Ng5+ Kf8 25 Qe5 is overwhelming) 22 cxd6 Qc5 23 Nd4 threatening 24 Rf6+! gxf6 25 Qe7+ Kg8 26 Nxf5.
c) 19...Ng4 20 exd7 Qxd7 21 Nd4 and the white knights walk all over the black position.
20 e7+! Kg8 21 Qe5

21...Qc6
21...Qxc5 22 Nxe8 Bxe8 23 Ng5 (threatening 24 Qe6+) 23...Qc6? 24 Ne6 costs Black his king or queen.
22 Nxe8 Bxe8 23 Nd4
23 Ng5 Ng4 is less clear.
23...Qf6
23...Qxc5 24 Nxf5 and g7 collapses.
24 c6
Now White’s pawns decide.
24...Qxe5 25 Rxe5 Kf7 26 c7 Bd7 27 Nb5 1-0
27...Bxb5 28 e8Q+ Rxe8 29 Rxe8 Bd7 30 c8Q Bxc8 31 Rxc8 is an easy win for White.
This is closely related to the Pirc Defence, with Black sharply counterattacking the white pawn centre, but Black hopes to benefit from delaying ...Nf6 (the knight is not exposed and there is more pressure on d4). In return, White has more flexibility, and can play c4. Moreover, there are lines in which White attacks on the kingside (including the moves Be3, Qd2, and Bh6 when the knight moves from g8) in which the position of the bishop on g7 actually loses Black time. Thus some specialists prefer move-orders with 2...d6, sometimes followed by 3...c6, with transpositions to the Pirc always in mind.
White can play most of the same systems that he can against the Pirc, but has a few extra options in view of the fact that Black has not attacked e4. Most notably, White can play 3 c4, reaching a position more akin to a queen’s pawn opening; indeed Black can transpose to a King’s Indian with a quick ...Nf6 if he so desires.
Modern 4 Bc4 Nd7??
1 e4 g6 2 d4 Bg7 3 Nf3 d6 4 Bc4

White develops actively, and sets a little trap for the unwary.
4...Nd7??
This move is rather passive, but it is a little surprising that it can be so catastrophic! Dave Norwood admits to having played this move once, immediately realizing it lost on the spot, and then suffering a nerve-racking wait while the opponent contemplated his reply. Fortunately for Dave, his opponent missed the devastating...
5 Bxf7+! Kxf7
5...Kf8, though abject, would be a lesser evil.
6 Ng5+ Ke8 7 Ne6 wins the black queen.
The knight on d7 commits two crimes: it removes Black’s protection of the e6-square, and it robs the queen of her flight square.
Modern/Caro-Kann, piece win
Unzicker – Telljohann
Münster 1994
1 e4 g6 2 d4 Bg7 3 Nc3 c6 4 Nf3 d5
This position can also arise via the Caro-Kann: 1 e4 c6 2 d4 d5 3 Nc3 g6 4 Nf3 Bg7.
5 h3 Nf6 6 Bd3 dxe4 7 Nxe4 Nxe4 8 Bxe4 Nd7 9 0-0 0-0
This is a very ordinary position, where White enjoys a slight edge due to his greater space. Surely no grandmaster could lose it in two moves?!
10 Be3
Not a great move, since the bishop is not needed here, but hardly catastrophic.
10...Qc7
Now for something horrible...
11 Qd2?? f5 0-1
Black wins a piece since 12 Bd3 f4 traps the e3-bishop.
Modern, disaster on c7
Burgess – S. James
Newport 1986
1 d4 g6 2 e4 Bg7 3 c4 d6 4 Nc3 Nc6 5 Be3 e5 6 Nge2 f5 7 exf5 gxf5 8 f4 exd4 9 Nxd4

In positions like this, it is quite easy for Black to be careless, and find both of White’s knights attacking the c7-square, with no adequate means of defending it.
9...Qe7??
The point of this move is to attack the e3-bishop, but unfortunately White can defend it while simultaneously gaining time on the black queen.
10 Nd5 Qf7 11 Nb5 1-0
The c7-pawn is dropping off, together with Black’s position. My opponent, who had played international chess for Wales, saw little point in playing on two pawns down with his king on the run.
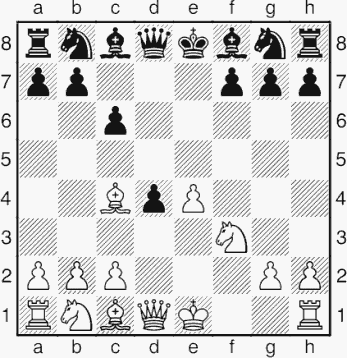
Modern Defence, Austrian Attack
1 e4 g6 2 d4 d6 3 Nc3 c6 4 Be3 Bg7 5 f4 Qb6 6 Rb1 e5 7 Nf3
Here’s a trap that isn’t totally clear. Black’s next move is risky, but the lines are messy.
7...Bg4 8 fxe5 dxe5 9 Bc4 exd4
9...Bf6 is an odd move, but with its logic, hindering Ng5 ideas.
10 Bxf7+ Kf8
10...Kxf7 11 Ng5+ Ke8 12 Qxg4 Ne7 is quite nice for White, but not game over.
11 Bf2
This position is not especially clear but White has very dangerous attacking chances, e.g.:
11...Qc7
11...Qa5 12 Bxg8 dxc3 13 b4 is quite good for White.
12 Bxg8 dxc3 13 Bb3 cxb2 14 0-0
Black’s king will suffer a nomadic existence.
Wikman – Uimonen
Correspondence
1 e4 d6 2 d4 g6
This is one of a number of ways for Black to play the Pirc/Modern, each with their set of pros and cons.
3 f4 Bg7 4 Nf3 Nf6 5 e5
White decides to try to take advantage of Black’s delay in developing his king’s knight. Instead 5 Nc3 would be a normal Pirc, Austrian Attack.
5...Nfd7
5...Nd5 6 c4 Nb6 is a transposition to a variation of the Alekhine Defence, Four Pawns Attack.
6 Bc4

White develops his bishop to an active square, and incidentally threatens to start a few tactics. However, Black is able to walk into the “trap”.
6...c5
Risky, but logical. White’s centre will crumble. 6...Nb6 is again reminiscent of the Alekhine Defence, and should be OK for Black.
7 Bxf7+!?
7 Ng5 0-0 (7...e6 8 d5 Nb6 9 Bb5+) 8 Nxf7 Rxf7 9 e6 Nb6 10 exf7+ Kf8 gives Black some compensation for the exchange, while 7 exd6 0-0!? is quite attractive for Black.
7...Kxf7 8 e6+ Kxe6?
The king should instead retreat, when things would be not at all clear: 8...Kg8 9 exd7 Nxd7; 8...Ke8 9 exd7+ Nxd7 or 8...Kf8 9 exd7 and then either 9...Bxd7 or 9...Nxd7.
9 Ng5+ Kf6
9...Kd5?? 10 Qf3+ Kc4 11 Qb3+ Kxd4 12 Be3#; 9...Kf5? 10 Nc3 intends to use both knights to weave a mating net around the black king, e.g. 10...e6 11 Nce4 h5 12 Qd3 forces mate.
10 dxc5
10...Nxc5
Otherwise:
a) 10...h6? 11 Qd5! forces mate in remarkably short order.
b) 10...Qa5+? 11 Bd2 wins since the queen has no decent square.
c) 10...dxc5? 11 Qd5.
d) 10...Qg8? also loses: 11 Qd4+ Kf5 (11...Ne5 12 0-0 Bf5 13 cxd6! and Black’s position crumbles) 12 g4+ Kxg4 13 Qd3 with the devastating threat of Qh3#.
e) 10...Bf8!? 11 Qd4+ (11 Qd5 is less clear) 11...e5 12 Qd5 Qe8 13 0-0 wins: 13...Nxc5 (13...Kg7 14 Ne6+ Kg8 15 Nc7+ Qf7 16 Qxf7+ Kxf7 17 fxe5+ forces a decisive gain of material) 14 fxe5++ Kg7 and now 15 exd6 gives White overwhelming threats, and is better than 15 Rf7+ Kg8 16 Re7+ Be6.
11 Qd4+ e5 12 fxe5+ dxe5 13 0-0+ Bf5 14 Qxc5 h6 15 Ne4+ Ke6 16 Nbc3 Bxe4 17 Nxe4 Na6
17...Qd4+ 18 Qxd4 exd4 19 Nc5+ is hopeless for Black.
18 Qc4+ Qd5 19 Qe2 Qc6 20 b3
Planning 21 Ba3, with 22 Qg4+ next.
20...b5 21 c3 Qb6+ 22 Be3 Qc6 23 Qg4+ Ke7 24 Rad1 Rhd8 25 Qh4+ Ke8 26 Rxd8+ Rxd8 27 Bxh6 Nc5 28 Bxg7 Ne6 29 Qf6 1-0
Semkov – Kr. Georgiev
Plovdiv 1988
1 d4 g6 2 c4 d6 3 Nc3 Bg7 4 e4 e5 5 Nge2 Nc6 6 Be3 Nh6 7 f3 f5 8 d5 Ne7 9 Qd2 Nf7 10 0-0-0 f4 11 Bf2 g5 12 h3 h5 13 Kb1 Ng6 14 c5 g4?

With White’s king safely tucked away on the queenside, this type of play by Black is far less dangerous than if the king is on g1.
15 hxg4 hxg4 16 Rxh8+ Bxh8 17 Nb5!
Black cannot defend his queenside.
17...a6 18 Qa5! Kd7
The king is not the best piece to use to try to hold a position together!
19 c6+ bxc6 20 dxc6+ Kxc6 21 Nxc7!
21...Kd7 22 Bb6 Bb7 23 Rc1 Qb8 24 Nxa8 Qxa8 25 Rc7+ Ke6 26 Qa4 Nf8 27 Qb3+ d5 28 Bc5 Nd7 29 Rxb7 1-0
An absolute slaughter!
A very rare choice, practised by a few free spirits. 2 d4 d5 can follow, when 3 Nc3 is considered promising for White, but there is plenty of unexplored territory here, and many players prefer the simple 2 Nf3, when it is hard to find a better reply than 2...e5.
Nimzowitsch Defence, underpromotion
Runau – Schmidt
W. Germany 1972
1 e4 Nc6 2 d4 d5 3 exd5 Qxd5 4 Nf3 Bg4 5 Be2 0-0-0 6 c4 Qh5 7 d5!?
Now Black embarks on a disastrous pawn-grabbing mission.
7...Bxf3 8 Bxf3 Qe5+
8...Qh4 might be OK.
9 Be3 Qxb2 10 0-0
10...Qxa1?
10...Ne5 is the last chance for Black to stay in the game; White’s compensation is highly dangerous, but at least it isn’t a forced win.
11 dxc6!!
A brilliant idea; White’s bishops, rook and far-advanced pawn will hunt down the black king.
11...Rxd1
11...b6 12 Qa4 wins without a fight.
12 cxb7+ Kb8 13 Rxd1 c6 14 Bxc6 Kc7
Or 14...Qb2 15 Bf4+ e5 16 Bxe5+ Qxe5 17 Rd8+ Kc7 18 b8Q+.
15 Rd7+ Kxc6 16 b8N# (1-0)
Instead 16 b8Q? Kxd7 is only a draw.

An astonishing final position!
Black will continue his development with a king’s fianchetto, putting piece pressure on White’s centre before committing himself to a pawn thrust (normally ...c5 or ...e5). White has simple schemes such as the Classical (3 Nc3 g6 4 Nf3 Bg7 5 Be2) in which Black must try to avoid a slight disadvantage, and aggressive systems such as the Austrian Attack, 3 Nc3 g6 4 f4 Bg7 5 Nf3, with the aim of swamping Black, but allowing far more counterplay. More “surgical” attacking lines have been popular recently, such as 3 Nc3 g6 4 Be3, often followed by Qd2 and Bh6.
Note that two lines in which Black does not fianchetto have enjoyed some popularity: the Czech System 3 Nc3 c6, intending 4...Qa5, with pressure on e4; and 3 Nc3 e5, offering White simplifications, or a transposition to the Philidor Defence with 4 Nf3 (previously normally reached via 1 e4 e5 2 Nf3 d6 3 d4 Nf6 4 Nc3; in this sequence 4 dxe5 is a problem).
A standard trick in the Pirc
Stangl – Azmaiparashvili
Tilburg 1994
1 d4 d6 2 Nf3 g6 3 e4 Bg7 4 Nc3 Nf6 5 Bf4 c6 6 Qd2 Qa5 7 h3 Nbd7 8 0-0-0 b5
8...0-0 could well be suggested here, but GM Azmaiparashvili evidently wanted to avoid castling into a kingside attack. Out of the frying pan...
9 e5
Black is already in trouble here, but his next move allows a very attractive, though standard idea.
9...b4?
9...dxe5 10 dxe5 Nh5 11 Bh2 threatens 12 g4.
10 exf6! bxc3 11 Qxc3!
11 fxg7 cxd2+ 12 Bxd2 Qxd2+ lets Black off the hook.
11...Qf5
11...Qxc3 12 fxg7! is the key point. Azmaiparashvili is regarded as a leading expert on the Pirc/Modern Defence, so he must have felt rather sick about allowing this.
12 fxg7 Qxf4+ 13 Kb1 Rg8 14 Qxc6 Rb8 15 Bb5 Kd8 16 Rd3 Qf5 17 Rc3 Qxb5 18 Qc7+ 1-0

Also known as the Centre Counter. After 2 exd5 Qxd5, White gains time on the black queen by 3 Nc3 and can try to put his development advantage to use, while Black will seek to demonstrate his queen’s nuisance value after either 3...Qa5 or 3...Qd6. Alternatively, 2 exd5 Nf6 is a fashionable line. Then 3 d4 is the normal move, when Black regains the pawn and a battle between White’s mobile pawns and Black’s nimble minor pieces will ensue. In recent years, Black has often been using 2...Nf6 as a gambit, meeting 3 c4 with 3...e6, the Icelandic Gambit (instead of the definitely sound 3...c6, which White normally declines), and 3 d4 with the outrageous and ambitious 3...Bg4 (later we dissect the move-order 3 Nf3, which seeks to avoid this troublesome line).
Scandinavian, Caro-Kann theme
de Firmian – Owen
Las Vegas 1995
1 e4 d5 2 exd5 Qxd5 3 Nc3 Qa5 4 d4 Nf6 5 Nf3 Bf5 6 Bd2 c6 7 Ne4 Qc7 8 Nxf6+ gxf6 9 g3 e6 10 Bg2 Nd7 11 0-0 Be4 12 Re1

12...f5?
Black decides to maintain his bishop on e4, but there is a tactical flaw. The idea seen in this game is also relevant to the 3 Nc3 dxe4 4 Nxe4 Nf6 5 Nxf6+ gxf6 line of the Caro-Kann.
13 Ng5! Bxg2? 14 Rxe6+! Be7
14...fxe6 15 Qh5+ Kd8 16 Nxe6+ wins the queen.
15 Qh5 Rf8 16 Kxg2
16 Rae1 is also very strong.
16...Nf6 17 Rxf6 Bxf6 18 Nxh7 0-0-0 19 Nxf8 1-0
19...Rxf8 20 Qxf5+ picks up the bishop.
Dimitrov – Rivera
Lalin 1994
1 e4 d5 2 exd5 Nf6 3 d4 Bg4
This is an interesting gambit which Rivera had analysed with the Portuguese players Damaso and Galego.
4 f3
Otherwise Black is comfortable.
4...Bf5 5 c4 e6 6 dxe6
6 Qb3 exd5 7 Qxb7 Nbd7 looks like reasonable compensation for Black.

6...Nc6 7 exf7+?!
This move is a bit too greedy and opens lines for Black.
7...Kxf7 8 Be3 Bb4+ 9 Kf2
One attractive possibility is 9 Nc3 Re8 10 Kf2 Rxe3 11 Kxe3 Nxd4 (11...Bc2! is even better) 12 Qxd4 Qe7+ 13 Kf4?? (White must play 13 Kd2) 13...Nh5+ 14 Kxf5 Qe6+ 15 Kg5 Be7+ 16 Kxh5 Qg6#.
9...Re8 10 Ne2
For 10 Nc3 see the previous note.
10...Rxe3!! 11 Kxe3 Qe7+ 12 Kf2 Re8 13 Qc1 Nxd4!! 14 Nxd4
14 Nbc3 is wiped out by 14...Bc5!.
14...Be1+
Although a highly eye-catching move, this is one slight blot on an otherwise outstanding attacking performance. Instead 14...Qe5 wins on the spot:
a) 15 g3 Bh3 forces mate.
b) 15 Ne2 Qc5+ 16 Kg3 Be1+ 17 Qxe1 Ne4+ 18 fxe4 Qe3+ 19 Kh4 Rxe4+ 20 g4 Rxg4+ 21 Kh5 Qg5#.
c) 15 Be2 Qxd4+ 16 Kf1 Ng4 forces mate: 17 fxg4 Bc5 18 Qe1 Qf4+.
d) 15 Nb3 Bc5+ 16 Nxc5 Qd4+ mates.
e) 15 Nxf5 Bc5+ wins trivially.
f) 15 g4 Nxg4+ forces mate.
g) 15 h3 Qxd4+ 16 Kg3 Bd6+ 17 f4 Re3+ with mate to follow.
15 Kg1 Qc5! 16 Qd1 Bc2!! 0-1
17 Na3 Bxd1 18 Rxd1 would allow White to limp on, but he evidently didn’t feel like it.

This is by far the most popular single chess opening. To many players, the Sicilian is a way of life; they would not consider playing anything else after 1 e4.
Black avoids symmetrical positions in an attempt to generate counterchances, while preparing to take White’s pawn if it comes to d4, and so ensuring that White will not dominate the centre completely.
White’s most critical response is to play 2 Nf3 followed by 3 d4. White will then argue that his advantage in development outweighs Black’s strategic advantage of having more pawns on the central files.
Although in top-level chess, the main line (2 Nf3 followed by 3 d4) occurs in the majority of games, at club level, White very often prefers a simpler system against the Sicilian. There are many possible reasons for this, most importantly that it is so difficult to keep up with the ever-changing theory of the main lines; besides many players feel that it is psychologically annoying for Black not to get a chance to play his favourite Najdorf, Dragon, or whatever. Also, some of these Anti-Sicilian systems are not at all bad.
The c3 Sicilian (2 c3) is an attempt to set up a big pawn centre. It is a popular choice at all levels of play. White’s intended follow-up is 3 d4, when White will be able to recapture with the c-pawn if Black exchanges pawns on d4, thus denying Black his characteristic central pawn majority.
Black can exploit the cumbersome nature of the move by immediately attacking the e4-pawn, with 2...Nf6 or 2...d5, and indeed these are the most popular replies. The c3 Sicilian gives Black plenty of scope for early disasters if he is too ambitious, but in the main lines Black seems able to deny White the slight edge he is seeking.
2 Nc3 traditionally implied that White intended the Closed Sicilian (3 g3 and a slow kingside build-up) or the Grand Prix Attack (when 3 f4, Nf3 and Bc4 or Bb5 follows).
However, in recent years, White has added 3 Nf3 and d4, reaching an Open Sicilian, to his arsenal, so Black’s choice of 2nd move must take all these possibilities into account. For instance, Najdorf players’ only option is 2...d6, whereupon the Grand Prix Attack option has a good deal more venom (compared to 2 Nc3 Nc6 3 f4 g6 4 Nf3 Bg7, when both 5 Bb5 Nd4! and 5 Bc4 e6 6 f5 Nge7! are unconvincing for White). Black can also play 2 Nc3 Nc6 3 Nf3 e5, with a different type of game entirely, while 2 Nc3 Nc6 3 Nf3 Nf6 4 Bb5 is a way to avoid a Sveshnikov.
The Morra Gambit (2 d4 cxd4 3 c3) is a club-players’ favourite. It is lively and speculative. There are myriad pitfalls if Black is unprepared, but it is not too dangerous otherwise.
The Moscow (2 Nf3 d6 3 Bb5+) and Rossolimo (2 Nf3 Nc6 3 Bb5) are logical systems that have gained in popularity as White has become weary of facing the main lines, such as the Najdorf and especially the Sveshnikov. Imaginative play by either player can breathe fire into both these Bb5 lines.
The antidote to 2 f4 is 2...d5 3 exd5 Nf6!. The Wing Gambit (2 b4) is a bit too reckless; Black should take the pawn. However, 2 a3 has gained some attention as a way to prepare this, while 2 Na3 is the latest anti-Sicilian.
The Kan (2...e6, 4...a6) gives Black interesting possibilities. He maintains total flexibility, but as yet puts no pressure on the centre, so White may develop as he pleases. 5 Bd3 is a good answer, with c4 and Nc3 to follow in most cases, but the straightforward 5 Nc3 is very popular too.
The Kalashnikov (2...Nc6, 4...e5 5 Nb5 d6) weakens d5, and even lets White nail down the square with 6 c4. Black has counterplay with his pieces, and the pawn-breaks ...f5 and ...b5.
The Pelikan (2...Nc6, 4...Nf6 5 Nc3 e5 6 Ndb5 d6) and its main line, the Sveshnikov (7 Bg5 a6 8 Na3 b5), was shocking to previous generations, but is nowadays considered very solid.
It is one of the most important openings of all in the new millennium.
The Taimanov (2...e6, 4...Nc6) can transpose to the Scheveningen (having avoided the Keres Attack) after a subsequent ...d6 and ...Nf6, while Black can also leave the pawn on d7 and seek piece play. White can reply 5 Nb5 d6 6 c4, with a variety of Maroczy Bind, but 5 Nc3 is most common.
We now move on to one of the most important Sicilian positions, from which some of the absolute main lines arise. It occurs after the moves 2...d6 3 d4 cxd4 4 Nxd4 Nf6 5 Nc3.

Now 5...g6 is the Dragon, 5...a6 is the Najdorf, 5...e6 is the Scheveningen, and 5...Nc6 (the Classical) 6 Bg5 is the Richter-Rauzer.
The Dragon (2...d6, 4...Nf6 5 Nc3 g6) is one of the most cut-throat lines, with play frequently degenerating into a race for the opponent’s king. Specialist knowledge is paramount.
The Najdorf (2...d6, 4...Nf6 5 Nc3 a6, preparing 6...e5, which White often discourages with 6 Bc4 or 6 Bg5) is one of the best-known opening lines, and a favourite with many of the top players.

It is entirely uncompromising, and frequently leads to chaotic complications. The notorious Poisoned Pawn arises after 6 Bg5 e6 7 f4 Qb6, with current theory suggesting that the b2-pawn is not too heavily laced with arsenic, though it is suicide to enter this line without specialist knowledge. The main line nowadays is 6 Be3 with f3, leading to the English Attack.
The Richter-Rauzer (2...Nc6, 4...Nf6 5 Nc3 d6 6 Bg5) was a hot favourite with many of the top players of the 1990s, who played it enthusiastically with either colour, but it occurs less often now. It is less chaotic than the Najdorf, but just as uncompromising.
The Scheveningen (2...d6, 4...Nf6 5 Nc3 e6) was for many years a popular work-horse of tournament players.

However, the Keres Attack (6 g4!) has caused many players to adjust their move-order, playing the Najdorf, not fearing the line 6 Bg5, and returning to a Scheveningen after 6 Be2 e6 or 6 Be3 e6 (rather than the true Najdorf, with 6...e5).
The Sozin Attack (2...Nc6, 4...Nf6 5 Nc3 d6 6 Bc4), a Fischer favourite, is an extremely direct attacking line. White is looking to land a quick sacrifice, typically on e6, though in an off-shoot called the Velimirović Attack, White often sacrifices a knight on f5.
Sicilian Dragon, 6...Ng4??
1 e4 c5 2 Nf3 d6 3 d4 cxd4 4 Nxd4 Nf6 5 Nc3 g6 6 Be3

This is a normal position in the Sicilian Dragon.
6...Ng4??
It is natural to molest the important e3-bishop, but the move just happens to be disastrous.
7 Bb5+ Bd7
7...Nc6 8 Nxc6 bxc6 9 Bxc6+ and White wins material, as he does in the event of 7...Nd7 8 Qxg4.
8 Qxg4
White has won a piece in broad daylight.
Sicilian Wing Gambit
Shirazi – Peters
USA Ch (Berkeley) 1984
1 e4 c5 2 b4
Although one of the all-time greats, Paul Keres, tried ideas related to this gambit a few times in his youth, few modern masters would touch it, but it is better than this “game” suggests!
2...cxb4 3 a3 d5
A logical reply to White’s dodgy gambit, denying White the central dominance he is hoping for.
4 exd5 Qxd5

Now, in a moderately well-known position, White falls into a trap of his own making.
5 axb4?? Qe5+ 0-1
Even the resourceful Shirazi cannot conjure up any tricks if he starts without a whole rook!
Morra Gambit 6...Nf6
1 e4 c5 2 d4 cxd4 3 c3 dxc3 4 Nxc3

This is the basic position of the Morra Gambit. It is a dangerous system, full of traps for Black, though objectively speaking Black has some excellent defences, if he knows what to do.
4...Nc6 5 Nf3 d6 6 Bc4 Nf6?!
This move is the most natural on the board, but it is highly suspect, and leaves Black struggling to survive.
7 e5! Nxe5??
7...Nd7 is probably best, while 7...Ng4 8 e6 is not totally clearly good for White either.
8 Nxe5 dxe5?
Black is going down in any case, with just two pawns for a piece, but this move loses the queen to a simple piece of deflection.
9 Bxf7+ Kxf7 10 Qxd8
White is a queen to the good.
Sicilian, trapped pieces
Pessi – Helmer
Odorheiu Secuiesc 1993
1 e4 g6 2 Nc3 Bg7 3 f4 c5
The game has now transposed from a Modern to a line of the Sicilian Defence – the Grand Prix Attack.
4 Nf3 Nc6 5 Bb5 d6 6 Bxc6+ bxc6 7 d3 Rb8 8 0-0 Nh6 9 Qe1 0-0 10 f5
White is going for a crude kingside hack.
10...e6??
10...gxf5 might be playable, while 10...Kh8 11 Qh4 Ng8 12 Ng5 Nh6 isn’t too clear.
11 f6! 1-0
Black loses a piece, since 11...Qxf6 12 Bg5 traps the queen.
Sicilian, odd piece win
Demeny – Giurumia
Baile Herculane 1996
1 e4 c5 2 Nc3 d6 3 d4 cxd4 4 Qxd4
Rather an odd idea by White: 2 Nc3 suggested a Closed Sicilian, but she now goes for a type of Open.
4...Nc6 5 Bb5 Bd7 6 Bxc6 Bxc6 7 Bg5
The idea is to damage Black’s kingside pawn formation by taking the knight if it moves to f6, and meanwhile to prevent ...e6. However, there is a flaw. 7 Nf3 would seem more sensible, with Bg5 then to follow.
7...h6

8 Bh4??
This loses a piece in a simple but most surprising way.
8...e5 0-1
9 Bxd8 exd4 leaves two white pieces attacked.
Closed Sicilian ...Bh3 trick
P. Rasmussen – Brøndum
Copenhagen Open 1995
1 e4 c5 2 Nc3 d6 3 Nf3 a6 4 g3 g6 5 Bg2 Bg7 6 d3 Nc6 7 Be3 e5 8 Qd2 Nd4
This move carries a threat that anyone who wishes to play this set-up as White absolutely must be aware of, since it is not obvious.
9 Nd5?? Bh3! 0-1
Amazingly, White loses material – but he should play on. After 10 Nxd4 (not 10 Bxd4 Bxg2; nor 10 0-0 Nxf3+ 11 Bxf3 Bxf1) 10...Bxg2 11 Bg5 White can hope for compensation for a pawn, but 11...Qb8!? (11...f6? 12 Ne6; 11...Nf6 12 Rg1 Bxe4 13 dxe4; 11...Bf6 12 Nxf6+ Nxf6 13 Rg1 Bxe4 14 dxe4) 12 Rg1 cxd4 13 Rxg2 h6 forces the win of two pieces for a rook: 14 Nb6 hxg5 15 Nxa8.
Sicilian, Nimzowitsch Variation – 5...b6? 6 e6!
1 e4 c5 2 Nf3 Nf6 3 e5 Nd5 4 Nc3 Nxc3 5 dxc3

This position does not seem to hold much danger for Black, but White’s lead in development and abundance of open lines mean that he must be careful.
5...b6?
White can now exploit the vulnerability of a8 and f7. This is far from obvious, as shown by the fact that Nimzowitsch played this move and even failed to see the problem when annotating the game, describing 5...b6 as “a concept of hypermodern boldness”. Had he not been one of the originators of hypermodernism, he might have been sued for libel!
6 e6! dxe6
6...fxe6 7 Ne5 threatens both 8 Qf3 and 8 Qh5+.
7 Qxd8+
Simplest. After 7 Bb5+ Bd7 8 Ne5, 8...Qc8 9 Nxd7 Nxd7 10 Qf3 gives Black very serious problems with the d7-knight, especially since the queen is currently tied to the defence of the a8-rook, while 8...Qc7 9 Bxd7+ Nxd7 10 Nxf7 is very good for White too.
7...Kxd8 8 Ne5 Ke8 9 Bb5+ Bd7 10 Nxd7 Nxd7 11 Bf4 “and White is close to winning already” – Nunn and Gallagher, in Beating the Sicilian 3.
Sicilian disaster
Tiviakov – Dzhandzhgava
Moscow Intel qualifier 1995
1 e4 c5 2 Nf3 b6 3 d4 cxd4 4 Nxd4 Bb7 5 Nc3 d6 6 Bg5 Nd7 7 Nd5
7 Ndb5!? is interesting too.
Black is already under considerable pressure here, having chosen a rather suspect line of the Sicilian.
7...h6??
This is far more than his position can take. 7...a6 was played in Mikhalchishin–Psakhis, USSR 1978. Then:
a) 8 Bb5?! axb5 (8...Bxd5 9 Bxd7+ Qxd7 10 exd5) 9 Nxb5 gives Black a choice between 9...f6, 9...Ndf6 and 9...Bxd5 10 Nxd6+ exd6 11 Bxd8, which is not too clear.
b) 8 Qf3 Qc8 9 Nf5? (9 0-0-0 should be quite good for White) 9...g6 (9...e6 10 Nde7 Qc7! 11 Nxg8 exf5 12 Qxf5 Qc5 and a subsequent ...Rxg8 will leave Black a piece up) 10 Ndxe7 Bxe7 11 Ng7+ (11 Bxe7? gxf5) 11...Kd8 (11...Kf8 12 Ne6+) 12 Qxf7 Nc5 makes it not so easy for White to justify his play.
8 Ne6!
8 Nb5 is good too, but Tiviakov’s actual move is annihilating.
8...hxg5
8...Qb8 9 Ndc7+ Qxc7 10 Nxc7+ Kd8 11 Nxa8 hxg5 gives Black only three pieces versus rook and queen.
9 Nxd8 Kxd8 10 Bb5 Ne5 11 Qd4 e6 12 Nc3 Nf6 13 a4 Rh4 14 f3 Nh5 15 a5 Ng3 16 Rg1 Rxh2 17 0-0-0 Kc7 18 axb6+ axb6 19 Na4 1-0
Sicilian Pelikan
Chelekhsaev – Filimonov
Saratov 1989
1 e4 c5 2 Nf3 Nc6 3 d4 cxd4 4 Nxd4 Nf6 5 Nc3 e5 6 Ndb5 d6 7 a4 a6 8 Na3 Be6 9 Bg5 Qb6!?
10 Bxf6?
Perhaps White played this move mechanically, assuming that Black must recapture. If so, this was a fatal lapse. Instead 10 b3? is answered by 10...Qb4, but 10 Rb1 Qb4 11 Bxf6 gxf6 is necessary.
10...Qxb2! 11 Nd5
11 Ne2 can be met by 11...gxf6 or the more interesting 11...d5!?.
11...Bxd5 12 exd5 Qc3+ 0-1
Sicilian Kan Nxe6, Qh5+
1 e4 c5 2 Nf3 e6 3 d4 cxd4 4 Nxd4 a6 5 Be3 Nf6 6 Bd3 d5?! 7 e5
7...Nfd7?
7...Ng8 is a necessity; that Black falls so far behind in development is sufficient reason for condemning Black’s play. If he tries to keep the knight active, the punishment is far more severe. 7...Ne4 is also vaguely feasible.
8 Nxe6 fxe6
8...Bb4+ 9 c3 fxe6 10 Qh5+ Kf8 11 cxb4 is also horrid for Black.
9 Qh5+ Ke7
9...g6? 10 Bxg6+ hxg6 11 Qxg6+ Ke7 12 Bg5+ wins the lot.
10 Bg5+ Nf6 11 0-0
White will regain the piece, having rendered Black’s position utterly chaotic. Note that 11 exf6+ gxf6 12 Bxf6+ Kxf6 13 Qh4+ Kg7 14 Qxd8 Bb4+ 15 c3 is roughly level.
Sicilian; unusual material win
McShane – R. Phillips
British League (4NCL) 1996
1 e4 c5 2 Nf3 g6 3 d4 Bg7 4 dxc5 Qa5+ 5 c3 Qxc5 6 Be3 Qc7 7 Qa4
An imaginative plan from the then very young Luke McShane. It clearly made an impact on those who saw the game live, as one of Luke’s team-mates recently caught another victim in the same way (G.Wall-G.Pinter, British League (4NCL) 2008/9).
7...Nf6 8 Na3 Nc6 9 Nb5

Now Black must be very careful.
9...Qb8?
This looks quite normal. Black intends to push White’s pieces backwards with ...a6, but he never gets the chance. 9...Qd8 10 0-0-0 makes it difficult for Black to unravel, but at least it is a fight.
10 Bb6!!
A horrible surprise for Black. There is no way of avoiding serious material losses.
10...axb6
Otherwise Bc7 wins the queen or Nc7+ picks up a whole exchange.
11 Qxa8 Qxa8 12 Nc7+ and White went on to win.
Accelerated Dragon; disaster on f7 and e6
Palac – Ostojić
Belgrade 1988
1 e4 c5 2 Nf3 Nc6
2...d6 3 d4 cxd4 4 Nxd4 Nf6 5 Nc3 g6 is the normal Dragon. Note that White cannot play c4, while for Black there is no longer a possibility of playing ...d5 in one move.
3 d4 cxd4 4 Nxd4 g6
This is the Accelerated Dragon, one of the most logically motivated of all Sicilian lines.
5 Nc3
5 c4 is the main alternative, aiming to punish Black’s move-order by putting a clamp on the centre. It is called the Maroczy Bind, a term that also refers more generally to White’s structure with pawns on c4 and e4 in a situation where this restrains Black’s potential pawn-breaks. It is probably the best line against the Accelerated Dragon, but the play tends to be fairly slow and positional, and not to the taste of many Open Sicilian players.
5...Bg7 6 Be3 Nf6 7 Bc4 0-0 8 Bb3
Now Black can re-enter normal Dragon lines by playing 8...d6, but will more frequently look for an alternative, often based on executing the ...d5 advance as a temporary pawn sacrifice.
8...Na5?
This move, however, can certainly not be recommended. Nevertheless, it is played quite often, including two games where grandmasters had the black pieces.
9 e5 Ne8 10 Bxf7+!! Kxf7
10...Rxf7 11 Ne6 wins the black queen.
11 Ne6!! Kxe6
11...dxe6 12 Qxd8 once occurred in a game Fischer–Reshevsky. Fischer was very young at the time – but already strong enough for it to be an insult for Reshevsky to play on!
12 Qd5+ Kf5 13 g4+ Kxg4 14 Rg1+ Kh5 15 Qg2 1-0
It will be mate next move.
Sicilian, neglecting development
Smirin – Afek
Israeli Ch 1992
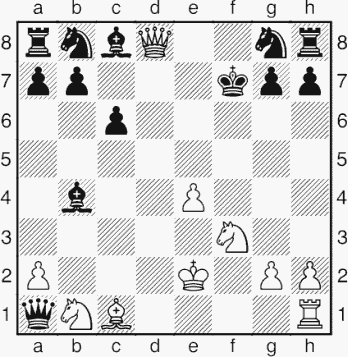
1 e4 c5 2 Nf3 Nc6 3 Bb5 Qb6 4 Nc3 Nd4
This attempt to avoid normal channels proves unfortunate. 4...e6 would be more conservative.
5 Nxd4 cxd4 6 Nd5 Qd8
Black now hopes to have time to push back White’s advanced pieces with his pawns (...e6 and ...a6) and then to develop normally. However, Smirin is too alert to allow this, and manages to make use of his pieces on the fifth rank. Perhaps 6...Qc5 7 c3 e6 8 cxd4 Qd6 was a lesser evil, with just a small advantage for White.
7 Qh5!
The threat is 8 Qe5, which Black cannot prevent by ...d6, due to the pin from the b5-bishop.
7...a6??
This move does not address the problem. 7...Nf6 was necessary, but after 8 Nxf6+ gxf6 Black will have long-term problems with his damaged and inflexible pawn structure. Now it is carnage.
8 Qe5!
“The end; the rest is history” said my electronic chum Fritz 4.
8...f6
8...e6 9 Nc7+ Ke7 10 Nxa8 axb5 11 Qxb5 and the knight escapes without difficulty.
9 Nc7+ Kf7 10 Qd5+ 1-0
White’s next move will be 11 N(x)e6, with utter devastation.
Sicilian, Najdorf-Sozin, disaster on the long diagonal
Soltis – Browne
New York 1970
1 e4 c5 2 Nf3 d6 3 d4 cxd4 4 Nxd4 Nf6 5 Nc3 a6 6 Bc4 e6 7 Bb3 b5 8 0-0 Be7 9 Qf3
Now Black must be careful.
9...Bd7?
Of course Browne would have seen White’s idea of e4-e5, but thought his resources were adequate.
10 e5! dxe5 11 Nxe6!
11 Qxa8 exd4 will give Black good compensation.
11...e4
Suicide, but if Black takes the knight, then he will simply be an exchange down.
12 Nxg7+ Kf8 13 Nxe4 Bc6
The pin on the e4-knight is Black’s last-gasp attempt, but with his king so exposed, White has no difficulty finding a win.
14 Bh6 Bxe4 15 Nh5+ 1-0
After 15...Kg8, 16 Nxf6+ Bxf6 17 Qxe4 is simply too humiliating for Black.
Taimanov Sicilian, Nd5 pseudo-sacrifice
Karklins – Sandrin
USA 1990
1 e4 c5 2 Nf3 Nc6 3 d4 cxd4 4 Nxd4 e6 5 Nc3 Qc7 6 g3 a6 7 Bg2 b5 8 0-0 Bb7 9 Re1

Black has been setting himself up for a devastating Nd5. He now really had to attend to this threat, but alas...
9...d6? 10 a4
There’s no harm in loosening Black’s queenside first. 10 Nd5 Qb8 would be more acceptable here.
10...b4 11 Nd5 exd5?
11...Qb8 12 Nb6!? is good for White, but the game would not be over by any means.
12 Nxc6
Perhaps Black thought White’s intention was the suspect piece sacrifice 12 exd5+ Nce7. However, matters are far simpler than that.
12...dxe4 13 Bxe4 Ne7 14 Qf3! f5 15 Bd5 1-0
Black is helpless, while White can win material virtually how he pleases.
Burgess – C. Jacobsen
Glamsbjerg (team event) 1992
1 e4 c5 2 d4 cxd4 3 c3 dxc3 4 Nxc3
This is the Morra Gambit. Objectively its soundness is certainly open to question, but in practice it is very dangerous. This game is a typical example.
4...e6 5 Nf3 Nc6 6 Bc4 Bc5 7 0-0 a6 8 Bf4 Nge7 9 e5 0-0 10 Ne4
10...Ba7?
This move gives White far too much leeway. Instead 10...Ng6 is sensible, when after 11 Bg3 Be7 Black is not in such danger.
11 Bg5
Direct attacking play is called for.
11...Qc7
The attempt to solve Black’s problems tactically by 11...Nxe5 12 Nxe5 f6 is doomed to failure since White has too much development:

White would blast through with the energetic 13 Bxf6! gxf6 14 Bxe6+! dxe6 (14...Kg7 15 Qg4+) 15 Nxf6+ Kg7 (15...Rxf6 16 Qxd8+; 15...Kh8 16 Nf7+) 16 Nh5+ Kg8 17 Qg4+ Ng6 18 Nxg6 and White wins.
12 Nf6+! gxf6
12...Kh8 is a more resilient defence.
13 Bxf6 Nf5
13...h6!?; 13...Nd4 14 Nxd4 Qxc4 15 Qg4+ Ng6 16 Qg5 followed by Qh6 forces mate.
14 Nd4!
14...h6
14...Nxe5 15 Nxf5 exf5 16 Qh5 Bd4 (16...Qd6 17 Qh6 Qxf6 18 Qxf6 Nxc4 is hardly adequate with the black king so exposed) 17 Qg5+ Ng6 18 Bxd4 is very good for White since 18...Qxc4 19 Qf6 forces Black to part with his queen.
15 Nxf5 Nxe5
15...exf5 16 Qh5, with Qxh6 to follow, forces mate.
16 Qg4+
I couldn’t resist this flashy move, but 16 Nxh6+ Kh7 17 Qh5 forces mate a good deal quicker.
16...Nxg4
Black plays ball. Instead 16...Ng6 17 Qh5 would be prosaic.
17 Ne7+ Kh7 18 Bd3# (1-0)
Simple stuff, but my team captain really liked it!
Zlochevsky – Yuferov
USSR Central Chess Club Ch 1989
1 e4 c5 2 Nf3 Nc6 3 Bb5
This variation, the Rossolimo, is not the most aggressive against the Sicilian, but it is a well-founded system, which is favoured by several young ex-Soviet grandmasters.
3...Qb6 4 Bxc6 Qxc6 5 Nc3 b5 6 0-0 b4 7 Nd5 e6
Now, if you were White here, would you automatically look for where to retreat the knight? If so, you would allow Black to justify his play so far. Play uncompromising chess!
8 Re1!
Black will have to work a little harder if he wishes to remove the irritating knight.
8...Qb7
Now Black does threaten to take the knight.
9 d4
Again, White finds a way to maintain his knight in the centre, but this time far less clear-cut.
9...Ne7?!
9...exd5 10 exd5+ Kd8 11 dxc5 Bxc5 gives White some attacking chances, but nothing too definite. Black ought to have gone in for this line.
10 dxc5 Nxd5 11 exd5 Bxc5 12 Ng5 h6 13 Ne4 Be7 14 dxe6
14 d6 doesn’t really cramp Black, and just blocks White’s lines of attack.
14...dxe6 15 Nd6+ Bxd6 16 Qxd6
It is far from easy for Black to complete his development.
16...a5 17 a3
White wishes to break open the queenside.
17...Ra6 18 Qg3 g5
18...0-0? 19 Bxh6 is horrible.
19 Bd2 Qd5
Black rests his hopes on centralization, but to no avail.
20 Rad1 Qc5 21 Be3 Qc6 22 Qe5 0-0
Finally castled, but hardly into safety due to the weakening ...g5 that he had to play.
23 Bxg5! Bb7
23...hxg5 24 Qxg5+ Kh7 25 Rd4 e5 26 Rh4+ wins material.
24 f3 Kh7
24...hxg5 25 Qxg5+ Kh7 is a good deal more robust now, since 26 Rd4 can be answered by 26...Qb6.
25 Rd4 Rg8
25...hxg5 should be compared with the previous note.
26 Rh4 Rg6 27 Rxh6+ Rxh6 28 Bxh6 f6
28...Kxh6 29 Qf6+ Kh7 30 Re5 wins.
29 Qxf6 Qd7 30 Bf4 bxa3 31 Be5 a2 32 Qh8+ Kg6 33 Qg8+ 1-0
It will be mate: 33...Kh5 34 g4+ Kh4 35 Qh8+ Qh7 36 Qxh7+ Kg5 37 h4#.
Next we see a standard pawn sacrifice by White to break Black’s apparent grip on the centre, and an imaginative counter from Black.
Dreev – Lputian
USSR Ch First League (Simferopol) 1988
1 e4 c5 2 Nf3 Nc6 3 Bb5 g6 4 0-0 Bg7 5 c3 e5
The idea of this move is to hinder White’s intended d4 advance. However, the move weakens Black’s position sufficiently for White to play the move as a gambit.
6 d4 cxd4 7 cxd4 exd4 8 Bf4 Nge7 9 Bd6 0-0 10 Nbd2 a6 11 Bc4 b5 12 Bd5 Bb7 13 Nb3
Black is under very considerable pressure here. If he does not play the following exchange sacrifice, then he would simply be worse after White recaptures the pawn.
13...Nxd5!?
13...Re8 unpins the knight, but allows 14 Bxf7+ Kxf7 15 Nc5 with ideas of Ng5+ and Qb3.
14 Bxf8 Qxf8 15 exd5 Nb4 16 a3
16 Nfxd4 is an alternative.
16...Nxd5 17 Na5
White reckons that the best way to get winning chances is by removing one of Black’s bishops.
17...Qb8
18 Qd2
18 Nxb7 Qxb7 19 Nxd4?! Nf4 and Black wins the b2-pawn, keeping two healthy pawns for the exchange.
18...Nb6 19 Nxb7 Nc4 20 Qd3 Qxb7 21 b3 Na5 22 Rad1 Nc6 23 Rfe1 Qb8 24 h4 Qd6 25 b4 Qd5 26 Rc1 Bf8 27 Qe4 Qxe4 28 Rxe4 a5 29 bxa5 Rxa5 30 Ne5 Nxe5 31 Rxe5 Bxa3 32 Rb1 Kf8 33 g3 h5 34 Kf1 Be7 35 Rd5 Ke8 36 Rdxb5 Rxb5 37 Rxb5 Bf6 38 Ke2 Ke7
This ending presents no great dangers to either side. The game finished as a draw 18 moves later.
Negulescu – Moldovan
Olanesti 1996
1 e4 c5 2 Nf3 e6 3 b3 b6 4 Bb2 Bb7 5 Nc3 a6 6 Qe2 d6
It seems that White is aiming for a very quiet, closed game, but as we shall see, his moves so far have by no means committed him to forego attacking options.
7 d4 cxd4 8 Nxd4 Nf6 9 0-0-0 Qc7 10 g4 Be7 11 g5 Nfd7 12 Rg1 0-0 13 Qh5
Now Black must watch out for Rd3-h3 or Rg3-h3, but these are not White’s only ideas.
13...Rc8
13...b5 (to stop Bc4) 14 Rd3 Rc8 15 Rh3 Nf8 16 Bd3 b4 17 Nce2 is good for White: 17...Qa5 18 Nf5! exf5 19 exf5 or 17...Nbd7 18 g6!! fxg6 19 Nxe6! with a strong attack.
14 Bc4! Nf8?
This walks into a horrible trick. 14...g6 15 Qh6 Nc5 (15...Ne5 16 Nxe6 fxe6 17 Bxe6+ Kh8 18 Bxc8; 15...Bf8 16 Nxe6) 16 Ncb5! is not too bright for Black either, so 14...Nc5!? was the move to try.

15 Nf5! Nc6
15...exf5?? 16 Qxf7+ Kh8 17 Qg8#; 15...b5 16 Nxb5! axb5 17 Qh6! forces mate. 15...Ng6 is relatively best, although 16 Nxg7 picks off a pawn for nothing, and threatens 17 Nxe6 to boot.
16 Nb5! 1-0
16...axb5 17 Qh6! gxh6 (17...Bxg5+ 18 Rxg5 f6 19 Rxg7+ Kh8 20 Bxf6 mates brutally) 18 Nxh6#.
Krivonogov – Galliamova
USSR Junior Ch (Pinsk) 1989
1 e4 c5 2 Nf3 Nc6 3 d4 cxd4 4 Nxd4 Nf6 5 Nc3 d6 6 Bc4 e6 7 Be3 Be7 8 Qe2
This is the Velimirović Attack.
8...0-0 9 0-0-0 a6 10 g4?!
This somewhat reckless move involves a speculative pawn sacrifice.
10...Ne5 11 Bb3
Allowing Black to take the bishop would not make any sense of White’s play.
11...Nfxg4
11...Nexg4 would make it far harder for White to justify the pawn sacrifice.
12 f4
The e3-bishop is not such a fundamental player in White’s attacking designs, so he is willing to part with it, considering there is gain of tempi involved.
12...Nxe3 13 Qxe3 Nc6

14 Nf3
The knight, on the other hand, avoids exchange, for several reasons: firstly, White needs a reasonable number of pieces to launch an attack; e4-e5 is now an idea; and as we shall see, the knight has a bright future on g5.
14...Na5
14...Qa5!? 15 Rhg1 is also quite dangerous.
15 Rhg1 Nxb3+ 16 axb3 Bd7?!
With this move, things start to become trickier for Black. Instead she could try 16...Qa5 17 Ng5 (or 17 Qd4 g6) 17...f6.
17 e5 Bc6
17...d5 18 f5 Kh8 is not too clear.

18 Ng5! Qc7?
This walks into an attractive sacrificial idea. 18...Bxg5 is necessary, though 19 Rxd6 offers White good play.
19 Nxh7! dxe5
19...Kxh7 20 Rxg7+ Kxg7 21 Rg1+ and mates; 19...Rfd8 20 Rxg7+, etc.
20 Nxf8?
White has a forced mate with 20 Rxg7+! Kxg7 21 Rg1+.
20...exf4
20...Bxf8 would have kept the game going, although Black does not have compensation for the exchange.
21 Nxe6! fxe6
21...fxe3 lets White keep an extra rook.
22 Qxe6+ Kf8 23 Rxg7! 1-0
Ermolinsky – Tukmakov
USSR Ch 1st League (Simferopol) 1988
1 e4 c5 2 Nf3 d6 3 d4 cxd4 4 Nxd4 Nf6 5 Nc3 Nc6 6 Bg5 e6 7 Qd2 Be7 8 0-0-0 0-0 9 Nb3 a6 10 Bxf6 gxf6 11 f4 b5 12 f5 Kh8
13 g3 b4
This is an essential preparation for Black’s next move. 13...e5 would be positional suicide with White’s c3-knight controlling, and ready to hop into d5, at any moment.
14 Ne2 e5 15 g4 a5 16 Qh6 Rg8 17 Ng3 a4 18 Nd2
Now Black seizes the initiative with a sequence of crisp pawn thrusts.
18...b3! 19 axb3 d5! 20 exd5 a3! 21 Kb1 axb2 22 Bb5 Nd4 23 Ba4 Qc7 24 Nc4 Rxa4! 25 Rxd4 Ra8 26 Rdd1? Rxg4 27 d6 Qa7 28 Kxb2 Rxc4 0-1
Yanovsky – Golubenko
Moscow Ch 1989
1 e4 c5 2 Nf3 d6 3 d4 cxd4 4 Nxd4 Nf6 5 Nc3 a6 6 Bc4 e6 7 Bb3 Be7 8 Be3 0-0 9 g4 d5 10 exd5 Nxd5 11 Nxd5 exd5

This cannot be regarded as a standard IQP (isolated queen’s pawn) position, since the kingside situation rules out a drawn-out manoeuvring battle.
12 Qf3 Nc6 13 h3 Qa5+ 14 c3 Ba3!
This is a standard tactical theme, but very hard to see if you’re not familiar with it.
15 Nxc6
White must avoid 15 0-0-0?? Qxc3+ and 15 bxa3? Qxc3+.
15...bxc6
16 Rb1
16 bxa3? Qxc3+ 17 Ke2 Qb2+ 18 Kd3 (18 Bd2 Re8+ 19 Kd3 a5 is no better) 18...a5 and the threat of 19...Ba6+ gives Black a strong attack, while 19 Bc2 d4 20 Bxd4 Ba6+ is devastating.
16...Bxb2??
Black should simply settle for dropping the bishop back to d6 or e7. He would then have disrupted any plans White may have had for castling queenside.
The move played looks strong, but has a surprising defect.
17 Rxb2 Qxc3+ 18 Rd2 d4
Now White has a cunning resource.
19 0-0!
By unpinning his rook, White makes the e3-bishop invulnerable.
19...Bxg4
19...dxe3 20 Qxf7+! Rxf7 21 Rd8# is the key point.
20 hxg4 dxe3 21 Qxe3 1-0
Donchev – Ermenkov
Bulgarian Ch (Sofia) 1988
1 e4 c5 2 Nf3 d6 3 d4
3...Nf6
This is a little move-order subtlety, varying from the normal 3...cxd4. It is employed by some Sicilian players to avoid White recapturing on d4 with his queen, rather than playing the normal 4 Nxd4 Nf6 5 Nc3. After 4 Qxd4 White has ideas of playing c4 if appropriate, e.g. after 4...Nc6 5 Bb5. This is not such a troublesome line for Black, but play tends to be rather slower than most Sicilian players would like.
4 Nc3
4 dxc5 Nxe4 5 cxd6 Nxd6 is quite satisfactory for Black.
4...cxd4 5 Nxd4
5 Qxd4 would make no sense at all here, since White is unable to set up a bind by playing c4, so will just lose time with his queen.
5...e6
This is the basic position of the Scheveningen Variation – a popular choice. Black erects a “small centre” and maintains maximum flexibility with his queenside development.
6 g4
This move is named the Keres Attack in honour of the great Estonian grandmaster.
6...h6
This is the normal reply, though 6...Nc6 7 g5 Nd7 is a major alternative.
7 Bg2
White avoids the heavy theoretical lines after 7 h4 Nc6 8 Rg1 h5.
7...Nc6 8 Nxc6 bxc6 9 e5 Nd5 10 exd6 Bxd6 11 Ne4
White is still trying to force the pace, but this is a risky way to do so, and gets White into trouble.
11...Ba6

Black seizes a chance to keep the white king in the centre.
12 b3
Aiming to play c4, but the move has drawbacks of its own.
12...Be5
12...0-0 is a good solid move; then 13 Nxd6 Qxd6 14 c4? bumps into 14...Qe5+, while 13 c4 can be well met by 13...Be5 or 13...Bb4+!?.
13 Bd2
13 Rb1 hands the initiative fully to Black, so White sacrifices the exchange.
13...Bxa1
Black sees no reason not to grab the material.
14 Qxa1 0-0 15 c4
This position must be winning for Black. However, a remarkable turn-about occurs during the next few moves.
15...f5?!
This gives White chances. Black had two better moves:
15...Ne7 is quite safe, since 16 Bxh6 gxh6 17 Nf6+ Kh8 18 Nd7+ f6 (18...Kg8 19 Nf6+ repeats) 19 Nxf6 (19 Nxf8 Qxf8 is a win for Black) 19...e5 wins for Black, e.g. 20 Qxe5? Ng6.
15...Qh4 is even possible, since after 16 cxd5 Qxg4 17 Ng3 exd5 Black has a rook and two pawns versus White’s two minor pieces, and he also has attacking chances against the white king.
16 Nc5 Nf4
Black was probably relying on this idea when he played his risky fifteenth move.
17 Rg1!
White finds his best chance; the g-file may prove a happy hunting ground for the white rook. 17 Bxf4 Qa5+ clears things up nicely for Black.

17...Nd3+
17...Nxg2+ 18 Rxg2 Bc8 (after 18...Qb6 19 Nxe6 Rf7 20 gxf5 Qb7 21 Bxh6 White smashes through on g7) 19 gxf5 Qe7 20 fxe6 (better than 20 Bxh6 exf5+ 21 Kf1 Rf7, when White has run out of steam) gives Black little comfort:
a) 20...Bxe6 21 Rxg7+ Qxg7 22 Qxg7+ Kxg7 23 Nxe6+ Kg6 24 Nxf8+ Rxf8 reaches an ending with bishop and five pawns versus rook and three; White should have winning chances.
b) 20...Rf6 21 Bc3 Rf7 22 Rg6 Bxe6 23 Nxe6 Qh4 and Black grovels on.
18 Nxd3 Qxd3 19 Bxc6
White is not just grabbing a stray pawn; he is opening the g-file for a shock counterattack!
19...Rad8?
19...Rac8? 20 Bxh6 is also good for White, but Black should play 19...Bxc4! 20 bxc4 Rab8 21 Bb5 Qe4+ (or 21...a6), when a draw is the most likely outcome.
20 Bxh6!
Suddenly the whole of White’s position makes sense.

20...Rd4
20...Rf7 21 gxf5 e5 is the best try at holding things together.
21 gxf5 Rxf5 22 Rxg7+ Kh8 23 Rg3 Re5+ 24 Be3
White’s plan is now to play the bishop to e2 via f3, whereupon Black will be finished.
24...Kh7 25 Bf3 Rxc4
Pure desperation.
26 bxc4 Qxc4 27 Qxe5 Qf1+ 28 Kd2 Qd3+ 29 Kc1 1-0
Next a game where the pawn formations become symmetrical, and by alert play White seizes a powerful initiative.
Van der Wiel – Klinger
Belgrade GMA 1988
1 e4 c5 2 Nf3 e6 3 d4 cxd4 4 Nxd4 a6 5 Bd3 Nf6 6 0-0 Qc7 7 Qe2 Bd6 8 Kh1
8 f4 is a more standard move.
8...Nc6
8...Bxh2 walks the bishop into a trap.
9 Nxc6 dxc6 10 f4

Black is in some danger here due to his lack of development.
10...Nd7?!
10...e5 11 f5 is good for White, but gives Black more survival chances.
11 e5 Be7 12 Be3 b5 13 Nd2 Bb7 14 c4!
White has ideas of playing c5, with a hideous grip on d6; ...c5 is ruled out by the pressure on b5.
14...Nc5 15 Bxc5! Bxc5 16 Ne4 Qb6
Now White can embark upon the final attack, but 16...Be7 17 c5 is too horrible to contemplate.
17 f5! Bc8
18 f6! g6
There are no other moves.
19 cxb5 cxb5 20 Nxc5 Qxc5 21 Be4 Rb8 22 Rac1 Qa7 23 Qd2 1-0
Black will be mated when the white queen lands on d8 (following Rfd1), on e7 (if Black plays ...Bd7) or on g7 (if Black castles).
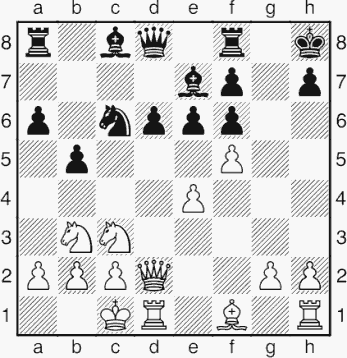
Ivanchuk – Kramnik
Monte Carlo 5th Amber Rapid 1996
1 e4 c5 2 Nf3 Nc6 3 d4 cxd4 4 Nxd4 Nf6 5 Nc3 d6 6 Bg5 e6 7 Qd2 a6 8 0-0-0 h6 9 Be3 Nxd4 10 Qxd4 Qc7 11 f4 b5 12 a4 bxa4 13 Qxa4+ Bd7 14 Bb5

White makes good use of the pin on the a-file. Rather than having to retreat his queen, White has instead found an active move, and so keeps the initiative.
14...Qb7 15 Bxd7+ Qxd7 16 Rd4 Be7 17 Rhd1 0-0 18 e5 Qxa4 19 Rxa4 Ne8 20 Nb5
For the second time White uses the pin, and the knight proves remarkably effective here.

20...d5 21 f5 exf5 22 Rxd5 Bg5 23 Bxg5 hxg5 24 c4 g6 25 c5 f4 26 c6 Ng7 27 Nd6 Ne6 28 Rda5 f6
Kramnik desperately tries to open the f-file to get the rook behind his passed pawns, but it is all too slow. 28...g4 carries no real punch without support from behind.
29 exf6 Rxf6 30 Rxa6 Raf8 31 Ne4 R6f7 32 h3 f3 33 gxf3 Rxf3 34 Ra8 Rf1+ 35 Kd2 1-0
Chiburdanidze – Hoffmann
Lugano 1989
1 e4 c5 2 Nf3 e6 3 Nc3 a6 4 d4 cxd4 5 Nxd4 Qc7 6 g3 b5 7 Bg2 Bb7 8 0-0 d6 9 Re1 Nd7 10 a4!
A standard idea for White in Open Sicilian positions where Black has played ...b5, but is not fully developed.
10...bxa4
10...b4 should be met by the straightforward 11 Na2, intending c3, since 11 Nd5!? exd5 12 exd5+ is probably too speculative.
11 Rxa4
11...Ngf6
11...Nb6 12 Ra2 Nf6 13 Nb3 Nc4 14 Bf1 intends Qd4 and Na5 after the black knight moves – Black’s position is difficult.
12 Nd5!
This is a standard sacrificial idea when Black’s king is caught in the centre. Here it is by no means calculable, but the fact that both her rooks are active may have helped Chiburdanidze to believe in the sacrifice.
12...exd5 13 exd5+ Kd8
Chiburdanidze felt that this was too ambitious, and that 13...Ne5 14 f4 Nd7 is better, but that White would then be substantially better in any case.
14 Nc6+ Bxc6 15 dxc6 Nb6
15...Nc5 16 Rc4 Ne6 17 f4 g6 18 g4 gives White good play.
16 Rd4! d5
16...Nc8 is a more passive idea, which allows White to infiltrate via the a-file: 17 Bd2 Rb8 18 Ra4.
17 c4! Qxc6
17...Bc5 18 cxd5 Bxd4 (18...Re8 19 Bf4) 19 Qxd4 Re8 20 Rxe8+ wins:
a) 20...Nxe8 21 Bf4 Nd6 (or 21...Qa7 22 d6, etc.) 22 Qxg7 with some very painful threats.
b) 20...Kxe8 21 d6 Qa7 22 c7 Rc8 23 Qe5+ Kf8 24 Qe7+ Kg8 25 Qd8+ Ne8.

Now White has the wonderful trick 26 Qxc8!! (26 d7? Rxd8 27 cxd8Q Qxd7 is only quite good for White) 26...Nxc8 27 d7, winning.
18 cxd5 Qc5 19 d6
Where should the rook go?
19...Rb8
After 19...Rc8, White can prove an advantage with vigorous play: 20 d7 Nfxd7 21 Bh3 Qb5 (21...Rc7) 22 Bg5+, and now:

a) 22...f6 23 Re6 Kc7 24 Bf4+ Ne5 25 Qc2+ and White wins: 25...Qc5 26 Qe4 Kb8 27 Bg2 Qc7 28 Rc4; 25...Kb7 26 Rxb6+ Kxb6 27 Qxc8; or 25...Bc5 26 Bf1.
b) 22...Kc7 23 Bf4+ Kd8 24 Re3 leaves Black with no decent defence to Rb3 and Rxb6 after the queen moves.
20 Bf4 Nbd7 21 Qd2
21...h6?
21...Rc8? is met by the killer 22 Rc4! Qb6 (22...Qxc4? 23 Qa5+; 22...Qb5 23 Rxc8+ Kxc8 24 Rc1+ Kb8 25 Qc3) 23 Rxc8+ Kxc8 24 Rc1+ Kd8 (24...Kb8? 25 Rc6) 25 Qc3 winning back heavy material.
21...Qb6 is more stubborn, though Black is wholly tied up, and has no obvious plan for unravelling his position. After 22 Rc4 it is very difficult to see even what Black’s next move should be. White’s threat is to triple her major pieces on the c-file, and 22...Qxb2 23 Qa5+ Qb6 24 Bd2 is extremely awkward for Black.
22 Rc1 Qb6 23 Qc3
Now White is winning.
23...Ne8 24 Qc7+! Nxc7 25 dxc7+ Ke8 26 Re4+ Be7 27 cxb8Q+ Nxb8 28 Rc8+ Kd7 29 Bh3+ 1-0
Anand – Epishin
Belgrade GMA 1988
1 e4 c5 2 Nf3 Nc6 3 d4 cxd4 4 Nxd4 Qb6 5 Nb3 Nf6 6 Nc3 e6 7 Bd3 Be7 8 0-0 0-0 9 Be3 Qc7

Why has Black moved his queen twice only for it to end up on c7? After all, there are some Sicilian lines where White voluntarily drops the knight back to b3. The point is that the knight is less active on b3, and generally when it retreats there “voluntarily” in some lines it is because Black is threatening to exchange it off in a favourable way. Black’s preparation for a favourable exchange on d4 may not constitute the most efficient development of his pieces. There are lines, for instance, in which Black has played ...Bd7, and then after White plays Nb3, the best plan for Black is to redeploy the bishop on b7, “undeveloping” it via c8. This gives rise to some strange subtleties in these Sicilian lines, as both players battle to lose fewer tempi than the opponent in reaching their target positions.
10 f4 d6 11 Qf3
The queen moves into an attacking position on the kingside.
11...a6
Black makes the standard pawn move to launch his queenside counterplay.
12 Nd4
So, White brings his knight back to d4, reckoning he needs it if his attack is to have much force. He does so at a loss of two tempi (Nd4-b3-d4), whereas Black lost only one tempo with his queen (...Qd8-b6-c7, rather than ...Qd8-c7). Has the opening therefore been a total success for Black? Not necessarily, since White has been able to play his bishop directly to the aggressive square d3, whereas in some variations it must move there via a stop-over on e2. In the Sicilian there is no such thing as a free tempo!
12...Bd7
12...b5 could be answered by 13 e5!?.
Then White wins in the event of 13...Bb7? 14 exf6 Nxd4 15 Qh3, but Black can play 13...Nxd4 14 Bxd4 (14 Qxa8 dxe5 is not too clear) 14...dxe5 (but not 14...Bb7?, when 15 Qh3 dxe5 16 fxe5 wins a piece, e.g. 16...Bc5 17 Bxc5 Qxc5+ 18 Kh1 Qxe5 19 Rxf6) 15 fxe5 Bc5 16 Bxc5 Qxc5+ 17 Kh1 Nd5 18 Nxd5 exd5, when White is better, but the game is not over.
13 Kh1 b5 14 a3 Rab8
Anand now chooses a direct way to start an attack.
15 Nxc6 Bxc6 16 Qh3
White threatens 17 e5, winning on the spot.
16...g6 17 f5

Note that White’s exchange on c6 has taken the bishop’s eye off the f5-square.
17...b4
With hindsight 17...exf5 18 exf5 b4 would appear more logical.
18 axb4 exf5
18...Rxb4 19 fxe6 Rxb2 20 Bd4 is very good for White.
19 b5!
Clogging up Black’s queenside play.
19...axb5 20 exf5 b4 21 Ne2 Ra8 22 Rxa8 Bxa8 23 Bd4

Here we see the fruits of Anand’s calm, logical attacking play. Black has no meaningful activity or counterplay and can do little more than await the execution.
23...Qd8 24 Nf4 Bc6 25 Qh6 Qa8 26 Bc4! 1-0
The only defence against White simply taking three times on g6 is to play 26...d5, but then it takes only a simple sacrifice to smash through on that square: 27 fxg6 fxg6 28 Nxg6 hxg6 29 Qxg6+ Kh8 30 Bd3 with mate to follow very shortly.