The best protection against getting lost in the woods is being a good Scout or Guide: Be Prepared. Careful preparation is not only a bulwark against disaster, it’s also the best way to enjoy your woods adventures in comfort. Preparation includes knowing what to take with you, what to wear, and how to make sure a search party could look for you effectively. It also includes preparing yourself by learning and rehearsing how to find your way around in the woods. Whether you’re hiking, snowmobiling, or berry-picking, your preparations will be much the same.
Everybody who expects to spend even the shortest amount of time in the woods should prepare a “ready pack,” which can become a survival kit if need be. It doesn’t need to contain an elaborate array of expensive equipment but may be prepared from supplies you would normally find in most homes or camps. Take care of your ready pack and carry it with you every time you think you may venture into the woods. If you use any of the contents, replace them immediately upon your return, to make sure your pack is ready for use again.
I always strap on my fanny pack containing the essential items, and you will never find me in the woods without it. In addition to any personal prescribed medication, these essential items are:
• spare knife
• waterproof matches in waterproof container
• Bic lighter(s)
• spare compass
• signal mirror
• flashlight
• whistle
• trail tape & pencil
• space blanket
• plastic garbage and grocery bags
• bite size chocolate chunks
• beef jerky (or similar dried food)
These items take up very little space and weigh practically nothing, yet they can sustain you for several days. A knife is the most useful and important tool you can carry. It can be used for everything from preparing a shelter to whittling a toothpick. A knife will help you bail yourself out of any difficulty, and the spare in your ready pack will protect you against loss, breakage, or forgetfulness. Waterproof matches are priceless. When you really need to light a fire in the rain, ordinary matches just won’t do the trick, and paper matches are not much better than no matches at all. Even waterproof matches can become useless if they are carried for any period of time in wet surroundings, so their container too must be waterproof. I also carry a number of Bic lighters. Usually I can get a fire going, even in a downpour, with these devices; however, to be on the safe side, I still always carry my waterproof matches.
Many times, while holding Map and Compass Courses for Search and Rescue people, I have watched participants become so sure their compasses were not working properly that they ignored the readings. I have actually seen an experienced member of the Canadian Armed Forces throw away a perfectly good — and expensive — compass, simply because it was not telling him what he thought it should. Under most circumstances your compass will do what it is supposed to do, but there may be times when you don’t believe it. Then you can refer to your second compass. There is always the possibility, too, that you will lose or break your compass, so you should carry a second one anyway, just in case.
A signal mirror is small and compact, and, when used properly, it can reflect sunlight for miles and miles. An aircraft can spot a reflection, even on a cloudy day. You need not acquire a professional signal mirror — any small mirror or piece of polished metal will do. I have seen the lid from a sardine can serve the same purpose as an expensive military signalling mirror. Cut the bottom out of any tin can, punch a hole in the centre, and you have a perfectly good signalling device. You would be amazed at what an effective mirror you can make from a small piece of aluminum foil, even the foil from a pack of cigarettes or chewing gum. All you have to do is press the foil against a small flat surface and hold it up so that the sunlight reflects off it. Then, raising your fingers in the shape of a “V” like a gun sight, find the target to which you wish to send a signal, position your fingers so that the target is in the gun sight, and flash the sun’s reflection off your signalling mirror back and forth across your fingers.
I always carry a small flashlight, powered by two AAA batteries, on a cord around my neck. It is not necessary to carry a 12-volt power pack, because you shouldn’t travel very far at night unless you know where you are going. You won’t have to see very much, and your need for light will be confined to your immediate surroundings or for treating injuries. On the same cord around my neck, I carry a police whistle. The piercing sound of these whistles carries much further than most human voices, particularly at night.
I always carry a roll of trail tape, usually hunter’s orange, but sometimes in another colour if orange may already have been used in a particular area for some specific purpose. I put this tape to a multitude of nonemergency uses, from tying my lean-to in place to marking a likely spot for hunting or fishing. I carry the pencil to write notes on the tape. As a rescuer, I have learned that people lost in the woods do not always understand signals that are designed by Search and Rescue people, so I write notes on the tape telling them which way to go to safety.
A space blanket comes folded into a nice neat little package, but, when needed, it unfolds into a double-bed-sized blanket. It will reflect body heat inward or the sun’s heat outward and perhaps keep you or some other person from perishing. Space blankets are inexpensive and, even without other equipment, this one article could save your life. Nobody should go into the woods without one.
Plastic garbage and grocery bags have numerous purposes. With a plastic bag you can make a shelter, a water container, a nature still (for making water, not booze), or a complete rain suit. You can keep moisture out of your clothes on a rainy day or keep moisture inside your still on a dry, hot day. Plastic bags are not bulky and will prove to be very useful if you find you have to spend any unexpected amount of time in the woods. One other item of a similar material could also come in handy: a condom. In spite of its tiny package, a condom will hold up to a litre of water for storage, although I would not recommend it for transporting water.
You will want a small amount of food in your ready pack, but, to tell the truth, you won’t need it. Hard as this is to believe, you can live for weeks without food as long as you maintain your body’s liquid ratio.
With this in mind, take only a very small quantity of foodstuff, as it is highly unlikely that you will spend any great length of time without either being found or finding something to eat. I carry bite-sized chocolate chunks or the little chocolate bars available at Hallowe’en. These items supply a quick source of energy and the sugar the body seems to crave for a sense of well-being. I also carry a few strips of beef jerky or a similar substance because I can chew on that stuff for hours and it makes me feel as if I’m eating. Don’t take these items for a snack while you are hiking; your ready pack is your survival kit, so keep these food items for emergency use only. I know, it seems like an emergency if you have been hiking for six or seven hours without food, but if you do eat any of the contents of your pack, be sure you replace those items before putting your pack away. That way you will be certain that your ready pack is indeed always ready.
If you like, you can add some things that will make a long stay in the woods more comfortable:
• a copy of Safe and Sound
• hard candy
• dried fruit
• water purification tablets
• instant coffee or tea bags
• instant soup
• dehydrated meats
• sugar cubes or packs
• instant cocoa
• collapsible drinking cup
• fire starter
• flint
• 1 sq m (1 sq yd) aluminum foil
• chewing gum
• light wire
• 8 m (25 ft) rope
• fish hooks, line, flies
• needle and thread
• iodine
• aspirin
• Band-Aids
• space sticks
• candle
• extra ammo (if hunting)
• spare eyeglasses
As you become accustomed to carrying your ready pack, you will also probably adjust the quantity of any particular item according to your own habits and tastes. You may add other things, but keep the pack small and light so you won’t regret having to carry it. Get in the habit of taking your ready pack with you every time you even suspect you may be going into the woods. This little pack will give you confidence while you are travelling in the woods, and, should you become lost, you will have everything necessary to survive almost indefinitely.
In days gone by, guides and loggers were well aware of the principles of keeping the body warm. They were active individuals, whether at work or at play, and they knew that bulky garments were a handicap. They knew very well that wool, even when wet, retains body warmth far longer than cotton or any other artificial fabric. Times have changed and the modes of dress have changed with them, but the principles that the early woodsmen applied in keeping warm are still valid and manufacturers still take them into account.
One of those principles is the value of nature’s own great insulator — air. Wool insulates so well because it traps a lot of air in its fibres. It is pretty much an accepted fact that the amount of dead air insulation is more important than its source. When dressing for the outdoors, even in today’s lightweight clothing, you should pay attention to the dead air principle.
Today’s lightweight garments have a remarkable ability to withstand penetrating winds, but often they do not effectively allow for evaporation of perspiration, which can amount to one-half litre (16 oz) of water every 12 hours. While walking, our bodies build up warmth, and we perspire almost continuously. When we stop to rest or stop for the night, unless this perspiration has escaped, it will be trapped in our clothing. This trapped moisture can be a serious problem in a survival situation, because it is essential to maintain body warmth by drying out before retiring for the night.
One way to avoid trapping perspiration is to wear wool and to carry with you a lightweight poncho which will give maximum protection from wind and rain while permitting the body to ventilate thoroughly. A hunter’s orange vest over your coat will add more weather protection as well as increase your safety.
Other fabrics as well as wool have valuable properties. Nylon is strong even when wet and is resistant to alkali, mildew, and insect damage, and it washes and dries easily. On the down side, it has low moisture absorption, but it will absorb and hold perspiration and body oils. Gor-Tex, Entrant, and Klimzate have tiny holes that allow water vapour to pass out yet prevent water drops from entering. These work well when the wearer is perspiring only lightly, when there is significant temperature and relative humidity difference between the two sides of the material, when the surface is not coated with a layer of water, and when the material is kept clean. Polypropylene has excellent insulation power, and it transfers moisture from the body to the outside layer of clothing where it is absorbed or evaporates. This fabric is quick drying, easy to care for, and non-allergenic, and it has a high abrasion resistance. Polyester is strong, durable, and inexpensive, it is moisture and rot resistant, and it makes ideal insulation for pants and other clothing articles.
Many types of clothing, both inner and outer, are available today. Don’t just go out and buy something because you like the style or colour. Ask questions of fellow outdoors enthusiasts, hunters, or Search and Rescue people and get their opinions. Sometimes sporting-goods store clerks can give you useful advice, though it’s important to be alert to their self-interest as well as your own. Based on all the information you can gather, buy what you feel is best suited for your activity, the weather, and the terrain you will be travelling over. I have often seen outdoors people spend good money on outer clothing only to have it ripped to shreds after a few hours of woods travel. I have seen people who could not possibly keep warm when they stopped to rest because all of their clothing was soaking wet with perspiration. You want clothing that is light enough for you to work in, yet with enough insulation value to keep you warm when resting. There is a happy medium for you — all you have to do is find it. No two people are the same, but if you find an article of clothing endorsed by several people engaged in activity similar to yours, the chances are pretty good that you will like it too.
One article of clothing is an absolute necessity: a hat. A great deal of body heat is lost through the top of the head, and you can reduce this loss considerably by wearing some form of head covering. This may not appear to be too important to you as you set off on a nice day. However, when retention of body warmth is crucial to your survival, a hat may save your life. As with other clothing, the choice of material is wide and varied, but any type will prevent some loss of body heat, and, even during cooler night temperatures in the summer, this is important.
Footwear is just as important as clothing. Your choice will depend a great deal on the type of activity you will be involved in. A good pair of hiking boots will probably be all you will ever need; however, if you are going to do much travelling through bush and wet terrain, you may wish to find something tougher and more moisture resistant. Again, as with clothing, ask around to see what your friends wear while they enjoy your activity and what has proven to be both sturdy and comfortable. I recommend wearing a boot that will support your ankles.
Rubber boots are waterproof, but they leave a lot to be desired in ankle support, and, because they do not permit ventilation, they are seldom comfortable. Leather boots can be waterproofed, and they are warm, but the waterproofing seals them and prevents any ventilation. Heavy moisture build-up can be expected in both leather boots that have been waterproofed and rubber boots, and they must be well dried after use. Felt insoles will help solve the moisture problem as they will draw the moisture away from the feet and socks, but they must be dried completely before they’re used again.
Lighter footwear could be a suitable choice if the terrain is gentle and you don’t plan to go far. Sneakers or tennis shoes provide good support and are comfortable, but they are not moisture resistant, and wetness causes a scalding effect on your feet. Biking boots are breathable, light, and comfortable, but they provide no support to the ankles.
Regardless of the type of footwear you choose, you should always carry an extra pair of socks, even when travelling only for a day. They will go a long way toward helping tired feet and warming cold ones. Wearing wet socks can create scalding, and walking with this condition is very uncomfortable.
Now you’re equipped: your ready pack is in hand, and you have appropriate clothing and footwear. There’s one job left: leave tracks at home.
First, leave actual tracks. Take impressions of your boot tread — or perhaps impressions from all the footwear you’d wear into the woods — and leave them at home. Should you happen to become lost, the searchers would have something positive to look for. This is especially good advice if you’re taking children with you, or if your children might stray into the woods by themselves.
Here’s how to do it. Place a sheet of aluminum foil on a piece of soft material, such as a folded towel or a pile carpet, and then step on it with both feet. Label the foil with the name of the person wearing that footwear and the date the impression was taken.
Then, let somebody know where you are going and what time you expect to return. This is not a major undertaking, but it is vitally important if you don’t return and someone has to go out looking for you. You don’t want to be the subject of this typical midnight phone call to the police:
“My husband has not come home yet. Would you see if you can find him?”
“Just what was your husband doing, ma’am?”
“He went hunting.”
“Where did he go?”
“I don’t know.”
“What time was he supposed to return?”
“I don’t know, but he’s usually home by dark.”
Where do the police start to look? What priority should they give to the problem? Do the circumstances warrant a full scale search? They have to ask your spouse a lot of embarrassing questions about your personal habits. Then, when they are satisfied that you are legitimately missing, they have to start looking for your vehicle. Providing you have had the forethought to park it in an open spot and haven’t hidden it, they will likely find it within the first few hours, but there’s no guarantee. You may be in for a long stay in the woods, and, if you are injured, that just may be too long.
Telling somebody where you are going and when you plan to return is not babyish. Although it is a kindness to those who care about you, it is primarily for your own benefit. At least you will have provided a general area where the police can begin their search for your vehicle. There may be times when you enter the woods for only a minute and don’t have a chance to tell anybody. (I have seen people become lost when they just stepped into the woods to answer the call of nature and not been able to find the way to return to their car.) Remember the trail tape you should always carry? Write a note on it and tie it to your vehicle’s radio antenna so the police will at least have a starting point when they set out to find you.
Usually in the woods you can’t see very far, yet you must know where you are, where you’re going, and how to get there. Therefore, it is important to take along a map and compass every time you go into the woods and to be comfortable in using them.
I recommend a topographic map, or “topo” as they are referred to by those who use them. You can acquire these from your local forest ranger office, and they will enable you to form a mental picture of the area you will be travelling in.
A topo is simply a schematic drawing that represents an area as seen from the air, and once you understand the principles, you can read the various symbols and markings. These symbols and lines are all defined on the margin of your map, and all you have to do is take a few minutes to learn what each represents. At least learn to tell at a glance the difference between a stream and a road, a hydro line and the map’s own grid line.
Contour lines show graduations in elevation, so you know that where these lines are close together the terrain will be steep, whereas far-apart lines show a gentle rise or fall. Elevations are usually given at even intervals (10 m, 20 m, 30 m, etc.) and are shown on the contour lines, while dots marking spot elevations show the highest points. The legend of your map will tell you just how much change in elevation the contour lines represent.
Other features on a topo map include highway systems, rivers and streams, lakes, communities, and occasionally buildings and other isolated structures.
By finding the features you can see before you on a map, you can pinpoint your own location. These features function like the signs you will see in shopping malls, airports or other large buildings: they say “You are here.” With this in mind, you can easily tell how major landmarks lie in relation to your base of operations and which of them you should be able to see on your route to your destination. Learn the scale too — the ratio between the distance between two points on your map and the actual distance on the ground.
By using the scale at the bottom of your map you can measure the distance between your starting point and your destination. Knowing how far you must travel, you can estimate approximately how long you will take to get there. At home, using a tape measure, mark off a distance of 100 metres and count the number of paces you take to cover that distance. If you will be travelling over different types of terrain, I suggest you do this in each of the types of terrain you will be in, if you can. If your estimate needs to be reasonably accurate, you can carry ten small pebbles in your hand and subtract one for every 100 metres you travel, or start with none and pick up one for every hundred metres.
The direction in which you will travel is determined from the map. You can usually assume that north is at the top of the map and south is at the bottom, but you will also see in the margin arrows pointing to both magnetic and true north. The degree of difference between true and magnetic north is called “magnetic declination.” This difference is caused by the fact that the magnetic North Pole is not at the same location as the true or geographic North Pole. The magnetic North Pole is located on Bathurst Island in northern Canada, about 2500 km (1560 mi) south of the geographic North Pole.
North of the equator, your compass needle will point to magnetic north. Magnetic north and geographic north are actually in direct alignment at about Thunder Bay, Ontario. As you travel east of Thunder Bay, your compass needle points more and more to the west of true north. As you travel west of Thunder Bay, your compass points more and more to the east of true north.
The magnetic North Pole is not stationary but continuously moves about, causing changes in magnetic declination. This change is very gradual — only a few degrees in a decade — so don’t worry that it will occur while you are taking a reading. To determine the exact declination in your area, call your local forest ranger office.
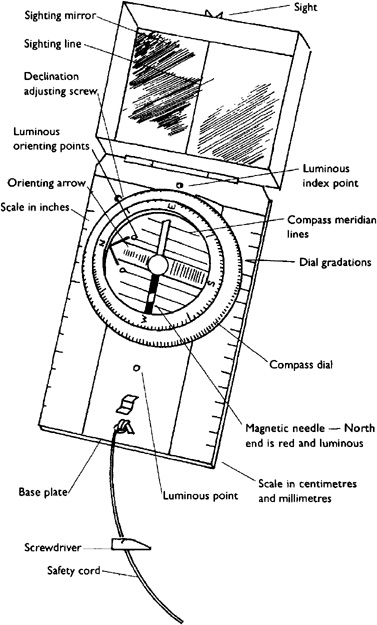
You will need a compass to go with your map. Trying to use one without the other is like trying to clap your hands by using only one hand. My favourite compass is the Silva Ranger, which is also used by many forest rangers and search and rescue people and by the RCMP. This type of compass contains all the necessary parts to enable you to use it properly together with a map, including a see-through base, a moveable dial, an adjustment for offsetting the magnetic declination. If your compass lacks this feature, you must always remember that the magnetic North Pole is probably not in the same direction as north on your map. You must calculate that degree of difference and take it into consideration when you determine your direction of travel. If your compass has this offset feature and you have set it properly, you can plan your excursion as if magnetic and true north are the same. This is why I prefer the Silva Ranger and similar compasses, and the following instructions assume that this is what you’re using.
First, as soon as you get your map, use a pencil and ruler to extend the true north line all the way up through the map to the top. Then, there are two methods of determining a direction (an azimuth) from a map, and I will describe both of them so you can compare one against the other.
This is a field method only. It cannot be done inside a building, over the hood of your car, or anywhere where you will have magnetic interference from areas of metal or hydro lines.
1. Set the magnetic declination on your compass for the area you will be working in. Draw a line on your map between your starting point and your destination.
2. Set 360/0 degrees on the hinge end of your compass.
3. Place the edge of the face of your compass along the true north line, making sure that the mirror end of your compass points toward north. (Otherwise you will be 180 degrees off and go exactly the wrong way.)
4. Turn the map and compass together until the north end of the needle falls directly into the orienting needle of your compass’s dial.
5. Don’t move your map. Your map is now oriented, that is, north on the map is the same as true north on the earth. Also, true north now on your compass is true north on the map. The map, the compass, and the earth are now congruent.
6. Place the edge of the face of your compass along your desired line of travel, making sure that the mirror end of your compass points in the direction that you want to travel.
7. Turn the dial of your compass until the north end of the needle falls directly into the orienting arrow of your compass.
8. Read the dial at the green mark on the hinge end of your compass. This is your reading, the azimuth you will want to use to reach your destination.
9. Proceed with caution! Think your way through! If you think of the four quadrants and know you want to travel in an easterly direction, and you discover you have an azimuth of 270 degrees (that is, due west), you know something is out of whack.
The second method can be used anywhere, and magnetic interference with your compass will not make a difference in your findings.
1. Draw a line on your map between your starting point and your destination.
2. There must be a grid line on the map representing true north-south intersecting this line. If not, you can draw in more north-south lines. If you must do this, make sure that all lines you put in are exactly parallel to the original north-south line.
3. Place the edge of the face of your compass along your intended line of travel, making sure that the mirror end of your compass points in the direction you want to travel.
4. Turn the dial of your compass until one of the meridian lines inside the dial of your compass is superimposed on a true north line on your map. Make sure that north on your compass points to north on your map.
5. Read the dial at the green mark at the hinge end of your compass. This is your compass reading, the azimuth you must take to reach your destination.
6. Proceed with caution! As with the first method, think your way through this before you start travelling.
When you’ve reached your destination and want to return to your starting point, you’ll need a reverse azimuth. To find a reverse azimuth, simply add 180 degrees, but be careful that the total does not exceed 360 degrees. If the total exceeds 360 degrees, subtract 180 degrees from your original azimuth instead. The result will be the reverse azimuth. Don’t get in the habit of simply turning your compass around and using the opposite end. This has all kinds of faults, and it is so simple to add 180 degrees to or subtract 180 degrees from your original reading.
If you plan to go hunting in a certain area and intend to use a particular course, you may find all the compass readings at one time and mark them on the map. Later, as you hunt, simply set your compass to the desired headings as you come to each waypoint. This saves time and eliminates errors because you are keeping an accurate log of your trip.
Additionally, when planning a hunting trip, you should mark the boundaries of the area in which you wish to hunt on your map — perhaps a road of some sort on the south, a river on the west, an old railroad bed on the north and a hauling road on the east. This way you won’t hunt farther from your starting point than you intended, a wise move if you don’t want to spend the night in the woods.
Another good idea for hunters with firearms hunting with a group: decide where each will hunt that day and where he or she will eat lunch. At noon, each fires a shot, with the oldest shooting first. This method accounts for all members of the party at a specific time. You must make contingency plans in the event that someone’s shot isn’t heard.
Before leaving the road and entering the woods, regardless of your starting point, you should check your compass and heading. You should make certain that the magnetic declination (the orientation needle) has not been moved or damaged. This check shows you which direction the road is running, and, most important, it determines the general direction or course which you must follow to return to the road. (It also assures you that you have not left your compass in your other pants pocket back at camp.) If you follow a deer track for a couple of hours, you can’t possibly follow an exact heading back to your starting point. However, if you know that a south-easterly course will put you back on the road, this is all the knowledge you will need to get out of the woods.
Tremendous strides have been made lately in the development of the Global Positioning System (GPS), and I carry a GPS unit whenever I’m in the woods. This little gadget can tell me where I am at any time, and, as well, it can tell me how far I am from my vehicle, what direction it is in, and, at my current speed, how long I will take to get there. You can pre-program a GPS unit to any location without ever having been there, so long as you know the co-ordinates.
Many times you will want to walk to a certain spot — a distant hill or some other significant landmark — but you know you will not be able to keep it in sight all the while. There are two ways of doing this: by using the information on your map, or by using your compass.
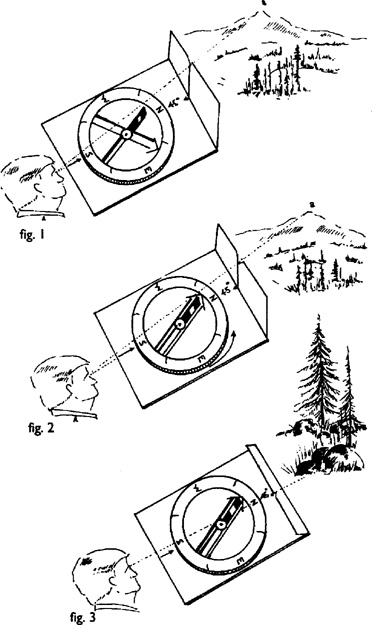
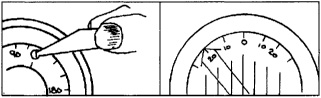
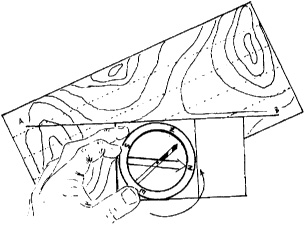
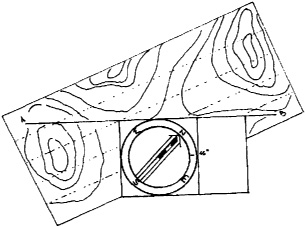
When you want to find the direction with your compass, face the object or place you will be travelling to, hold the compass in front of you at eye level, and look at the object through the gun sight on your compass dial (fig. I). Turn the dial of your compass so the north end of the needle is directly over the orienting needle. The reading at the green dot is the azimuth or direction you must travel (fig. 2).
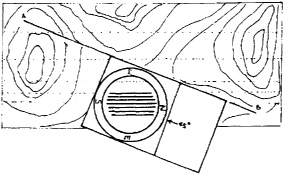
You can now walk from your starting point to your destination even though you go from hill to gully and lose sight of it several times. Pick objects along the way to walk to that are directly in your compass line and walk to one after the other (fig. 3) until you arrive where you want to be. Even if you have travelled this piece of woods before, remember to check every landmark and noteworthy feature against your map. Skip this simple precaution once, and you could be lost for a long time.
The golden rule: believe your compass. Unless it is obviously broken, or except under very unusual circumstances, it will do what it is supposed to do.
You can use any ordinary watch to help you find the north-south line. This system will work, even on cloudy days.
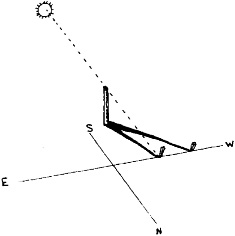
If the sun is out, point the hour hand of your watch at the sun. A line halfway between the hour hand and 12:00 standard time (1:00 daylight saving time) points south. On a cloudy day, hold a small stick at the centre of your watch so that its shadow falls along the hour hand. A line halfway between the hour hand and 12:00 standard time (1:00 daylight saving time) points north.
A person improvident enough to have entered the woods without a watch or compass, or unlucky enough to have lost them, can still improvise.
In the daytime, you can use the sun to find directions by using a branch or stick to cast a shadow. Find a straight stick about one metre (3 ft) long. On a level, brush-free spot, push the stick into the ground, inclining it to get a longer, bigger shadow if necessary. Mark the tip of the shadow. Wait until the shadow moves a few centimetres (10 to 15 minutes will do). Mark the position of the new shadow tip. Then draw a straight line from the first mark through and about 30 cm (1 ft) past the second mark. Now, put the toe of your left foot at the first marker and the toe of your right foot at the end of the line you just drew. You are now facing true north. Your left foot is at the west end of the line and your right foot is at the east end of the line. South is behind you.
This works because the sun always travels from east to west and so the shadow always moves in the opposite direction.
Another method works on the same principle. Push a one-metre (3-ft) stick into the ground so that it points directly at the sun and casts no shadow on the ground at its base. Wait 10 to 15 minutes; the stick will now cast a shadow. A line drawn between the tip of the shadow and the base of the stick is an east-west line, with the base of the stick at the west end.
You can also use the shadow tip method to approximate the time of day. At the centre of your already-drawn east-west line, draw an intersecting perpendicular north-south line and push a stick into the ground at the intersection. The shadow of the stick becomes the hour hand of your clock and thus you can estimate the time. The stick’s shadow would fall on the west part of the line at sunrise (6:00 a.m.) and on the east part at sunset (6:00 p.m.). At noon, the shadow would fall on the north part of the intersecting line. Of course, everywhere except at the equator, while the noon shadow is always true, the other hours will vary somewhat with location and time of year.
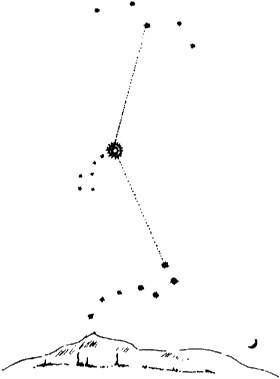
On a clear night, you can use the stars to find directions. To find the North Star, locate the Big Dipper in the northern sky. Visualize a straight line through the two stars forming the outer end of the bowl. Follow along this line about five times the distance between the two stars to find the bright star we know as the North Star.
The constellation Cassiopeia, a group of five bright stars shaped like a lopsided M, or a W when it’s low in the sky, can also be used to find the North Star. It is straight out towards the centre of the sky from the middle star in Cassiopeia, at about the same distance as from the Dipper lip. Cassiopeia is almost directly opposite the Dipper; therefore, one constellation or the other will generally be visible so you can find the North Star.