No matter how much you prepare, no matter how experienced you are, eventually you’re likely to end up not where you thought you’d be. When do you know that you’re lost? You may have been feeling uneasy for some time, but you know for sure when you can’t deny any longer that night will arrive before you do. Even if you know where you are, but you’ve been delayed by injuries (or blisters), or you’ve simply underestimated the time you’d need to get out to wherever you’re expected, other people will believe you’re lost. Of course, it’s possible to realize you’re lost at any time of the day, but, since the realization most frequently dawns at dusk, I’ll explain how to handle the situation from that perspective.
The first thing to do is to stop, sit down, and gather your thoughts. There’s no point in charging through the woods in an unknown direction towards some unknown destiny. Look the situation over and take stock of what is at hand. Decide what should be done first and what can wait until later. Now is the time to prove to yourself that you really are worthy of the title “ woodsman.“
As you make your preparations to spend a safe and comfortable (if unexpected) night in the woods, keep your ears open even though your eyes will become less and less useful. People may be looking for you. Don’t pay too much attention to rifle shots fired at random. If searchers want to get your attention this way, they will fire three well-spaced shots and await a two-shot reply. Be alert for chain saw motors, car horns, a siren, or a whistle — searchers may try to get your attention with any of these, and you, properly equipped as you are, will be able to reply with your own whistle. Answer any sound you feel may be directed to you, but stay where you are. Don’t try to walk to searchers; let them come to you. Searchers are likely to have strong lights, but if you try to travel at night you probably will just get in more trouble.
Maintaining a constant body core temperature is vital to survival. But you’re lost. There are no national park lean-tos in sight. Therefore, you must call upon your ingenuity and improvise a shelter.
Think: what do you need? Your first decision should be the selection of your campsite. In making this choice, you should keep in mind natural shelter. The side of an open hardwood ridge affords little natural shelter from either wind or rain. A better bet would be to find a place with a canopy of green growth on the edge of open hardwoods. Such a site will afford both the shelter of the canopy and an abundance of dead firewood. If the spot you select is near a clearing or shoreline, so much the better, as this open ground would make it easier for you to signal a rescue plane. Also consider the availability of drinking water in picking your campsite, but don’t set up near a roaring brook or a waterfall — you won’t be able to hear signal shots or your rescuers’ shouts. And don’t make camp under a tree loaded with snow, which might come down on you and your fire.
Anything you can use to protect yourself from the elements can be considered shelter. Here is where plastic garbage bags prove their worth. A lean-to can be made by placing poles against a ledge or bluff, and the poles can be thatched with evergreen boughs. This construction, with your plastic bags to waterproof your new home, can make a very comfortable shelter and keep you warm and dry through the foulest weather. You can use dirt and grass to chink holes or cracks and cut down the draft, and you can make a fairly comfortable bed by placing boughs on the ground beneath you.
Your shelter needs to be just big enough for you to get inside without too much cramping. It will take only a few minutes to build, and you don’t have to worry about being marked for neatness. A few branches leaned against a low limb and lined with a garbage bag will serve just as well as an elaborate lean-to that would make an entire Scout troop a proud home. Squirming your way in under an old windfall is also a good quick way to find a shelter.
In very hot weather, remember that shade from the sun is your most important daytime requirement. You will need to rest in the shade during the hot part of the day, keeping your clothes on and your head covered. It is also helpful to have moving air — a convection current. Air temperature below the ground surface is up to 40 degrees cooler than the air above ground. A closed metal structure without adequate ventilation, such as a vehicle or storage shed, can become hot enough to kill you. If your stay extends beyond overnight, work during cool periods to improve your shelter. Build a fire at night if the temperature drops to an uncomfortable level.
In very cold weather, a fallen tree is the basis of the easiest shelter to construct. It already has a roof, a floor, and one side, and, if there is snow, a shelter may thus be available, already partially made.
In an exposed area, you will have to scrape out a trench in the snow, or, if there is no snow and the ground is not frozen, scrape out a trench in the ground. Pile snow, or rocks or other materials, on the windward side of the trench to make a wind break. Line the trench with evergreen boughs, grass, bark, extra clothes, or any handy insulating material. Cover your trench with snow or evergreen boughs and crawl in. Close the opening if you can to keep your body heat inside.
Snow is a good insulator and gives adequate protection from the wind, but digging a snow cave can take time, and it requires considerable energy. Finding and adapting a snowbank may be less trouble. Either will require work, though, and you must pace yourself to minimize sweating, because you must keep your clothes dry. Ensure that your shelter has ventilation, both to prevent your clothes from becoming damp with perspiration or your breath, and to keep ice from forming. Ice on the inside of your shelter will become a conductor of heat rather than an insulator. I recommend using a candle as a small source of heat, but ventilation is necessary to make sure the candle (or other heat source, if you have one) does not consume all the oxygen.
In extreme cold, shelter should not be taken in icecoated or metal structures, as metal and ice become conductors and deplete your body heat very rapidly.
The type and size of your shelter will determine your need for a fire. If you have a small, dry, insulated shelter, you will lose less heat and have less need for a fire. You will have to ask yourself if building and maintaining a fire is worth the cost of the energy it will take.
Rules of thumb:
• The better the shelter, the less need for a fire.
• If your clothing is inadequate, you will require a good shelter.
• If your clothing and shelter are both inadequate, you will require a fire.
You may not absolutely need a fire, but you may want one anyway. Most nights get cool enough to make you uncomfortable without a fire, and on a warm evening a fire will make a great signal for searchers. In addition, where man finds work he finds contentment, and gathering firewood is a positive action that will relieve you of the burden of imagined danger.
One in four people cannot start a fire in dry conditions with a match. The reasons for firecraft failure are impatience, inexperience, and poor selection of starter fuels, and the single most important factor in fire starting is the knowledge of fire starters and kindling. Starting a fire in a downpour may seem impossible, but many dried branches, helped by birch bark, a shaved fuzz stick, and some egg carton fuzz balls, will light and burn, even in the heaviest of rain, if given a little shelter.
The first step in making a fire is to decide where your fire will be. Select an area that is protected from the wind, near potable water, if possible, and near fuel supplies, and prepare your fire spot properly so you won’t start a forest fire. Make a fire circle 2 m (6 ft) in diameter on sandy or gravelly soil. A circle of dry rocks can contain the fire, and, if you plan to cook, walling in the fire will concentrate the heat. But never use rocks found in wet areas, such as a stream bed, a swamp, or any other place where they may have been submerged in water. Wet rocks may explode when heat expands any water trapped in their pores. Never build a fire near dry, flammable materials — in very dry grasslands, under overhanging branches, in a very dry forest — or under a snow laden tree, directly on the snow, or on or near wet rocks. A reflector on one side of a fire makes it more efficient, but if you choose a fire site with a large rock surface or at the base of a cliff, do not use the rock as a reflector. Build the fire so that you can sleep between the fire and the rock. The rock will provide warmth on one side and the fire on the other. In colder weather, several small fires built around you heat better than a single larger fire. If a fire must be built in deep snow, build it on a platform of green logs to keep the fire from sinking.
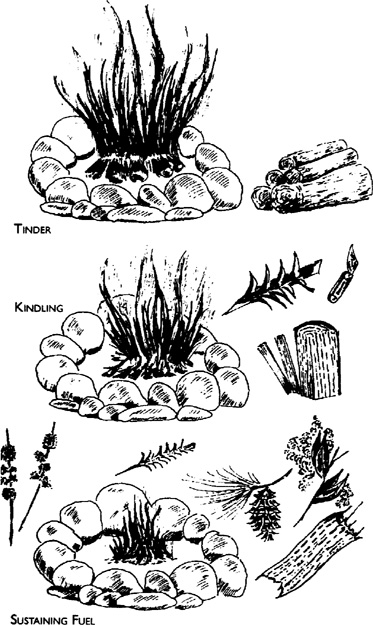
As soon as you decide that a fire is necessary and where it will be, you must gather all your fire material before attempting to start it. Make all your movements count. Even your supply of wood can be used as a windbreak by careful arrangement, and this will conserve fuel as well as reflect heat. You should collect three piles of materials: tinder, kindling, and sustaining fuel.
Tinder is anything that will ignite at a very low temperature with a spark, a small flame or some other heat source. Nature has provided many excellent fire starters. Birch bark is ideal because it contains an oil that will ignite even when wet. Dead tree moss, leaves, and grass also make excellent tinder. When it is raining, your supply of fire starters will prove their worth, and here are some other materials you can use as tinder:
• cotton or scraped cloth
• fine, dry wood shavings
• bird down
• lint or clothing fuzz
• steel wool
• seed down, such as cattail fuzz
• paper
• hair
• dried moss or lichen
• dry, reddish pine needles
• pitch wood, finely shaved or powdered wood
• inner bark of cedar
• candle
• shaved fuzz sticks
• petroleum products or cloth soaked in oil or gas
To make a shaved fuzz stick, select a small dry stick. Begin shaving it from the centre toward the end, but stop the cut just short of the end of the stick so that the shavings are held on.
Use petroleum products cautiously as fire starters. Please be sure you understand their explosive nature and take the necessary precautions.
You can make tinder at home and carry it with you. Try filling the holes in an egg carton with lint from your clothes dryer. Pour melted wax over the lint. You have now created 12 “ fuzz balls” that are lightweight, will ignite easily, and will burn for several minutes: excellent fire starters. Other articles soaked in melted wax serve the same purpose: cotton batting, old socks, or almost any cloth. It’s smart to carry something of this nature to be used as tinder. So is carrying flint and steel or a metal match as a backup for your waterproof matches and Bic lighter. A common candle is a useful addition to your fire starting kit, as it will ignite easily, it will burn for a long time, and, if you can get it out of the fire, it can be used many times. After you’ve used your candle to start your fire, you can then use it for illumination.
For kindling, find something that will ignite easily from the tinder. It needs to be small in diameter and broken, split, or shaved to increase flammability. Finely split wood, small dry dead branches, or dead dry twigs, which are often available near the base of green trees, are good for kindling, or you can make a fuzz stick. A good supply of kindling should be kept handy in case the fire goes down during the night.
Sustaining fuel is anything that will burn for an extended period. Generally, it will not ignite from the initial flame, and it requires a high temperature for continued burning. You can use:
• dead wood
• pitch
• dry peat
• coal
• dried dung
• rubber
• green wood
• animal oil or fat
• grass tied into bundles
• petroleum
Be careful of what you choose, because some man-made products, such as Styrofoam, may emit poisonous gases when burned, and others, such as containers, may explode.
Green wood will burn if finely split. If it’s dry, nearly all dead wood will burn, and you can find dry wood in the centre of standing dead trees or damp, dead wood lying on the ground. If you have no cutting tools sufficient for splitting wood, whittle a wedge from a piece of hardwood and drive it into weathering cracks in the end of the wood you want to split.
How much wood is needed to sustain a fire overnight? A good rule of thumb is to gather what you think you will need, stand back and have a good look at it, make a guess as to how much wood you have, and then double it, because that’s how much you will need. A good test is to measure your fire’s consumption for one hour, then multiply that by the number of hours you expect to be in darkness.
Now you can build your fire. Arrange the material so that when the tinder ignites, the heat and flame will rise through the maximum amount of kindling. A tepee shape works well. Stack your kindling on end, in the shape of a small tepee about 30 cm (1 ft) high, with your tinder inside the base of the tepee. Now, ignite the tinder.
There are many possible sources of the spark that will ignite your tinder. Learning the primitive skills required to make a spark using friction takes a lot of time, practice and energy, although they give you a great sense of pride when you have mastered them. But modern inventions such as lighters or matches carried in a waterproof container are considerably more reliable and convenient.
Many sporting goods stores carry different types of spark-producing fire starters, such as flints and steels, metal matches, and magnesium fire starters. You can also use your vehicle battery to make a spark. Or you can intensify the sun’s light with a magnifying glass, any camera or binocular lens, or a flashlight reflector to start a fire safely.
As your tinder starts to burn the kindling, add larger pieces of fuel. Always start with small pieces and work up to larger materials. Make sure you don’t smother the fire by adding too much fuel and cutting off the draft and the oxygen necessary for combustion. As the fire becomes larger and hotter, you can start to put on damper and greener wood.
If you have gasoline or oil available, and also a can, fill the can partially full (about 5-7 cm or 2-3 in) with dry dirt or sand. Then saturate the dirt with oil or gasoline, add a cloth wick, and you have improvised an emergency stove.
Even though you’re lost in the woods, you’ve provided yourself with a cosy shelter and a fire. Now for a good night’s sleep. To keep nice and warm, you should keep your head covered to prevent the escape of body heat. You should never enter your sleeping area to sleep while you are sweating — let yourself dry off first. You can open your shirt neck, uncover your head, and take off your jacket to cool down, but don’t overdo it and get a chill before you retire. If you’re short of bedding, remember, thickness combined with dead air equals warmth. Even totally dead dry grass can be used by stuffing it into your clothing or around your sleeping area. Wrap it around your knees, ankles, elbows, feet and chest to help maintain your natural body heat.
Eating sweets before retiring gives a boost to your metabolism which will keep you warm long enough to allow you to fall asleep. Doing light exercises by flexing your muscles, working them against each other without sweating, will stimulate your natural body heat, and then, as you lie down, you will feel cosy and comfortable.
Satisfying your body’s need for water is critical to survival, and your minimum requirement of two litres (64 oz) a day doubles in hot weather. Obtaining water may not always be easy, but you can improvise rain water collectors and catch rain in plastic bags or waterproof clothing. In an emergency, you can wring water out of vegetation, devise stills, or dig catch basins for seepage water. Efforts to find water by searching and digging will consume energy and body liquid content, and thus they will increase your water requirement. Drink plenty of water any time it is available, particularly when you are eating.
Remember that your body can lose up to half a litre (16 oz) of water a day in sweat. Therefore it’s important to conserve your body fluids by controlling your sweating, especially in hot weather. Keep your clothes on so perspiration doesn’t evaporate so fast and so you don’t get sunburned. Wear a hat and a neck cloth. If you have a choice, wear light-coloured clothing to reflect light and heat. Stay in the shade during the day. Ration your sweat, not your water!
Along the coast, you may sometimes find water in dunes above the beach or sometimes in the sand above the water level. If not, you can find water by digging a hole just behind the first sand dune from the shore. A damp area in a depression is a likely place. Dig until the hole begins to fill with muddy water, but don’t dig too deep or you may get salty water, which is unfit to drink. Let the impurities and suspended particles settle until the water looks clear. Make the water safe to drink by purification and clarification, explained below.
Mountainous or hilly areas are the easiest geographic environment in which to locate water. Most canyons have streams, springs, or intermittent run-off flows during all or part of the year. Dig a hole in a stream bank approximately 2 m (6 ft) from the stream, allow the water to seep in. Wait for it to settle.
If you don’t find a stream nearby, look for large rock formations bearing green moss or lush vegetation and seek water at the base. Small isolated clumps of green vegetation in arid regions are good signs of springs. Water is easier to find in loose sediment than it is in rock. Look for springs along valley floors. Benches or terraces above river valleys may have springs or seepages along their bases, even when the stream is dry, and dry stream beds may have water just below the surface. Dig at the lowest point on the outside of a bend in the bed channel. Signs of damp sand along the bottom of a canyon or the base of a hill also suggest that you might get water by digging a seepage hole.
Animals other than humans need water and congregate at good sources. Watch for animals and birds moving in the early morning or late evening. They are probably moving toward water. When an animal trail forks, the best-travelled branch usually leads to water, because animals converge more and more on the same trail as they near a water source. But if you come upon a pond or slough with few or no animal tracks around it and few plants nearby, the water may have a high mineral content which could cause extreme illness. Do not drink it.
As long as you have a plastic bag, you can distil your own water using vegetation or the sun. Some garbage bags are treated with anti-fungal or anti-bacterial chemicals, and these should not be used for making a still. Clear plastic bags are the most efficient. Water produced in a vegetation still will taste like the plants that are used. Whether or not poisonous plants produce poisoned water is still being debated; therefore, I suggest that you not use poisonous plants. Do not drink water that has been in direct contact with the vegetation or that has dripped off of the underside of the vegetation.
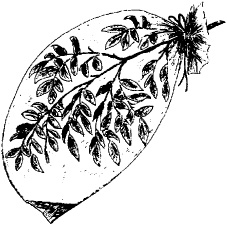
Tree and herbaceous plant roots draw moisture from the ground, but a tree may take it from a water table 15m (50 ft) or more below the surface, too deep for you to reach by digging. You don’t have to. You can let the tree do the pumping for you. Choose a tree with healthy vegetation and leafy branches. Place a plastic bag over as much of a leafy branch as you can. Keep the mouth of the bag at the top, and make sure a corner hangs low to collect condensation.
You can do the same with any leafy shrub, or even cut vegetation. Place a plastic bag like a tent over any vegetation. Support the tent with a padded stick upright under the centre, and be sure you have a trough to collect the condensation around the bottom of your tent. Water drawn from the plant by the sun will evaporate and condense on the plastic. As the condensation cools, it will trickle down the plastic and collect in the trough or channels at the bottom. Don’t let the foliage touch the plastic, because it will divert the moisture.
Solar stills work slowly and require hot sunlight and patience. Dig a hole 1m (3 ft) wide and 1m (3 ft) deep in the location where water would stand the longest after a rain. Line the bottom of the hole with any green vegetation. Place a water container in the centre on top of the vegetation. Run a tube through which you could suck water, if you have one, from the container out over the edge of the hole. Lay clear plastic over the hole so that it sags down in the centre above the container, and seal the edges of the plastic with dirt. Place a small rock insulated with cloth or paper in the centre of the plastic, directly over the container.
This still can produce half a litre (16 oz) of water in about three hours. Use the drinking tube and open the still only when necessary, as regaining the operating atmosphere inside once the still has been opened takes a long time. Make several stills, if you have the materials.
Water is critical to your survival, and your life may well depend on your ability to find or create it. This is another reason why your emergency kit should contain plastic bags.
During the winter or in the Arctic, getting enough water to prevent dehydration is as much a concern as the cold. Streams or lakes may provide access to water. If the sun is shining, you can melt snow on dark plastic, a dark tarp, the metal surface of your vehicle, or any surface that will absorb the sun’s heat. Whenever possible, melt ice for water rather than snow. You get more water for volume using less heat and in a shorter time. Do not eat ice or snow; not only is the expenditure of body heat to melt it too great a sacrifice, but, if you eat ice or snow over long periods, the mucous membranes of your mouth will become swollen and raw.
The water you find or make while you’re lost in the woods may not be of the best quality and can cause nausea, vomiting, diarrhea, low fever, vague feelings of discomfort, fatigue and weight loss. You do not need any of these symptoms. Therefore you will need to clarify and/or purify your water.
There are several methods to clarify water, depending on your equipment and the water source. If you’re getting water from a seepage hole, simply wait for the bits to sink. You can fill several containers with water and let them stand until the sediment has settled, then pour the clarified water off very carefully.
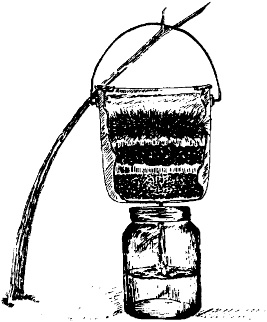
You can filter water by pouring it through several layers of cloth, or you can improvise a filter by putting layers of sand on the bottom of any container with a small hole in the bottom, adding a layer of charcoal and placing a layer of grass on top. Pour in the water, and, as it filters through the contents of your can, it will come out clear.
Remember, clarification is not purification. Clear water can still be contaminated. The best way to purify water is to boil it vigorously for about 10 minutes. Add one extra minute for each 300 m (1000 ft) of altitude. In addition to boiling, you can also use chemical purifiers. Add 4 drops of tincture of iodine to each litre (32 oz) of clear water, or 8 drops to each litre (32 oz) of cloudy water. Or add 2 drops of bleach per litre (32 oz) of clear water or 4 drops per litre (32 oz) of cloudy water. If you use water purification tablets, follow the instructions on the package.
If you must drink questionable water in an emergency, seek medical attention as soon as possible.
Personal cleanliness safeguards good health by preventing or minimizing internal and external infection and infestation by parasites. Dirty hands can infect any open abrasion and inoculate you with the bacteria in the dirt, and this can lead to infected open cuts or blisters or even to tetanus.
Wash your feet only after the day’s work is done, and do not rinse your feet off at travel breaks. I encourage you to take water out of the stream to wash your feet, rather than washing them in the stream. Dispose of wash-water in a cat-hole; don’t pour it back directly into the stream.
Properly used signals will make others aware of your plight, and the sooner you start signalling, the sooner you will get someone’s attention. You must accomplish your signalling without further endangering yourself and in such a way as to improve your chances of being rescued. Your location and distress must be recognized before anyone can rescue you.
The internationally accepted distress sign is a series of three repetitions of any signal — three shots, three fires in a triangle, three whistle blasts — and the response or acknowledgement by the rescuers is two repetitions of any signal.
You can make signals using many different things, and your emergency kit will equip you with some of the materials:
• fire and smoke, natural or canned
• lights
• shadows
• movement
• flags or coloured signalling panels
• dyes
• flares or rockets
• mirrors
• whistles
For maximum efficiency, place signal fires in open areas. Effective smoke signals need to contrast with the surrounding environment: dark against snow, white against dark turf, etc. For black smoke, add to your fire engine oil or rags soaked in oil, plastic, pitch, pitch wood, or pieces of any rubber product. For white smoke, add to your fire green leaves or boughs, moss, ferns, a little water, or wet cloth.
Create an evergreen torch by cutting a small evergreen tree with dense foliage and moving it to the centre of any clearing. Stand it upright and place dry tinder in the lower branches. When an aircraft approaches, light the tree. Smoke, in most circumstances, will shoot upwards 40 m to 55 m (130 ft to 180 ft).
You can send mirror signals with the purchased or improvised mirror in your ready pack, or you can make any shiny metal, grease-coated unpolished metal, or food tin function as a mirror. This type of signal can be seen for miles even on hazy days.
Shadow signals, for best results, should be arranged in a north and south line and made in an international distress pattern of three, using straight lines and right angles.
If you use colour signals, remember that searchers can best see bright colours contrasting with an oppositecoloured background. Bright royal blue contrasts with all environments. Small signal panels or flags are more visible when moved slowly or waved.
Repeated sounds coming from unusual places or at odd times attract attention, and anything audible can carry a vital message that someone is in trouble. Change in landscape, such as brush cut in conspicuous patterns, large lettering tramped in the snow, or rocks piled in regular mounds all spell “ help” to rescuers. Anything that will disturb the natural look of your environment is attention-grabbing and could be the signal that attracts your rescuers.
Safe and Sound is not intended to be a wilderness medicine manual. This section of the book should be understood only as instruction in how to help yourself or your companions in case of common back country injuries until trained rescuers arrive. Anyone who spends much time in the woods should take the courses in first aid that are available in most communities.
People can suffer from exposure or hypothermia at any temperature below the normal body temperature; it does not have to be freezing. Symptoms of hypothermia will include shivering and feeling cold, which progress to unconsciousness and, if not treated, eventually to death. The treatment is to warm your body as quickly as possible. You can do this in any number of ways — drink hot liquids, warm yourself by a fire, get out of the wind, change wet clothes to dry, exercise mildly — but you must increase the body core temperature. Avoid caffeine and alcohol. Both promote hypothermia because they dilate the blood vessels all over the body.
Hypothermia is easy to prevent: reduce heat loss and increase heat production. Dressing properly is your most useful tool in preventing heat loss, and mild isometric exercise is the best way to increase heat production.
Applying direct pressure to small cuts will stop the bleeding under most circumstances. To do this, simply place a clean pad over the wound and press hard. You can make a pad out of any clean piece of cloth, such as a handkerchief or shirt-tail. If pressure does not stop the bleeding, apply pressure with your finger(s) directly to the artery feeding the area. If the cut is in the lower arm, you will find the spot to apply pressure — the pressure point — on the inside of the arm between the armpit and the elbow. If the injury is to the leg, you can find the pressure point in the groin towards the front, about where your leg joins your torso. The strong pulse will tell you when you have found the right place. Pressure on these points will usually stop any bleeding on the arms, hands, legs or feet.
If bleeding still persists, use a tourniquet. Make a loop from your belt or a strip of cloth (don’t use a wire or cord). Make a pad out of a piece of cloth to place between the tourniquet and the skin to act as a pressure pad and to protect against injury to the tissue. Place the belt or cloth strip about 5 cm (2 in) from the injury, between the injury and the heart; wrap it around the limb twice and tie it off with a knot. Place a stick through the knot and twist the loop until the tourniquet is just tight enough to stop the bleeding. Once the tourniquet has stopped the bleeding, leave it alone; don’t remove it.
If you are not sure if the injury is indeed a fracture, treat it as a fracture anyway. The most important thing is to prevent the broken bone ends and adjacent joints from moving. Splint the limb by using either saplings or small tree branches to immobilize both the joint above and the joint below the injury. Pad the branches and the limb for comfort. Tie the splint in place with a belt, a strap, or cloth strips torn off clothing, but don’t cut off the circulation.
It is common for people travelling through the woods to sprain their ankles. Taping, wrapping, or, splinting the ankle firmly over the shoe or boot will permit the injured person to walk short distances without too much difficulty, and you can easily improvise a crutch.
Extremities such as noses, ears, fingers and toes are the body parts most likely to freeze during cold weather. Early frostbite symptoms include slightly flushed skin that later become swhite or greyish-yellow. Either pain or loss of sensation is a warning of impending freezing. Apply warmth, but do not rub the affected part. Warm your fingers or hands in your armpits, then firmly place them over the affected part. Drink warm or hot fluids if they are available. If you absolutely must walk with frostbitten feet or toes, do not thaw them out before you reach medical help. The pain and swelling that accompany thawing might prevent you from putting your footwear on again or even prevent you from walking.
Shock will often set in after an injury or loss of blood. Symptoms include extreme pallor, cold sweaty skin, severe thirst, and excitability. To help prevent shock, and also to treat it, keep the injured person warm and lying down. Keep the head low unless the injury is to the head, in which case the injured person should recline in a half-sitting position.
Any burns will likely be minor, but they should not be ignored. Don’t try to clean the burn or break the blisters. Unless you have a clean dressing, leave the area exposed. Don’t use iodine or antiseptic or apply grease, butter, or cotton to burns. But don’t let the burned area get any dirtier, and protect it from sunburn, scrapes, and other further injuries.
Symptoms of a heart attack include a severe gripping pain in the chest; difficulty in breathing; pain spreading to the neck, to one or both arms, and sometimes to the face; loss of control of normal body functions; profuse sweating; a fluttery feeling; and rapid pulse. If you think you are having a heart attack, lie down with your head slightly raised. Loosen any restrictive clothing to ventilate your body and enable you to breathe freely.
What you do next will be governed by the amount of residual pain after the initial attack passes. If you begin to feel cool, refasten your clothes to stay warm. If you fire signal shots, do not take the shock of recoil on your shoulder — rest the butt of the rifle on the ground. Build a small fire if you’re cold and if wood is handy and can be gathered with an absolute minimum of exertion. Even if you begin feeling better, do not exert yourself in any way. Plan your moves carefully. Don’t panic. Rescuers will find you.
When you’re lost, you really should stay put to enable searchers to find you quickly. If you have a stalled vehicle, it’s likely to be highly visible, and you should stay with it. But, if you absolutely must move on, follow this plan. Leave a note at your campsite. If you forgot your trail tape and pencil, carve a message in a tree or stamp it out in the snow. Then set up sticks or stones pointing in your direction of travel, and mark your trail as you go.

In most areas, there will be an abundance of logging roads, some new and some barely visible, but you will have difficulty in telling which way to go towards civilization and which way would lead you further into the woods. Usually you can determine which way leads to safety by remembering that bulldozers pushed their way in towards the deep woods; trees pushed over on the roadside will lean in that direction. You merely have to walk in the direction opposite to the lean, or against the tree tops. Also, where side roads join the main logging road, the turns will be in the direction of civilization.
You can also follow a brook or stream downstream. The smallest trickle of water, deep in the woods, will eventually end up in the ocean. All you have to do is follow it, and sooner or later you will encounter indications of civilization.
Don’t let these woods-travel tips encourage you to try to find your own way out. Remember, except in an unusual circumstance, you are far better off to wait where you are. You will be found.
Although you are lost, the chances of being found before you actually need food are excellent. Still, eating makes everyone feel better. There are few places you can go in the world where you will be far from some kind of vegetation — bush, vine, creeper, flower, grass or lichen — which you can eat to nourish yourself. The only skill you need to make use of these plants is to know which is which and where to find them.
Here are two simple rules to govern your use of edible plants.
1. Leave all mushrooms alone. Mushrooms are mostly water and, from a nutritional standpoint, they aren’t worth the gamble.
2. To see whether fruits are edible, cut them horizontally. If they have a star-shaped seed compartment, like an apple, they are edible. But if they have a single seed, like a peach, you had better not risk eating them.
I have serious reservations about eating unknown plants. A person can survive for several weeks without any food at all as long as he or she has a supply of water, so finding food should not be a priority for someone temporarily lost in the woods. Although there are no animals in the woods that cause you harm if eaten, there are some plants that will cause you considerable discomfort and may even be fatal. Do you want to take the chance?
Do not assume that, because birds, mammals, or insects have eaten a plant, it is edible for humans. If you feel that eating unknown plants is essential to your survival, test them using the following procedure. Only one person should test each plant. Never take short cuts. Complete the whole test. If in any doubt, do not eat the plant. Should stomach trouble occur, get relief by drinking plenty of hot water; do not eat again until the pain goes away. If the pain is severe, induce vomiting by tickling the back of your throat. Charcoal from your fire is a useful emetic, and white wood ash mixed to a paste with water will relieve stomach pains.
1. Try to identify the plant.
2. Ensure that it is not slimy or worm-eaten; it will be past its best and have little food value other than the grubs and worms on it, and some plants, when old, change their chemical content and even become toxic.
3. If the plant looks all right, crush a small portion. If it smells of bitter almonds or peaches, DISCARD. This is the smell of strychnine, a deadly poison.
4. Rub lightly or squeeze some juice onto a tender part of the body, under the arm between the armpit and elbow, for instance. If you feel any discomfort or see any rash or swelling, DISCARD.
5. If the plant does not irritate the skin, proceed in the following stages, going on to the next stage only after waiting at least five minutes to check that there is no unpleasant reaction:
• Place a small portion on the lips.
• Place a small portion on the corner of the mouth.
• Place a small portion on the tip of the tongue.
• Place a small portion under the tongue.
• Chew a small portion, but do not swallow.
If you feel any discomfort whatsoever, such as sore throat, irritation, stinging or burning sensations, itching or swelling, DISCARD.
6. Swallow a small amount and wait five hours. During this period, eat or drink nothing else.
7. If you have no reaction, such as soreness to the mouth or other discomfort, or digestive problems, you may consider the plant safe. Do not eat large quantities of any one plant at a time, and, if you are not used to eating a plant, start by nibbling a fresh specimen.
All birds and animals are edible, even though some are not too palatable. If you catch either fish or game, you must be sure to cook it thoroughly. If you have a small container for cooking, so much the better. If not, you can fashion a nice cooking pot with your aluminum foil. Cut any meat in small pieces and boil it thoroughly. The broth will have as much nutritional value as the meat itself. If you can’t boil it, cut it in small strips and cook it on a stick.
Again, it is important to remember that food is the least of your worries. With plenty of water, your system will sustain itself for long periods with no food or with what you have in your ready pack. Try to keep your mind off your stomach and put your efforts into your shelter or signals.
If you have done everything you were supposed to do, help will be on the way, and all you have to do is wait. In my 40 years of work with Search and Rescue, I’ve learned that most lost people are found within 12 to 15 hours from the time they are reported missing. Even if you have to stay in the woods for longer than this, there is no need to fear anything out there. You must keep yourself busy and stay in control of your mind and imagination. Fear has a way of working on the mind, and, if you let it, it will create far more evil monsters than have ever actually existed. If you keep your body busy and your mind on what you need to do to survive, everything will turn out just fine. Don’t worry too much about food — you now know that you can go for many days without food as long as you have an abundant supply of water. If you have the slightest concern about your safety, don’t just sit and worry about it. Do something. You can always gather more firewood or work on improving your shelter. If you are in complete control of your mind, you can just wait, be patient, and enjoy the wonderful peace and quiet of the woods. Help will come, and within a few hours you will be back home with your loved ones telling of your experience.