Thermodynamics
Keeping It Cool without Electricity
Idea by Kathy Ceceri
One of the key features of the mad scientist’s kitchen is the two-story walk-in refrigerator. You can keep anything cold in there! The only drawback is the power bill; the local utility is threatening to shut us down. We’ve tried a number of our own solutions to keep down electricity costs, but we haven’t quite been able to keep the giant hamsters (the ones we genetically engineered to run in the giant wheels to spin the turbines) from exploding every forty-seven miles. So we need to figure something out, because what mad scientist doesn’t need their cup of ice cream before bedtime each night?
Obviously, if we’re going to have our ice cream, we’re going to need to keep it cold, and that means we need to devise some kind of cooling system that will run without electricity. At least until we get the hamsters sorted out.
Refrigerators work because of the Second Law of Thermodynamics, originally conceived by Nicolas Carnot in 1824, and more clearly stated by Rudolf Clausius in 1850. The law basically says that heat energy degrades over time—a process called entropy. Heat always flows to an area of lower heat, never the reverse (unless you add more energy to the system). This has a whole bunch of ramifications with respect to how machinery works, and explains why the fabled perpetual motion device can never actually exist. But for us, the law is important because it helps us keep our ice cream cold!
When a liquid turns to a gas by evaporation, the energy that was used floats away with the evaporated liquid, taking heat with it. In the 1750s, scientists like Benjamin Franklin experimented with cooling things by evaporation. They used liquids that evaporate quickly, such as alcohol. But these “volatile” liquids are also dangerous to handle.
However, even evaporating water can keep a container cool. In West Africa the zeer pot is a traditional kind of evaporative cooler that has been updated for wide use where electricity is unavailable. In Australia in the early twentieth century, housewives used evaporative coolers when they didn’t have electric refrigerators. In many places where a hot climate is the norm, devices called swamp coolers are used as a less expensive alternative to traditional air conditioners. Swamp coolers are evaporative coolers, simply using fans to blow warm, dry air through pads that are kept constantly wet. The incoming heat evaporates the water, dissipating heat energy and causing the exhaust air to be cooler (and moister) as a result.
For this experiment, we will use the same principles to keep a small space cold enough to store ice cream. The process outlined below will help you think about potential alternative designs that you could come up with yourself, and perhaps include in a science fair experiment.
STEP 1: Design Your Evaporative Cooler
To design your cooler, there are a few important criteria to consider:
1. Evaporative coolers consist of containers that can soak up water and let it evaporate into the atmosphere, thus expending heat energy and becoming colder in the process. They work best in hot, dry climates, where water evaporates quickly. It is useful to position them in direct sunlight and in a space with good airflow to keep the evaporation happening as actively and constantly as possible.
2. Because the evaporation carries the water away from the soaked container, water must be added back into the system on a regular basis. So the best designs include a supply of water that can replace the water that has evaporated.
3. Cost of materials is an important consideration, since the cheaper and more plentiful the parts are, the easier they are to replicate for the most people.
From the Mad Scientist’s Notebook
Here are some possible designs you can try out (or skip this section if you want to experiment with designs on your own). They are based on real-life evaporative coolers used throughout the world and will give you an idea as to how the system should function. Use these as your baseline for studying the concepts, then formulate and build your own designs.
► Traditional coolers are usually made from terra-cotta clay pots, the same material that flower pots are made out of. These clay pots can soak up a lot of water. One typical design has two pots, one inside the other, with a layer of sand, wool, or other absorbent material in between. The outside pot is soaked with water, and so is the sand between the two pots. As the outer pot dries, it pulls more water from the sand layer toward it through osmosis.
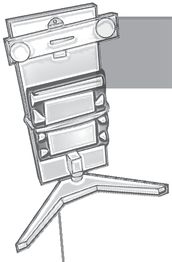
► Another common design uses a pot turned upside down in a dish of water. A cloth over the pot wicks water from the dish, keeping the pot wet.
STEP 2: Prepare the Experiment
The bottom line of all this work is to preserve food by keeping it cold. That means we need to pick some kind of food to be our testing material inside our cooler designs. And while we are ultimately hoping to keep our mad scientist ice cream cold, we’re going to use another material for testing (why would we want to waste all that perfectly good ice cream?).
Instead, butter makes an excellent food to test an evaporative cooler with. It is easy to measure the temperature of butter, and it was actually the food for which these kinds of coolers were used in the early twentieth century all over America and the UK.
Depending upon how many designs you’re testing, leave one or more sticks of butter out at room temperature long enough until it is soft, but not runny (obviously what “room temperature” is varies from house to house, so keep an eye on it).
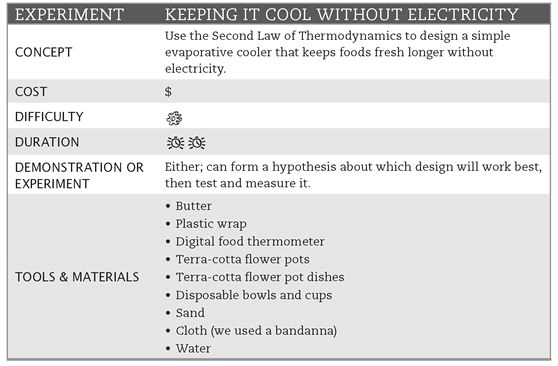
To keep the butter clean, put each testing sample into a small disposable cup and cover it with plastic wrap. Use the food thermometer to poke a hole through the plastic wrap and let the thermometer sit in the butter and measure its temperature (unless your thermometer is an instant-read style). Fill one cup for each design you are going to test, plus one to sit out without cooling (your first control), and one more to put in the electric refrigerator (your second control).
STEP 3: Test the Coolers
Assemble your test coolers, put a cup of butter inside each one, and set up your controls. Prepare your datasheet for each sample, as well as the controls, with a description of the given design, how much water your system can hold in one fill-up (not applicable for the controls), and with enough lines to record temperature readings at regular intervals for as long as you plan to carry out the test. Depending upon the complexity of your designs (especially if they have water reservoirs), this could be many days.
When you’re ready to go, take a start temperature reading for each sample and start your engines (or coolers, as it were). Set a timer to measure the temperature of all the test cups of butter at regular intervals, but over the course of the experiment, try as much as possible to avoid disturbing the coolers or moving the cups, to allow for as little contamination as possible.
Of course, an important question is, when is the experiment done? Depending upon the longevity of your designs, this could be hours, days, or more. One big indicator that you’ve exhausted the single fill-up capacity of a given design is that it dries out, which means there’s no more active cooling going on. You could also decide that a given design test is over when the temperature of the sample inside reaches within a few degrees of the room temperature. Or when the butter starts spoiling—but that might take quite a while if you’re a good designer!
STEP 4: Analyze the Results
This is the kind of data that just cries out to be graphed. Create a graph with temperature on the y-axis and time on the x-axis. Plot the data for each design in a different color, and look at the results. You should have one nearly straight horizontal line at room temperature for your un-chilled control, and another at the temperature your electric fridge is set at for that control. And then you’ll have all sorts of interesting curves for your cooler design test.
Looking at the data, you should be able to determine the following for the results of your experiment:
► Which version cools the butter the fastest?
► How much colder does each design keep the butter, compared to the butter at room temperature?
► Which design worked the best overall (and what does that mean)?
► What other improvements could you make?
This experiment makes for an excellent science fair project—because of the variations that are possible to study, the ingenuity that’s easy to add to personal designs, and the important scientific principles at work. And of course, because it involves food, it always makes a mad scientist happy.