
DRYING, CURING & STORING
Properly grown, dried, and cured flowers burn smoothly and taste flavorful. The smell and flavor come from the terpenes and flavonoids in the buds. Terpenes also contribute to the cultivar’s specific effects. Cannabinoids have no odor.
Using most methods, for quality dried and cured buds, think “low and slow.” Drying and curing flowers takes time and patience, but the finished buds are worth the wait.
“Low” refers to temperature. Terpenes evaporate at different temperatures, and some slightly below room temperature. When the air is fragrant with flower odors, the buds are losing their terpenes. Improperly dried and cured buds lose terpenes due to evaporation.
For example, the terpene myrcene—found in mango fruit, hops, bay leaves, eucalyptus, lemongrass, and cannabis—volatizes at just 68°F (20°C). Flowers must be dried at low temperatures for the terpenes to be preserved. Drying at low temperatures and moderate humidity takes longer, hence “low and slow.”
Keeping the area clean is imperative when slowly drying buds at low temperatures. No animals are allowed in the area because they shed fur and dander that become airborne and catch on sticky buds.
Workers should wear gloves, hair, and beard nets. Fungal spores are ubiquitous and germinate under favorable conditions: moisture, oxygen, and temperatures between 50 and 70°F (10-21°C), and a mildly acidic surface. Bacteria also prefer moisture, warm temperatures, and a neutral pH.
Buds infected with powdery mildew are considered unfit for consumption. Hydrogen peroxide baths remove powdery mildew. (See Picking.) Smoking has not been implicated in any human ailments, but some people may be especially sensitive to inhaling mold.
Buds attacked by bacteria turn brown and crispy. When anaerobic bacteria attack, they emit an acrid ammonia gas and turn buds to mush.
Under cool conditions the plant’s cells can stay alive for several days after cutting. It is theorized that during the early part of drying, the plant consumes some of its store of water and carbohydrates. Dried too fast, the buds use fewer starches, resulting in a harsher smoke. Cells on the surface of the plant die first, and the ones farther inside die last. During the first stage of drying, water loss is rapid. At the same time, some of the chlorophyll degrades, creating a smooth smoke. Buds dried slowly and then cured for a few weeks develop the smooth draw of fine herb.
It is hypothesized that a slow drying process, coupled with low to no light conditions, promotes a more thorough breakdown of the plant’s primary metabolites such as chlorophyll. These compounds decompose into their congregate parts (sugars, aldehydes, etc.). Then they are available to aerobic bacteria to metabolize during the cure process. The secondary metabolites and compounds resulting from their breakdown add to a harsher smoke, which is why their removal via aerobic bacterial metabolism results in a smoother smoke.
The Hot Fast Dry

Ocimene Kush by Greenshock Farms Photo: Mendo Dope
Cultivators are using a wide range of methods, theories, and strategies to dry cannabis. Sometimes these theories are in conflict with one another or accepted science and practice. Further testing and research will determine which methods are best for which cultivators and cultivars and why. A hot and fast dry is one method that seemingly goes against what is known about cannabis, but some growers swear by it.
At Greenshock Farms, plants are hung to dry and then the temperature is raised to 84°F (29°C) and humidity lowered to 30% for two days. Once the plants are bone-dry, the buds are bucked from the branches. This should be done where it is slightly cooler and more humid so that the buds don’t lose resin.
Next, the untrimmed buds are put into paper bags for three to four days. Finally, they are stored, sugar leaves on, in freezer bags until it is time to sell them. They say this process speeds up the drying process, allows for a longer storage, and keeps buds greener and fresher. Before they go to market, buds are given a quick water spray to moisten.
They say it is crucial to the process to treat everything delicately so that the flowers are not bruised and the trichomes remain unbroken.
Small-Scale Drying
The drying needs of a small-scale grower are the same as those of a large-scale grower, but climate control is less of a challenge.
Climate-Controlled Drying Chamber
Create a climate-controlled drying chamber in a grow tent, small room, or closet. A small room or a closet is likely to have the right temperature for drying. Add a hygrometer connected to a small dehumidifier, or ventilation in low-humidity situations, and a thermostat regulating a heater or air conditioner.
Drying in a Bag
A brown paper bag is a simple way to keep humidity higher than the humidity in a room and works by slowing evaporation. Recirculate humidity by opening or closing the bag. To keep the humidity lower, place only two or three layers of big buds in the bag and use a hygrometer to measure the moisture level. If the humidity climbs above 55%, open the bag and use a fan to remove moisture-laden air from the space.
Dry on Racks or Screens
The advantage of rack or screen drying is that air flows freely around the buds. Use fans to circulate air and shorten drying time. Rotate buds every two days to prevent flattening.
Not a Drying Space
Don’t dry buds in a room with growing plants or in bathrooms because the conditions are incompatible. The result may be mold attacks and loss of potency, color, and quality.
Buds should not be dried in an enclosed container such as a closed box, plastic container, or jar that traps air. As the buds dry, humidity in the container builds up, and water is likely to condense on the sides of the container, increasing the relative humidity. These are ideal conditions for mildews, molds, and bacteria to thrive.
Mold and mildew are likely to attack in closed containers, causing rot (botrytis) and molds. The fungi and aerobic bacteria use up the oxygen and anaerobic bacteria, which thrive in a nonoxygen environment. Their telltale sign is the acrid odor of ammonia they emit.
Molds, mildews, and bacteria have a devastating effect on potency and quality. The cannabis loses its distinctive odors and smells earthier.
Steps to Drying
- Clean the space to be used for drying. If it has been used for harvests before, wipe it clean with a hydrogen peroxide, bleach, hypochlorous acid, or other disinfecting solution or just spray the whole space using it. This decreases microorganisms on surfaces. To keep air free from mold spores, hang a UVC sterilizing light.
- Use an air conditioner and a heater to maintain a temperature of about 60-65°F (15-18°C) in the drying area. The most volatile terpene, myrcene, evaporates at 68°F (20°C). Set the humidifier or dehumidifier to 50-60% relative humidity. When RH is higher than 60%, the germination and growth of fungi and bacteria on wet material proliferates. Humidity below 50% promotes faster drying, but at that humidity buds have a tendency to dry on the outside while the inside remains moist and produces brittle flowers that result in a harsh smoke. Growers have different climate recipes for temperature and humidity and sometimes adjust temperature throughout the drying process
- Turn on oscillating circulation fans to keep air moving throughout the space. It is important to keep the air in the drying room flowing over the buds.
- When drying buds or branches on screens, rotate the buds every other day because gravity flattens them and they won’t work well in trimming machines.
- Monitor the buds during the drying process. This process can last from a few days to three weeks; 5-10 days is optimal. Don’t let temperatures get too low or drying will be prolonged. Bud size, crop weight, crop moisture, ambient temperature, and humidity all affect drying time.
When Are Flowers Dry Enough?
When the buds first start to dry, they may smell more like hay or freshly mown grass than fragrant flowers. When the plant is cut, it releases stress chemicals called green leaf volatiles (GLVs), which are the same stress-related chemicals lawn grass releases when it is mowed. As the buds dry, they lose color and weight and become more brittle. The green color fades a bit as chlorophyll degrades, making yellow, brown, red, and purple hues more prominent.
Buds are ready for curing when they have reached 10-13% inner moisture. Handheld moisture probes can be used to determine approximate dryness. Because these meters are designed for use with wood and drywall and not cannabis flowers, they require some experience to get accurate readings. Err on the side of caution before container curing or packaging buds for storage.
Without the use of a moisture meter, it can be determined that the first stage of drying is complete when buds feel dry on the outside but retain moisture inside that keeps them pliable. Take an average-size bud and slowly try to fold it in half. If the base of the bud’s stem is dry and bends without retracting or snaps, it is ready to cure. Another way of subjectively judging readiness is by lighting up a thinly rolled joint. If it doesn’t go out between puffs, then it is ready for curing and storing.
Buds on whole plants take a longer time to dry than on cut branches and drying trays/screens because there’s more vegetation and thus more water to evaporate. Big, thick, dense buds take much longer to dry than smaller buds and are more susceptible to mold and powdery mildew.
Drying Outdoors
Drying outdoors is not ideal; however, it may be necessary in some situations.
The main factors that affect outdoor drying are the same as indoors: temperature and humidity. However, dealing with these factors outdoors is more complicated because humidity and temperature vary over the course of a day. Starting in the morning at sunrise, the day begins to heat, drying any dew that sets during the evening. Heat accumulates until midafternoon, when the temperature drops, increasing relative humidity and the chance that dew will fall. Even in areas with small rises and drops, there may be danger during the hottest part of the day and then again as dew drips onto the plants.
Keep plants away from the sun’s heating rays using white reflective material that bounces rather than absorbs the light.
In the shade: Provided that the ambient temperature and humidity stay in a moderate range—50-68°F (10-20°C) and 40-60% RH, plants can be dried outdoors. Buds that experience wider temperature variation lose many more terpenes than those dried in a smaller cooler temperature range. The evening humidity and temperature are critical. Moisture from dew promotes infections. An area exposed to dew is unsuitable for drying unless a dehumidifier is used to eliminate the moisture. Another possibility is to maintain temperature at 68°F (20°C) using a heater; electric heaters are best because they do not emit moisture or particulates, decreasing RH. When the temperature rises with no increase in the water content of the air, humidity decreases.
In a covered area with no sidewalls: An outdoor area that is covered and has no sidewalls is suitable for drying, provided the temperature and humidity stay within range. White roofs reflect light, so they stay cool. Fans are needed to exchange air and to prevent dew from forming on the leaves.
Rehydrating Overdried Buds
There are plenty of myths and old-fashioned methods for rehydrating overdried buds. One calls for placing fresh tortillas or fruit in a sealed container with the buds so they can absorb the moisture from them. This is unsanitary.
Either put the buds in a climate-controlled room with humidity increased to about 70% or use a tea kettle to add steam to a Rubbermaid container full of buds and close the lid tightly. Leave the steam in the container for a couple of hours. Check the buds to determine if they are remoistened enough or if they are too moist and need to be dried again.
Using a paper towel that is slightly moistened can add moisture into the environment that the flowers are stored in. Be sure not to allow the buds to come in contact with the paper towel. Place the wet towel in an open container inside a cure tote to increase the humidity and add some moisture back to the bud.
Although hydration packs are primarily used for maintaining appropriate water content in dried flowers that will be stored for longer periods of time, they can also be used to rehydrate overdried buds. Returning moisture to overdried buds with a moisture packet will not improve a cure. However, moisture packs can be used to rehydrate buds that will soon be consumed.
These methods cannot salvage buds that have lost their terpenes due to overdrying.
Curing
The vast majority of water is removed during the first phase of drying. This usually happens within 5 to 10 days. The second phase, removing more water while more evenly distributing the remaining moisture and retaining the terpenes, is known as curing. It is analogous to the tobacco curing process, in that it uses a precise climate and time to bring out the aromas of the plant.
Curing is essential to the taste and experience of the finished buds. Like aged wines, well-cured buds are smooth and flavorful. Uncured buds still “work” but are not nearly as enjoyable or desirable. Some buds sold commercially are not cured, just dried.
Curing does not make buds more potent than they already are.
Keys to Curing:
- Start with mostly dried buds or colas. Buds should feel dry to the touch yet remain slightly spongy when squeezed. The stems at the base of each bud should break or snap when bent, while the bud’s inner stem should remain lightly pliable.
- Place initially dried buds into an enclosed container or bag, filling it about three quarters of the way and leaving space for air at the top. Some cultivators use glass jars or plastic or stainless steel bins, and others use paper bags.
- Leave curing buds in closed containers to allow capillary action to wick the inner moisture from their cores. This will cause the inner buds to dry slightly and the outer surface area to remoisten slightly while evaporating some of the moisture into the air of the curing container or bag.
- This evaporation increases the relative humidity of the air in the container, which must be “burped” periodically. Steps to burping the curing container:
- Open the container.
- Smell the off-gassing air to ensure that the buds retain their sweet and/or skunky aroma. If there is even a slight musty odor, pour the buds out and allow them to air dry for another 24 hours before restarting the curing process.
- Feel the buds. They should begin to feel more evenly moist but still dry to the touch and lightly spongy. If they feel overly moist or soggy, pour them out and allow them to air dry for 12-24 hours before restarting the curing process.
- Gently rotate the buds, so that the buds at the top of the curing container are mixed with the buds from the bottom of the container. Rough handling damages resin glands.
- Close the container.
- Sweating or condensation indicates high humidity, not only on the container’s interior, but also on the buds. Invariably, with even mild sweating, aerobic bacteria become active and can change the aroma and taste.
- Burping should occur more frequently in early curing and less frequently in late curing. It is recommended to burp at least:
- Once per day during the first week of curing.
- Two to three times per week during the second week of curing.
- Once per week for week three and beyond.
- The room containing these curing containers or bags should be climate-controlled, with consistent temperature and relative humidity, so that when burped, the moist air escapes the curing container and is replaced by cooler, drier air.
- Temperature: 60-65°F (15-18°C)
- Humidity: 50-60%
- Create continuous circulation using oscillating and/or ceiling fans on low.
- Keep it dark. Bright light, especially ultraviolet light, degrades cannabinoids and terpenes. Curing buds should sit in low light to total darkness.
- Curing time: One week to two months, before placing into storage.
- By the end of the cure, all hay-like odors should be gone and terpenes should be prominent. A bud’s pigments are expressed more without chlorophyll’s green dominance. When pinched, a nug should be dry to the touch from the surface to the stem but should bounce back from squeezing, much like a sponge. When bent, the bud should snap in the middle.
Open-Air Curing Spaces
Although most cultivators have traditionally cured in closed containers, curing can also occur in an open, climate-controlled space. The conditions should be similar to the drying room, but with slightly elevated humidity to slow down this second-stage drying process and reap the benefits of curing buds outlined above. Open curing rooms should maintain the following conditions so that the buds equalize their moisture content, lose water at a slow, stable pace, and retain their potency:
- Temperature: 60-65°F (15-18°C)
- Humidity: 60-65%
- Continuous air circulation using oscillating and/or ceiling fans on low
- Bright light, especially ultraviolet light, degrades cannabinoids and terpenes. Curing buds should sit in low light to total darkness.
- Buds or colas hung on lines, placed loosely on trays, or in a thin layer in open bags
Pros of Room Curing
Delicacy: Handle the material as minimally as possible. Each bud movement breaks off trichomes and decreases value. By curing in a room, the buds remain undisturbed. Less Labor and Time: Batch-curing a large, room-size crop requires much less time in monitoring and burping than curing in containers.
Drying Straight into Storage
Some growers don’t cure their buds. They leave the crop in place in a controlled drying room until it’s time to bag for storage. The only time the buds are touched is during trimming or packaging.
The supply chain can act as a curing agent. A proper dry and cure can take two to three weeks. Buds stay in the supply line for many days to weeks before they reach the end user. They continue to cure during that time.

The Cannatrol™ Cool Cure Box with patented Vaportrol® Technology, gives the small grower precision control over the drying and curing processes. Dial in the optimal conditions, and close the door. Water is removed gently, so that the trichomes will not be damaged and potency and flavor are retained. The fully programmable system dries and cures up to 2.2 pounds (1 kg) of wet buds per cycle and can store up to 4 pounds (1.8 kg) of finished flower in ideal conditions.
Fast Curing
Sometimes there isn’t enough time to cure, and that’s okay. Plenty of people can’t tell the difference. There is no such thing as “fast curing”: that’s an oxymoron. By its nature, curing is a slow process that takes time.
Using Moisture Packs
Hydration packs are primarily used for maintaining appropriate water content in dried flowers that will be cured and/or stored in sealed containers. They can be used to ensure that moisture levels inside storage containers do not exceed or fall short of optimal levels for curing and storage.
Moisture Meters
Buds are ready for storage when they have reached 8-11% inner moisture. Handheld moisture probes can be used to determine approximate dryness. Because these meters are designed for use with wood and drywall and not cannabis flowers, they require some experience to get accurate readings. Err on the side of caution before packaging buds for storage.
Storing
Cannabis quality and potency change over time. In the living plant, the precursors of THC and CBD are found in their non-psychotropic acid forms, THCa and CBDa. Only when they lose a portion of their molecules do they become active as THC and CBD. This occurs naturally over time and is accelerated in the presence of heat and light, especially ultraviolet light.
Once buds are dried and cured, quality for use is at its peak. Over time THC gradually degrades and is far less psychotropic.
Research conducted at the University of Mississippi on low-quality cannabis stored for four years at room temperature (68-72°F/20-22°C) found that the percentage loss of THC was proportional to time in storage, with the greatest loss in the first year. As the THC level declined, the concentration of CBN increased (Ross and Elsohly 1999).

This research is consistent with the experiences of cannabis users. Cannabis loses potency over time as the psychotropic THC converts to CBN or other cannabinoids, which induces sleep. Storing buds in the freezer or refrigerator slows deterioration. Freezing keeps buds fresh and preserves them the longest. However, even in a deep freeze, THC deteriorates at a rate of nearly 4% a year. In deep freeze (below 0°F/-18°C), deterioration slows further. At refrigerator temperatures, THC deteriorates at the rate of about 5.4% a year.
Terpene molecules vary in size, and the smallest ones evaporate at lower temperatures, starting in the high 60s Fahrenheit (18-20°C). Buds kept at room temperature in an open container will experience some loss of terpenes. Storing buds in a refrigerator or freezer keeps terpenes in a liquid state, rather than gassing off. A freezer is best for long-term storage; a refrigerator is good for protecting terpenes in the short term.

Cannador® manufactures storage products that separate cultivars and keep them at the appropriate relative humidity in order to maintain the flower’s natural terpenes and mitigate evaporative loss. They are lockable and come in different sizes that can range in capacity from one to six ounces.
There are several problems with storing cannabis in a freezer, especially when supercooled to 0°F (-18°C).
Even under higher temperatures in the freezer, glandular trichomes become very brittle and are easily and inadvertently shaken off buds. For that reason, once placed in the freezer, the container should be handled very gently, and when removed, the buds should be given time to warm up so that they become more pliable.
The moisture in the air in the container freezes and can form ice crystals, especially during long storage. This may also occur when buds have not been dried sufficiently.
In several experiments, properly dried cannabis in a plastic container developed no ice crystals when placed in a freezer for several months. The trichomes remained intact. If moisture is a problem, vacuum sealing mostly eliminates it, although the process may result in crushed buds. Another solution is to purge the air with moisture-free gas such as carbon dioxide or nitrogen. These can be injected into the container as the ambient air exits through another hole. Then both holes are sealed.
When freezing cannabis in glass containers, choose shoulder-less containers, as shouldered containers are more likely to develop cracks. Metal, wood, and some plastic containers are better candidates for freezing.
One way to store frozen cannabis is in small containers. Just enough for a week’s use is stored in each container. The rest of the stored material is not disturbed when a single container is removed, so the glands are not at risk.
Heat and light, especially UV light, evaporate terpenes and erode quality. Only an opaque container will completely protect the terpenes and therefore the quality of the buds stored inside. An opaque container with a white exterior reflects heat, keeping the contents cool.
Storing Materials
Cannabis can be properly stored in different materials, each with pros and cons that make them more or less suitable depending on function.
Glass
Glass makes great, inert, hard, nonbiodegradable storage containers. Different types of glass are used to store food. The color of the glass determines the type of light and heat that can penetrate the barrier. The downside is that most glass jars are clear, and light degrades trichomes, which doesn’t matter if buds are stored in the dark. For storing buds exposed to light, an opaque glass is best.
Stainless Steel
Stainless steel tubs with plastic seals and flip-top locking mechanisms are popular because they’re strong and can be stacked. The metal does not interact with the buds and is impervious to outside air. Stainless steel containers are an excellent choice for storage.

True Liberty® Bags and Liners are industrial strength and intended to be used as a protective device to maintain sterility and prevent cross-contamination. True Liberty® nylon bags and liners can be used in applications as low as -100°F (-73°C) up to about 400°F (204°C). True Liberty Can Liners are 100% food-grade nylon, double bottom sealed, sterile, smell-proof, and durable. The Can Liner is 48 by 30 inches (1.2 by 0.7 m) and designed to line a 30 gallon (113 l) drum or 20 (76 l) gallon trash can.
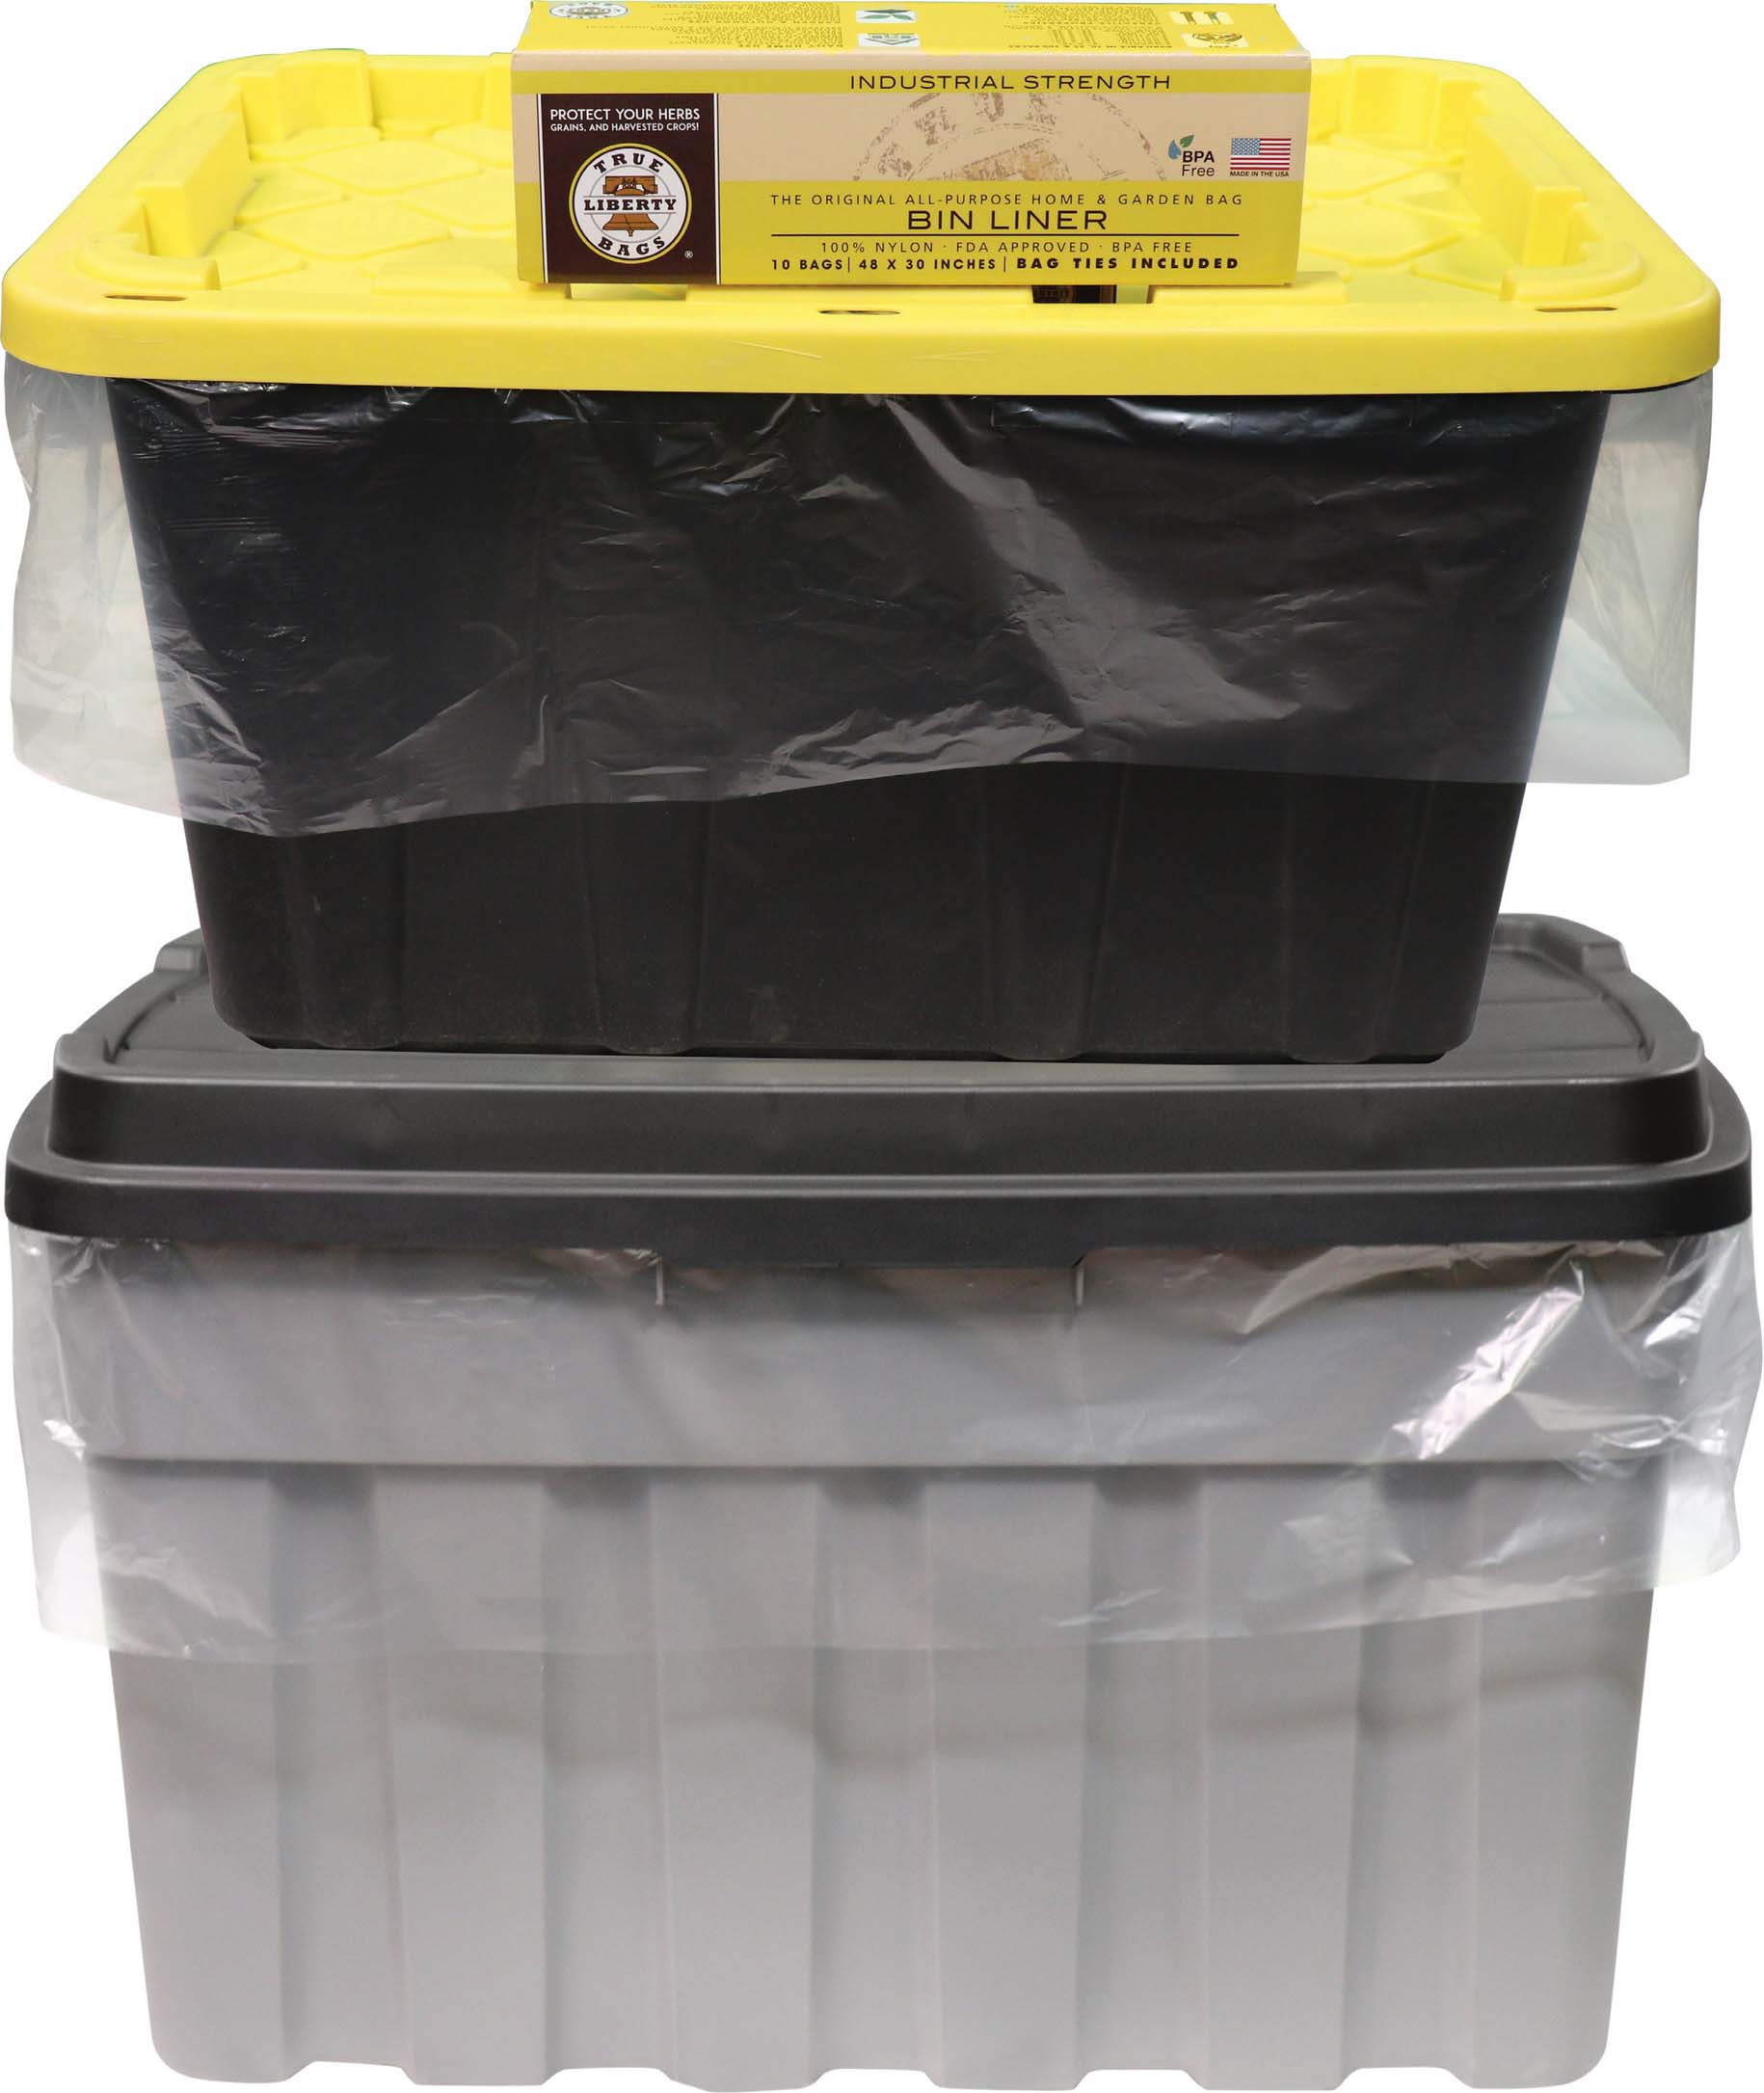
True Liberty® Bags, sometimes called “Turkey bags” or “oven bags,” have long been used as an industrial strength and smell-proof way to protect and store cannabis. The Bin Liner size was specifically developed based on industry demand and is 100% food-grade nylon, side-sealed, sterile, smell-proof, and durable. The standard Bin Liner is 48 by 30 inches (1.2 by 0.7 m) and designed to line a 25-37 gallon (95-140 l) tote bin. The Bin Liner XL provides more bag height at 48 x 36 inches.
Plastic
Cannabis is slightly acidic and lipophilic, so it degrades some plastics. Plastics are stickier than glass or stainless steel. Turkey bags are popular because they contain almost all odors and are inexpensive. However, they are easily pierced by stems and offer no protection from shaking and movement, which leads to more damage and separation of sugar leaves and trichomes. Five-gallon (19 l) buckets sealed with airtight lids protect buds from getting crushed and can be stacked.
Moisture Control Packs
Moisture control packs made for cannabis storage attempt to maintain a preset moisture level by absorbing or releasing moisture. Using one of these packs maintains a set humidity of about 55-62% ensuring the proper level of moisture is retained without causing mold. They are also available at higher humidities to remoisten overdried buds.
Vacuum Sealing
Vacuum packaging is popular because it decreases the amount of oxygen present in a storage container. Oxygen is corrosive and degrades the buds’ color. Decreased presence of oxygen also discourages the growth of spoilage bacteria. However, anaerobic bacteria thrive in low and no-oxygen, damp environments. Never seal and store wet or damp buds except when freezing for fresh frozen storage.
Gas-Based Storage
Gas-flushed, sealed Mylar bags are excellent packaging for long-term storage. The process injects the bag with nitrogen, purging the oxygen, and seals it. Unlike oxygen, nitrogen is inert and doesn’t burn. Purging packages of oxygen extends the life of the buds and prevents growth of mold and discoloration, similar to vacuum sealing. Some automated packaging technologies offer nitrogen bagging using tamper-proof packaging.
Storing Fresh-Frozen
Harvested biomass can be processed directly into concentrates or freezer-stored fresh to be processed later. This saves energy and labor. With fresh-frozen storage, extracting the material can be postponed to a more convenient time.
Fresh frozen buds can be used for making “live” concentrates. For hash making, first, the frozen buds are added to ice water. Then agitation from a paint mixer or other tool makes the glandular trichomes brittle; they break off and are collected in a series of filters that catch different-size glands. When collected, the glands can be sold/consumed as hash or used as an intermediate for making “live rosin.”
Light hydrocarbon extractors commonly use butane and propane as solvents to turn fresh frozen cannabis into “live resin.” The result is a high-quality dabbable concentrate with very high terpene content.
Evaluating Cannabis Quality
By Max Montrose
This material was originally published in Interpening: The Art and Science of the Cannabis Sommelier (Trichome Institute, 2019) and is reprinted with permission from the author.
Interpening is the science of evaluating cannabis flower to determine quality, variety type designation, and psychotropic effects, through physical and aromatic inspection. An interpener can be thought of as a cannabis sommelier. Interpening is important for industry professionals and consumers because speciation, cultivar names, and lab testing do not provide the consumer with much information about the quality or the effects of cannabis today. Interpening teaches people how to evaluate cannabis with a deductive process that encompasses both technical sciences and sensory observations that enable people to identify the quality and effect types of cannabis varieties.
Summary of Visual Evaluation
When visually evaluating flower with the naked eye, hold it about one foot (30 cm) away from the face in a properly lit environment. While evaluating the flower, note if there are any faulty characteristics such as discolorations, odd-looking structures, excess trim, or white spots. After this initial inspection, look closer with a magnifying glass, jeweler’s loupe, or scope, to determine the ripeness, health, and density of the trichomes. During this close-up evaluation, search for flaws ranging from insects to mold, and other flaws discussed in the following sections.
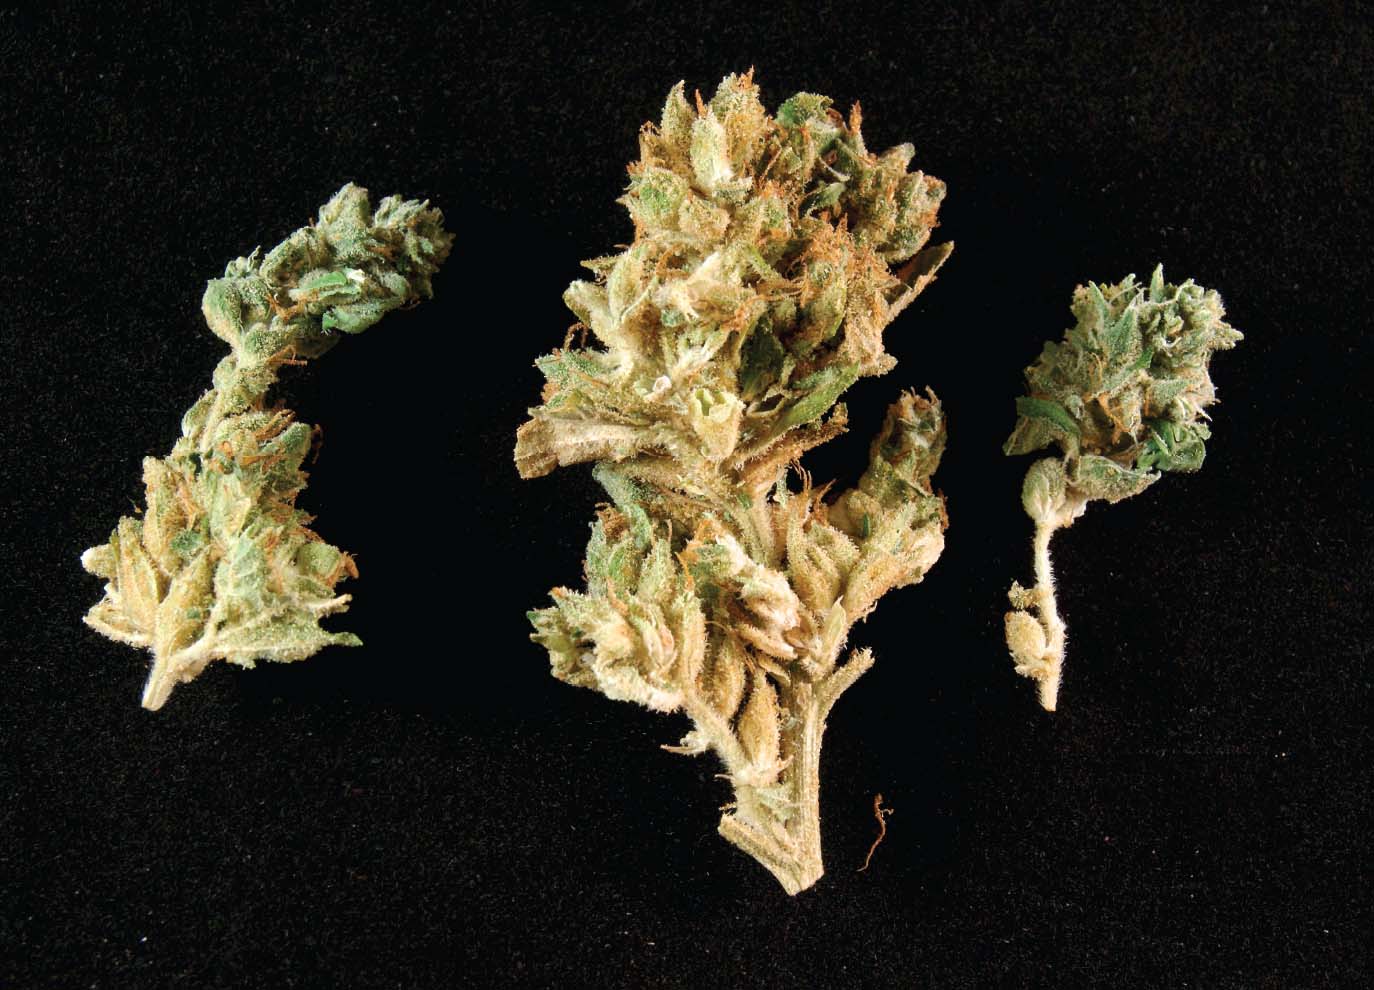
Photo: Max Montrose
Visual Evaluation Checklist
Faulty Flower Structure
The first thing to look for when evaluating quality is the integrity of the flower structure. When qualifying the structure of flower, simply decide if it came from a healthy plant or not. Quality is determined by the natural shape, color, trichome density, ripeness, and attractiveness of the flower. If the plant was grown properly, the flowers will be robust, beautiful in color, and alluring. Yet, if the plant was grown poorly, flower can look dull, unattractive, and weathered.
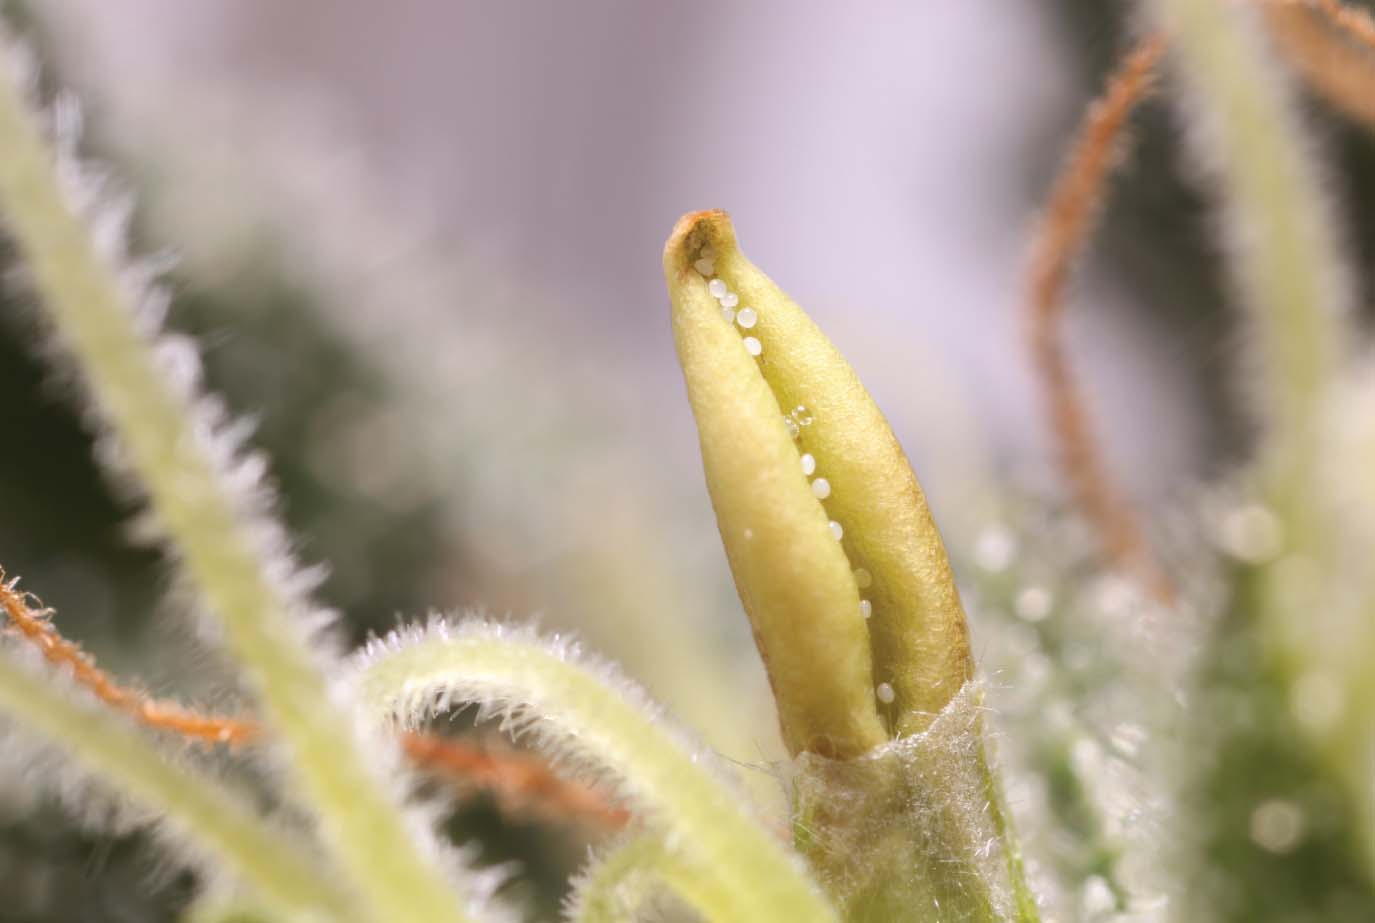
Photo: Kale Worden
Anthers
Anthers are male stamens that contain pollen and are often referred to as “hermies” or “bananas.” If an anther that looks like a banana-shaped sack is visible, evaluate the flower more carefully to see if seeds are present, as seeds are harsh to inhale and take away from a pleasant cannabis experience, making the flower quality unacceptable.
Premature Flower
Premature flower is tricky because the flower may have already formed with trichomes and stigmas, and smells good when fresh, but ultimately lacks potency due to the early harvest. If the stigmas of the flower are pale orange, yellow, or white, it’s an indication of a premature flower. Use a loupe for a closer evaluation of the trichomes.
Poor-Quality Trichomes
When evaluating trichome quality, use a jeweler’s loupe or scope to confirm if the majority of the trichomes are clear (premature), milky (mature), or amber (overripe). Sometimes all three of these ripeness levels can be found within the same inflorescence. Non-glandular trichomes and broken heads will still make flower look amazing from a distance, but a jeweler’s loupe is necessary to reveal these flaws and determine quality.
Poor Trim
All leaves should be completely removed from the flower during the trimming process. Look for untrimmed sugar leaves and their stems (aka “crow’s feet”).
Visible Mold
The primary indicator of botrytis is color and off-putting odor. If a flower looks healthy but smells suspicious or off-putting, break it open vertically, exposing the stem, and examine the interior. If there are any indications of a reddish-brown or light-gray fuzzy mold in between the bracts and around the stem, it’s most likely botrytis. Off colors close to the base of the flower such as gray, red, tan, or brown indicate that the botrytis is very light and may be difficult to smell. Heavy botrytis has a very specific odor that is semisweet and acrid simultaneously and can easily upset the stomach upon smelling it. When this fungus comes in contact with the plant’s trichomes, it can turn them brown, dissolve them, and destroy them.
Powdery mildew (PM) is much easier to spot on a living plant, as that is when it thrives. If PM spots are visible on a cured flower, it means the PM is much worse than is seen because the majority of the mold’s structure has dehydrated and shrunk. PM does not produce any odor and is not systemic, unlike botrytis.

Photo: Max Montrose
Jar Rot
Jar rot is the same fast-growing, light-gray mold found on strawberries that are left in the refrigerator for too long. If jar rot is fresh, it will smell slightly damp, and a gray fuzzy mold will be present. If the flower has jar rot and then dries out, mold residue can be seen faintly but will not have an odor. This material is unsuitable for smoking or ingesting.
Discoloration
A bright lime-green color can indicate a possible nutrient overdose depending on the variety. It is rare to find flowers that have been dyed purple or blue, but those chemical dyes do exist, and some growers use them; be suspicious of flowers with unnatural, wild-looking colors and investigate further before consuming. Cannabis with dyes are harsh to inhale and taste like burning plastic. However, deep purple colors do naturally occur. This natural purple color is beautiful, harmless, and easy to distinguish from unnatural dyes.
Insects
Insects injure flowers, leaves, branches, and roots by eating or sucking them, leaving residual by-products such as carcasses, fecal matter, eggs, webs, and exoskeletons. Some insects that infest flowers are too small to be seen by the naked eye, which is why a microscope or jeweler’s loupe is needed to detect them. Freckles on leaves can be spotted from a distance and are the result of insects eating the underside of the leaf. Always look for small, discolored spots on the leaves and trim because if a plant has them, it most likely contains a whole spider mite or thrip life cycle, which should not be consumed.

Old vs. fresh buds. Photo: Max Montrose
Burning
If a plant has a multicolored burn toward the top of the inflorescence, it is most likely “light burn” from growing too close to the lights. If the trim coming out of the flower is brown or scorched, that is usually a sign of “nutrient lock,” which burns the internal tissues of the plant from excess or improperly added nutrients. Consuming flowers with nutrient lock can cause coughing and discomfort.
Old Cannabis
Old flower is very easy to identify because it looks dull, tarnished, and tan. Flower that is just beginning to age generally starts deteriorating in color from the base of the flower stem and moves up toward the top. The major factors to look for when determining if the flower is old are its vibrancy, color spread, and scent. The natural green-to-purple colors from the chlorophyll and flavonoids within the bracts will diminish to tan tones, and the orange-to-red stigmas will start to look rusty and brown.

Trichome Institute provides a variety of high-level cannabis courses and certification including the cannabis sommelier, Interpening. Interpening is the art and science of evaluating cannabis flower to determine quality, variety type, and psychotropic effects, through physical and aromatic inspection. Check out Trichome Institute to learn more about its courses, books, tools, and more.