
Most woodworkers have several tools that are small, like screwdrivers, files, chisels, pliers, dividers and compasses. These can all be stored in shallow drawers, which is where this chest comes into the picture.
The design for the chest came from a couple of inspirations. One was a Craftsman-style bookcase plan. The chest is made of quarter-sawn white oak, and the sides and top are shaped like the bookcase. The other inspiration came from multidrawer chests that were made years ago to store sheet music.
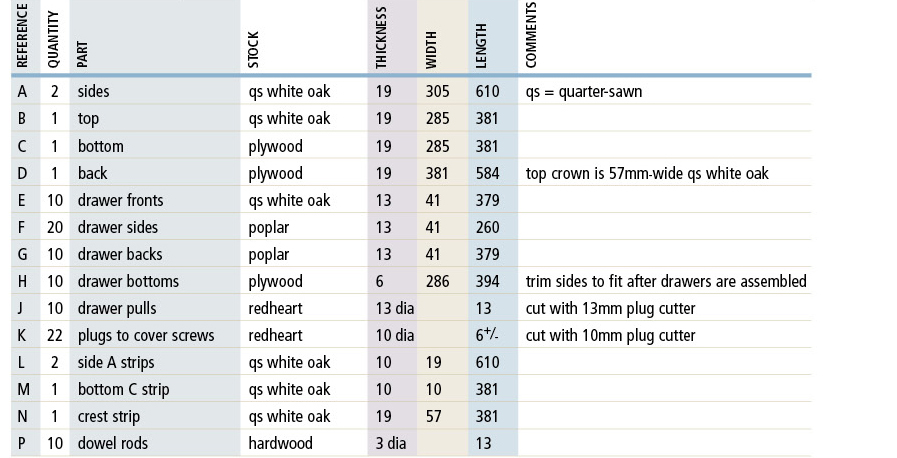
This chest was assembled with butt joints and screws. The screws were countersunk and the holes plugged with 3⁄8″ redheart plugs. The drawer pulls are also redheart, which were cut using a 1⁄2″ plug cutter.


INCHES

MILLIMETERS
STEP-BY-STEP

step 1 • Cut the sides A 3⁄8″ narrower than the finished dimension. Then cut the grooves for the drawers. Glue a 3⁄8″ × 3⁄4″ strip L to the back of each side. This strip will cover the ends of the grooves.

step 2 • Draw the top arc on each of the sides.

step 3 • When laying out the radii at the bottom of the sides, use a small, round object to draw the small radius that defines each foot.

step 4 • Connect these two small radii with an arc that is 1″ high from the bottom of the side. Trammel points mounted on a stick are great for drawing arcs. A little trial and error is involved here unless you can figure the radius using math. I try connecting the dots, moving the pencil up or down the stick until I find the radius that works. If you don’t have trammel points, drive a nail through a stick at one end. This is your fixed point. Use a small clamp or rubber band to hold a pencil anywhere you need to along the length of the stick to draw your arc.

step 5 • Drill holes with the same radius as the small arcs and connect them by cutting the larger arc with a jigsaw or band saw.

step 6 • Smoothing and shaping is easily done with a rat-tail file or curved rasp.

step 7 • Glue the crest strip N on the top of the back panel D. Make the arc on the crest as you've done for the sides. Cut the top B and bottom panels C to size, then glue a 3⁄8″ × 3⁄4″ strip M on the front of the bottom panel. Assemble the chest using 2″ screws. Cut the plugs K and glue them in place to cover the screw heads.

step 8 • If you like, you can cut the crest arc with a bevel to match the arc of the sides. You could go one step further and put a bevel on the side arcs to match the arc of the crest. These little details will make the sides and back flow together nicely.

step 9 • Cut all the drawer parts E, F, G and H to size. The sides F are captured between the front E and back G parts, so glue-up can be done with two clamps. I just used glue on these butt joints. I know what you're thinking:Why would he use just glue and no fasteners or other joinery to strengthen this joint? Well, after the bottoms are glued in place, the drawers are quite strong. (If you would like to use fasteners, please do so. Screws or tenons would work well.)

step 10 • I use bench horses all the time to hold parts for gluing. Several drawers can be glued at one time. After applying glue to the bottoms H, hold them in place with a few small brads or nails. Then stack up a few drawers and clamp them while the glue dries. This also helps keep the drawers flat.

step 11 • When the glue has dried on the drawers, rout the beading on the top and bottom of the drawer fronts. The drawer bottoms are the perfect thickness to accept the radius of the bead. (See the technical illustration drawer detail.)

step 12 • If necessary, fit the drawers by planing or sanding the sides of the bottoms that fit into the grooves to ensure the drawers slide smoothly. Then cut the plugs for the drawer pulls J. I attached the pulls with a 1⁄8″ dowel rod P. Drill a hole in the center of the plug, and a matching hole in the drawer front. Glue the pulls in place, then sand and finish the chest and drawers.