
If you need a place to store hand power tools, this rolling cabinet is a great choice. If you need to move the tools where the work is, no problem. The top of the cabinet also makes a great work surface. The drawers are deep enough for most hand power tools. If you need more room, it’s easy to make the drawers larger. I built this cabinet from two pallets. Pallet lumber is good to use because it won’t change dimensions much. It has been exposed to the elements for a fair amount of time, so its moisture content is stable.

You can use the tool-box in project five with this cabinet to make a roomy tool storage unit.

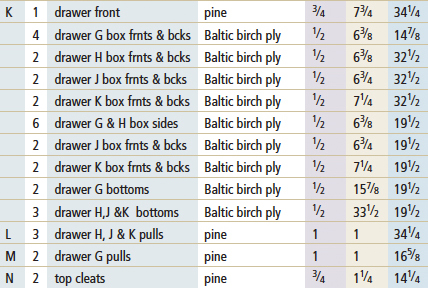
INCHES

hardware
MILLIMETERS


hardware
STEP-BY-STEP

step 1 • Carefully inspect all the wood for nails, screws, staples and any other pieces of metal. Use a small metal detector to find the hidden nails, etc. Once the wood is cleaned up, it’s on to building the project!

step 2 • Construct the frame and panel sides A and back D as shown in the sidebar “How to Assemble a Frame and Panel” in project seven. Cut a tongue on the sides and bottom of the back panel. Then cut matching grooves in the sides and bottom C. (See the technical illustration for details.) Lay out the dovetail slots for the front rails E on the insides of the side panels, then make a simple jig as shown to guide the router when cutting the stopped slots.

step 3 • Using the same dovetail router bit, cut the tails on the ends of the front rails E. (Use some scrap wood the same thickness as the rails to make test-cuts when fitting the tails to the stopped slots.) Note the use of a scrap piece of wood to stabilize the rail.

step 4 • When all the parts are fitted properly, add some glue to the slots and tails. Tap the rails E into place.

step 5 • Glue the back panel D into the grooves in the sides A. I let the cabinet hang over the bench so the tongue on the bottom of the back panel could stand proud of the sides.

step 6 • Cut biscuit slots in the bottom panel C as shown.

step 7 • Cut matching biscuit slots in the bottom edges of the cabinet sides A. Put glue on the center biscuit only, set the panel in place and use screws in oversize clearance holes to hold the panel in place. (The extra biscuits are to help align the parts.)

step 8 • Lay the cabinet on its sides to install the drawer slides. Draw a center line square to the front of the cabinet, line up the screw holes in the slide on this line and insert the screws. I prefer to mount side-mount drawer slides toward the top of the drawer box. Use full-extension, heavy-duty slides. You'll be putting heavy tools into these drawers, and you'll want full access to them. Then, install the top cleats N on the inside top of each side panel. Put glue only in the back groove in the top. Use screws installed in oversized holes drilled in the cleats N to attach the top. This allows for seasonal movement of the top.

step 9 • Cut the drawer parts to size and screw the drawer boxes together. I've found that drawers that are screwed together are very strong and are much quicker to make than drawers that involve more complex joinery. Of course, you can make them to your own personal preferences. If you do, remember to make the proper adjustments in the drawer parts' dimensions.

step 10 • Attach the bottoms. The 1⁄2″-thick bottoms will support large amounts of weight.

step 11 • Draw a center line on the sides of each drawer box and install the hardware runners. Then put the drawer boxes into the cabinet so you can align and attach the drawer fronts.

step 12 • When mounting the drawer fronts onto the drawer boxes, I've found it’s easiest to install two screws toward the top and at each side of the box front. Drive the screws slightly through the drawer box front, align the drawer front on the cabinet and tap it slightly. This will make two dimples on the inside of the drawer front that you can use as guides to drill pilot holes for the screws. Then simply realign the drawer front and screw it into place on the drawer box.

step 13 • These down-and-dirty drawer pulls will stand up to whatever you dish out. Cut each pull’s profile on the table saw, sand the pulls smooth and glue them onto the drawer fronts. They'll never bend or come loose!