Let's go out with a bang! For this last chapter, we are going to create a small project to test developing a server app in Swift. We will use the IBM Swift Package Catalog to find a web server framework. I really like using Slack for team communication. If you haven't tried it, you should consider evaluating whether it could be a good tool for your team. One of the powerful features of Slack is the array of integration options you have to customize the experience for your team. Slack has opened many of its APIs to developers for customization and integration. Slack even provides an App Store for users to add third-party apps that their teams can use together. The catch, if there is one, is that your third-party app or integration has to be hosted on an outside server. We are going to create a Slack integration that you can later modify into a full Slack app of your own. Our Slack integration will be written entirely in Swift, and it could be hosted on a Linux virtual machine in the cloud with a provider such as Heroku, Digital Ocean, or Amazon Web Services.
Note
You can download the code for this project from http://www.packtpub.com/support .
Our project needs a web server framework to work properly. We could write one from scratch, or we could see what third-party frameworks are available. Using the IBM Swift Package Catalog, I found several web application frameworks that are highly rated and are both actively developed and popular with developers. IBM's Kitura, Perfect by PerfectlySoft, and Vapor by Vapor are all viable candidates from which to choose. Each of these projects will feel familiar to you if you have ever dabbled with Node.js and Express, or with Ruby on Rails. While any of these frameworks would work for our project, I selected the Vapor project for our app because it was at the top of the list in the "essential" category at the time I was writing this chapter.
According to Vapor, their project is the most used web framework written for Swift. You can learn more about Vapor, including the Swift version it supports and links to the documentation, at https://swiftpkgs.ng.bluemix.net/package/vapor/vapor.
Now that we have covered the libraries and frameworks that we will use, let me give you a description of the server application that we will be building together. Slack gives developers the option to create custom integrations for their own team or to make Slack apps that would be available to any team. We are going to create a custom integration for a single team. However, you could easily convert our customization into a full app for any team to discover.
We are going to build a storefront web application to sell widgets. As a user purchases a widget from us, we will process the order and send the order to our order-tracking channel in Slack. In the interest of keeping this application simple, we are going to take some shortcuts.
Since you learned how to install Swift in Chapter 2, Discovering New Territories – Linux at Last! we will skip over that step and move on to installing the Vapor framework. We are going to add Vapor's command line toolkit to gain access to shortcut commands and assistance for common tasks.
Note
You can find detailed links to documentation and examples on how to use Vapor at https://vapor.github.io/documentation/.
Here's how you do it:
To install the toolkit, run the following command in a terminal:
curl -sL toolbox.vapor.sh | bash
You can verify that the command worked by running:
vapor -help
Next, let's create a new Vapor project and name it storefront:
vapor new storefront
Our newly created project will have the following file structure:
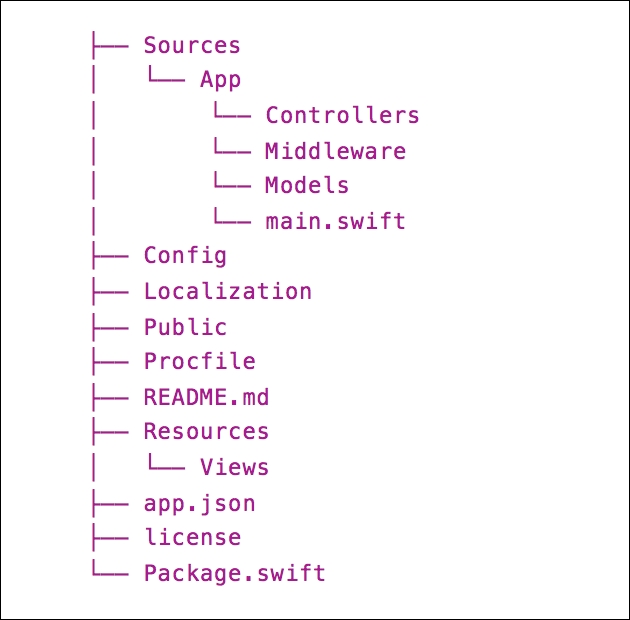
The file structure should be familiar to you, as it follows the structure required for the Swift Package Manager to work. Under the cover, vapor creates a new project with swift package init--type executable. The Vapor script also adds the vapor framework as a dependency in Package.swift. Our main.swift is our entry point, since we created an executable program.
I'm going to develop my code on a Mac and then deploy it to a Linux VM in the cloud. For me, the benefit is that I can use Xcode and it's debugging tools for my local development. In fact, the Vapor framework supports this concept by offering a command in their toolkit to generate an Xcode project for development. Let's create an Xcode project that we can use for development of our storefront app:
vapor xcode
When Vapor creates a companion Xcode project, it first checks to see if you are missing any dependencies specified in the Package.swift file. Vapor will download any missing dependencies for you, prior to creating the Xcode Project. In addition, Vapor will create a scheme to use for running your app in Xcode. Finally, Vapor will show you which toolchain the Xcode project expects to be linked against:
$vapor xcode
No Packages folder, fetch may take a while...
Fetching Dependencies [Done]
Generating Xcode Project [Done]
Select the `App` scheme to run.
Make sure Xcode > Toolchains > 3.0-GM-CANDIDATE is selected.
Open Xcode project?
y/n>nz
Whenever you create new dependencies for your project, you have to rebuild the project so that the Swift Package Manager can download your new dependency before attempting to compile your code:
vapor clean or vapor build --clean
Let's take a quick look at Package.swift to see what the Vapor create command generated for us. We can configure the name of the app with something that better suits our project. The current default name is VaporApp, but we could change this to Storefront. You should also notice that the vapor framework is added for us as a dependency.
import PackageDescription

let package = Package(
    name: "VaporApp",
    dependencies: [
        .Package(url: "https://github.com/vapor/vapor.git", majorVersion: 0, minor: 18)
],
    exclude: [
        "Config",
        "Database",
        "Localization",
        "Public",
        "Resources",
        "Tests",
    ]
)
When you use the Vapor CLI to create a new project, Vapor adds example code with documentation to project. Open main.swift and glance over the included routes and comments. Delete everything in this file, and we will be build our app from scratch.
In Vapor terminology, a Droplet is a service container that acts as a gateway to Vapor's service offerings. Use a Droplet to register routes and add middleware to start your server. To get things started, we need to import Vapor and create an instance of a Droplet.
import Vapor

let drop = Droplet()
We can also customize the behavior of our Droplet instance via properties. You can read more about options in Vapor's documentation.
Now that we have a Droplet instance, we need to talk about routing. Routing is an essential function for every web framework. When an incoming request is received, we need to have a way to appropriately filter and handle each request. Vapor gives you multiple options for addressing your routing concerns. We are going to create two routes for our application: one to serve our shop page, and the other to respond to post requests when a user purchases an item on our page.
A basic route in Vapor is composed of a method, path, and closure. Two of our routes fall into this category. Vapor routing supports the standard RESTful HTTP methods (get, post, put, patch, delete, and options). We register routes by calling the corresponding method on our Droplet instance, passing in our route path and returning a closure we define.
drop.get("/") { request in
    return try drop.view.make("shop.html")
}

drop.post("purchase") { request in

// more stuff happening here but omitted

var response = try Response(status: .ok, json: json)
    return response
}
Our first route handles all get requests for the root directory of our website. When this route is requested, we return the shop.html view. Our second route handles post requests for the /purchase route. Once we finish carrying out work, we return a response to the requester with a status and JSON payload.
Vapor also supports nested routes and parameters. Creating a nested route is as easy as replacing the forward slashes in the URL with commas when registering your route.
// Nested route
drop.get("products", "vehicles", "trucks") { request in
    return "You requested /products/vehicles/trucks"
}
Vapor handles parameters by making them type safe. Many web frameworks default to using strings for route parameters and types, which can be error prone. Using Swift's closures allows for a safer way to access route parameters. In the following example, we define the route to accept an Int parameter. Our route matches artboard/:id where our :id parameter must be an Integer value.
// Type Safe parameters
drop.get("artboard", Int.self) { request, productId in
    return "You requested Artboard #\(productId)"
}
We could have also written this without using route parameters and then access our parameters on the request object.
drop.get("artboard", ":id") { request in
    guard let productId = request.parameters["id"]?.int else {
        throw Abort.badRequest
    }

    return "You requested Artboard #\(productId)"
}
When you want to send HTML from your application, you create views. You can create a view from an HTML document or you can build your views using renderers like Mustache. By default, views are stored in the Resources/Views directory. Going back to the first route registered for our root directory, we used a view to return an HTML document (shop.html). You create an instance of a view by calling the view.make method on your Droplet instance.
drop.get("/") { request in
    return try drop.view.make("shop.html")
}
More complex documents, such as mustache templates, need more information to process and create a view. This additional information is passed to the view.make method as the second argument.
drop.get("shop_template") { request in
    return try drop.view.make("shop.template", [
        "countdown": "2 days left",
        "shopper_count": "1,000"
        ])
}
For the most part, we want all of our server code and files protected from snooping eyes and web crawlers. Vapor handles that for us. When we need to provide resources that are reachable from our views, we use the Public folder created at the root of our application. We will store our images, scripts, and styles nested under the Public folder.
When we serve the root level document on our application, we return a shop.html view. Our simple page displays a welcome message and details of three products.

When a user clicks the buy now button, we execute a jQuery Ajax post command to communicate with our server. We send the product ID of the product we want to purchase to our "/purchase" route.
On the server, when we receive a request that matches this route, we extract the product ID and search for a matching product in our local store. Of course, in a production app, we would use a database to house our products and even populate our store listings. In situations where we can't find a valid product ID on our request object or where we can't find a matching product for a supplied product ID, we throw an error that is sent back to the client.
Finally, we create a JSON payload that contains some of our product details and return it to the client with a successful status code.
drop.post("purchase") { request in
    drop.log.info("purchase request made")
    guard let product_id = request.data["product_id"]?.int else {
        throw Abort.badRequest
    }

    guard let product = products.filter({ (prod) -> Bool in
        return prod.id == product_id
    }).first else{
        throw Abort.badRequest
    }


    let json = try JSON(node: [
        "Product" : "\(product.name)",
        "price" : "\(product.price)",
        ])

// more work happening and omitted

    var response = try Response(status: .ok, json: json)

    return response
}
When our client receives the post response, we display an alert dialog that thanks the user for their purchase. We also display the returned JSON data in a console.
Now that we covered the basics of our web app, let's make it a bit more interesting by integrating with Slack. Using Slack's APIs, we can extend Slack to make our workflow better. In our case, we want to notify our operations team of new orders so that they can immediately start processing them. We are going to take advantage of incoming webhooks to send messages into Slack from our Swift server. While this webhook will only be for our team, you can read the documentation https://api.slack.com/ and easily convert our custom integration into a Slack app that any team could incorporate into their workflows.
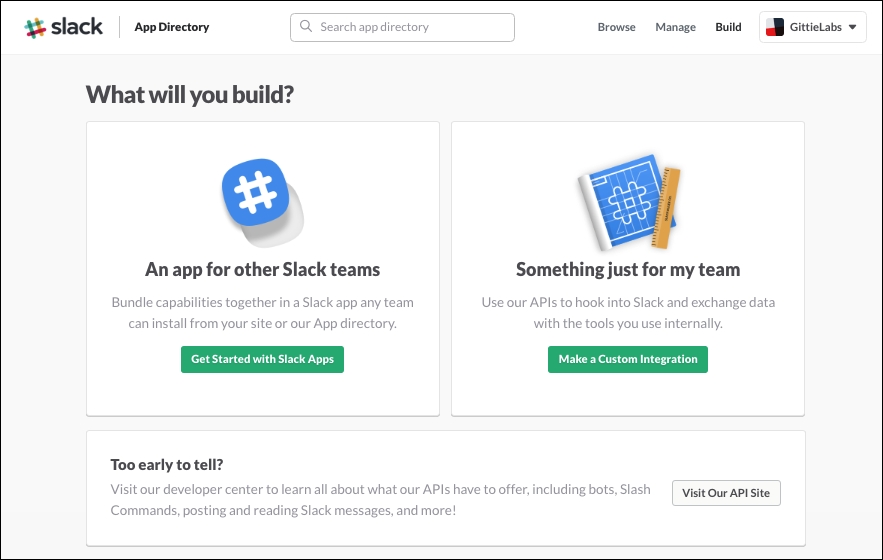
Since our custom integration will only work with a single Slack team, you will need to create an account and team on Slack if you don't already have one. Once you do that, you can navigate to the build section of the Slack app directory located at :
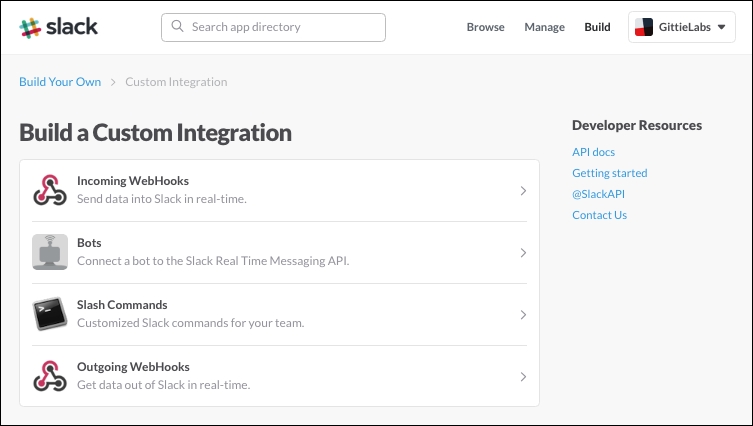
- Click on the Make a Custom Integration button.
- Select the Incoming WebHooks link next.
Choose a channel to post your messages to or create a new channel. I chose to send my messages to my orders channel. After picking your channel, press the "Add Incoming WebHooks integration" button.
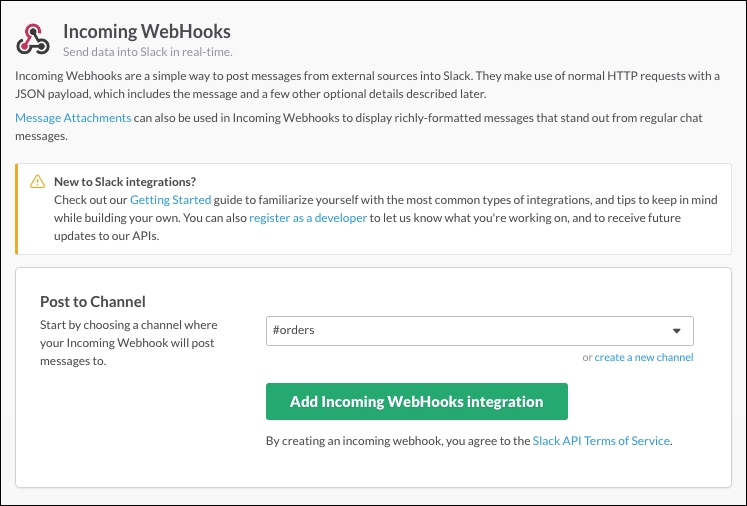
On this view, you can see instructions for setting things up as well as the fields you can customize for your use case. You can provide an optional descriptive label for this integration along with a user name. The default name is incoming-webhook, but I changed mine to OrderUp. I also added an emoji to serve as my icon for the messages I add to this channel. Once you have previewed your settings, you just need to click on the Save Settings button to make your changes go live.
Before we close this view, we need to copy the Webhook URL to use from our external service. You can click on the Copy URL button, and it will be added to your clipboard. Let's head back to Swift and open main.swift. Update your purchase route to create a JSON payload for Slack to send our post request to Slack's servers:
drop.post("purchase") { request in
 // omitted code above

    let slack_payload = try JSON(node: [ "attachments":
        try JSON(node: [
            try JSON(node: [
                "fallback": "New purchase Request",
                "pretext": "New purchase Request",
                "color": "#D00000",
                "fields": try JSON(node: [
                    try JSON(node: [
                        "title" : "Product: \(product.name)",
                        "value" : "Price: \(product.price)",
                        "short" : "false"
                        ])
                    ])
                ])
            ])
        ])

     _ = try drop.client.post("https://hooks.slack.com/services/<your hook id>", headers: [:], query: [:], body: slack_payload)

    var response = try Response(status: .ok, json: json)

    return response
}
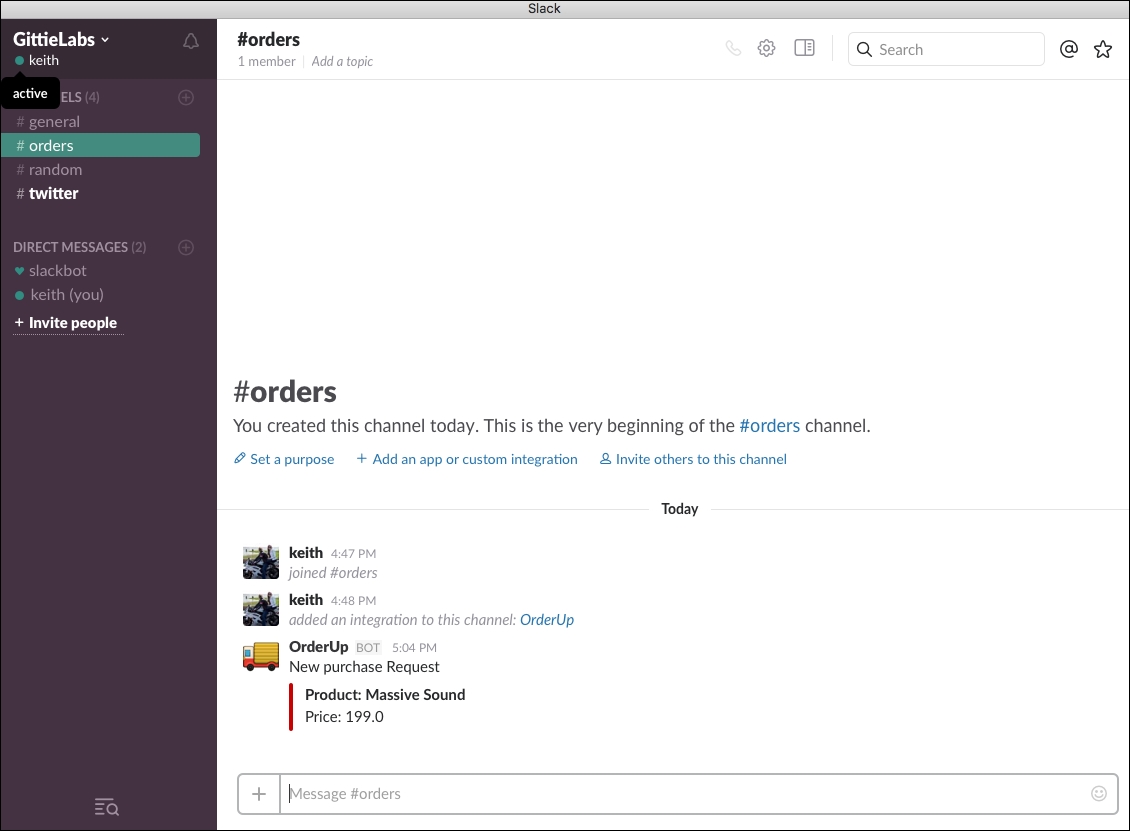
Our formatted message payload sends a general message, which will show up in your Slack notifications on desktop and mobile ("New purchase Request"). We also use the attachment syntax to provide details on the product order. We pass the product name and price.
Now, when you make a purchase on the website, you will also get a real-time message sent to the orders channel in Slack for your team.