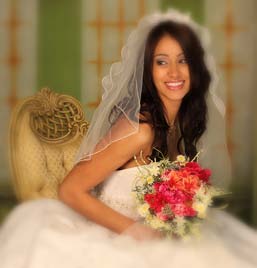
Part 3
The Studio Shoot
You’ll find a lot of candid pictures in this book; they seem to be the current trend in photography. You’ll also find some wonderfully posed images by some of today’s top pros. However, you will not find many studio shots, as most brides and grooms are too busy for a studio shoot these days, or they just prefer on-location photographs.
That said, it’s very likely that, in time, you will encounter wedding couples who want studio shots. It’s important that you are able to provide them.
In this chapter, you’ll find some basic studio lighting tips…for those occasions.
I took all these photographs in Vered Koshlano New York City studio. She assisted with the photographs, but she is an excellent photographer herself. Please check out her site: www.byvk.com.
And heads up: I could not resist! I had to mention and illustrate some Photoshop enhancements, as they seemed to apply nicely to some of these images.
Painting with Light
This chapter begins with one of the most basic and affordable types of artificial lighting: a flashlight.
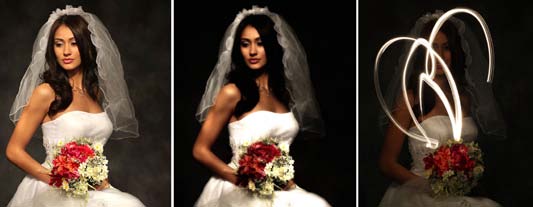
That’s right! You can create beautiful portraits by illuminating your subject with an inexpensive flashlight. Basically, the technique is to “paint” the subject with light. I used a $5 flashlight to create the picture on the left. Here’s the deal.
Set your subject in an almost completely dark room.
Mount your camera on a tripod. Set the ISO to 400 and the f-stop to f/8. Then select the self-timer mode and be prepared to experiment with shutter speeds from five to ten seconds (depending on the brightness of your flashlight).
Ask your subject to hold perfectly still. Perrrrrrrrrrrfectly still!
Release the camera’s self-timer while the shutter is open and use the beam of the flashlight to paint the subject with light.
You’ll have to practice this technique to get it just right. It will take you a few attempts to get the correct exposure and the right amount of illumination on your subject.
The center picture on this page illustrates use of the Midnight Filter from Nik Software applied to my original image. The picture on the right illustrates what happens when the flashlight is pointed at the camera. Clearly, this is something you need to avoid.
See the end of this chapter for a behind-the-scenes look at this creative technique.
Basic Three-Light System
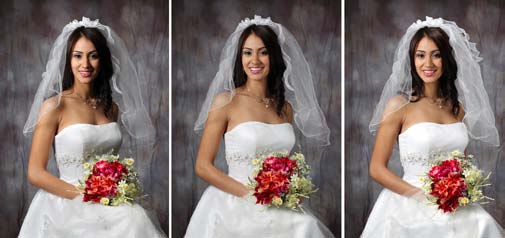
You don’t need a ton of lighting equipment to get professional-quality photographs in a studio—whether it’s a full-time studio or a home studio. Here you see the results of using a basic, three-strobe-light studio lighting system, which includes a main light, a fill light and a hair light.
Left: One strobe light, which is the main light, is placed in a soft box and positioned above the subject’s eye level and at camera left.
Center: Same as above but with a second light—a fill light that’s set to half power to fill in the shadows on the subject’s face—placed above the subject’s eye level and at camera right.
Right: Main light and fill light are set up as described for pictures on the left and in the center. A third light, a hair light (set at one-quarter power), is placed behind the subject and off to camera right. This slightly illuminates the subject from behind to add a slight glow to her hair and veil. Look closely and you’ll see the subtle effect of the hair light.
See the end of this chapter for a behind-the-scenes look at this basic lighting set up.
Change the Color of the Background
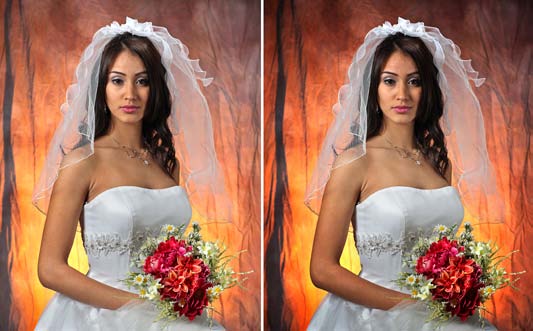
Compare the color and intensity of the background in this picture to the background shown on the previous page. It’s the same background. But here it looks golden and much brighter.
That’s because a background/ separation light (a fourth light) was placed behind the subject and pointed toward the background. An orange gel was placed over the background light to change the perceived color of the background from blue/ gray to bright sunset orange.
In the picture on the right, the background color is even more intense because I selectively increased the saturation of the background in Photoshop.
If you don’t have a lot of different backgrounds, pick up a few gels (available from professional camera stores) for your background light and change its color instantly—and affordably.
Take Three
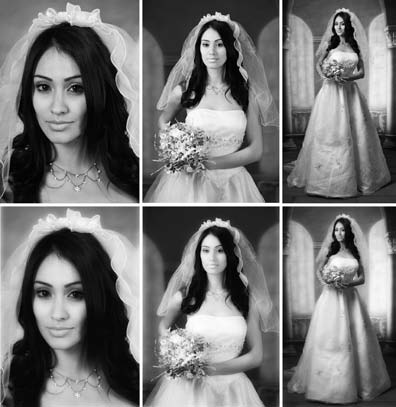
Whenever I photograph a person, in a studio or foreign country, I always take three shots: a headshot, a three-quarters shot and a full-length shot. That way, I have three options to choose my favorite image. In the case of a bride, she gets three pictures from which to choose.
On the top row you see my out-of-the-camera shots. They were changed to black-and-white in Photoshop.
On the bottom row you see the effect of Photoshop’s Diffused Glow filter, which makes the images look more artistic. What’s more, using that filter with the Clone Stamp tool helped me to “iron” the bride’s gown and remove some of the wrinkles.
Begin with the End in Mind
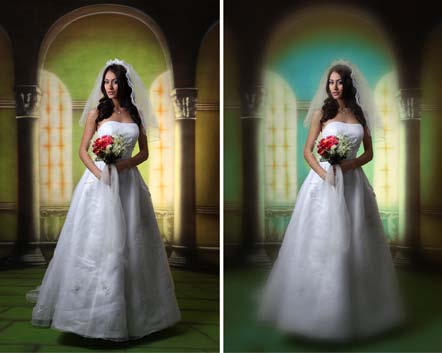
As always, it’s important to envision the end result when you are photographing, whether you are going for a straight shot or a Photoshop effect.
To get a sharp shot of a subject positioned in front of a painted background, be sure to carefully adjust the lights to evenly illuminate both the subject and the background. For this shot, I envisioned and tried to create a photograph in which the model would be sharper and brighter than the background. I got that shot.
I also wanted to create an artistic image. And since I was not thrilled with the green tone of the background, I used the Color Replacement tool in Photoshop to change it to blue. Then I used the Vignette Blur filter in Color Efex Pro from Nik Software (www.niksoftware.com) to blur the outer edges of the frame.
Finally, as with the image on the previous page, I ironed the gown using the Clone Stamp tool.

Experiment with Creative Poses
The picture on the right shows a model in a standard pose. It’s an okay shot, but it’s not that creative.
The picture on the left shows a more imaginative pose. It was created by asking the model to simply lean forward and position her head directly at the camera, and then look off camera to her right so that more of the whites of her eyes show than in the picture on the right.
I used two Photoshop techniques for that photograph. The Vignette Blur effect that you saw on the previous page is obvious. I also used the Dodge tool to brighten the whites of the model’s eyes—to draw more attention to them. This is a standard technique of photo-retouching artists, and it’s one you have seen many times on the covers of fashion and glamour magazines.
Check it out the next time you go though the checkout line at the supermarket. You’ll see that the whites of the models’ eyes are almost as white as the paper on which the magazine is printed. That’s Dodge.
Behind the Scenes: Painting with Light
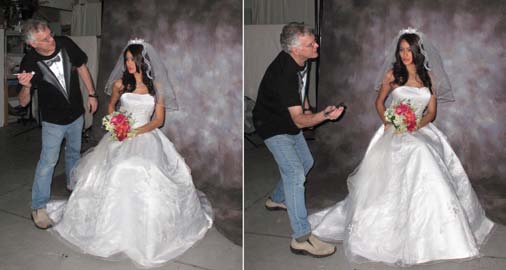
Here you see me demonstrating the painting-with-light technique, using my trusty $5 flashlight. As I mentioned earlier in this chapter, the idea is to paint your subject with the beam of a flashlight, moving around to simulate the effect of using several lights.
The picture on the left illustrates something else: When working near a bride, make sure you don’t step on her gown! Oops! Sorry!
Watch your step.
Behind the Scenes: Three-Light Set-Up
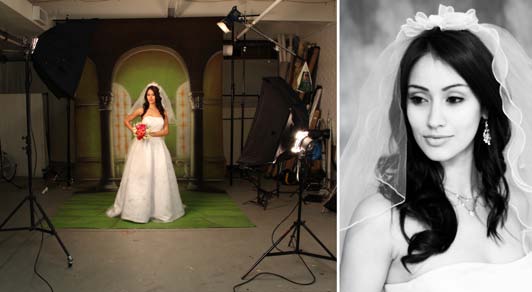
Earlier in this chapter you saw the effect of using a three-light set-up. See that set up here.
On the left is the main light; on the right is the fill-light; and at the top right of the photograph is the hair light.
All these lights have built-in modeling lights that illuminate the subject before the strobes are fired. These modeling lights help you position the light stands so you can avoid—or create—shadows.
The modeling lights can also be used to create soft, continuous-light photographs—as illustrated by the portrait of Stephanie you see here on the right. I applied Photoshop’s Diffuse Glow filter to create an even softer effect.
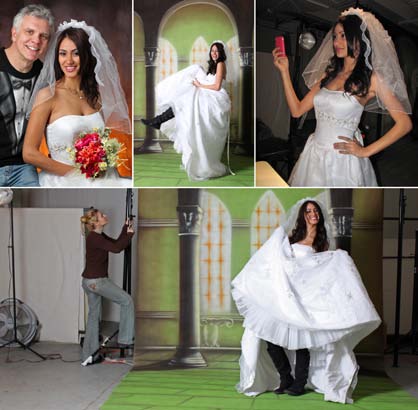
Don’t Forget the Fun!
Simply put, the more fun you have during a shoot, the more fun your subjects will have. I like to make photography fun.
In fact, I work hard at making photo sessions fun. I wear fun clothes, take fun shots, get in the shots and take behind-the-scenes shots. Subjects really like these, because they can joke around and be themselves without having the pressure of looking great!
If you keep it fun, you’ll end up with more “serious” pictures that your clients love.