Part 7
The Creative Touch
Stephanie Smith contributed the insightful material for the previous chapter. In this chapter, her husband, Shannon Smith, offers additional advice and creative ideas on how to turn what could be standard wedding snapshots into memorable photographs.
Like Stephanie’s chapter, this is written in Shannon’s own words and is accompanied by his creative, personal and fun images—such as the McDonald’s window shot, which you’ll see in a few pages.
You can check out more of his work at 831 Photography (www.831Photography.com).
Anticipate the Moment
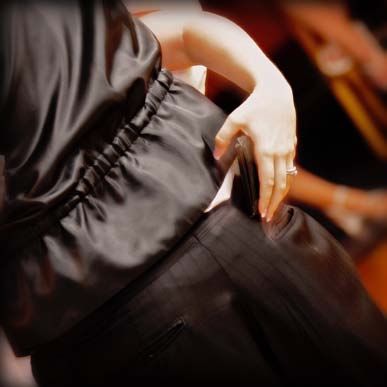
Receptions are full of unscripted, fleeting moments. In this image, the bride had pulled out her husband’s wallet, joking around. After capturing the laughs and smiles, I circled the dance floor hoping she would put it back in for him—and it paid off.
The tight crop, playful angle and hints of people in the background all add to the fun feel of this image.
Even though I missed her pulling the wallet out of his pocket, I anticipated what might come next and was able to capture the image I wanted.
Another way to give this advice is to say, “Think ahead.” It’s something all good wedding photographers do.

Focus on the Attendants, Too
One of my favorite subjects at a wedding, aside from the bride and groom themselves, are their attendants. Obviously important enough to be a special part of this big day, attendants are always great subjects. Photographs of them are guaranteed to have a special meaning for the newlyweds.
In this image, the flower girl quietly went out to the hallway during the reception to sign the guestbook. The setting was perfect—candles, white tablecloth, good background—but there wasn’t enough natural light to freeze the action.
At the time, my assistant had a flash on a monopod that was controlled by a radio trigger, so I simply had them bounce the flash off the ceiling. Our beautiful flower girl was close enough to the table that we could use it as a natural reflector. Therefore, her face didn’t fall deep into shadow, and the lighting wasn’t overpowering to the natural light coming from the candle.
Color balance was an issue though, as there were three distinct sources of light: overhead fluorescent bulbs, the warm candlelight and our flash. I wanted to keep the warm feel but needed to lose the clash of colors. A simple sepia toning did the trick.
By keeping my eye on the bridal party and being able to predict how light would be reflected—and then making some simple adjustments in Photoshop—I was able to capture this delicate moment without interaction. It turned out to be one of the bride’s favorites!
So the tip here is to include the wedding attendants and not focus exclusively on the bride and groom.
Set Yourself Free
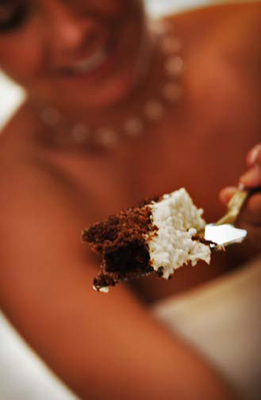
I almost always work with a second photographer, because this frees me to get creative with my photography without worrying about missing the traditional shots. This image is a perfect example of the rewards of being free to experiment with creative angles and techniques.
In this image, I knew the cake was very important to the bride. Rather than using the traditional wide-angle lens, I used my 70-200mm lens and focused on the slice they were about to share. The bride, completely out of focus in the background, shows her complete joy while I captured a great shot for their album.
When you set yourself free, you’ll come up with more creative images.

Keep It Fresh
I always try to keep my eyes open for fresh, new locations and scenes. In this case, we were approaching the church, and I saw the sign as we pulled in. I knew we had to take the groom out there immediately. It totally fit his personality.
Always observe your surroundings, and you’ll find that opportunities for unique images present themselves to you.
As long as I am talking about keeping you eyes open, it’s a good idea to learn how to shoot with both eyes open—like a sports photographer. When you do this, you can, among other things, see if another person is about to walk into the scene, which can either add to or take away from the image you capture.
Use Natural Light When it Feels Right
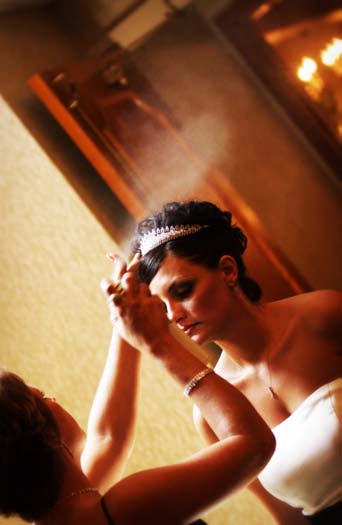
When possible, use natural light. In this case, there was a skylight off to my left, and I saw the bride getting her hair touched up before walking down the aisle. If I had used a flash, the mist of the hairspray would never have shown up with such depth. By waiting for the right moment and not overpowering the scene with light, I was able to capture this striking image.
As with all your photographs, it’s important to see the light and know how to control it on site—with a flash, reflector or diffuser … or by repositioning the subject. Afterward, know how to manipulate the effects of light in Photoshop.

Eliminate Distractions
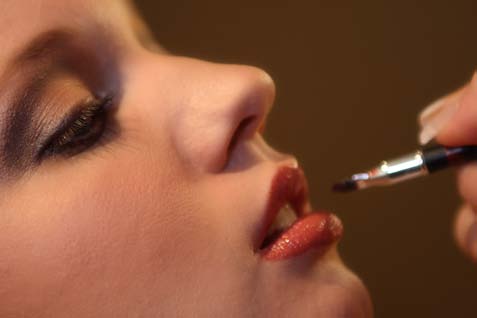
During the makeup session, try to get in close to your subject(s) in order to eliminate the many distractions found in salons.
Wait until the lipstick brush is just off the bride’s lips to shoot. This creates a feeling of anticipation and avoids the strange open-mouth face that usually accompanies lipstick application. Also, since lipstick is typically the last touch of a makeup session, the bride’s skin appears much smoother—and the eyes are much more dramatic—at this point in the day.
Being close to the subject also creates sharpness in the image, because the frame is filled with only the important details.
A little Photoshop work sometimes is necessary here, because being this close can be unforgiving. The results are dramatic though. Even the bride’s brother was in shock. He didn’t recognize her at first and commented on how hot this woman looked! A good lens for these situations is a 17-400mm zoom lens.

Bring Your Own Lights
Reception halls usually have some of the toughest lighting a photographer will ever face. They are typically low, extremely warm (tungsten lights get warmer as they are dimmed), and positioned directly overhead—casting eyes into shadow to create “raccoon eyes.”
Of course, using the flash on your camera helps but, even then, you’re left with dark backgrounds and possible red-eye. Some photographers use high ISO settings and drag the shutter, allowing more ambient light in to lighten the backgrounds, but this can cause extremely warm backgrounds and shadows along with motion blur and noise.
A great solution to this problem is to just bring your own lights. Set up four manual flashes on light stands and position them around the room. Trigger them with radio triggers.
Use manual mode to get consistent power and light up the entire dance floor. Since you’re not using the ambient light in this scenario, color balance won’t be an issue. Get great starbursts in your pictures by including the overhead lights in your shot.
Diffusers are generally unnecessary if you place your light stands in corners, because no matter the angle, you will always have a main light, a fill light and two rim lights.
That’s it. Studio quality lighting at the reception is easier than you thought, eh?
Think Outside the Rectangle
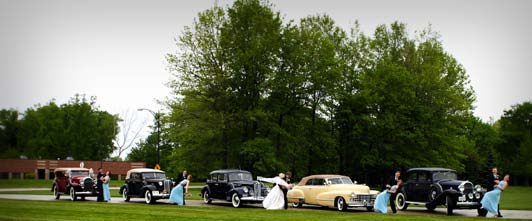
Sometimes, cropping makes all the difference between good and great. In this case, the bride and groom used antique cars to transport their bridal party from the ceremony to the reception, and they wanted an image that captured these stunning automobiles.
The weather was dreary, so we had a very short window of time to get photographs without everyone ending up soaked. We had to work quickly.
On the way to the reception, we found a circular driveway, so we had the cars pull up to the edge, and I went across the little strip of grass. The bridal party was positioned in front of their vehicles, and I snapped three shots.
Unfortunately, to get the wide angle to capture all the cars, I ended up with a foreground featuring an unflattering parking lot. A simple crop transformed this image from average to great. Eliminating the foreground distraction resulted a nice panoramic image for the bride and groom to cherish forever.
Remember, just because your camera captures in a 2:3 format doesn’t mean you are limited to that size for your finished image.

Make Suggestions
One thing I like to do is suggest situations, rather than poses. In this case, I suggested that we stop at a McDonalds near the church. What a fun shot!
Don't be shy; make suggestions.
Scan the Crowd
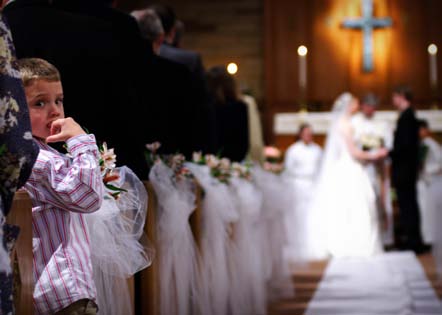
During the ceremony, there are periods of time when a photographer will wait for the next reader, the exchange of vows or some new scene to present itself. We are often restricted with our movement options and want to keep a low profile.
At these times, I often scan the pews for less-traditional images. Many times, children are excellent subjects, as they rarely are as interested in the ceremony as the adults, and they find amusing ways to distract themselves.
This image is a classic example. The bride and groom are holding hands, ready to exchange vows, and this young boy is clearly bored with the whole situation. As he looks around, I focus on him, ready for the eye contact I know is coming.
By observing the entire wedding, rather than focusing only on the main group, you will be able to capture many images that are easily overlooked. You also end up with photographs that tell a more complete story of the wedding day. Since these small moments and situations are rarely noticed by the bride, groom … or even the child’s parents…presenting beautiful photographs of them will likely make the newlyweds very happy.

Work with Reflections
Reflections are almost always a sure-fire way to capture unique images, especially when you give the viewer two separate subjects to see. Sunglasses are perfect for reflections. They allow you to capture in your photograph what the primary (or secondary) subject is seeing.
A great technique is to turn your flash toward the reflected subject. Because your point of view will be different from the angle of your light source, you immediately get off-camera lighting and shading—without any extra equipment.
The added bonus of being able to see both facial expressions practically guarantees this will be a favorite image for both the bride and groom.
As I mentioned earlier in this chapter, seeing the light in a scene and knowing how to control its effect is critical, especially when working on an image such as this.

Do a Double Check
When capturing the exit, I always check two things on my camera. I make sure the high-speed drive mode is enabled and that my flash is on.
The exit is usually shot outdoors, and the bright sunlight can create harsh shadows under the eyes, ruining an important image. By using my flash to fill in these shadows, the newlywed’s expressions are easily seen and their eyes have a nice catch light, which gives them some sparkle.
The drive mode allows me to capture multiple images, as it is very unpredictable where things like petals, rice or, in this case, streamers will fall. Having multiple images allows me to choose the absolute best smile, position and lighting.
Remember, it’s easier to throw away bad images than to wish you had captured a better one!

Observe BodyLanguage
Many times, I like to give my clients some alone time, especially when they have been running around all day. This is usually a rare treat for them, since they are pushed along by their timeline all day long. This alone time usually results in some of the most memorable moments of their big day.
Yet I never keep my eyes off of them during this time, because their emotions are easily seen through their body language. I like to use a longer lens for these shots to stay out of view, so the couple can interact naturally.
In this case, I was inside the reception hall, shooting through the window. I was watching the groom look at all the beautiful details of the wedding bouquet that the bride had so carefully chosen. It was obvious he wanted to make sure he noticed the details.
The panes of glass added interest to the image, and helped frame them in an otherwise plain pre-winter background.