Introduction
This book was a ton of fun for me to put together, even though I do not specialize as a wedding photographer. If you have read my other books or viewed my online WebTV shows, you know I don’t really claim a specialty; I “specialize” in beautiful photography. Yet I am probably best-known for travel photography—mostly for portraits of strangers in strange lands.
That said, I do have some focused experience with wedding photography.
From 1978 to 1980, I was the editor of Studio Photography magazine, which was, at the time, the leading magazine for wedding and portrait photographers. A cover of our special wedding issue opens this introduction.
I was also the editor of PPA Daily, which was the daily newspaper of the Professional Photographers of America’s annual trade show. At the PPA shows, I attended many seminars on wedding and portrait photography.
Sharing Secrets
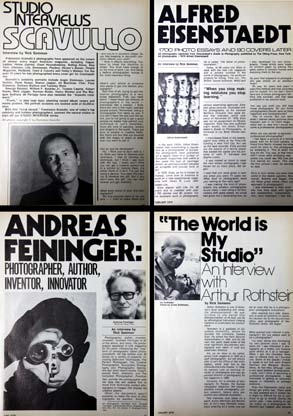
While I was the editor of Studio Photography, I had the opportunity to interview many wedding photographers in their studios and learn their secrets …. way back then. Scavullo, Feininger, Rothstein and Eisenstaedt were among my favorite interviews. Here’s a look at the opening pages of those interviews. The papers are faded now, but the memories of these luminaries are still sharp in my mind.
During this time, I shot weddings on weekends for studios on Long Island, New York, where I lived. For each event, I tried to apply any new tips and techniques I had gathered from interviews and other sources. And I realized it takes time to figure out how to apply new tricks to specific situations and your personal style.
Now, jumping forward almost 30 years, some of my fellow Canon Explorers of Light (www.usa.canon.com/dlc) are among the top wedding photographers in this country. I have listened intently to their presentations at trade shows while I waited for my own turn to take the stage.
I have been tuned into wedding photography for a long time, and I’ve stayed current on image-based technology and techniques. I appreciate this opportunity to pass some ideas and techniques on to you.

The Learning Process
During the process of writing this book, I had the opportunity to talk to some of the top wedding photographers in the country, who gladly shared their tips, techniques, secrets and photographs. They did so to help you take better wedding photographs.
And it was a terrific experience for me as a professional, too. Through interacting with industry experts, I also learned a lot and have applied some of their tips to my own work.
See, from a technical standpoint, photography is photography—no matter what occasion or subject. Covering a wedding—and working with a bride and groom to capture their wedding day in a way they love—is a unique specialty, but the technical aspects of photographing people translate to other situations and venues as well.
Perhaps the most fun I had, which turned out to be the best learning experience as well, was a one-day studio shoot I did with a model in New York City. Experimenting with different lighting set-ups, backgrounds and poses gave me a close look at a “day in the life of a studio wedding photographer.” You’ll see the pictures that came from this shoot later in this book. And hey, if I could get some nice studio shots, having never worked in a studio before, you can too!
Check out these two images. On the right is a photograph taken during this studio session. On the left is a photograph of my parents’ wedding (slightly faded), taken in 1947. To my point that photography is photography no matter what the occasion, you can see that many aspects of wedding photography have remained the same over the years. Both of these pictures have good lighting, and they show the subjects in nice poses with a painted background.
So the good news for you is that you can apply the techniques in this book for many years to come.
Basic People Photography Tips
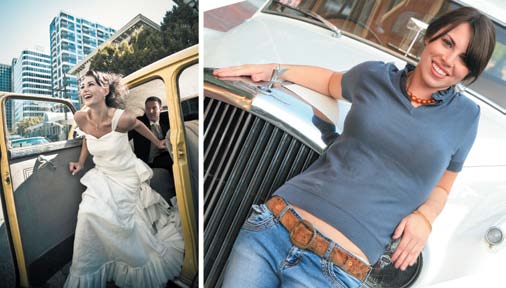
With all that in mind, I thought it would be fun—and helpful, since I’m sure your photographs sometimes vary from wedding shoots—to compare some of my work with wedding photographs I purchased from istockphoto.com. The intent was to find out if the same technical photography tips apply equally to both images.
Note: My photographs are either on the bottom or right side of each pair.
Indeed, as you’ll see, the tips offered in this book definitely apply to people photography in general. For example, using the disequilibrium effect—created by tilting the camera down and to the left or right—makes a photograph look a bit more creative than the standard eye-level shot.
I’ll go into this and other tips in more detail later. For now, they are here to help you jump-start your photo learning.
Let’s go.

Place the Subject Off Center
Take a look at these pictures. Even though I am not there beside you, I can guess at your process for looking at these images. You were first drawn to the subjects, and then you began to look around the frame to see what else was happening in the scene.
I know this because both photographs show the technique of placing the subject off center. This compels viewers to look around the frame for other interesting objects.
When you place your subject dead center in the frame, the viewer’s eyes get stuck there. It’s why professional photographers say, “Dead center is deadly.”

Master Studio-Style Lighting
Some brides and grooms like the photojournalist-type approach for their wedding album. This is basically a style that requires a photographer to shoot what (s)he sees—without any set-up. Other couples prefer the more formal, studio-type approach.
In talking with some married couples who chose the photojournalist style for their wedding, I’ve heard them say they now have some regrets about not getting studio photographs, too.
As a wedding photographer, you need to be prepared to take studio shots. What’s more, you can make extra income by adding studio photographs to your list of services.
You don’t need a fancy and expensive studio lighting set up to get nice quality photographs. Westcott (www.fjwestcott.com), for example, sells hot light and strobe light kits—each with three light sources—for under $500 and $800, respectively.
The photograph on the right was taken with a three-light set up that includes a main light, fill light and background/ separation light.

Watch the Hands
The hands in both of these photographs take up less than 5% of the frame, yet they are important to the overall success of the pictures.
You need to make sure your subject’s hands are well-positioned. Don’t be shy about providing direction if his or her hands look awkward and need to be placed differently. If left unchecked, gawky hand position can ruin an otherwise terrific photograph.
Yeah, I know this is a short tip—maybe even the shortest one in the book—but it’s definitely an important one.
Work Close for an Intimate Portrait
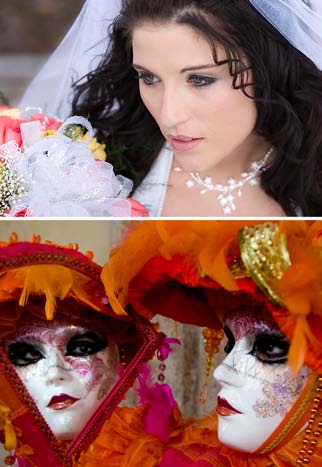
The closer you are to your subject, the more intimate the portrait becomes. That’s why many wedding photographers like to use wide-angle to medium-telephoto zoom lenses and shoot relatively close to subjects when possible.
Working close also lets you identify with and relate better to your subjects. So, get up close and personal.
I have another tip that I’ll include here, since I have your attention … and space on the page.
Watch the nose. When you are photographing a subject from the side, be sure that you position his/ her nose so that the cheek acts as a background, as illustrated in the top photograph. Or, position the subject to get a complete profile of the nose, as illustrated in my photograph.
If you don’t follow this advice, then the tip of your subject’s nose will probably look “funny,” sticking out like a lobe from the cheek.
Expose for the Highlights
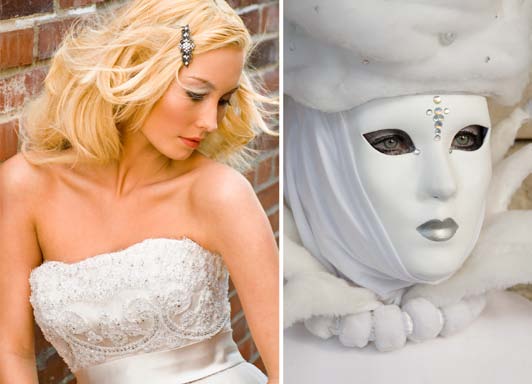
Back when I was the editor of Studio Photography magazine, I used to shoot slide film. When shooting slides, we had to expose for the highlights. If we did not, the highlights would be overexposed, showing little or no detail. In those cases, the slides were tossed into the out-take pile.
When I shoot digital, I also expose for the highlights … even though in Camera RAW, I can rescue up to one f-stop of overexposed highlights. In fact, this is what I had to do with the istockphoto.com image you see on the left.
Conversely, in the image I shot (on the right), I exposed for the highlights, which saved me time in the digital darkroom.

Envision the End-Result
Ansel Adams, the most famous landscape photographer of all time, was known for, among other things, envisioning the end result. That is, he considered all—and I mean all—the factors that go into taking a picture (including the f-stop, shutter speed, exposure and more) and enhancing it in post processing.
I am big on envisioning the end-result, and I talk a lot about that in my workshops.
When I shot the photograph here (bottom), I envisioned a silhouette even though I could actually see detail in the backlit subject at the time of shooting. This is because our eyes see a dynamic range of about 11 f-stops while cameras see only five or six.
To create the silhouette, I set my camera on the Av mode (automatic) and set my exposure compensation to –1 1/2. Had I used no exposure compensation, some of the detail in the subject would be visible in the image, and the silhouette would be less dramatic.
Make Pictures; Don’t SimplyTake Pictures
Anyone can take pictures, but not everyone takes the time to make them. When we take a picture, we simply point and shoot.
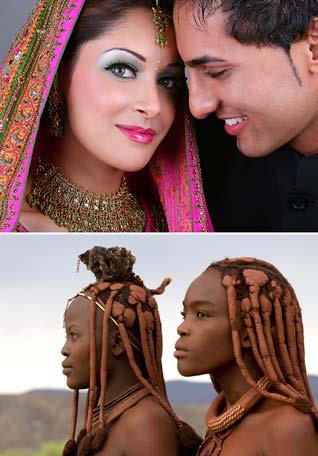
When we make a picture, we carefully arrange subjects in a scene—sometimes moving hair out of the face or posing people in a certain manner. We see the light and use a reflector, diffuser or flash to help control it. We carefully choose our camera angle, lens, exposure mode, and the f-stop and shutter speed combination.
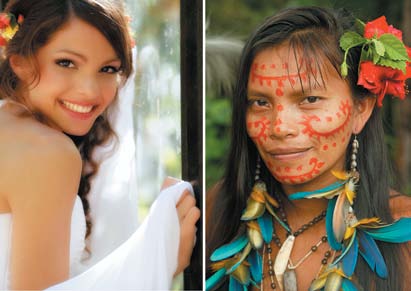
To make my picture of two Himba women in Namibia, I asked them to stand on a log and look off into the distance. As in the above photograph, I positioned them so that their faces were isolated from one another, with no parts overlapping.
Take the time to make pictures in addition to taking candid photographs, and you’ll make your clients happy.
Always Consider Digital Noise and ISO Setting
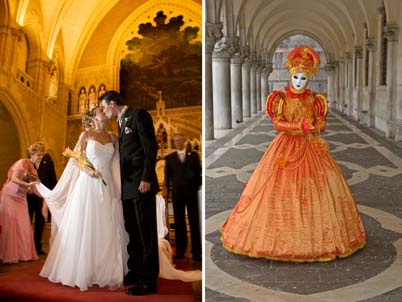
Both of the pictures you see here were taken in relatively low light and are clean! “Keeping it clean” is actually one of my main goals when I take a photograph. And by clean, I mean the image has very little digital noise. I get clean pictures by shooting at the lowest possible ISO setting for a hand-held shot.
I also shoot with a top-of-the-line digital SLR camera, because top-of-the-line cameras have less noise than entry-level and mid-range digital SLRs.
In situations that require me to use a high ISO, such as shooting in very low light, I sometimes use the noise-reduction feature in my camera. Yet the process of this feature increases the time before I can take another picture. If I can’t afford the wait, I reduce the noise in Adobe Camera RAW or Apple Aperture.
When you reduce noise in post processing, reduce the chroma (color) noise first and then luminance noise. In both cases, try not to reduce the noise more than 30%. If you go beyond this, your picture will start to lose sharpness.
Also note that noise shows up more in the shadow areas than in highlight areas.
By the way, in-camera noise-reduction features reduce only chroma noise.

Use—Don't Overuse—the Disequilibrium Effect
Both of these pictures illustrate what's called the disequilibrium effect, which is created when you tilt your camera down and to the left or right.
It's a simple, fun and creative effect. Just don't over use it.
Another tip here: Have fun with this technique!

The Camera Looks Both Ways
When you photograph a person, you reveal an image of yourself. Your mood, energy and emotions are reflected in your subject’s face and eyes. This is what “the camera looks both ways” means.
This is actually my #1 tip when it comes to photographing people—whether your subject is a beautiful bride in her home or church or a magnificent woman in the rainforest. Your disposition matters.
So as a people photographer, keep this expression in mind … and don’t get bogged down with camera settings. The technical stuff has to become automatic, so that you can concentrate on getting a great personality portrait that you and your clients will love.

People Photography Tidbits
This is not a technical photography tip. Rather, it’s some interesting thoughts on photographing people that were first published in my previous Wiley book, Rick Sammon’s Digital Photography Secrets. I share a condensed and modified version with you here because the information offers some perspective on photographing people.
Here goes.
Overhead Lighting: The majority of famous painters “illuminate” their subjects from above and to the left. For whatever reasons, we seem to like that kind of lighting. Here are two pictures that illustrate this lighting technique. Hey, if it works for famous painters and if it works for me, it will work for you!
Open Pupils: Pictures of people with their pupils open wide are typically preferred over those in which pupils are closed down. That’s one reason we like pictures of people taken in subdued lighting conditions—in the shade and on cloudy days, when a person’s pupils are open wider than they are in bright light and on sunny days.
Color Variation: We see colors differently at different times of the day, depending on our mood and emotional state. Before you make a print, look at it on your monitor at different times of the day to see if you still like your original version. You may want to tweak the color to get the look you like best.
You can learn more facts about people pictures, and why we like them, in one of my favorite books: Perception and Imaging by Dr. Richard Zakia. You’ll find more info on seeing colors at iLab (http://ilab.usc.edu).
Make the Time
Here is another non-technical tip. It’s a philosophical tip about working as a photographer—well, working in general.
I’ve told the following story at least a thousand times since 1979. It illustrates the point about wanting to do something and then doing it.
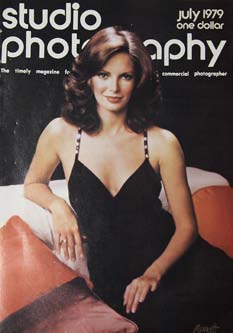
While I was the editor of Studio Photography, the cover featuring Jaclyn Smith was my favorite. I thought she was exceptionally beautiful and I liked the photograph. My boss, Rudy Maschke, knew that.
One day he came into my office and asked me to do something. I said, “Mr. Maschke, I’m too busy. I’m sorry I can’t do it right now.”
He said, “Sammon, who do you think is the most beautiful girl in the world … aside from your wife, of course.”
I replied, “Jaclyn Smith.”
“Well, Sammon, if Jaclyn called you up right now and asked you to have lunch with her for 20 minutes, would you go?”
“Sure.”
He said, “Sammon, get to work.”
The point of this little story is that if you really want to do something, you’ll make the time and you’ll do it well.
Keep that story in mind the next time you feel as though you don’t have the time to do something.
Here’s another thing I learned from Mr. Maschke: When there is not enough time to do something right, there is usually enough time to do it over.
Here is another photo philosophy—well, actually a philosophy for life in general: If you love what you do, you never have to work a day in your life!
Rick Sammon
Croton-on-Hudson
January 2009