This is an important section because it shows how much muscular definition is visible on the skin’s surface of the average, trim manga figure. Unless you learn which muscles “show through” to the surface of the skin and which ones don’t, you can’t use the muscular anatomy information very effectively.
This section also presents comparisons between the muscles in a relaxed state and in a flexed state. Most anatomy books only show the superdefined, flexed muscle groups. But what do you do when you want to draw someone who isn’t flexing all the time? After reading this chapter, you’ll know how much definition to add to a relaxed muscle. It’s a valuable addition to your growing arsenal of manga techniques.

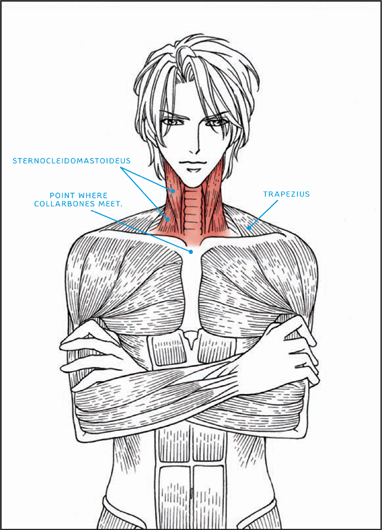
Many artists are surprised to learn that the neck has major muscles. They thought it only had stringy tendons. But when you look at the muscular chart of the neck, you’ll immediately notice that one thick neck muscle stands out: the sternocleidomastoideus. Do not try to spell this at home. You’ll drive yourself and others insane. This main neck muscle travels from the ear to the collarbone, where it forks off. This is the neck muscle with most of the definition at the skin level.
Notice, too, that fully half of the length of the neck is set down into the trapezius muscle. It’s not just teetering on top of the torso but is set deep inside of it.
Even when relaxed, both sternocleidomastoideus muscles are still apparent, especially on thin and athletic people but less so on heavier people. In this straightforward view, you can see clearly how the sternocleidomastoideus muscles travel from just beneath each ear to attach to the two collarbones where they meet, in the middle of the torso.
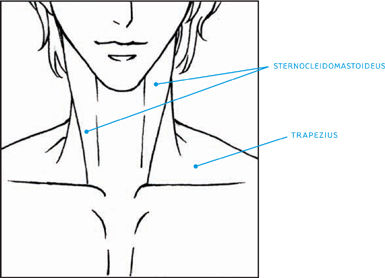
When the neck turns, it flexes. This position reveals the other, smaller neck muscle, which is closer to the throat: the sternohyoideus. This muscle isn’t as apparent on the surface of the skin, so use it sparingly.


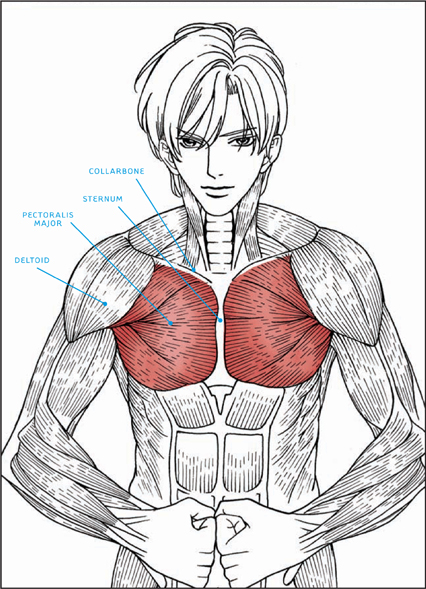
On male characters especially, a well-muscled chest equals power. It makes the stature of a character impressive in almost any pose. On female characters, developed chest muscles accentuate strong posture.
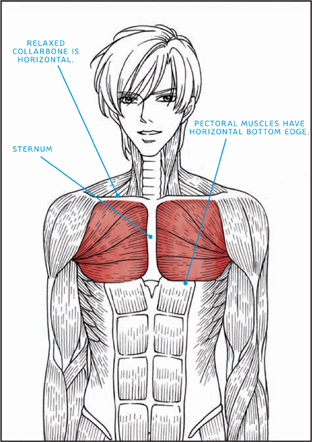
A good deal of anatomy is knowing where the muscles are positioned in relation to one another. Looking at the diagram here, you see that the chest muscles are attached horizontally across the collarbones. Running vertically down the middle of the torso, the chest muscles attach to the sternum (breastbone) in the center of the chest. On the sides, the chest muscles tilt up a bit and wind into the deltoids (shoulder muscles).
The sign of a youthful, trim, in-shape male character are “square-ish” chest muscles. You should be able to draw a straight line horizontally under the pectoral muscles.
Every body type shows the muscular contour where the chest muscles (pectorals) wind into the shoulder muscles (deltoids).
When relaxed, the collarbone is horizontal and the outer ends should not tilt downward. The outer ends of the collarbones can tilt upward, but in general the collarbones should be parallel to the ground. A perfectly horizontal collarbone is one indicator of a lack of tension in the body.

We use chest muscles all the time without realizing it, but it’s during big movements—such as pushing, squeezing, and pulling—that they really stand out. When flexed, chest muscles can bunch and show striations like any other muscle; but they must have sufficient size to do so; therefore, only athletic or muscular characters’ chests reveal a muscular flex like the one seen here. Note also how the collarbones crunch into a V shape when the chest flexes.


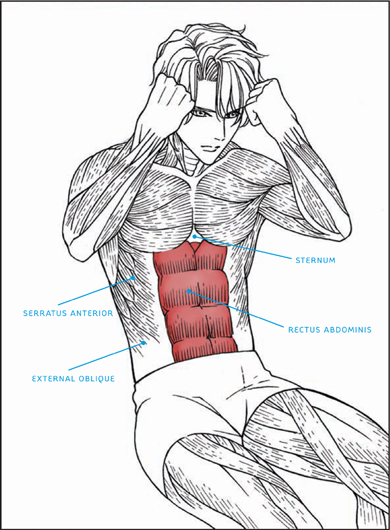
A well-defined midsection gives a character the look of inner strength and power. This accent is effective for both bad guys and good guys. Women also have well-developed abdominals. But it’s less attractive to articulate each individual stomach muscle. It looks very extreme. Just suggest the definition with a minimum of line work.
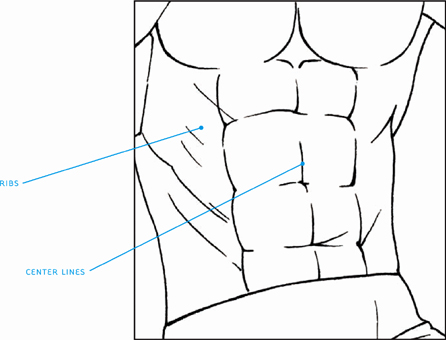
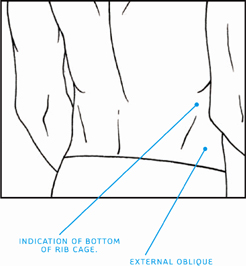
Abdominals are made up of four pairs of tight muscle groups running vertically down from the sternum to the pelvic region. On either side of the abdominal wall is the rib cage muscle, called the serratus anterior, and below each of these is a side muscle, called the external oblique (which adds unwanted width to the waistline!).
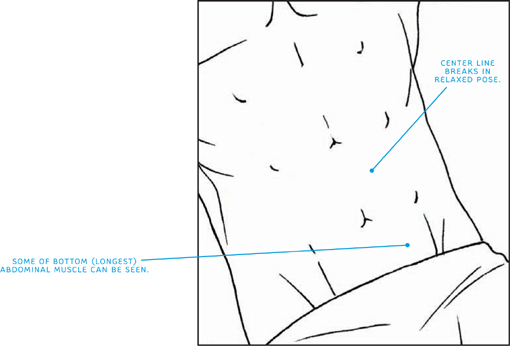
The shortest abdominal muscle is the top one, just below the sternum. The longest is the bottom one, just above the pelvis; this is partially blocked by clothing in the diagram here.
In the relaxed position, the abdominal wall loses its highly segmented appearance on the skin surface. The center line, therefore, breaks up, too.

It’s not necessary to articulate every single rib muscle in the flexed position. You can generalize. Also notice how the center line of each abdominal section is visible when the muscles are flexed.

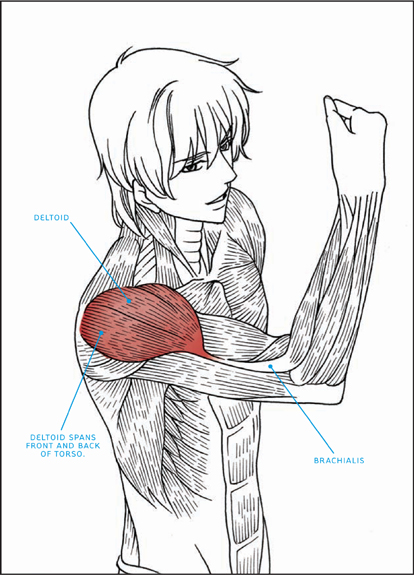
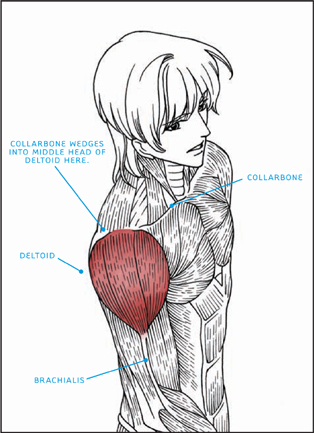
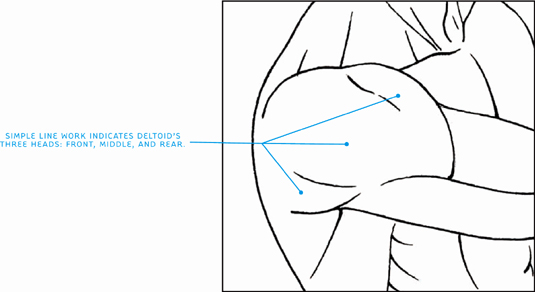
The main shoulder muscle is the deltoid, which is a big, round muscle that covers a lot of territory. It’s capable of showing a good amount of definition, since it has three heads: front, middle, and rear. But it’s still all one muscle. When drawing the definition lines, make sure they’re curved, because they should appear to travel around the heaping mass of the deltoid.
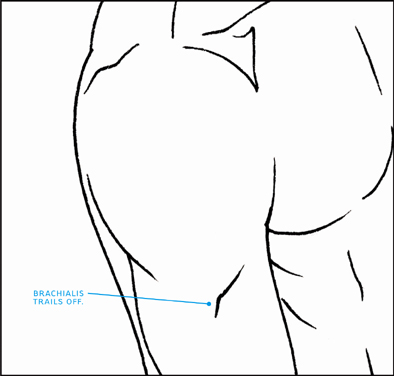
When the deltoid is relaxed, the three heads don’t show any signs of articulation. It just looks like one smooth muscle. The definition lines remain on the actual muscles below the skin, however; you just can’t see them. From this angle, the deltoid looks like an upside-down teardrop. Note how the point of the teardrop lands in the middle of the upper arm, at the brachialis muscle. You can allow the lines of the brachialis to trail off without much definition, especially when a character is relaxed.
In the flexed view, you can clearly see how the deltoid muscle funnels down to meet the thin brachialis on the outside of the upper arm. The deltoid is large enough that it covers part of the front and back of the torso.

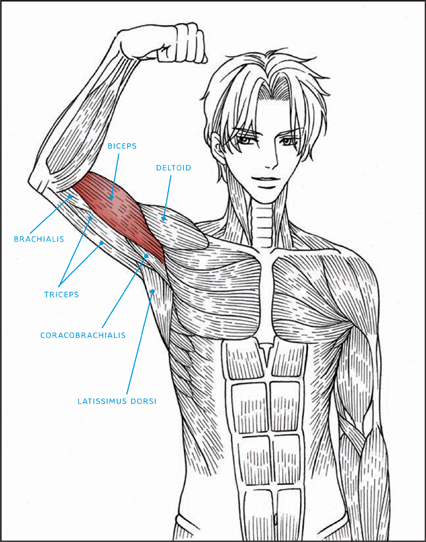
People tend to think of the upper arm as all biceps, when at least half of the arm is triceps, as well as other smaller yet still visible arm muscles.
The biceps wedges into the crook of the elbow and is cut off by two forearm muscles: the brachioradialis and the pronator teres. On the outside of the upper arm, the thin brachialis muscle connects the shoulder muscles to the forearm muscles. The brachialis is important, because it separates the biceps from the triceps. Though some beginners omit this (due to lack of knowledge), pros always add it to their drawings.
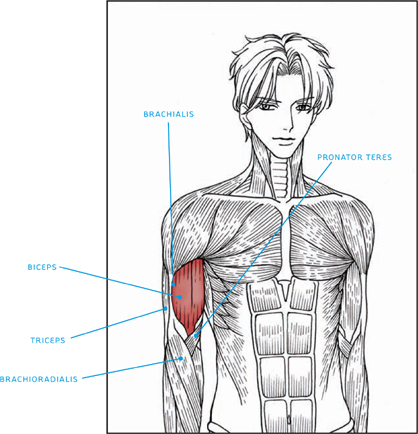

On the underside of the arm, the latissimus dorsi (a back muscle) wedges its way between two upper arm muscles: the triceps and the coracobrachialis.
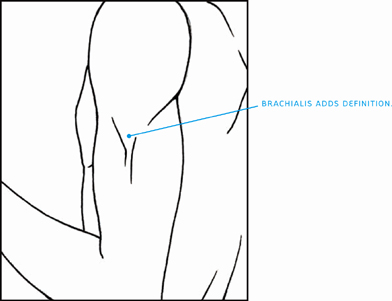
The detail to the right is very defined here, but some artists eliminate the brachialis.
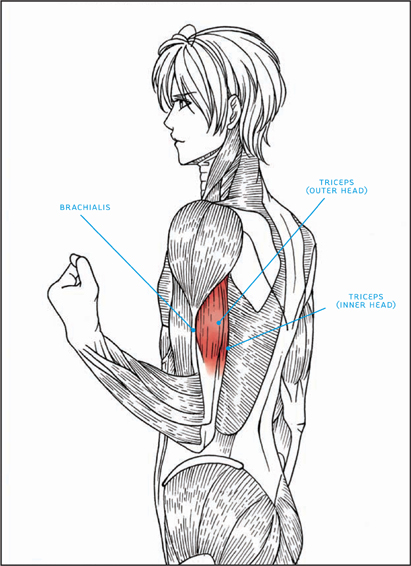
When the biceps flexes, the triceps, which is on the opposite side of the arm, relaxes. As the arm bends at the elbow, with the forearm curling upward, the triceps is pulled, and as a result, it elongates. When stretched like that, the triceps loses definition and appears smooth.

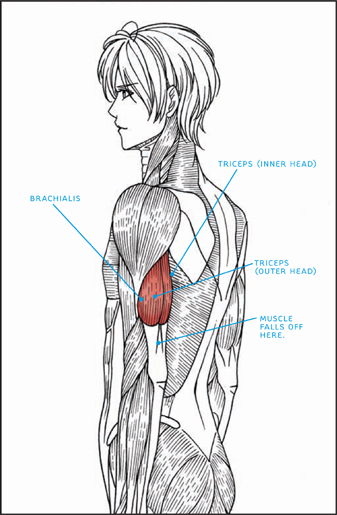
When the arm hangs straight down so that the biceps is relaxed, the triceps flexes, rising and bunching up. This flexing defines the two heads of the triceps (inner and outer) on the skin surface. The triceps is used primarily for pushing, pressing, striking, and throwing movements. The flexed muscle turns into tendon before reaching the elbow.

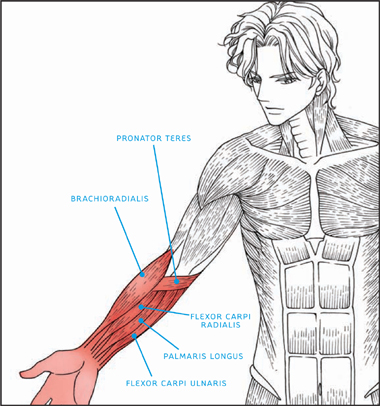
The forearms have many thin, long muscles running from elbow to wrist. You may look at the diagrams and ask yourself if you really have to memorize all of them. This is why having diagrams of surface anatomy is so important. They show you which muscles to concentrate on for drawing and which are just for your information.
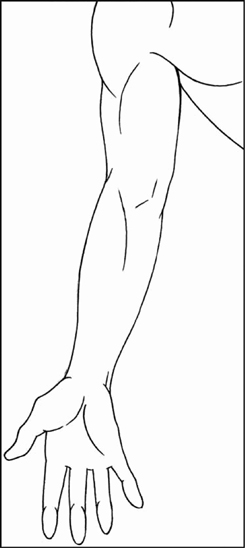
Opening up the palm relaxes the forearm muscles. Here, the prominent muscle is the brachioradialis, which takes up half the width of the forearm. Not all artists choose to articulate the forearm muscles in a relaxed pose. Most allow the outline of the forearm to suffice; however, if the muscles are articulated, it is usually near the crook of the elbow.
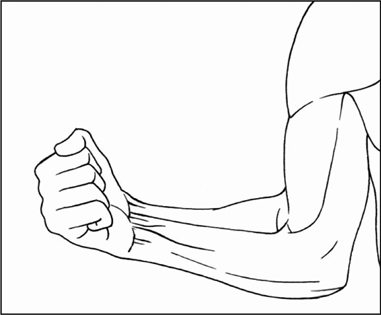
When the hand is balled into a fist, the forearm is generally tense, and the tendons will show around the wrist area. The closer to the wrist you get, the more prominent the tendons become. When the palm is held supine (facing upward) and there’s no twisting or rotating of the forearm, the muscles travel in a straight line from the elbow to the wrist. Note that the muscles also taper from the elbow to the wrist.
This forearm is partially relaxed because the character is holding something light, with his arm down at his side. But tension still remains in the cluster of muscles around the elbow and a bit at the wrist. And remember, you’re only suggesting muscles when you’re drawing surface anatomy; you’re not delineating an entire group of them. Just a few light strokes may be all you need—even when your inclination may be to do more. Sometimes restraint works better than elaborate technique.

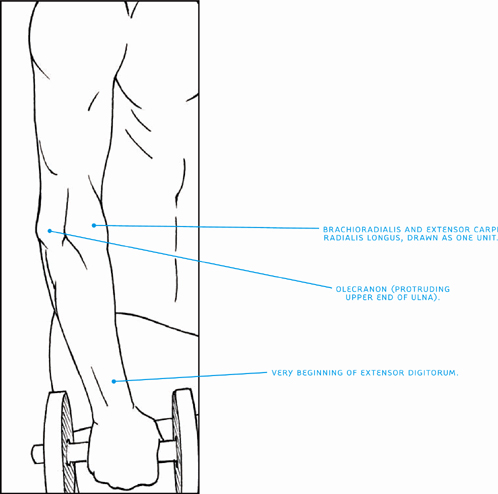
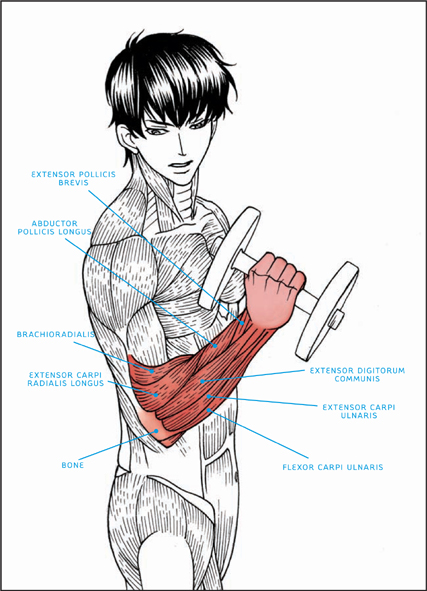
Some of the muscles of the forearm are never articulated on surface anatomy. Examples are the abductor pollicis longus and the extensor pollicis brevis. No one ever sees them. They’re called out on the diagram at right but aren’t defined on the skin surface below. However, two forearm muscles are very important for artists: the extensor carpi radialis longus and the brachioradialis. They are usually visible when the forearm rotates into the palm-down (or pronate), “hammer fist,” or sideways positions. In addition, the extensor digitorum communis and extensor carpi ulnaris are typically seen when the forearm is flexed. So take a close look at these two main muscles in both diagrams and commit them to memory.


The upper back has the trapezius muscle—the one that connects the neck to the shoulders, travels down to the middle of the back, and covers the inner half of the scapula (shoulder blade).
In actuality, there are three muscles that cover each shoulder blade; however, usually the shoulder-blade muscles are not well developed unless the subject is a super-athlete; therefore, it suffices to just draw the shoulder blades.

Most characters in manga have idealized body types. You don’t typically see out-of-shape manga characters. On these trim types, the spine and shoulder blades are evident, even when the back is in a relaxed state. These areas have been articulated to a high degree in these illustrations. You can show less definition omitting the diagonal ridge at the top of the shoulder blades where the shoulder muscles attach to the scapula. In these drawings, there’s more definition than would normally be seen on a relaxed back. This has been done to convey the shape of the shoulder blades. Also note that the shoulder blades become more pronounced the closer they are. They become less defined as they travel out toward the arms.

There are three muscles that cover the shoulder blade, the most prominent of which is the teres major. These muscles rarely show on people who aren’t athletes.
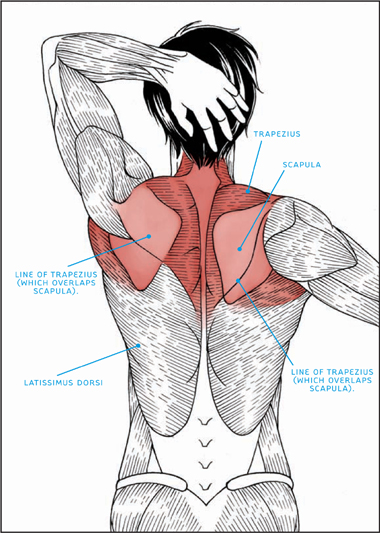

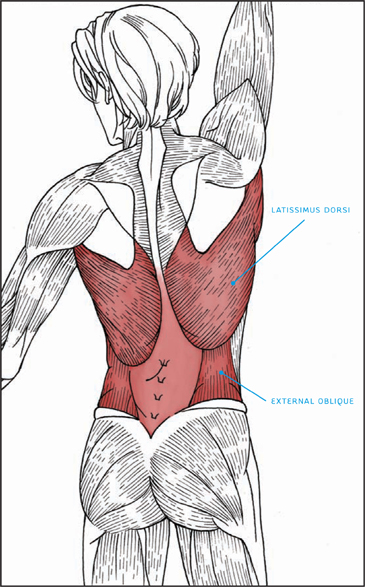
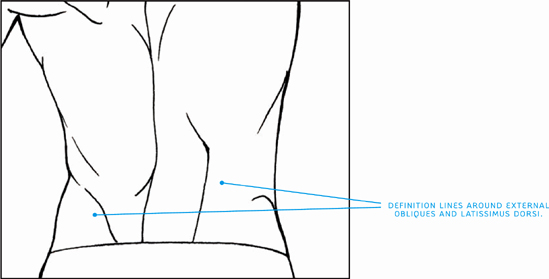
The job of holding up the torso and the head is carried, to some extent, by the abdominal muscles, but the lower back receives the lion’s share of pressure—and aches. The line of the spine is visible on the surface of the skin from the top of the neck all the way down to the lower back and pelvis. No muscles cross over the spine. The largest back muscle, the latissimus dorsi, appears as two huge slabs on either side of the back. Under it are the external obliques, which are the famous parts of the waistline that add a bit of girth as we age. Even though everybody has external obliques, some manga artists omit them on idealized characters, especially on bishounen.

When the body arches back, the lower back experiences pressure and tightens up, flexing.

Beginners often draw legs that look too straight; legs look more natural if they’re drawn rounder and fuller.
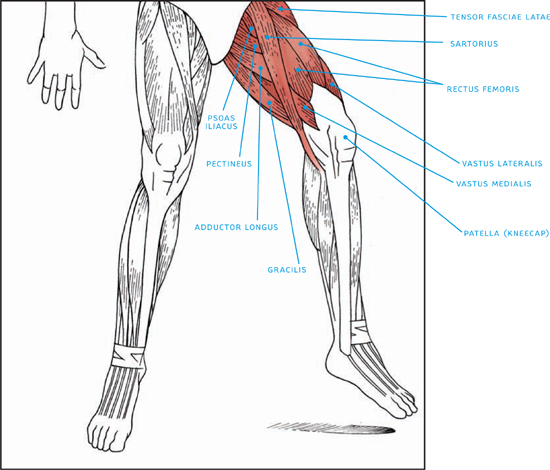
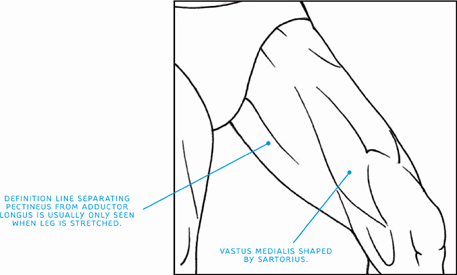
Muscles that are relaxed, as a rule, are less defined; however, the one muscle that is often still articulated, even in its relaxed state, is the sartorius (the thin band that winds diagonally across the thigh from the knee to the hip). Except for that, the relaxed leg should have few interior definition lines.
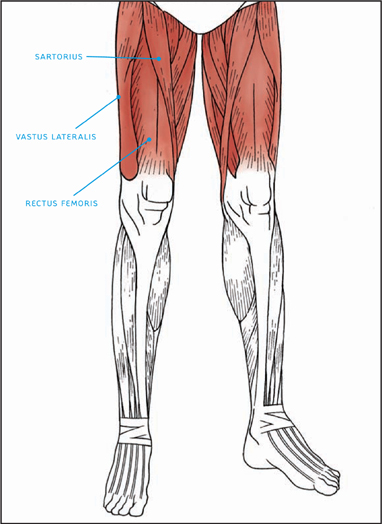

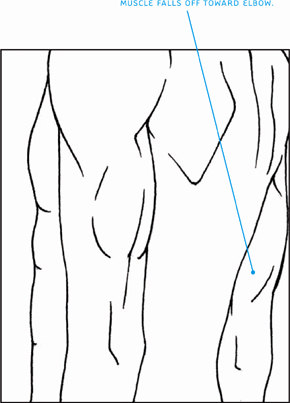
There are many muscles in the upper leg that can be articulated during action poses. The most prominent of those, the vastus medialis, is defined by the thin band of the sartorius muscle, which pulls it into shape. Don’t worry if there seem to be too many individual muscles to memorize and master here; you only have to articulate two or three to indicate that the leg is flexed. This drawing shows many more for illustrative purposes.
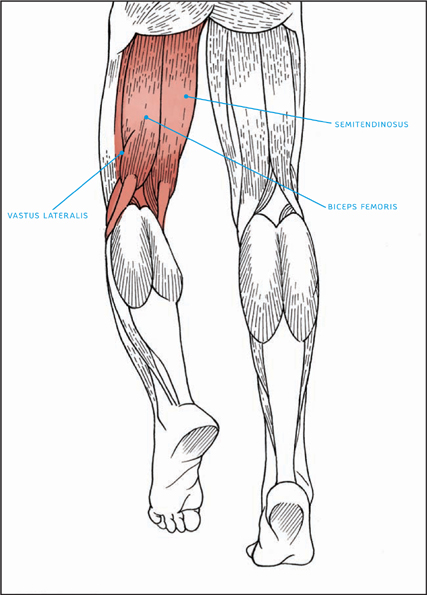
The rear muscles of the upper legs are composed of two major muscles: the biceps femoris and the semitendinosus. Unless flexed, they appear to form a single group of muscles and therefore don’t usually need to be individually articulated.
These muscles don’t transition smoothly into the gluteus maximus (the main buttocks muscle above them) but instead meet it perpendicularly. Notice, too, how the big leg muscles taper down into the small tendons at the back of the knee joint. Now you can see what causes that little pocket of space behind the knee that we all have.
Note how the placement of the muscles in the anatomical illustration at right corresponds precisely to the placement of the definition lines below.


The biceps femoris and the semitendinosus make a powerful pair of muscles that is sometimes referred to as the “biceps of the legs,” because flexing them makes a bulge, much as the biceps in the arm does.


Don’t usually pay attention to the lower leg? Drawing skinny calves can make an otherwise well-executed drawing look mediocre. But this is an easy fix. Check out the tips on these next few pages and you’ll eliminate common mistakes.
In the front view, the lower leg doesn’t exhibit many definition lines when the muscles aren’t under exertion. Unncecessary definition lines are distracting. Don’t compete with other, more important parts of the body that require significant definition lines, such as the biceps and the chest. Definition lines for a relaxed shin can be short, as in the image below, or you might choose to accent the shin bone instead.
Nonetheless, there are times when you may wish to show tension in the body—even when the legs are not under stress. An example would be if something shocks the character and his or her body tenses up, or if preparing for a fight, the entire body tenses in anticipation. Those are moments when definition lines help to underscore the anxiety of the moment.
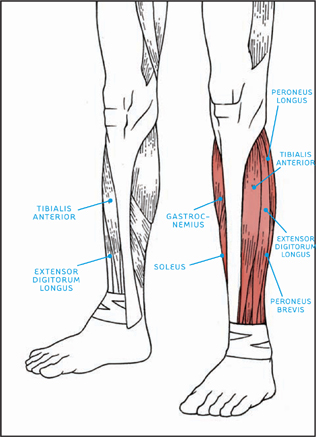
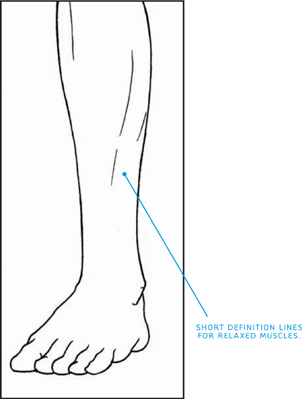
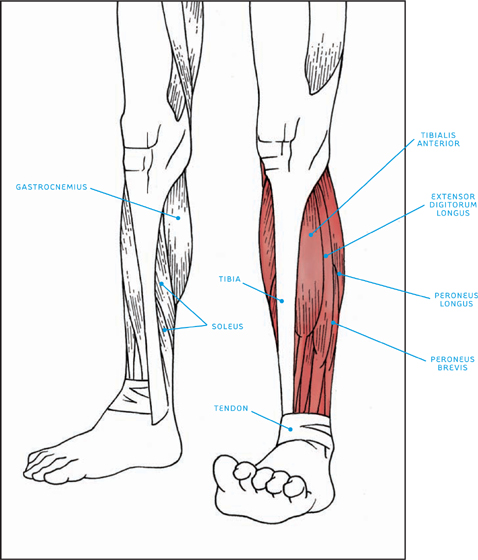
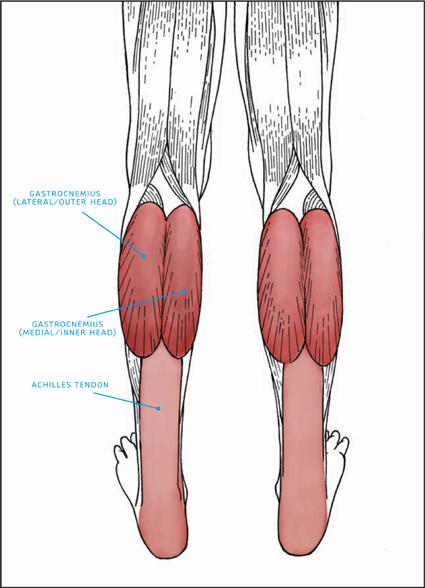
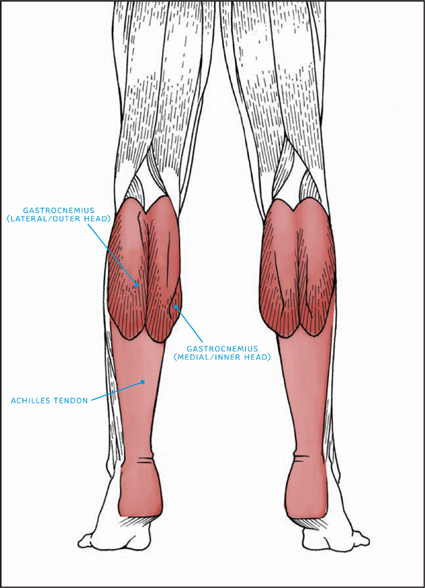
For the sake of thoroughness, I’ve included a front view of the lower leg muscles when flexed. But this isn’t so dynamic, because the tibia (shinbone) is so prominent that it crowds out most of the muscles and relegates them to the sides of the leg. The inner portion of the lower leg, however, has the prominent calf muscle: the gastrocnemius. On the outside, you’ll see several prominent definition lines (right), owing to the longer muscles that appear there.

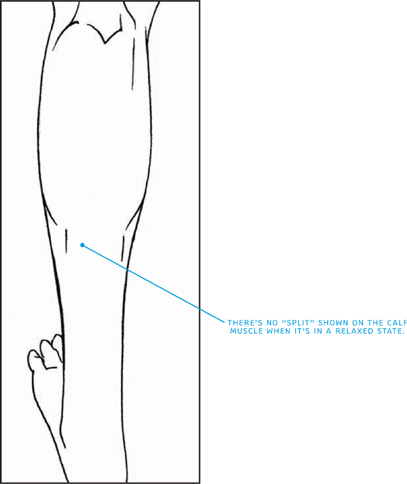
The prominent calf muscle, the gastrocnemius, is responsible for most of the girth of the lower leg. It looks like a three-quarter-full water balloon even when relaxed and is one of the few muscles that retains much of its roundness, even in a relaxed state. It has two distinct sections separated by a vertical split, but you don’t see this on the surface of the skin when the gastrocnemius is relaxed, so there’s no definition line there in the drawing below. For practical purposes, the gastrocnemius is often sketched as an oval and then adjusted at the top and bottom to show the gradual transition into the other muscles and tendons. The Achilles tendon always remains smooth.
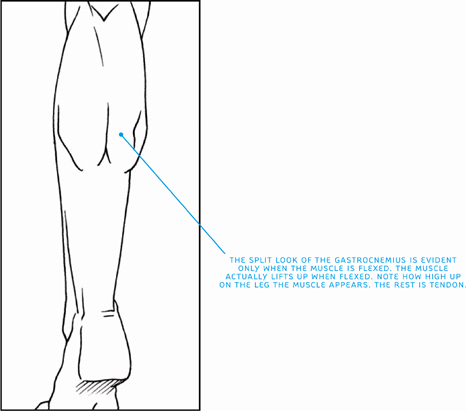
The calf muscles can really bunch up when flexed. The split in the gastrocnemius becomes visible when the muscle tightens up. It appears to be two different muscle groups, but actually, it’s two heads of the same muscle. Fully half of the lower leg is covered by the Achilles tendon.

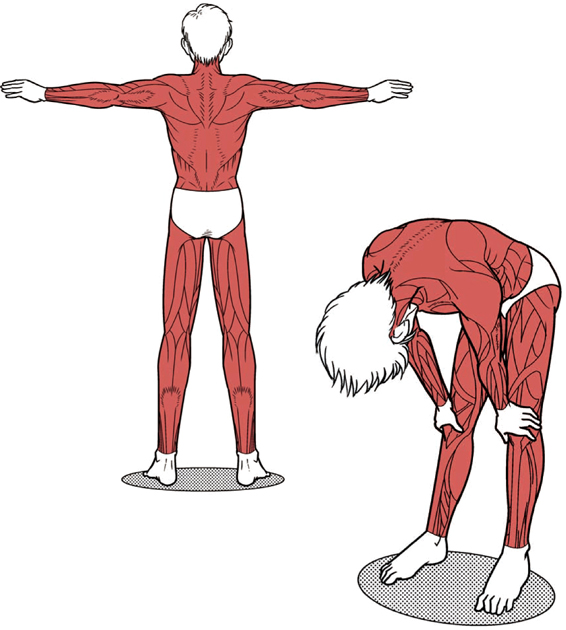
Not every muscle is superdefined on the outline of the figure, because that would result in an outline that’s bumpy all over. The outline of the figure is certainly influenced by the various muscle groups, but just as important, you must be sure to draw a smooth transition between the groups, even if that requires losing some definition. Every body has a coating of fat and skin that acts as a smooth layer covering the muscles. Note how fluid the black ink outline is on these figures. The heavily muscled areas occur on the interior of the form.


It’s important to know the basic direction in which a particular muscle appears to travel: up, down, horizontally, or diagonally. When a muscle tenses up or stretches, definition lines result. If you don’t know how the muscle is formed, you won’t know how to draw those lines.
It’s also important to be somewhat familiar with the general shapes of the muscles. For example, look at the triangular muscle (the trapezius) in the middle of the upper back below. How are you going to draw this guy holding a boulder over his head without drawing his back flexed? And how can you draw a flexed back if you don’t know the shape of its major muscle? So the shapes of the muscles become integral, because they give definition to the individual body parts, making them look tense, which in turn makes an action pose look sharper.
These poses show various muscles and their general placement and shape, which can be highlighted when the muscles are flexed or stretched. It’s good reference material.