 ″, and
  ″ increments. If you want true accuracy, this ruler makes it easy to cut the unfriendly ruler numbers you often come up with when drafting Feathered Stars.
Before we go into true Feathered Stars in Class 380, we are introducing you to another type of star that is equally striking—what we call mock Feathered Stars. These stars are completely made of half-square triangles, whereas Feathered Stars have a 45° diamond at the tip of each point. Mock Feathered Stars are generally drafted on an even grid, whereas Feathered Stars require an unequal grid and are much harder to draft. Mock Feathered Stars can have different sized half-square units in the same block just as Feathered Stars do, so be careful in trimming the half squares and keep them separated and marked to eliminate confusion.
We thought this would be a great place to have you jump into more complicated blocks without bogging you down with big quilts. These stars also prepare you for the more technical piecing needed for Feathered Stars. If you have worked through the quilts in this book up to this point, you are ready to apply that knowledge to this Class. By this time, we feel that if you want to turn any of these blocks into awesome quilts, you have the ability to do so if you have worked through all three books. We have faith in you!
The projects you will be making to learn the techniques in this Class are not made into actual quilts. They could be small table toppers or wallhangings, but you might want to consider laying the blocks aside after you have completed them and use them as centers for the medallion quilts you will be designing in Volume 5.
TIP
We find that the most helpful tool to work with when making either mock Feathered Stars or Feathered Stars is Marsha McCloskey’s Feathered Star Ruler, which is an 8½″ ruler that measures in 1″, ½″, ¼″,  ″, and
  ″ increments. If you want true accuracy, this ruler makes it easy to cut the unfriendly ruler numbers you often come up with when drafting Feathered Stars.
All of these blocks use many of the same-sized triangle units, so we have left it up to you to choose the techniques you would prefer to construct these units. We are not going into detail on the construction of each block. We have broken out the units and have listed the cutting requirements for one block. General instructions are given on the breakout of the blocks; you can fill in the blanks for how to get to that point.
TIP
We suggest that you read all of the instructions before you start to cut and sew. We routinely cut the large side triangles and corner squares larger than is mathematically correct. We will give you the right measurements but suggest that you add 1″ to what is listed for trimming. These triangles and corners tend to sew in small, and if they are not large enough to accommodate the points of the single triangles at the ends of the feather rows, the block will not be square, and you will lose your points on the outside edge of the block. There is also the problem of the long side of the triangle not staying straight and therefore needing to be trimmed. It is always easier to add too much and trim than to have the block not go together easily.
Consider this your midterm exam.
Star Diamond is a classic quilt block that was published in the April 1933 issue of Ladies’ Home Journal. The original illustration of the quilt in that magazine was set on point with plain alternating blocks. It can also be set together as a straight set with sashing separating the blocks. We recommend that you make a sample block first and then create your own ideas with the worksheets in Volume 2, Class 250.
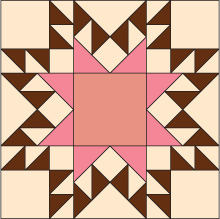
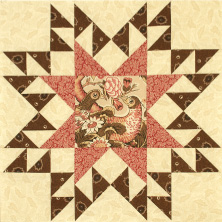
We have drafted this block to finish at 16 ″ square. Study the block on graph paper and see if you can see how the lines connect and how you get the shapes and sizes. Everything is evenly divided, working off the corners of the basic nine-patch grid. Can you see how you get two different sizes of half-square triangles?
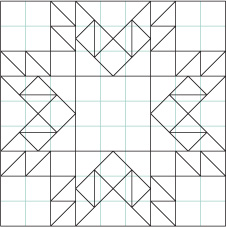
You will be working with 2″ and 1 ″ finished units. Keep the units in 2 separate envelopes and mark each with its size. The larger half squares are used in Unit 1, and the smaller ones are used in Unit 2. We recommend that you work with either the Bias Square ruler or Marsha McCloskey’s Feathered Star Ruler for this class, as they are marked for precision cutting of
  ″ increments.
You will be able to make one star from a fat quarter of each fabric. We used a dark pink print, a brown print, a beige background and a fussy-cut panel for the center.
For one star—
Cut from dark pink:
4 – 3¾″ squares. Cut each square once diagonally into 8 triangles (G).
Cut from brown:
4 – 2 ″ squares; cut once diagonally into 8 triangles (Unit 2—D).
Cut from background:
4 – 2½″ squares (Unit 2—E)
4 – 2 ″ squares (Unit 1—B)
1 – 6 ″ square; cut twice diagonally into 4 triangles (Unit 2—F). (Consider cutting larger—see tip above.)
4 – 4¼″ squares (Unit 1—C) (Consider cutting larger.)
From large print:
1 – 6 ″ square (H)
Construct (using any technique you prefer):
8 – 2½″ half-square triangle squares (Unit 2—D)
16 – 2 ″ half-square triangle squares (Unit 1—A)
Unit 1
Construct 4 of Unit 1 for each star you make. Unit 1 uses pieces A, B, and C.
Read all the instructions before you start anything.

Following the above diagram, lay out the 4 half-square triangle units, 1 B square, and 1 C square. Sew the half squares together in both rows. Add 1 set of half-square units to the side of C. Press the seam allowance toward the square (C). Add the B square onto the end of the remaining set of half-square triangles. Press toward the B square.
Add this unit to the lower edge of the C square, butting the seams carefully. Press toward the C square. Make four of these units.
We find that if you press the seam allowances of the feather units open as you construct the rows of feathers (half-square triangle units), it is easier to see the intersecting seams and hit them exactly when sewing the row of feathers onto the larger triangles. Press the seam allowance toward the single triangles. All the other seams are pressed the direction they tend to lie, or toward the large triangles.
NOTE
Check each side of each unit to ensure that the points of the triangles are exactly ¼″ from the raw edge.
For Unit 2 you will need the remaining pieces except the center print (H). Lay out the pieces for one unit following the diagram below.

Join 1 half-square triangle unit to 1 single triangle for each side. Attach 1 of these units to the side of triangle F. Press toward the large triangle (F). Add the E square to the end of the remaining joined triangle unit. Press toward the square. Sew this unit to the other side of the F triangle. Add the G triangles, one at a time, to the opposite side of the half-square triangle units. Fold each G triangle in half along the long side to find the center point and align it with the seam on the side of Unit 2.
Trim Unit 2 so that all the points are ¼″ from the raw edge, and the unit is 6 ″ square.
Using the diagram of the block above, lay out the 4 Unit 1 pieces in the corners and 4 Unit 2 pieces in between them, in 3 horizontal rows of 3 units each. Place the center square in the center of the block.
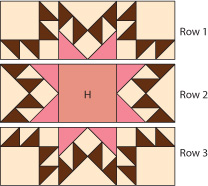
Sew together the units in each row. Press the seam allowances in one direction, alternating with each row. Join the rows to make a Star Diamond block. As always, pay special attention to the points as you are joining units.
Now that you have made one block, are you up to making four or even twelve for a throw or a quilt? See the following two diagrams to inspire you.
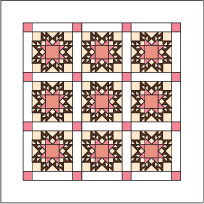
As you look at the illustration above, how would you change it or improve on it to suit your tastes? Play with some of these ideas:
• Use narrower sashing.
• Use no cornerstones.
• Windowpane the blocks.
• Make it very scrappy with different backgrounds and different triangle colors.
• Use a bold stripe border print in the center of the blocks and the border.
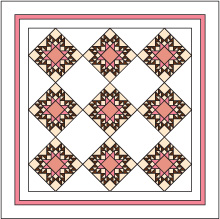
Again, as you look at the illustration, could you do anything to the design to jazz it up a bit? Work with Volume 2 and the worksheets to get some ideas going. Here are some options:
• Different fabric for setting triangles
• Internal frame added instead of plain borders
• Windowpaning
• Scrappy fabrics
• Solid alternate squares for a lot of heavy quilting
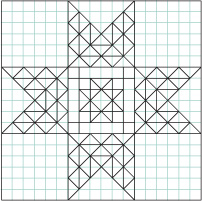
We are adding a bit more detail to this star. Carrie drew this on graph paper years ago, and we thought it was a nice addition here. It is similar to Star Diamond; it just has more half-square triangle units in the points. We have gradated the colors from medium to light in the triangles to soften the lines a bit.
Quilt top size: 27″ × 27″
Grid size: 3″
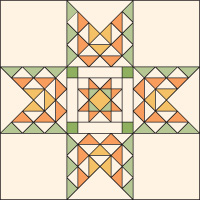
This block is again drafted on a nine-patch grid. We have assigned a size of 1½″ finished for the grid, as we know from the formula for Sawtooth Star that 1½″ gave us a ruler-friendly number for the half-square triangles.
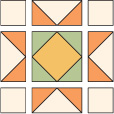
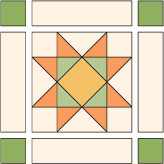
The center of the star has a 9″ square. You can put anything in this space. You might want to interview different 9″ blocks, a panel print that can be fussy cut, another square in a square, an appliqué, or most anything else you like the looks of. We chose a simple 6″ star and surrounded it with a frame. Time to play with graph paper again!
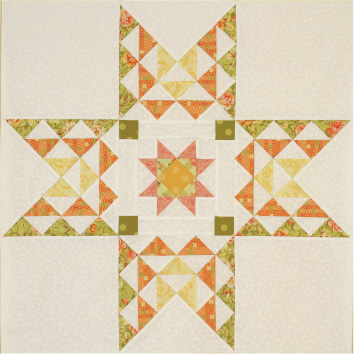
Begin by choosing and constructing whatever you want in the center. If you are making the star we chose, you will be making a small square in a square, four Flying Geese units, and four squares.
• Construct a 3″ finished (3½″ cut) square-in-a-square unit for the center (Class 330, Lesson Three, page 38).
• Construct 4 Flying Geese units 1½″ × 3″ (Class 350, any method you choose).
• Cut 4 – 2″ squares for corners.
• Cut 4 – 2″ × 6½″ strips for star borders.
Lay the units out to form the block and sew them together into rows; then sew the rows together. The frame is cut 2″ for each of the 4 sides, with 4 – 2″ cut squares in the corners. The block should measure 9½″ exactly.
When sewing the Flying Geese units onto the square in the square, you have ten layers of fabric coming together where all the points meet. Place the stitch at this point, one thread outside the points. This helps give a bit of ease when pressing to ensure that the points can be sharp.
Begin by counting how many half-square triangle units are needed in each color combination and how many single triangles are needed in each color. Here are the totals we came up with:
24 peach and white half-square triangles
12 yellow and white half-square triangles
12 white single triangles
24 green single triangles
Using your method of choice, construct the half-square triangles, making sure they are cut exactly 2 ″, to finish at 2
 ″.
″.
Cut:
12 green 3″ squares, cut in half diagonally for single triangles
6 white 3″ squares, cut in half diagonally for single triangles
For the outside corner squares and side triangles, cut:
4 – 9½″ squares of background (Consider cutting larger for trimming.)
1 – 10½″ square, cut in half diagonally twice (Consider cutting larger for trimming.)
1. Break the point units apart into 4 separate triangles: 1 background triangle and 3 pieced triangles. Using the diagram below, piece the triangles into rows and then connect the rows. There are 2 different layouts for this unit. Make 8 of the unit with the green single triangles and 4 of the unit with the white single triangles.
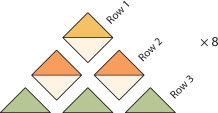
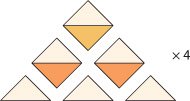
2. Once the triangles are pieced together, join the 4 units for each side unit.
3. Now you are ready to lay out all of the 9 units using the diagram below. Sew the units into rows and sew the rows together.
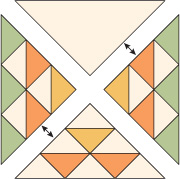
Are they getting easier? Practice makes perfect. One more star to go, and you will be ready to tackle the real Feathered Stars in Class 380!
Sawtooth Star is a fairly simple-looking block, but there are some construction techniques that will be different from what you have done up to now. The pieces are larger than in the two previous stars, so you can have a short break from the small triangles; however, there are quite a few formulas to work through to see where we get the sizes to cut for each position in the star.
You will notice when you study the drafted version of this star that the center section is larger than the corner sections. Star Diamond and Carrie’s Star are simple nine-patch squares, with three even divisions in each row. Sawtooth Star has five grids in the corners and eight grids in the center and side units. This is the basic format of a true Feathered Star, but the added diamond on each of the eight points of a Feathered Star makes the drafting much more difficult. Star Diamond ends up with two different-sized half-square triangles, whereas Sawtooth Star uses all the same size.
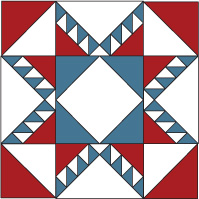
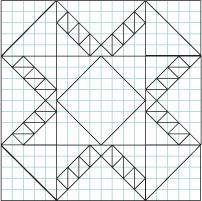
We are going to walk you through how we came up with the sizes of the units as we go. The formulas will be messy, as we want you to understand what the numbers represent and where they came from. We will start with the center square in a square. By counting the squares on the graph paper, we find that there are eight. We are assigning a 2″ finished measurement to the grid, making the center square 16″ finished. The formulas are as follows:
16 ÷ 1.414 = 11.32 + .5 (seam allowance) = 11.82, or 11 ″ cut for center square
11.875 (11 ) ÷ 1.414 = 8.4 + .875 (seam allowance) = 9.27, or 9¼″ cut for corners on center square
Cut:
1 – 11 ″ square fussy-cut fabric
2 – 9¼″ squares, each cut in half diagonally once
Using the instruction in Class 330, Lesson Two (page 37), construct the center square in a square. Trim the excess fabric of the corner triangles away to ¼″ from the points. Make sure the piece is a perfect 16½″ square. A 16½″ square ruler is a real asset for trimming squares this large.
From here on in, the rest of the cutting sizes will be figured using the center square measurements.
To find the size of the large triangles along the sides, take 16.875 (finished size of center square) plus seam allowance for a half-square triangle (.875); this equals 17.75.
Cut 1 – 17¾″ square background fabric; cut into quarters. (This number is larger than the mathematically correct 16 ″, for trimming.)
Using the above findings, you can figure the size of the half-square triangle units. How do we figure out what size to make them?
11.93 (the short leg of the side triangle) – .875 (subtract the seam allowance) = 11.06 ÷ 4 (4 triangles on the side of the large triangle) = 2.75 (finished measurement of the feathers—or half-square triangles) + .5 (seam allowance) = 3¼″ cut half-square triangle units. Using any method of your choice, make:
24 – 3¼″ half-square triangles (cut measurements). These will finish to 2¾″.
For the single triangles at the end of each row and the triangle at the center:
2.75 (size of finished half squares) + .875 ( ″ seam allowance for triangles) = 3
 ″ cut squares, cut in half diagonally.
Cut:
4 – 3 ″ squares of blue; cut each square in half diagonally.
2 – 3 ″ squares of background; cut each square in half diagonally.
The last pieces to cut for the side units are the smaller red triangles. What size are they?
2.75 (finished size of half-square triangle) × 3 (number along the diagonal side of the triangle) = 8.25 (finished measurement of the diagonal) ÷ 1.414 = 5.83 + .5 (seam allowance) = 6 ″, or 6
 ″ if you want extra to trim and square up.
Cut:
4 – 6 ″ squares of red; cut in half diagonally.
Now you are ready to assemble all these pieces into the side units. Follow the instructions carefully, as this is a bit different from the other piecing you have done up to now.
1. Join 3 half-square triangle units together as illustrated—one set the mirror image of the other. Repeat for the remaining three sides.

2. Add the single blue triangles onto the ends. Be sure to carefully study the diagram so that you don’t add them to the wrong end.

3. Add a single white triangle to the opposite end of four of the above units. Make sure you are adding it to the same oriented pieces. Press toward the white triangle.

4. You are ready to add these units to the large triangle. They will be added to the short sides, which are bias. Handle with care. Take one of the strips without the white triangle and position it on the right side of the large triangle. See the illustration. Sew very carefully. Align the points exactly and pin in place to prevent slipping. Start sewing by turning the flywheel of the machine the first couple of stitches. These points are easily eaten by the machine. Press the seam allowance toward the large triangle.

5. Add the remaining strip of half squares to the other straight side of the large triangle. Align the points exactly and butt the seam of the small white triangle with the half-square triangle. Press toward the large triangle.
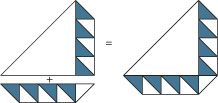
6. The last thing to add to this unit is the smaller red triangles. One goes on each side of the half-square units. You can go back to the graph paper drafting of the star to determine the size this triangle needs to be. The short legs of the triangle are 3 grids. Each grid equals 2″, so the short legs are 6″ finished. For the triangle, add  ″ for seam allowances, both on the sides and the diagonal cut. If you want a bit extra for squaring and trimming, add 1″, or cut 7″.
Cut:
2 – 7″ squares of red, cut in half diagonally.

Find the center of the row of feathers and the center of the long side of the red triangle. Mark and align the 2 pieces. Pin and sew the seam.
Once these triangles are sewn onto the edge of the feathers, check that the finished piece is 16½″ along both long edges and 10½″ on the short sides. Measure from the center out 8¼″ and square the edges to be exactly square and straight. If anything is a bit off, try using starch and gently persuade the piece to the correct size with heat and starch. Always use a very light misting of starch—do not make the fabric damp. This is what causes distortion when ironing. Because the measurements in the formulas are not exact ruler measurements, there are times when things don’t fit exactly to the thread. Gentle persuasion is the order of the day.
Once these corners are attached, stitch 2 of these units to the sides of the center square-in-a-square unit.
Again, the drafted pattern will tell you that the corners use 5 grids × 2″, or 10″ squares finished. You will need 10 ″ (or 11½″ for trimming) squares.
Cut 2 – 10 ″ squares each of red and background fabric.
Pair 2 opposite color squares together, draw a line diagonally corner to corner, and sew ¼″ from both sides of the line. Cut on the line, press toward the red triangle, and trim to be exactly 10½″ square.
Now it is time to lay out the units to form the block.
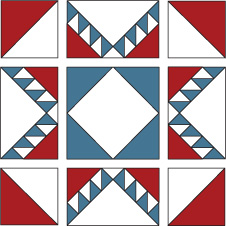
There are fewer seams to match here than on Star Diamond, but the ones to watch out for are:
• The points at the edges of the block
• The seams between the units (Check that they butt accurately.)
• The point of the square in a square
When joining the half-square corners to the center units, be sure you butt the diagonal seams at the outside edge in order to get a perfect ¼″ distance from the point to the outside cut edge.
Whew … was that fun! Ready for more?
This last star combines many of the processes that made the previous stars go together. We are going to give you the measurements we used (2″ finished) and the breakouts, but no instructions. You can choose any grid you want to make any size quilt you want. There are no diagonal measurements in this pattern. All the half-square triangles are straight with the grid. You should be able to do the figuring and sewing sequences by now. Have fun!
Quilt top size: 40″ × 40″
Grid size: 2″
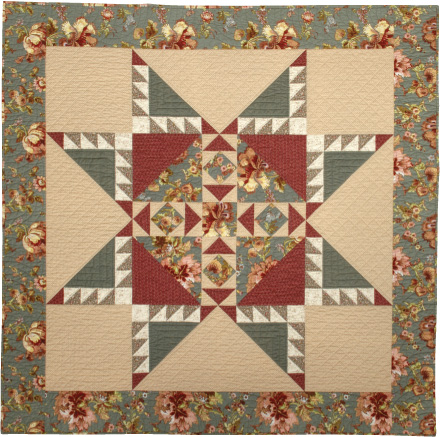
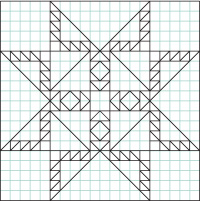
Start by breaking the star apart into units. They are separated below. Count how many you need of each unit and determine what size you will need to cut your fabric to obtain the correct finished size. The units are on an even grid in the drafted illustration above. We assigned a 2″ finished size to each grid. The drafting is on 8-to-the-inch paper, so every two grids = 2″.

How many are there? ________
What is their finished size? ________
What is their cut size? ________

How many are there? ________
What is their finished size? ________
What is their cut size? ________

How many are there? ________
What is their finished size? ________
What is their cut size? ________

How many are there? ________
What is their finished size? ________
What is their cut size? ________

How many are there? ________
How many green and white half-square triangles? ________
How many white squares? ________
What is their finished size? ________
What is their cut size? ________
How many single red triangles? ________
What is their finished size? ________
What is their cut size? ________
How many large green triangles? ________
What is their finished size? ________
What is the cut size of the square? ________

How many are there? ________
What is their finished size? ________
What is the cut size of the square? ________

How many are there? ________
What is their finished size? ________
What is their cut size? ________
Once you know all your unit requirements, you can figure the yardage you need for each color. We sincerely hope that this is getting easier and easier and you are starting to see how these blocks are drafted and where the measurements come from. The more you try this on your own, the closer you will be to looking at a photo and being able to translate it into a pattern with your own measurements and proportions. How liberating is that!
Once your top is finished, play with borders, settings, expanding the size, and so forth. This star is especially attractive when set on point as the center of a medallion quilt. You might want to keep going with this one and turn it into a larger quilt.
Now on to the real Feathered Stars with diamond points.