NOTE: To create a raised tail, immediately shape cookie after removing from oven. Using prepared molds, such as a bowl wrapped in aluminum foil and oiled with cooking spray, is the easiest way to give the tail added shape.
1 1/2 cups (3 sticks) unsalted butter, softened, plus more for pans
5 cups all-purpose flour, plus more for pans
2 cups granulated sugar
4 large eggs
1 teaspoon vanilla extract
2 teaspoons salt
• Preheat oven to 400°F. Butter and flour three baking sheets. In a stand mixer, cream butter and sugar together. Add eggs and vanilla, beating on medium speed. Once smooth, slowly add flour, 1 cup at a time, and finish by adding salt. Divide dough in half. Wrap one half in plastic wrap and set aside. With the other half, you’ll be breaking off pieces to mold with clean hands.
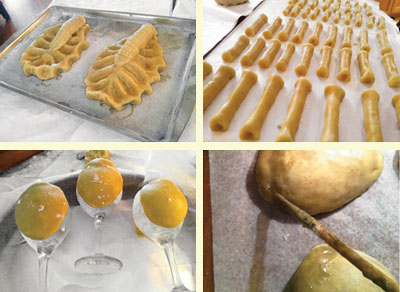
• This is an extremely time-consuming and delicate project, so keep in mind, the smaller you make your facehuggers, the easier they’ll be to construct. This life-size model took two days and a ton of work to create, due to the weight of the cookies. No matter what size you choose, you will need to create: one body, eight legs (with three sections each), one tail, and two round “breathing flaps” (see photo here).
• For the body, roll out dough on parchment paper or a floured work surface. Sculpt overall shape, using fingers to create indentations and a butter knife or sculpting tool to create score marks. Roll out another section of dough into a log, slightly tapered at one end, about half the length of alien body. Lay log onto body, smoothing tapered end into center of body. Score pattern onto log, then carefully transfer to a prepared baking sheet and place in fridge.
• For the tail, roll out more dough into a log, twice the length of body and tapered at one end. (The untapered end should match the diameter of the log already on the body.) Using a butter knife or sculpting tool, add in segmented pattern. Transfer to a prepared baking sheet and slightly curl tapered end.
• For the legs, roll out more dough into eight logs. Cut each log into three pieces—lengths will vary depending on the size of your facehugger, but the second and third pieces should be slightly shorter than the preceding piece. For the long and medium sections, indent both ends using fingers. For the shortest section, indent one end and then taper the other to a point. Place on a prepared baking sheet.
• For the breathing flaps, roll out more dough to about 1/4 inch thick. Cut out two ovals and place over two buttered and floured standard wine glasses. Chill dough on wine glasses until very firm. To help flaps keep their shape while baking, use aluminum foil rolled into a ball and place on prepared baking sheet. Carefully remove flaps from wine glasses and place, dome-side up, over foil balls. With end of a clean paintbrush or a sculpting tool, create an indentation just above widest end of oval. Immediately place in oven.
• Bake all alien parts for 8 to 12 minutes, until golden brown, depending on the size of the parts you’re baking (body will take longer than other parts).
NOTE: To create a raised tail, immediately shape cookie after removing from oven. Using prepared molds, such as a bowl wrapped in aluminum foil and oiled with cooking spray, is the easiest way to give the tail added shape.
1/2 recipe Homemade Caramel
• Coat bottoms of each cookie section with caramel and allow to harden. To assemble the aliens, dip one end of a joint in caramel and adhere to opposite joint. Hold until caramel has set. Use wooden skewers to hold various appendages upright until fully constructed.

NOTE: I won’t pretend this was an easy project, as you have a very limited amount of time when the caramel will stick. So, if you’re brave and decide to tackle this project, be patient and know you’ll need to work quickly. A slightly less delicious but much easier method is to use brown royal icing as the glue, allowing each joint to set for at least 5 minutes before moving to the next.