2 cups sweetened coconut flakes
Cocoa powder
Modeling Chocolate, in white
Modeling Chocolate, in brown
Chocolate Buttercream Frosting
1 cup melting chocolate, melted
Corn syrup
Clear piping gel
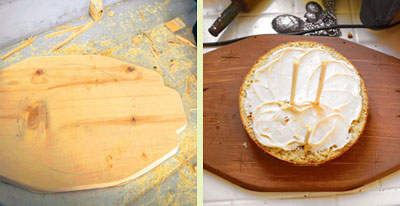
• For this project, I handcrafted a panel of wood, carving in decorations and attaching a picture-hanging fixture onto the back. Then I drilled and hot-glued three wooden spikes for stability in the front. I then cleaned it with warm water and painted a mixture of cocoa powder and water over it to give it a rustic look and ensure all cracks were filled. If you’re not planning on displaying your cake vertically, any serving tray will do.
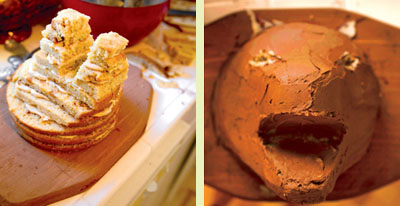
• Retrieve your cakes from fridge. Slice each cake horizontally into two layers. Center one 10-inch layer on serving tray or panel. Spread a generous dollop of butterscotch frosting on top and add second 10-inch layer. Continue layering cake and frosting, building up the wolf’s head using progressively smaller layers. To create a realistic face and snout, trim middle and top layers with a serrated blade. Once all layers are stacked, use the blade to carve and refine the shape. Use some of the cake scraps to create the ears.
• Coat final form evenly with the remaining butterscotch frosting for base crumb coat and then refrigerate for 30 minutes.
• In the meantime, preheat oven to 400°F. Toast coconut flakes on a rimmed baking sheet for about 5 minutes. Remove and toss in cocoa powder. Sculpt eyes and teeth out of white modeling chocolate.
• Remove cake from fridge and frost on a layer of chocolate buttercream to give definition to wolf head. Carve out two small almond shapes for eyes using a small, sharp blade. Smooth out frosting using water-moistened fingertips. Add a little base texture by taking a fork and carving grooves in the direction of where fur would grow. Chill for another 30 minutes.
• Glue in eyes and teeth using melting chocolate. Once set, begin applying coconut hair by lightly basting exterior of cake with corn syrup, section by section, and then sprinkling coconut over syrup. (I went in afterward and individually glued in long shards of coconut to give a direction to the hair growth.) Eyes were coated last with prepackaged clear piping gel to give a wet appearance.
• After chilling overnight, my cake was ready to be hung and photographed. While the cake is cold it will remain supported on your secured wooden spikes. However, don’t leave it hanging for long, as the frosting softens to room temperature and will become unsecured. But for a little while, this cake makes quite a statement and is seriously delicious!